Introduction
My colleague Steve gave me some sample date of the point cloud (about 5.5GB in LAZ), so I tried to make voxel tile to easily overview the data. As the source was large, I used pdal tile to reduce the burden during the voxel resampling. Here is the record of my work. The source data, the point cloud data, was generated by using OpenDroneMap.
Result
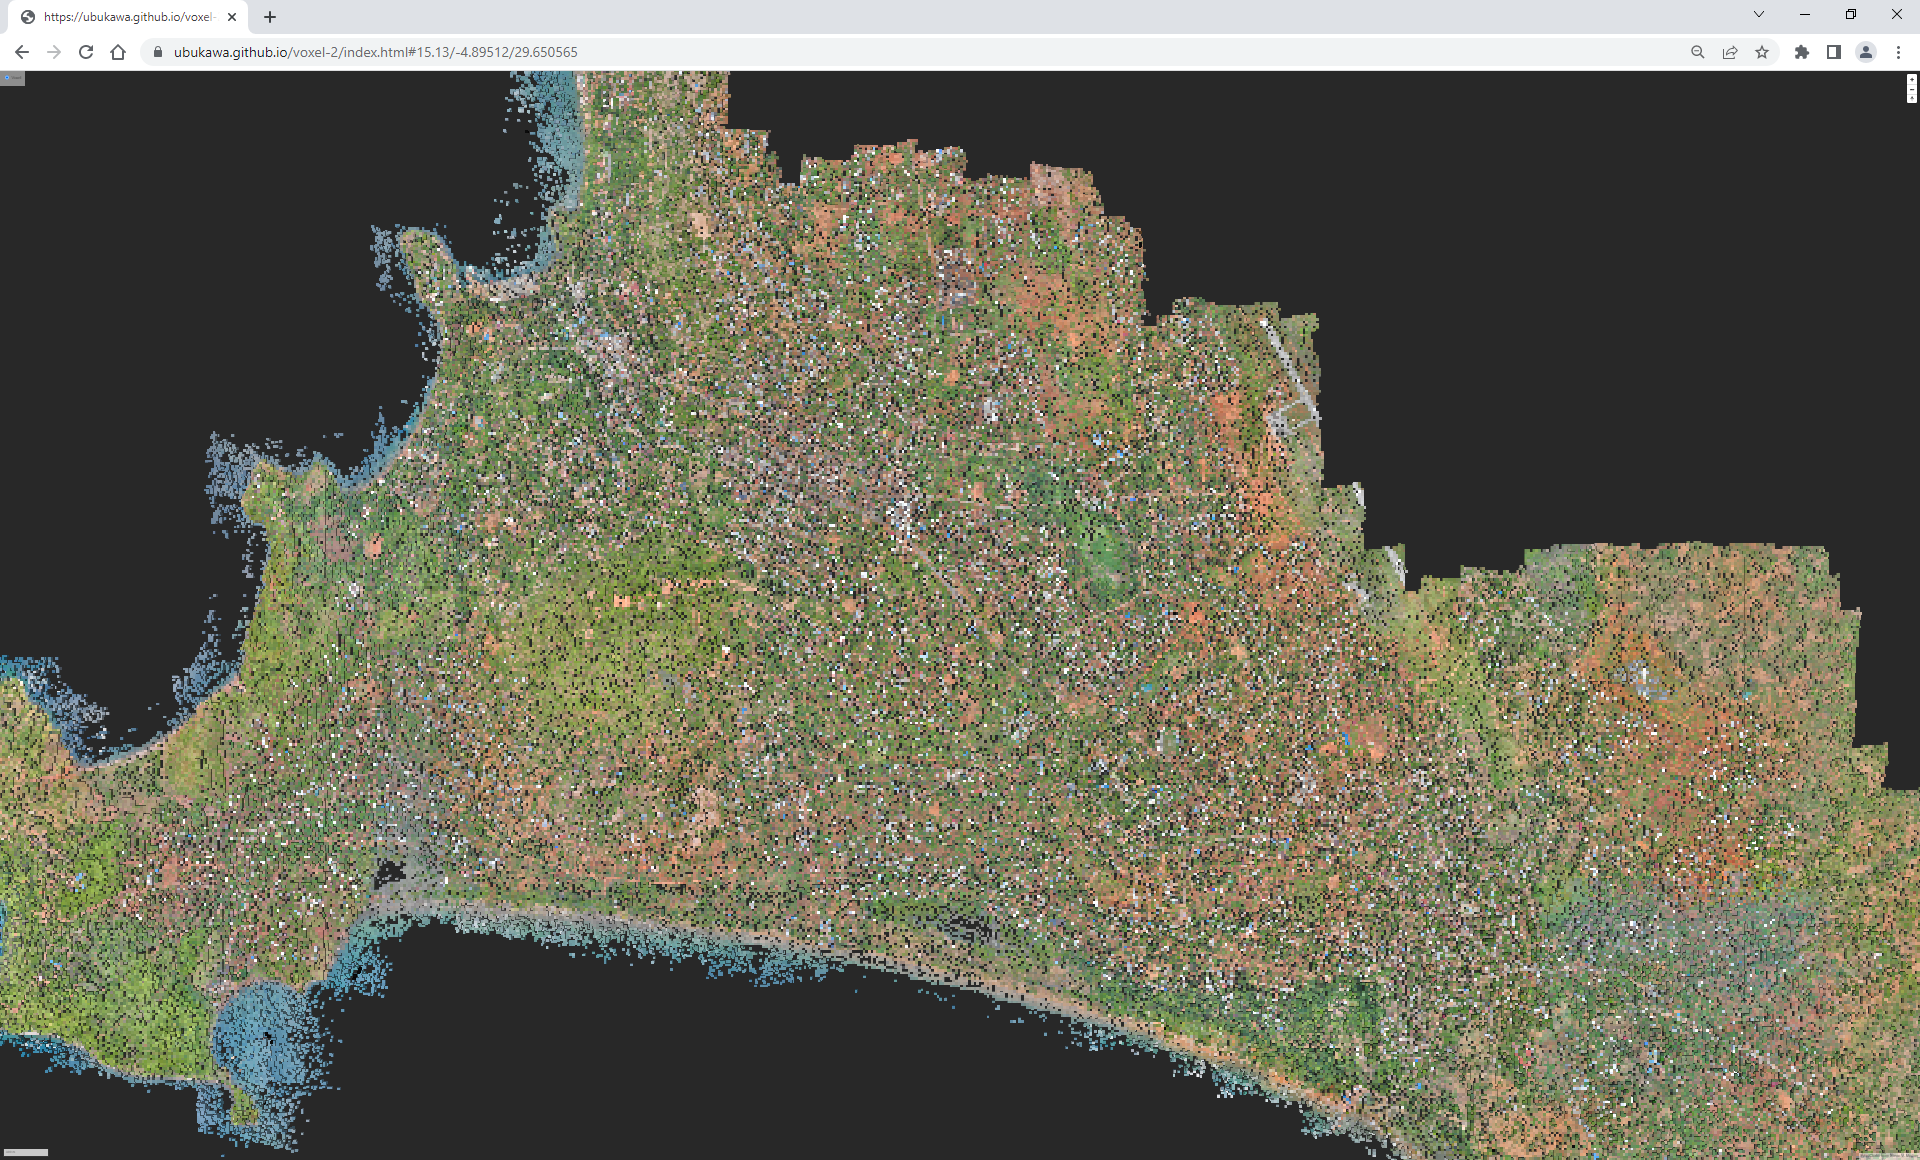
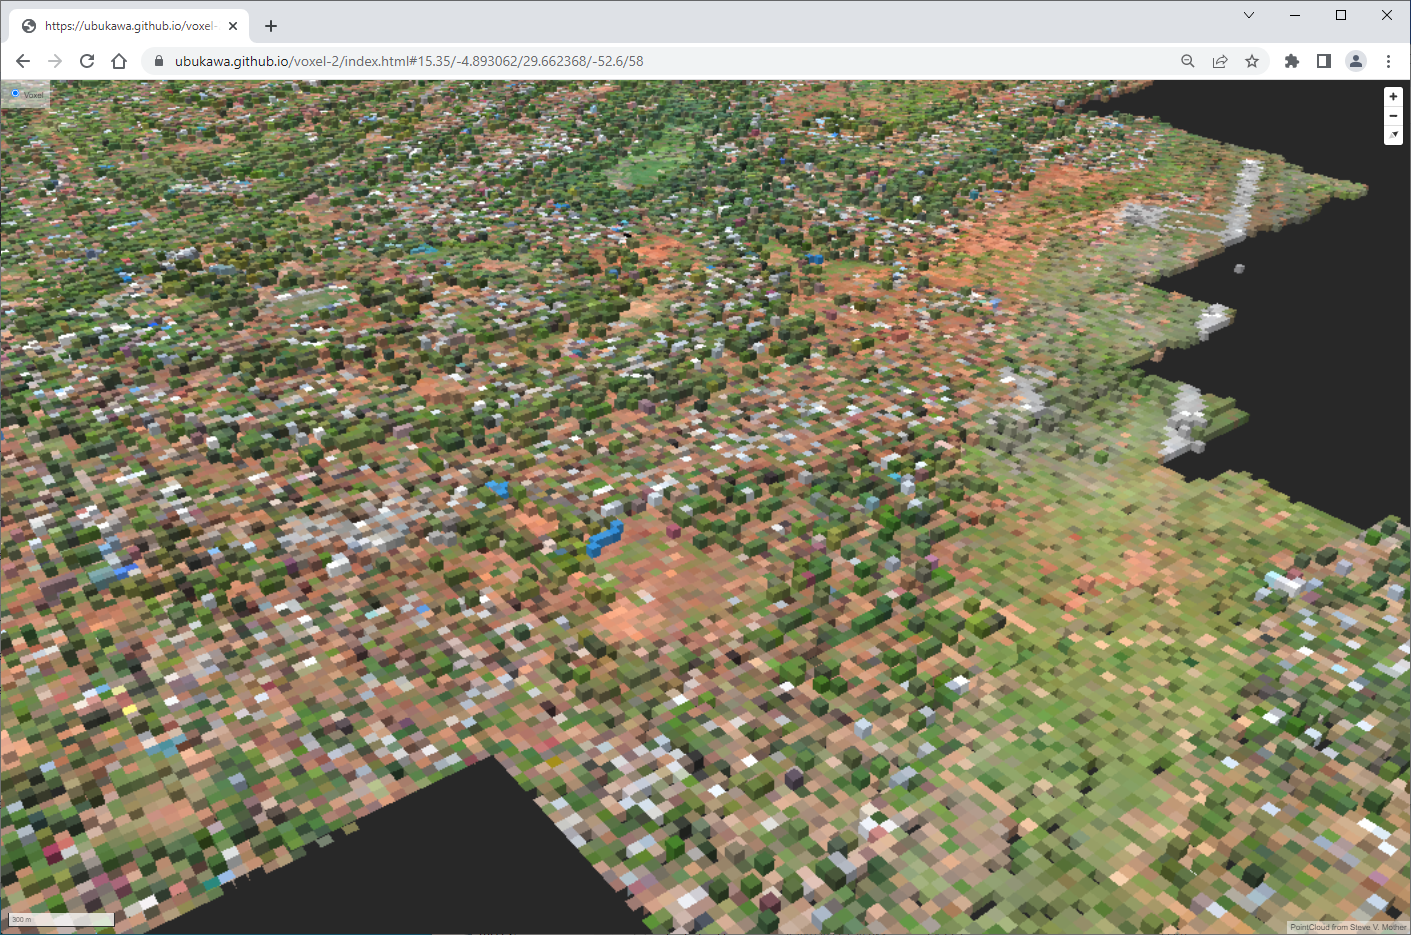
Before introducing the procedure, here is the overview of my final result in GitHub page. They can be seen at https://ubukawa.github.io/voxel-2/index.html . It would be a good to change your browser scake to smaller such as 50% or 33%.

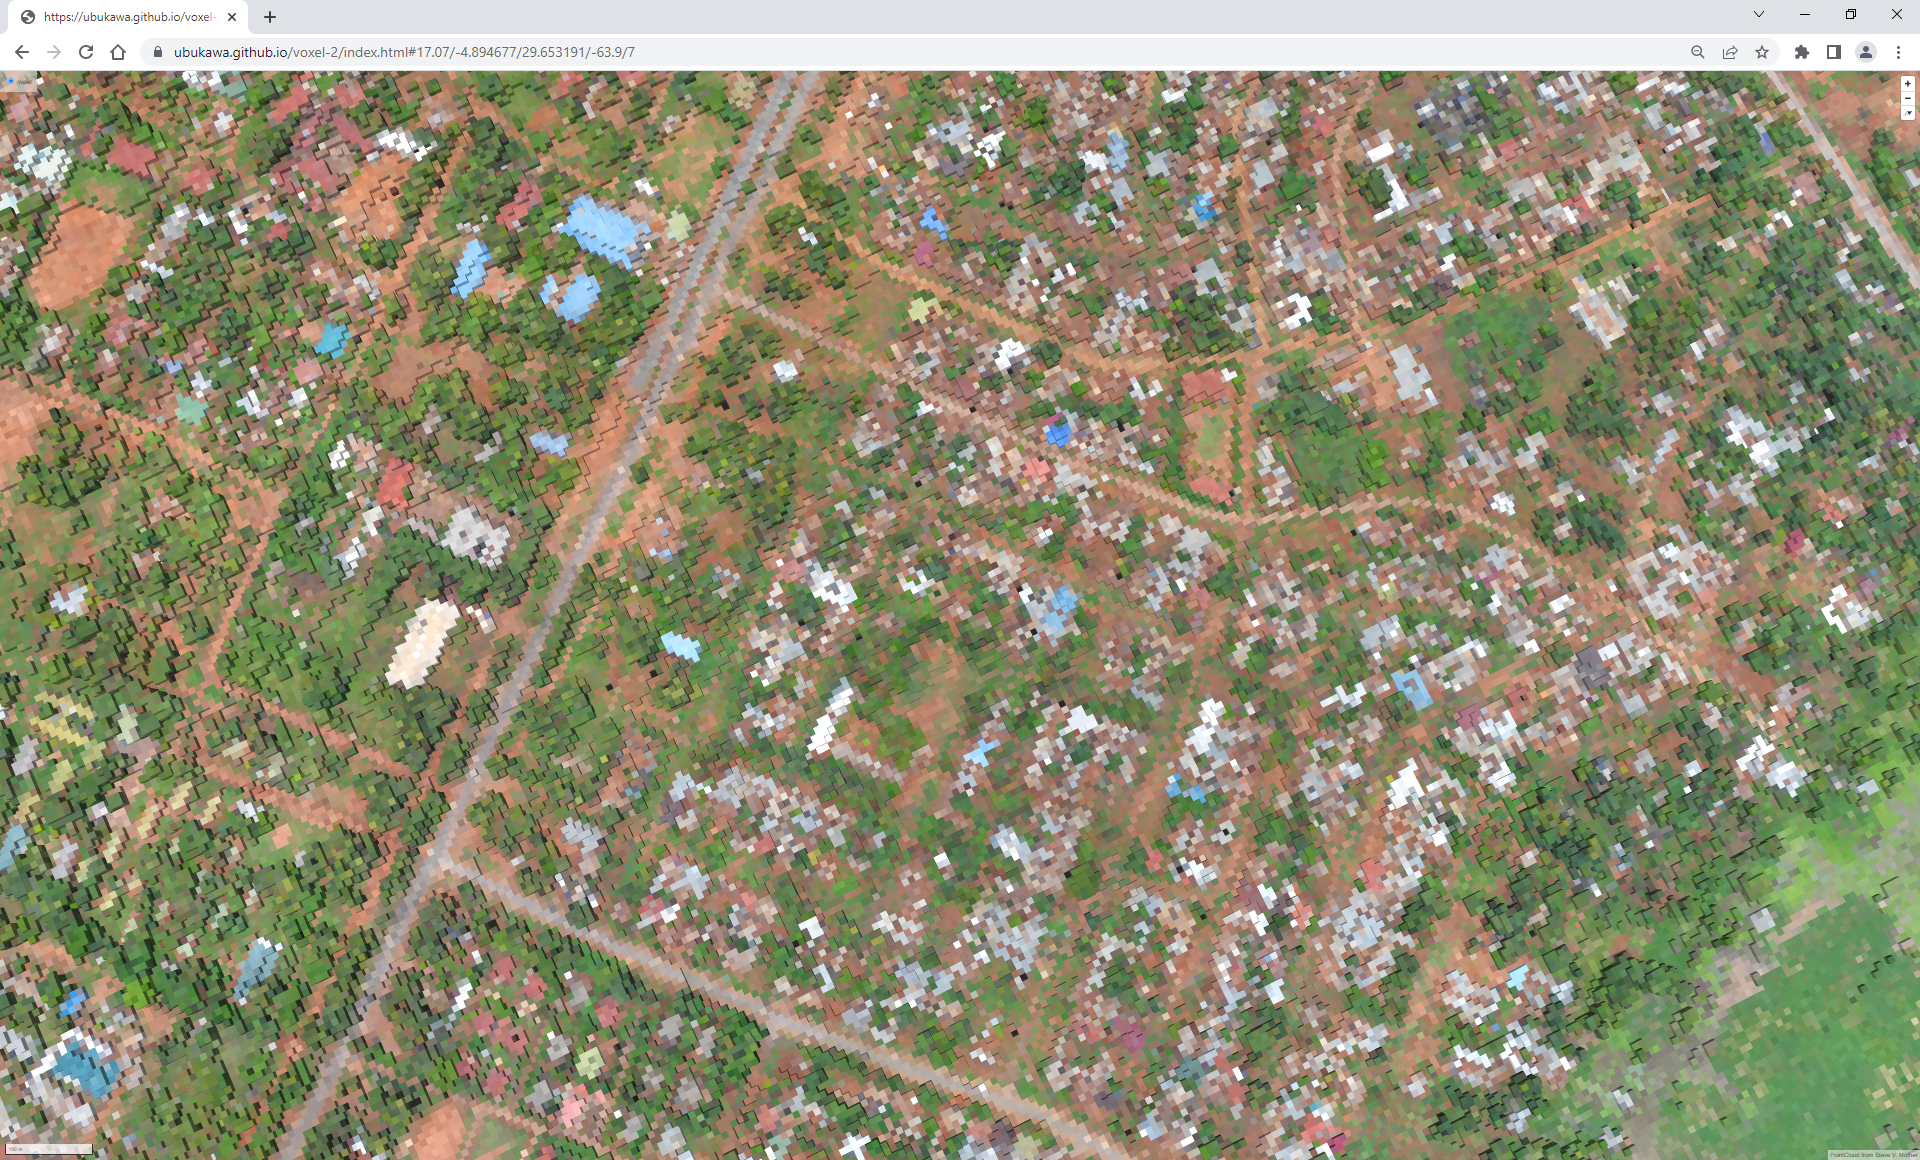
https://ubukawa.github.io/voxel-2/index.html#17.07/-4.894677/29.653191/-63.9
My Environment
- Windows 10 Enterprise
- Docker version 20.10.8
- GitHub Repository for this work https://github.com/ubukawa/voxel-2
Procedure
Step 0. Starting a Docker container
In order to easily establish my working environment, I used Docker container. A docker image unvt/voxel has the pdal and other tools for this work.
docker run -it --rm -v ${PWD}:/data unvt/voxel
Step 1. Check the point cloud data
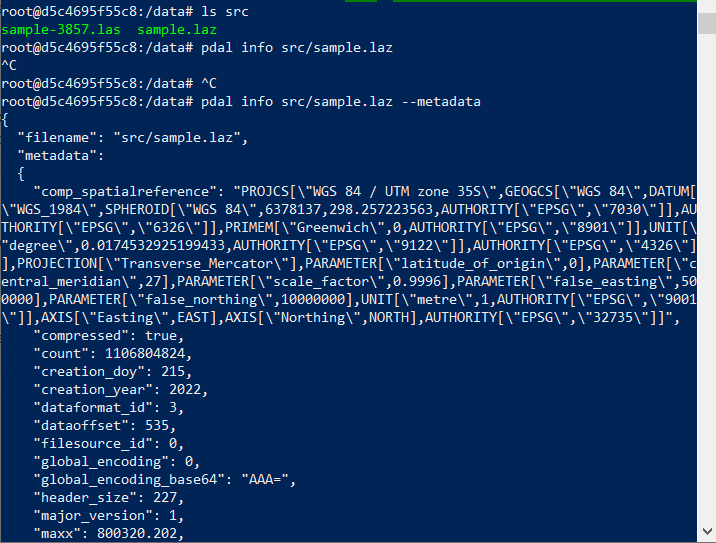
We can check metadata of the targeted data by running the following command. The option "metadata" will save time if your data is too big. You can check the projection and datum of the target.
pdal info src/sample.laz --metadata
In this case, I confirmed that the datum is WGS84 and projection is UTM35S, therefore its EPSG code should be 32735.
Let's also check a specific point (#0) with the following command (dumping the point #0).
pdal info src/sample.laz -p 0
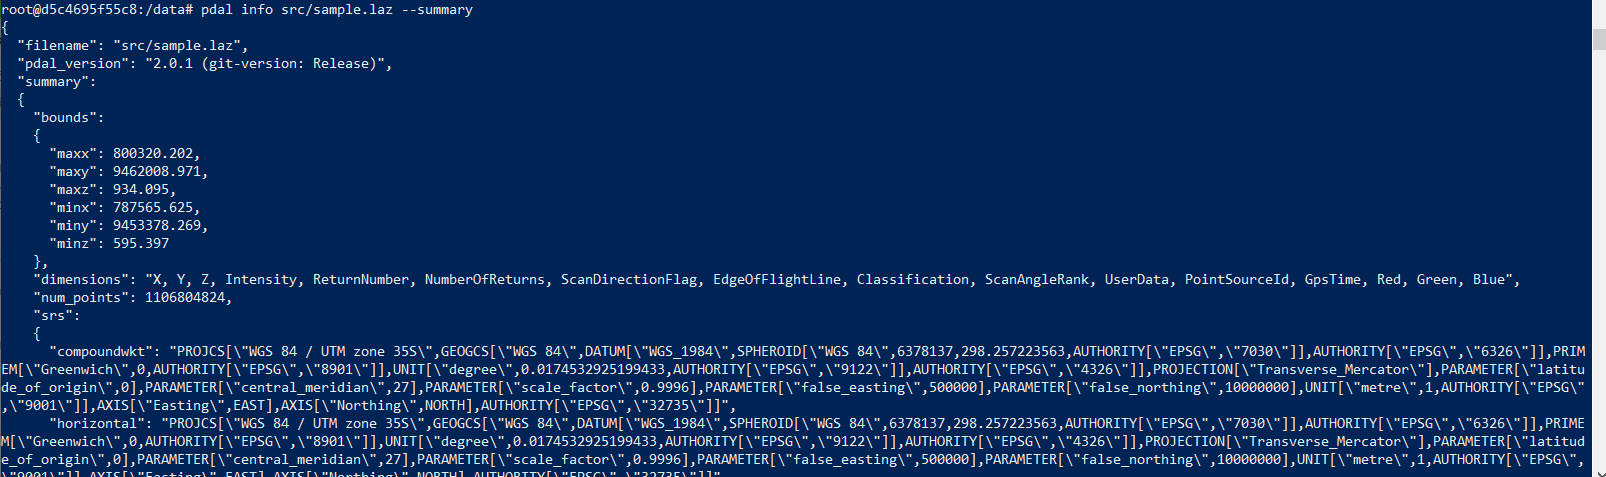
But, I found that it took long time wit the above command. Let's use this then.
pdal info src/sample.laz --summary
This one worked promptly, and I can see the properties at "dimensions." It seems that the RGB values are in #13rd, 14th, and 15th columns.
Step 2. Reprojection
Using pdal with ruby, we can convert the projection from UTM to the web mercator which is for the web map tile. Prepare the following "1.rb" and "constants.rb", and run the command.
# for reprojection. (actually it is not needed)
require './constants'
require 'yaml'
require 'json'

basename = ENV['BASENAME']
src_path = "#{TMP_DIR}/#{basename}.laz"
dst_path = "#{TMP_DIR}/#{basename}-3857.laz" # you can use las if you want

pipeline = <<-EOS
pipeline:
  -
    filename: #{src_path}
    type: readers.las
    spatialreference: "EPSG:32735"
  -
    type: filters.reprojection
    out_srs: "EPSG:3857"
  -
    type: writers.las
    filename: #{dst_path}
EOS

print JSON.dump(YAML.load(pipeline))
1.rb defined the projection of the source and output. In addition, it defines the format of output as "LAS" or "LAZ". Although its export type is "writers.las", it covers LAZ format if you define the export file name as laz (see "dst_path" in the 1.rb).
After the conversion as the las format, I found that the exported file in LAS format is about 37GB while the source file in LAZ (compressed) is 5.6 GB. When I converted it into laz, the exported file was almost the same size with the source.
SKIP = true

TMP_DIR = 'src'
Z_ONE_METER = 19
BASE = 2

MAXZOOM = 19
MINZOOM = 10
MINCOPYZOOM = 10

LAYER = 'voxe
You run the command with specifying the basename. Thus, "src/sample.laz" will be converted and exported as "src/sample-3857.las" (or "src/sample-3857.laz"). It will take several hours depend on your data size.
BASENAME=sample ruby 1.rb | pdal pipeline --stdin
Step 3. Conversion (failed)
Now, we have "sample-3857.las" (or laz) in src directory. Let's go futher. Prepare 2.rb and 3.rb, then run the following command. Then, wait for a while.
Z=19 BASENAME=sample ruby 2.rb | pdal pipeline --stdin | Z=19 ruby 3.rb | tippecanoe --maximum-zoom=19 --minimum-zoom=19 --projection=EPSG:3857 --force --output out-19.mbtiles --no-tile-size-limit --no-feature-limit
2.rb is for resampleing using filters.voxelcenternearestneigbour of pdal.
require './constants'
require 'yaml'
require 'json'

z = ENV['Z'].to_i
spacing = (BASE ** (Z_ONE_METER - z)).to_f
basename = ENV['BASENAME']
src_path = "#{TMP_DIR}/#{basename}-3857.laz" #unless File.exist?(src_path)
dst_path = "#{TMP_DIR}/#{basename}-#{z}.laz"
$stderr.print "#{spacing}m for #{dst_path} from #{src_path}\n"

pipeline = <<-EOS
pipeline:
  -
    filename: #{src_path}
    type: readers.las
  -
    type: filters.voxelcenternearestneighbor
    cell: #{spacing}
  -
    type: writers.text
    format: csv
    filename: STDOUT
EOS

print JSON.dump(YAML.load(pipeline))
3.rb is for cleaning and adjusting the GeoJSON sequence for Tippecanoe, a vector tile conversion tool, processing. If you are an advanced user, you may find it interesting about the minzoom/maxzoom setting. This process will generate vector tiles at a single ZL. So, you have to repeat the process with the different z parameters. This is because we want to use different spacing for each zoom level (e.g. 1 meter at ZL19, 2 meter at ZL18, 4 meter at ZL17, etc..).
require './constants'
require 'yaml'
require 'json'

z = ENV['Z'].to_i
minzoom = (z == MINZOOM) ? MINCOPYZOOM : z
maxzoom = z
spacing = (BASE ** (Z_ONE_METER - z)).to_f
n = 0

first = true
start_time = Time.now
while gets
  if first
    first = false
    next
  else
    n += 1
  end
  r = $_.strip.split(',')
  x = r[0].to_f - r[0].to_f % spacing
  y = r[1].to_f - r[1].to_f % spacing
  h = r[2].to_f - r[2].to_f % spacing
  h = h.to_i
  color = '#' + r[13..15].map{|v| sprintf('%01x', v.to_i )}.join
  g = <<-EOS
type: Polygon
coordinates:
  -
    -
      - #{x}
      - #{y}
    -
      - #{x + spacing}
      - #{y}
    -
      - #{x + spacing}
      - #{y + spacing}
    -
      - #{x}
      - #{y + spacing}
    -
      - #{x}
      - #{y}
  EOS
  g = YAML.load(g)
  f = <<-EOS
type: Feature
properties:
  color: '#{color}'
  h: #{h}
  spacing: #{spacing}
tippecanoe:
  minzoom: #{minzoom}
  maxzoom: #{maxzoom}
  layer: #{LAYER}
  EOS
  f = YAML.load(f)
  f[:geometry] = g
  print JSON.dump(f), "\n"
end

def hms(s)
  min, sec = s.to_i.divmod(60)
  hour, min = min.divmod(60)
  "%02d:%02d:%02d" % [hour, min, sec]
end

$stderr.print "\n[#{z}] #{hms(Time.now - start_time)}s\n"
However, unfortunately, after a while, I found that the process was killed, I meant the voxelcenternearestneighbour was killed, dut to the large size of the source (about 5GB in LAZ format). If your data is not so big or if your PC is strong enough, you would succeed. I need to try another way.
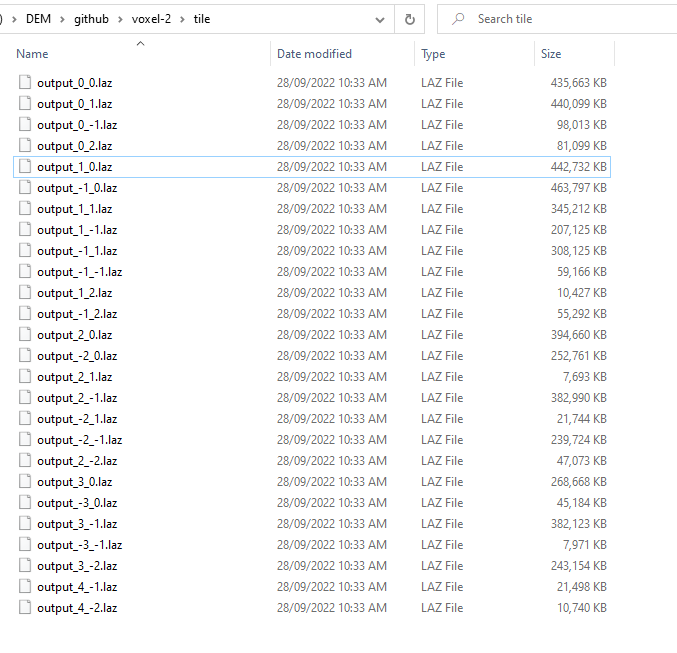
Step 4. Divide the data
Because the data is too big. Let's divide it into several pieces using pdal tile.
pdal tile --length 2000 src/sample-3857.laz "tile/output_#.laz"
Then, we have the tiled laz data. If the size of the files is still large, you can change the parametere of the previous tiling command. (I first used 3000, but it was not good, so I used 2000.)
Step 5. Resampling to Voxel, and other minor adjustments
conversion of each file at each zoom level
For each laz file, we create the voxel vector tile with the following script. I ran the same command for zoom level 19 to 15. At ZL19, it has 1 meter voxel, while we have 16 meter voxel at ZL15.
mkdir mbtiles/19
for f in tile/*.laz; do Z=19 BASENAME=`basename ${f} .laz` ruby 2.rb | pdal pipeline --stdin | Z=19 ruby 3.rb | tippecanoe --maximum-zoom=19 --minimum-zoom=19 --projection=EPSG:3857 --force --output mbtiles/19/`basename ${f} .laz`.mbtiles --no-tile-size-limit --no-feature-limit; done
mkdir mbtiles/18
for f in tile/*.laz; do Z=18 BASENAME=`basename ${f} .laz` ruby 2.rb | pdal pipeline --stdin | Z=18 ruby 3.rb | tippecanoe --maximum-zoom=18 --minimum-zoom=18 --projection=EPSG:3857 --force --output mbtiles/18/`basename ${f} .laz`.mbtiles --no-tile-size-limit --no-feature-limit; done
mkdir mbtiles/17
for f in tile/*.laz; do Z=17 BASENAME=`basename ${f} .laz` ruby 2.rb | pdal pipeline --stdin | Z=17 ruby 3.rb | tippecanoe --maximum-zoom=17 --minimum-zoom=17 --projection=EPSG:3857 --force --output mbtiles/17/`basename ${f} .laz`.mbtiles --no-tile-size-limit --no-feature-limit; done
mkdir mbtiles/16
for f in tile/*.laz; do Z=16 BASENAME=`basename ${f} .laz` ruby 2.rb | pdal pipeline --stdin | Z=16 ruby 3.rb | tippecanoe --maximum-zoom=16 --minimum-zoom=16 --projection=EPSG:3857 --force --output mbtiles/16/`basename ${f} .laz`.mbtiles --no-tile-size-limit --no-feature-limit; done
mkdir mbtiles/15
for f in tile/*.laz; do Z=15 BASENAME=`basename ${f} .laz` ruby 2.rb | pdal pipeline --stdin | Z=15 ruby 3.rb | tippecanoe --maximum-zoom=15 --minimum-zoom=15 --projection=EPSG:3857 --force --output mbtiles/15/`basename ${f} .laz`.mbtiles --no-tile-size-limit --no-feature-limit; done
merge outputs into one at each zoom level
As we went through the resampling process, I think now we can marge output mbitles.
First, we will merge mbtiles at each zoom level.
tile-join -pk -o mbtiles/compile-19.mbtiles mbtiles/19/*.mbtiles
tile-join -pk -o mbtiles/compile-18.mbtiles mbtiles/18/*.mbtiles
tile-join -pk -o mbtiles/compile-17.mbtiles mbtiles/17/*.mbtiles
tile-join -pk -o mbtiles/compile-16.mbtiles mbtiles/16/*.mbtiles
tile-join -pk -o mbtiles/compile-15.mbtiles mbtiles/15/*.mbtiles
Ok, now, we can roughly see the size of the voxel tiles for each zoom level.
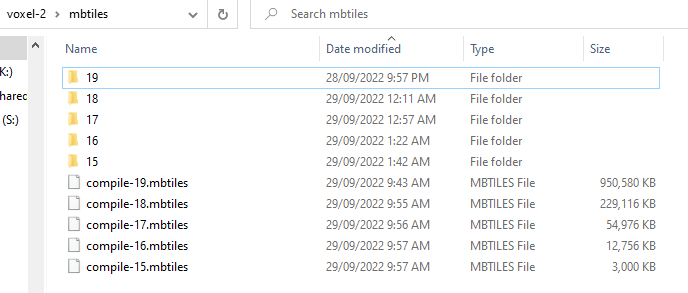
The source LAZ data was 5,574,559KB. At zoom level 19, where the voxel spacing is 1 meter, it is about 1 GB, and I think this is still large. Although it is 2 meter voxel, at zoom level 18, I thik about 230MB is pretty good for overview the data. I can continue my work at 1 meter voxel, but in order to host them in GitHub page, I will continue with ZL 18 and smaller.
Making pbf tiles from mbtiles
In order to host vector tile in static way, we will convert mbtiles into (zxy folder structured) pbf. I think we can do this with tile-join. By converting into pbf, although we can host them easily, the data size will be bigger.
tile-join -pk -pC -e  pbf/zxy18 mbtiles/compile-18.mbtiles
tile-join -pk -pC -e  pbf/zxy17 mbtiles/compile-17.mbtiles
tile-join -pk -pC -e  pbf/zxy16 mbtiles/compile-16.mbtiles
tile-join -pk -pC -e  pbf/zxy15 mbtiles/compile-15.mbtiles
We have pbf tiles like this.
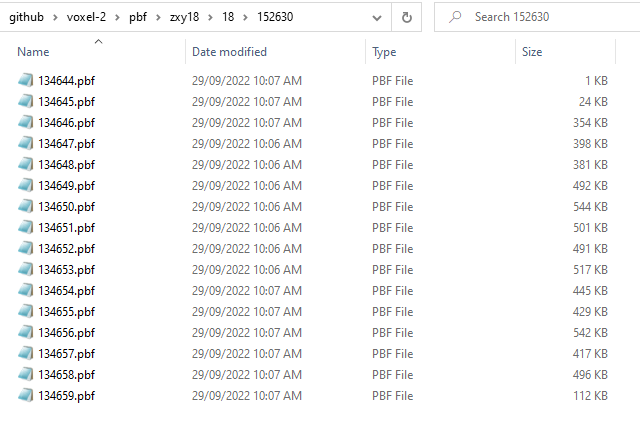
Oh, I found that the total size for ZL18 now exceeds 1GB while it was about 230MB in mbtiles format. It is well expected.
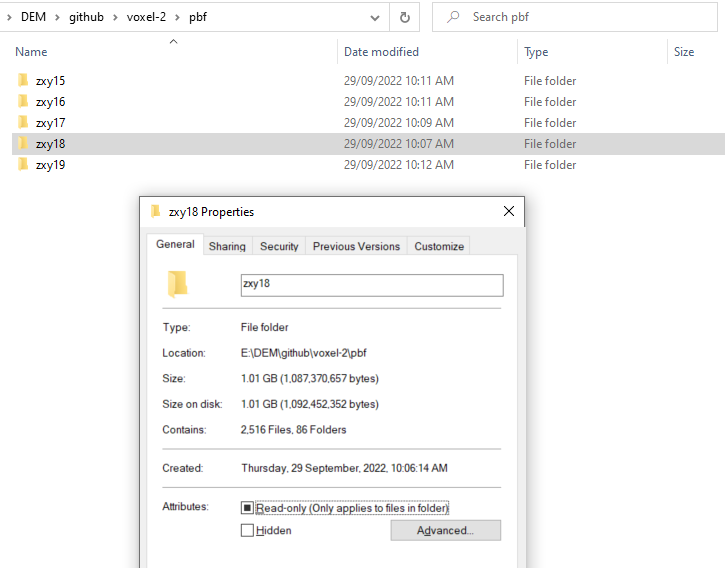
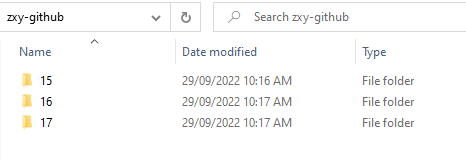
So, I created voxel tile set from ZL 17 to 15 like this (at ZL17, voxel spacing is 4 meter). Its total size is 315MB.
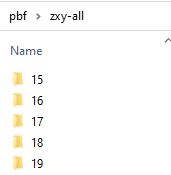
FYI, if I include all like below, its total size is 4.83GB. Not good for easy hosting...
Step 6. Hosting
I enabled GitHub page, and uploaded the files at docs folder. This time, we use MapLibre as the map library.
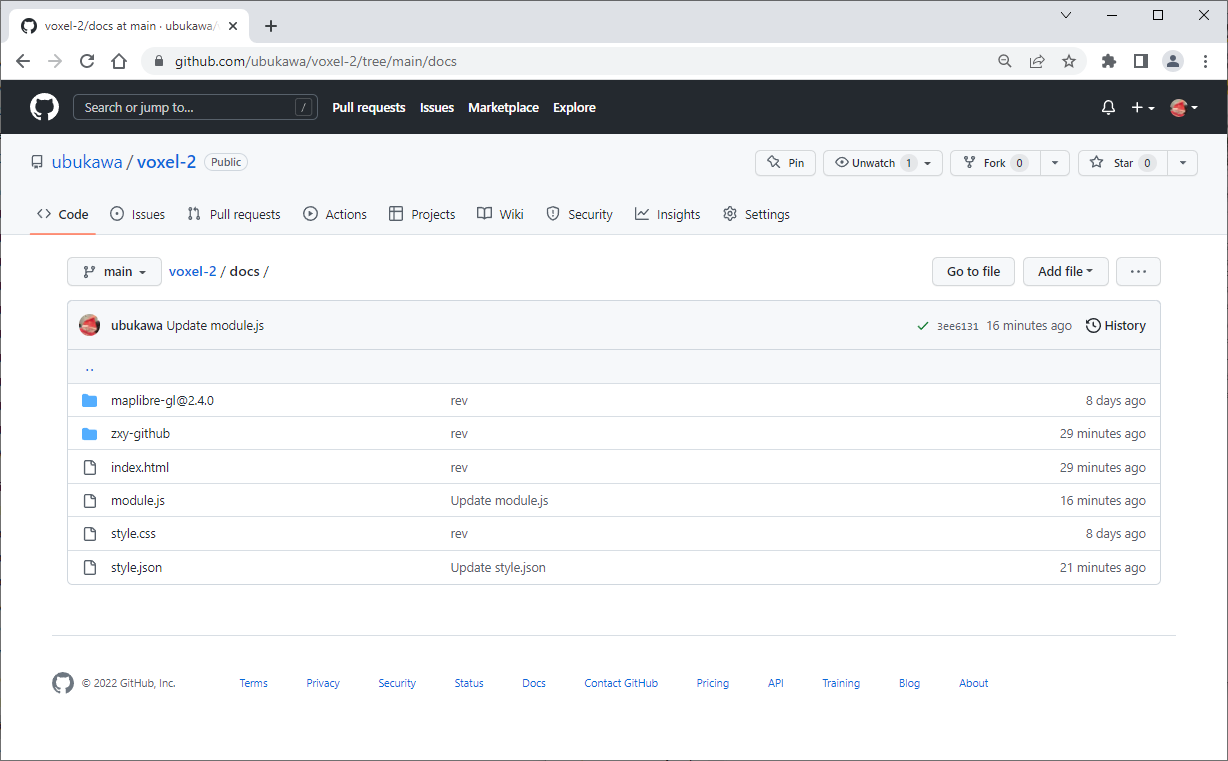
For detail, please check https://github.com/ubukawa/voxel-2/tree/main/docs
Result
Due to the file size constrain, I just uploaded the voxel tile of up to 4 meters at ZL 17. You can see it here https://ubukawa.github.io/voxel-2/index.html
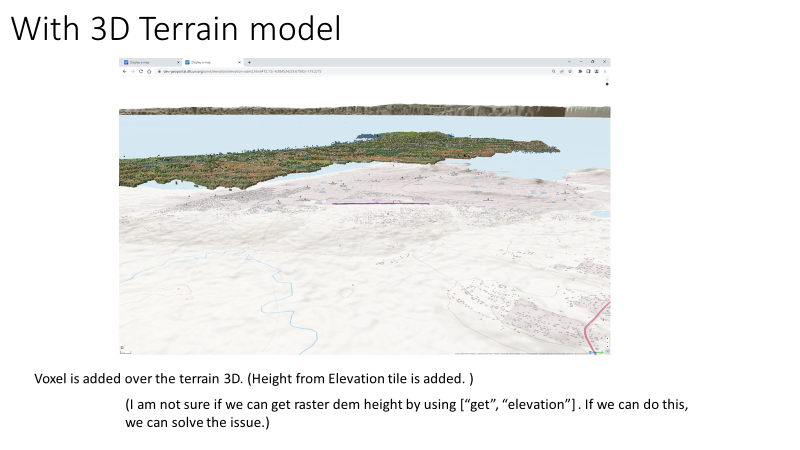
Future issue
I want to know how we can remove the terrain offset for certain layers when I overlay over the 3D terrain model with MapLibre GL JS.
Acknowledgement
Thank you Steve V. M. for sharing your sample data. Thank you @hfu for developing this method.
Reference
- PDAL https://pdal.io/en/stable/index.html
- MapLibre GL JS https://github.com/maplibre/maplibre-gl-js
- How to create voxel tiles (in Japanese) at YouTube (by Furuhashi Lab. and @hfu ) https://www.youtube.com/watch?v=LrDk0VFodTE
- OpenDroneMap https://www.opendronemap.org/
- optgeo/kid-c https://github.com/optgeo/kid-c
- Making Voxel tiles from LAZ using pdal and Tippecanoe https://qiita.com/T-ubu/items/1a0cd7363b8f93de8821