Introdution
I have developed voxel tile from a point cloud data (LAZ) format. This is a record of my work.
Envrionment
- Windows 10 Enterprise
- Docker version 20.10.8
Procedure
Step 1: Starting Docker container
Because we need some software for the data conversion, let's use Docker. For window's user, it is sometimes hard to use the vector tile conversion tool, Tippecanoe, in their local environment, so it would be easier to use Docker container to do the conversion.
We have unvt/voxel image, so we can use it if needed.
docker pull unvt/voxel
docker run -it --rm -v ${PWD}:/data unvt/voxel
cd /data
Step 2: Reprojection to the web mercator projection and export to LAS file
As the source data is in LAZ format and its projection is UTM17 (EPSG:32617), we will reproject it and save it as LAS file. We will use the pdal (PDAL - Point Data Abstraction Library) with some help from ruby (note: ruby is an open source programming language).
I prepared 1.rb and constant.rb for reprojection using pdal. The constants.rb includes some other constants for our future work.
# for reprojection.
require './constants'
require 'yaml'
require 'json'

basename = ENV['BASENAME']
src_path = "#{TMP_DIR}/#{basename}.laz"
dst_path = "#{TMP_DIR}/#{basename}-3857.las"

pipeline = <<-EOS
pipeline:
  -
    filename: #{src_path}
    type: readers.las
    spatialreference: "EPSG:32617"
  -
    type: filters.reprojection
    out_srs: "EPSG:3857"
  -
    type: writers.las
    filename: #{dst_path}
EOS

print JSON.dump(YAML.load(pipeline))
SKIP = true

TMP_DIR = 'src'
Z_ONE_METER = 19
BASE = 2

MAXZOOM = 19
MINZOOM = 10
MINCOPYZOOM = 10

LAYER = 'voxel'
BASENAME=tappan ruby 1.rb | pdal pipeline --stdin
Step 3: Resampling
I made 2.rb for resmpling the input data with pdal. Because I defined Z-ONE_METER as 19 in the constraints.rb, the spacing will be 1 meter at the zoom level 19. (The spacing will be larger in smaller zoom level. e.g 2 meter at ZL18, 4 meter at ZL 17, etc.)
require './constants'
require 'yaml'
require 'json'

z = ENV['Z'].to_i
spacing = (BASE ** (Z_ONE_METER - z)).to_f
basename = ENV['BASENAME']
src_path = "#{TMP_DIR}/#{basename}-3857.las" #unless File.exist?(src_path)
dst_path = "#{TMP_DIR}/#{basename}-#{z}.las"
$stderr.print "#{spacing}m for #{dst_path} from #{src_path}\n"

pipeline = <<-EOS
pipeline:
  -
    filename: #{src_path}
    type: readers.las
  -
    type: filters.voxelcenternearestneighbor
    cell: #{spacing}
  -
    type: writers.text
    format: csv
    filename: STDOUT
EOS

print JSON.dump(YAML.load(pipeline))
Then, run the pdal as below. Because the output is not piped into a vector tile conversion tool, tippecanoe, we just see the result as the stdout. It seems that their RGB is also properly extracted.
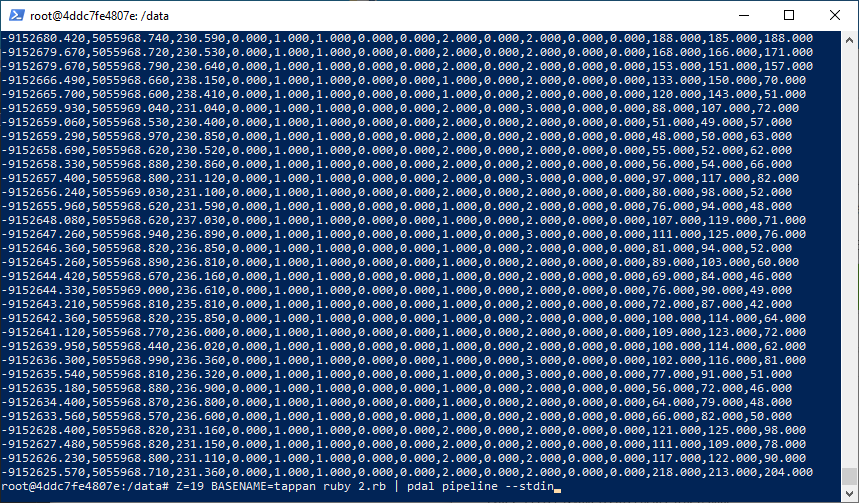
Z=19 BASENAME=tappan ruby 2.rb | pdal pipeline --stdin
We can see that coordinates are in the web mercator, and spacing of each voxel is one meter. We can also see that the values for RGB appear at the end of the row. Please check their order so that we can use them at the following step (This case, they are 13th, 14th and 15th.).
Step 4: Adjustment for VT conversion
Because the vector tile conversion tool, Tippecanoe, reads GeoJSON as input, we will edit the previous result for that format. In addtion, we develop the data structure for each recortd to be converted as vector tile.
require './constants'
require 'yaml'
require 'json'

z = ENV['Z'].to_i
minzoom = (z == MINZOOM) ? z  : MINCOPYZOOM
maxzoom = z
spacing = (BASE ** (Z_ONE_METER - z)).to_f
n = 0

first = true
start_time = Time.now
while gets
  if first
    first = false
    next
  else
    n += 1
  end
  r = $_.strip.split(',')
  x = r[0].to_f - r[0].to_f % spacing
  y = r[1].to_f - r[1].to_f % spacing
  h = r[2].to_f - r[2].to_f % spacing
  h = h.to_i
  color = '#' + r[13..15].map{|v| sprintf('%01x', v.to_i )}.join
  g = <<-EOS
type: Polygon
coordinates:
  -
    -
      - #{x}
      - #{y}
    -
      - #{x + spacing}
      - #{y}
    -
      - #{x + spacing}
      - #{y + spacing}
    -
      - #{x}
      - #{y + spacing}
    -
      - #{x}
      - #{y}
  EOS
  g = YAML.load(g)
  f = <<-EOS
type: Feature
properties:
  color: '#{color}'
  h: #{h}
  spacing: #{spacing}
tippecanoe:
  minzoom: #{minzoom}
  maxzoom: #{maxzoom}
  layer: #{LAYER}
  EOS
  f = YAML.load(f)
  f[:geometry] = g
  print JSON.dump(f), "\n"
end

def hms(s)
  min, sec = s.to_i.divmod(60)
  hour, min = min.divmod(60)
  "%02d:%02d:%02d" % [hour, min, sec]
end

$stderr.print "\n[#{z}] #{hms(Time.now - start_time)}s\n"
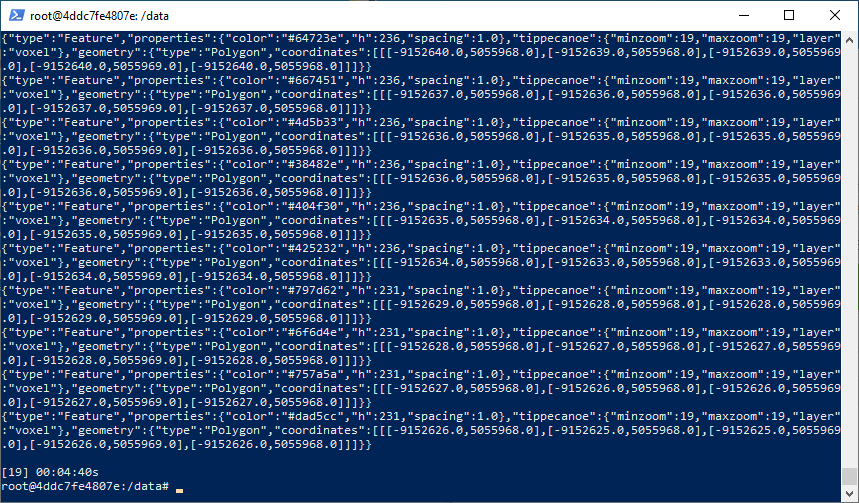
Z=19 BASENAME=tappan ruby 2.rb | pdal pipeline --stdin | Z=19 ruby 3.rb
Then, you can confirm the geojson output as stdout. This will be forwarded to Tippecanoe at the next stage.
Step 5. Vector tile conversion
Then, we forward the result from the previous step into Tippecanoe by using pipe funciton. You can do it by just running the following command.
Z=19 BASENAME=tappan ruby 2.rb | pdal pipeline --stdin | Z=19 ruby 3.rb | tippecanoe --maximum-zoom=19 --minimum-zoom=19 --projection=EPSG:3857 --force --output out-19.mbtiles --no-tile-size-limit --no-feature-limit
The, you will get the vector tile in mbtiles format.
Step 6. From mbtiles to pbf format
We convert the mbtiles file into pbf files so that we can host them via GitHub page.
tile-join --force --output-to-directory=docs/voxel --no-tile-size-limit --no-tile-compression output.mbtiles
Step 7. Hosting voxel tiles
Using MapLibre GL JS, we can create a web map like this.
https://ubukawa.github.io/tappanSQ/index3.html#15.56/41.293028/-82.216623/85.2/44

I do not explain how we can create such webmap, but you can check necessary files for the hosting from here: https://github.com/ubukawa/tappanSQ/tree/main/docs
Acknowledgement
I thank Steve V. M. for sharing the test data.
References