はじめに
前回の記事に対して、VueとTypeScriptを導入して修正します。
環境
- OS: Ubuntu 18.04.4 LTS (Virtual BOX上)
- PHP:7.2
- Laravel:7.9.2
- Python:3.8.0
- tensorflow:1.14.0
- numpy:1.18.2
- opencv:4.2.0.34
- node.js:8.10.0
- npm:3.5.2
npmコマンドが必要になるので、以下のコマンドでインストールします。
$ sudo apt-get update
$ sudo apt-get install nodejs
$ sudo apt install npm
Visual Studio Code
プラグインで「Vetur」を入れています。インテリセンス、構文ハイライト等をやってくれます。
Vueの導入
// プロジェクトフォルダに移動
$ cd laravelAI
// laravel/uiパッケージをインストール
$ composer require laravel/ui
// UIにvueを指定する
$ php artisan ui vue
上記のコマンドで以下のファイルの追加・更新が行われます。赤字が追加されたファイルです。(git管理の対象外になっているフォルダは除きます。)
laravelAI
┗ composer.json
┗ composer.lock
┗ package.json:npmでインストールするパッケージ(vue関連,Bootstrap,jquery,popperが追加されていました)
┗ resources
┗ js
┗ app.js:Vueコンポーネントの定義(ここにコンポーネントを指定しないと、ビルドされない)
┗ bootstrap.js:Bootstrap,jquery,popperのrequire()が追加されていました
┗ components
┗ ExampleComponent.vue:サンプルのコンポーネントファイル
┗ sass
┗ _variables.scss:FontやColorの指定
┗ app.scss:FontやBootstrapのimport
// package.jsonに記載のパッケージのインストール
$ npm install
// ビルド
$ npm run dev
ビルドが成功すると、以下のファイルが自動で生成されます。
laravelAI
┗ public
┗ css
┗ app.css
┗ js
┗ app.js
┗ mix-manifest.json
TypeScriptの導入
$ npm install --save-dev ts-loader typescript vue-property-decorator
$ npm run dev
package.jsonに3パッケージが追加されます。
自動ビルド
コンソールからnpm run watchを実行しておけば、Vueを保存すると自動でビルドがかかります。
差分ビルドなのでnpm run devよりかなり早いです。また、ビルド結果はトーストで表示されるので、ビルドエラーがある場合はすぐに分かります(Ubunts以外は知らない)。
Vue+TypeScript向けベース修正
Laravel 5.5で簡単!Vue.js + TypeScriptを参考にしました。
プロジェクト作成時に自動で作成されるwebpack.mix.js(Laravel mix用のファイル)をTypeScript用に修正します。
const mix = require('laravel-mix');

//mix.js('resources/js/app.js', 'public/js')
//    .sass('resources/sass/app.scss', 'public/css');
mix.ts('resources/assets/ts/app.ts', 'public/js')
    .sass('resources/sass/app.scss', 'public/css');
TypeScriptの設定ファイルを追加します。
{
    "compilerOptions": {
      "outDir": "./built/",
      "sourceMap": true,
      "strict": true,
      "noImplicitReturns": true,
      "noImplicitAny": true,
      "module": "es2015",
      "experimentalDecorators": true,
      "emitDecoratorMetadata": true,
      "moduleResolution": "node",
      "target": "es5",
      "lib": [
        "es2016",
        "dom"
      ]
    },
    "include": [
      "resources/assets/ts/**/*"
    ]
  }
resources/js/app.jsのTypeScript版。
import Vue from 'vue';
import bootstrap from './bootstrap';
//作成するコンポーネントをimport
import MnistComponent from './components/MnistComponent.vue';

bootstrap();
//作成するコンポーネント定義
Vue.component('mnist-component', MnistComponent)

const app = new Vue({
  el: '#app',
});
resources/js/bootstrap.jsのTypeScript版。
//【参考】https://www.hypertextcandy.com/laravel-vue-typescript

import Axios, { AxiosStatic } from 'axios';

declare global {
  interface Window {
    axios: AxiosStatic;
  }
  interface Element {
    content: string;
  }
}

export default function bootstrap() {
  //非同期通信で使用する
  window.axios = require( 'axios');
}
型定義ファイルを追加する。
declare module "*.vue" {
    import Vue from "vue";
    export default Vue;
  }
Mnist実装
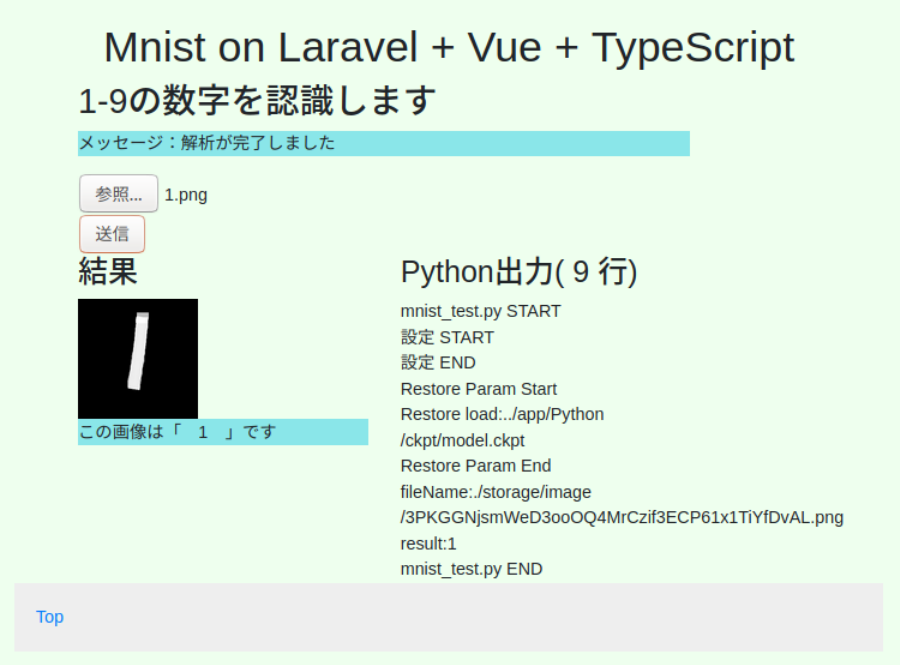
前回の記事ではPythonで解析後にページを再読み込みしていましたが、解析結果をJSON形式でクライアントに対して送信して、表示するようにしています。
画面イメージはほぼ前回と同様です。

Mnist実装(バックエンド)
今回の肝となるvueファイルです。
template部分
<template>
    <div class="container">
        <div class="row">
            <div class="col-sm-10">
                <h2>1-9の数字を認識します</h2>
                <p>メッセージ:{{msg}}</p>

         //Form送信ボタン押下から結果が返るまでは、ボタンをDisableにしています
                <form @submit.prevent="testImage">
                    <input ref="test_image" type="file" name="test_image" v-bind:disabled="!activate_button"/><br>
                    <input type="submit" id="submit" value="送信" v-bind:disabled="!activate_button">
                </form>
            </div>
        </div>

        <div class="row" v-if="result!=-1">
            <div class="col-sm-5">
                 <h3>結果</h3>
                <img v-bind:src=image_pass  width="112" height="112"> <br>
                <p>この画像は「 {{result}} 」です</p>
            </div>

            <div class="col-sm-5" v-if="lines > 0">
                <h3>Python出力( {{lines}} 行)</h3>
                <!-- p100 -->
                <template v-for="output in outputs">
                    {{output}} <br>
                </template>
            </div>
        </div>
    </div>
</template>
Laravelの記法(@csrf、@foreachとか)は使用できません。Vueの記法で修正します。
CSRF対策は、呼び出し元のMETAタグに記載します。
Form部分を以下のようにしていた場合は、サーバから419エラー(たぶCSRFトークンエラー)が返ってきてました。
submitボタンのclickイベントより先に、FORMのPOST送信が先に動くらしい。その結果、送信するCSRFトークンが違うものが送信されているっぽいですが、よく分かりません。
     <form method = "POST" enctype="multipart/form-data" action="/mnist/test">
       <input ref="test_image" type="file" name="test_image"/><br>
       <input type="submit" id="submit" value="送信" v-on:click="testImage" />
   </form>
script部分(JavaScript版)
まだ、TypeScriptにはなっていません。JavaScriptで記載しても正常に動作します。
<script>
export default {
    name: "MnistComponent",
    data () {
        return {
            msg: "画像を入力してください",
            result : -1,
            image_pass : "",
            outputs: [],
            // ボタン 有効
            activate_button : true,
        }
    },
    computed: {
        lines: function () {
            if(this.outputs != null){
                return this.outputs.length;
            }else{
                return 0;
            }
        }
    },
    methods:{
        testImage: function(){
            // ファイルを取得し、POST送信用のデータに
            let fl = this.$refs.test_image.files[0];
            let data = new FormData();
            data.append( 'test_image' , fl , fl.name);
            this.msg = "判定中...";
            this.activate_button = false;
            // サーバーにデータを送信
            var self = this;
            window.axios.post('/mnist', data)
            .then(res =>  {
                //成功時には結果表示
                self.msg = res.data.msg;
                self.result = res.data.result;
                self.image_pass = res.data.image_pass;
                self.outputs = res.data.outputs;
                self.activate_button = true;
                console.log(res);
            })
            //失敗時にはエラーメッセージをダイアログ表示
            .catch( error => {
                this.msg = error;
                this.activate_button = true;
                console.log(error);
            })
        },
    }
}
</script>
script部分(TypeScript版)
同じ内容をTypeScriptで記載すると以下のようになります。<script lang="ts">と指定することで、TypeScriptと認識されます。
<script lang="ts">
import { Component , Vue} from 'vue-property-decorator' ;

@Component
export default class MnistComponent extends Vue{
    // プロパティ
    private msg : string = "画像を入力してください";
    private result : number = -1;
    private image_pass : string = "";
    private outputs : string[] = [];
    private activate_button : boolean = true;
    // getterアクセサー
    private get lines () : number{
        if(this.outputs != null){
            return this.outputs.length;
        }else{
            return 0;
        }
    }
    //メソッド
    private testImage() : void{
        let fl:any = this.$refs.test_image;
        // let命令では型省略時は型推論される
        let data= new FormData();
        data.append( 'test_image' , fl.files[0] , fl.files[0].name);
        this.msg = "判定中...";
        this.activate_button = false;
        // サーバーにデータを送信
        let self = this;
        window.axios.post('/mnist', data)
        .then(res =>  {
            //成功時には結果表示
            self.msg = res.data.msg;
            self.result = res.data.result;
            self.image_pass = res.data.image_pass;
            self.outputs = res.data.outputs;
            self.activate_button = true;
            console.log(res);
        })
        //失敗時にはエラーメッセージをダイアログ表示
        .catch( error => {
            this.msg = error;
            this.activate_button = true;
            console.log(error);
        })
    }
}
</script>
style部分
<style scoped>
    p{
        background-color: rgb(138, 230, 233);
    }
</style>
blade
前回のindex.blade.phpをコピーして、コンポーネントを呼び出しするように変更する。
<!doctype html>
<html lang="{{ str_replace('_', '-', app()->getLocale()) }}">
<head>
    <title>Mnist</title>
    <meta charset="UTF-8">
    <meta name="viewport" content="width=device-width, initial-scale=1">
  <!-- CSRF対策 -->
    <meta name="csrf-token" content="{{ csrf_token() }}">

    <link rel="stylesheet" href="https://stackpath.bootstrapcdn.com/bootstrap/4.3.1/css/bootstrap.min.css" >
    <style>
        body{
            background-color: #EEFFEE;
            padding : 30px;
        }
        h1 {
            text-align: center ;
        }
    </style>

</head>

<body>
    <h1>Mnist on Laravel + Vue + TypeScript</h1>
    <div id="app">
     <!--コンポーネントの呼び出し-->
        <mnist-component></mnist-component>
    </div>
    @include('components.footer')

  <!--vueをビルドして作成されるjsファイルを読み込み-->
    <script src="{{ asset('/js/app.js') }}"></script>
</body>
</html>
Mnist実装(バックエンド)
Python呼び出し部分は前回と同様で、JSONで結果送信できるように変更しています。
   public function test(Request $request)
    {
        //エラー発生時にJSON作成で未定義エラーとならないようにする。
        $msg = "";
        $image_pass = "";
        $result = -1;
        $outputs = [];
        if(!empty($request->test_image))
        {
            ///// 〜 省略 〜  /////
            if(count($results) == 1){
                $result = reset($results);
                $result = substr($result , strlen('result:') , 1 );
                $msg = "解析が完了しました";
            }
            else {
                $msg = "解析に失敗しました。";
            }
        }
        else {
            $msg = "画像がありません";
        }
        //JSON形式で応答
        return response()->json(['result' => $result , 'msg' => $msg , 'image_pass' => $image_pass , 'outputs' => $outputs]);
    }
}