TFで使えるデータセット機能
TFではtf.data.Datasetと言う非常に強力なデータセット機能があります。
具体的に何ができるのかというと、データの塊を入れるとパイプラインを構築してデータを吐き出すジェネレータを作成する機能が使えます。
データパイプラインを使用する強み
tf.data.Datasetデータパイプラインを用いると以下のことができます。
- Batchごとにデータを排出
- データをShuffleしながら排出
- データを指定回数Repeatしながら排出
- チェインメソッドにより複雑に変形可能
- データを途中で変換掛けながら排出
- GPU演算中にCPUでデータセットを用意
特に、データ変換機能は、DataAugmentationが応用でき、Generatorとして非常に強力です。
さらにいえば、keras.preprocessing.image.ImageDataGeneratorで結構苦労された方もいらっしゃったのでは?と思いますが、
データのAugmentationがボトルネックになって一向に学習が進まない、遅い。とかって経験ありませんか?
tf.data.Datasetではそういったボトルネックを解消してくれる事でしょう。
使ってみたくなってきましたか? 今回はそういった部分でのハンズオンを記事を用意しました。
是非お役に立てればと思います。
注意🚨
基本的にEager modeで動くので、TF2.0でなければ動きません。
Dataset作成
基本
まずは基本からおさらいしましょう。Dataset化はこのように行います。
import tensorflow as tf
import tensorflow.keras as keras

dataset = tf.data.Dataset.from_tensor_slices(tf.range(10))
Generatorなので、for文で値が次々に排出されていきます。
for item in dataset:
    print(item)
tf.Tensor(0, shape=(), dtype=int32)
tf.Tensor(1, shape=(), dtype=int32)
tf.Tensor(2, shape=(), dtype=int32)
tf.Tensor(3, shape=(), dtype=int32)
tf.Tensor(4, shape=(), dtype=int32)
tf.Tensor(5, shape=(), dtype=int32)
tf.Tensor(6, shape=(), dtype=int32)
tf.Tensor(7, shape=(), dtype=int32)
tf.Tensor(8, shape=(), dtype=int32)
tf.Tensor(9, shape=(), dtype=int32)
このようにしてDataset化することができます。
別のデータ媒体でも大丈夫
listなども当然入れられます。
dataset = tf.data.Dataset.from_tensor_slices([0,1,2,3,4])
for item in dataset:
    print(item)
tf.Tensor(0, shape=(), dtype=int32)
tf.Tensor(1, shape=(), dtype=int32)
tf.Tensor(2, shape=(), dtype=int32)
tf.Tensor(3, shape=(), dtype=int32)
tf.Tensor(4, shape=(), dtype=int32)
ですが、以下のようなListはDatasetには入れられません。
dataset = tf.data.Dataset.from_tensor_slices([[1,2],[3],[4,5,6]])
---------------------------------------------------------------------------
TypeError                                 Traceback (most recent call last)
/usr/local/lib/python3.6/dist-packages/tensorflow_core/python/data/util/structure.py in normalize_element(element)
     90       try:
---> 91         spec = type_spec_from_value(t, use_fallback=False)
     92       except TypeError:

11 frames
TypeError: Could not build a TypeSpec for [[1, 2], [3], [4, 5, 6]] with type list

During handling of the above exception, another exception occurred:

ValueError                                Traceback (most recent call last)
/usr/local/lib/python3.6/dist-packages/tensorflow_core/python/framework/constant_op.py in convert_to_eager_tensor(value, ctx, dtype)
     94       dtype = dtypes.as_dtype(dtype).as_datatype_enum
     95   ctx.ensure_initialized()
---> 96   return ops.EagerTensor(value, ctx.device_name, dtype)
     97
     98

ValueError: Can't convert non-rectangular Python sequence to Tensor.
advanced:Ragged Tensor
しかし、TensorFlowにはRagged Tensorと呼ばれる機能があります。
それは横道に話がそれてしまうので、詳しくはGuideの方を参考にしてください。
最新版TFでは以下のようなことができます。
# tf-nightly(最新版TF)バージョンのみ実行可能
data = tf.ragged.constant([[1,2],[3],[4,5,6]])
ds = tf.data.Dataset.from_tensor_slices(data)

for x in data:
    print(x)
tf.Tensor([1 2], shape=(2,), dtype=int32)
tf.Tensor([3], shape=(1,), dtype=int32)
tf.Tensor([4 5 6], shape=(3,), dtype=int32)
これで、文章系タスクもPaddingせずにKerasなどに流し込むことができるっぽいです(要検証)。
複数Input
推論元の(いわゆる説明変数)データXと、推論の答え(いわゆる目的変数)データYは
Batchで流す時には一緒に流してFor文を回した方がいいですよね。
そう言う時は、複数のInput処理を行います。
dataset = tf.data.Dataset.from_tensor_slices((tf.range(10),tf.range(10,20)))
for item1,item2 in dataset:
    print(item1,item2)
tf.Tensor(0, shape=(), dtype=int32) tf.Tensor(10, shape=(), dtype=int32)
tf.Tensor(1, shape=(), dtype=int32) tf.Tensor(11, shape=(), dtype=int32)
tf.Tensor(2, shape=(), dtype=int32) tf.Tensor(12, shape=(), dtype=int32)
tf.Tensor(3, shape=(), dtype=int32) tf.Tensor(13, shape=(), dtype=int32)
tf.Tensor(4, shape=(), dtype=int32) tf.Tensor(14, shape=(), dtype=int32)
tf.Tensor(5, shape=(), dtype=int32) tf.Tensor(15, shape=(), dtype=int32)
tf.Tensor(6, shape=(), dtype=int32) tf.Tensor(16, shape=(), dtype=int32)
tf.Tensor(7, shape=(), dtype=int32) tf.Tensor(17, shape=(), dtype=int32)
tf.Tensor(8, shape=(), dtype=int32) tf.Tensor(18, shape=(), dtype=int32)
tf.Tensor(9, shape=(), dtype=int32) tf.Tensor(19, shape=(), dtype=int32)
複数DatasetをPythonのZip的に流したい
複数のInput,複数のOutputを構成するマルチタスクラーニング手法を用いたい時は、
以下のようにdatasetをpythonのzipのように流すこともできます。
datasetX = tf.data.Dataset.from_tensor_slices(tf.range(-10,0))
datasetY = tf.data.Dataset.from_tensor_slices((tf.range(10),tf.range(10,20)))
dataset = tf.data.Dataset.zip((datasetX,datasetY))
for itemX,(itemY1,itemY2) in dataset:
    print(itemX,itemY1,itemY2)
tf.Tensor(-10, shape=(), dtype=int32) tf.Tensor(0, shape=(), dtype=int32) tf.Tensor(10, shape=(), dtype=int32)
tf.Tensor(-9, shape=(), dtype=int32) tf.Tensor(1, shape=(), dtype=int32) tf.Tensor(11, shape=(), dtype=int32)
tf.Tensor(-8, shape=(), dtype=int32) tf.Tensor(2, shape=(), dtype=int32) tf.Tensor(12, shape=(), dtype=int32)
tf.Tensor(-7, shape=(), dtype=int32) tf.Tensor(3, shape=(), dtype=int32) tf.Tensor(13, shape=(), dtype=int32)
tf.Tensor(-6, shape=(), dtype=int32) tf.Tensor(4, shape=(), dtype=int32) tf.Tensor(14, shape=(), dtype=int32)
tf.Tensor(-5, shape=(), dtype=int32) tf.Tensor(5, shape=(), dtype=int32) tf.Tensor(15, shape=(), dtype=int32)
tf.Tensor(-4, shape=(), dtype=int32) tf.Tensor(6, shape=(), dtype=int32) tf.Tensor(16, shape=(), dtype=int32)
tf.Tensor(-3, shape=(), dtype=int32) tf.Tensor(7, shape=(), dtype=int32) tf.Tensor(17, shape=(), dtype=int32)
tf.Tensor(-2, shape=(), dtype=int32) tf.Tensor(8, shape=(), dtype=int32) tf.Tensor(18, shape=(), dtype=int32)
tf.Tensor(-1, shape=(), dtype=int32) tf.Tensor(9, shape=(), dtype=int32) tf.Tensor(19, shape=(), dtype=int32)
batch化
要素ごとではなく、Batchごとに出力したい時は、チェインメソッドみたくtf.data.Datasetの先に.batch(batch_size)をつけます
dataset = tf.data.Dataset.from_tensor_slices(tf.range(10)).batch(5)
for item in dataset:
    print(item)
tf.Tensor([0 1 2 3 4], shape=(5,), dtype=int32)
tf.Tensor([5 6 7 8 9], shape=(5,), dtype=int32)
repeat
.repeat(repeat_num)は単純にデータセットを繰り返したい時に使います。
.repeat()の場合は無限にリピートするので注意です。
dataset = tf.data.Dataset.from_tensor_slices(tf.range(3)).repeat(3)
for item in dataset:
    print(item)
tf.Tensor(0, shape=(), dtype=int32)
tf.Tensor(1, shape=(), dtype=int32)
tf.Tensor(2, shape=(), dtype=int32)
tf.Tensor(0, shape=(), dtype=int32)
tf.Tensor(1, shape=(), dtype=int32)
tf.Tensor(2, shape=(), dtype=int32)
tf.Tensor(0, shape=(), dtype=int32)
tf.Tensor(1, shape=(), dtype=int32)
tf.Tensor(2, shape=(), dtype=int32)
もちろん、チェインメソッドなので、.Batchメソッドと併用もできます。
dataset = tf.data.Dataset.from_tensor_slices(tf.range(10)).repeat(3).batch(7)
for item in dataset:
    print(item)
tf.Tensor([0 1 2 3 4 5 6], shape=(7,), dtype=int32)
tf.Tensor([7 8 9 0 1 2 3], shape=(7,), dtype=int32)
tf.Tensor([4 5 6 7 8 9 0], shape=(7,), dtype=int32)
tf.Tensor([1 2 3 4 5 6 7], shape=(7,), dtype=int32)
tf.Tensor([8 9], shape=(2,), dtype=int32)
逆も可
dataset = tf.data.Dataset.from_tensor_slices(tf.range(10)).batch(7).repeat(3)
for item in dataset:
    print(item)
tf.Tensor([0 1 2 3 4 5 6], shape=(7,), dtype=int32)
tf.Tensor([7 8 9], shape=(3,), dtype=int32)
tf.Tensor([0 1 2 3 4 5 6], shape=(7,), dtype=int32)
tf.Tensor([7 8 9], shape=(3,), dtype=int32)
tf.Tensor([0 1 2 3 4 5 6], shape=(7,), dtype=int32)
tf.Tensor([7 8 9], shape=(3,), dtype=int32)
shuffle
基本
概念が少々複雑なので、少し詳しく説明します。 .shuffle(buffer_size)はbuffer_sizeの幅でシャッフルしていくイメージです。
つまり、.shuffle(1)は全く変わりませんし、.shuffle(2)は隣同士で入れ替わるかどうかを端から端までやります。
dataset = tf.data.Dataset.from_tensor_slices(tf.range(10)).shuffle(1)
for item in dataset:
    print(item)
tf.Tensor(0, shape=(), dtype=int32)
tf.Tensor(1, shape=(), dtype=int32)
tf.Tensor(2, shape=(), dtype=int32)
tf.Tensor(3, shape=(), dtype=int32)
tf.Tensor(4, shape=(), dtype=int32)
tf.Tensor(5, shape=(), dtype=int32)
tf.Tensor(6, shape=(), dtype=int32)
tf.Tensor(7, shape=(), dtype=int32)
tf.Tensor(8, shape=(), dtype=int32)
tf.Tensor(9, shape=(), dtype=int32)
dataset = tf.data.Dataset.from_tensor_slices(tf.range(10)).shuffle(2)
for item in dataset:
    print(item)
tf.Tensor(1, shape=(), dtype=int32)
tf.Tensor(2, shape=(), dtype=int32)
tf.Tensor(0, shape=(), dtype=int32)
tf.Tensor(3, shape=(), dtype=int32)
tf.Tensor(4, shape=(), dtype=int32)
tf.Tensor(5, shape=(), dtype=int32)
tf.Tensor(6, shape=(), dtype=int32)
tf.Tensor(7, shape=(), dtype=int32)
tf.Tensor(9, shape=(), dtype=int32)
tf.Tensor(8, shape=(), dtype=int32)
2は微妙にshuffleされているのがわかる。
グラフ化
import matplotlib.pyplot as plt
dataset1 = tf.data.Dataset.from_tensor_slices(tf.range(100)).repeat(2)
dataset2 = tf.data.Dataset.from_tensor_slices(tf.range(100)).repeat(2).shuffle(1)
X=[]
Y=[]
for item in dataset1:
    X.append(item.numpy())
for item in dataset2:
    Y.append(item.numpy())

plt.figure(figsize=(5,5),facecolor="white")
plt.plot(X)
plt.plot(Y)
plt.legend(['not_shuffle', 'shuffle(1)'], loc='upper left')
plt.show()

2の場合

10の場合
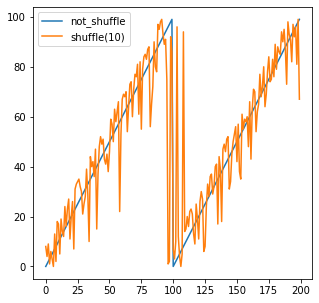
100(全体Shuffle)の場合

つまり、全体Shuffleしたい場合は、データサイズそのままを記入すれば全体でランダムにすることができます。
チェインメソッド化
これも.repeat,.batch同様にチェインメソッドで複雑に構成できます。
dataset = tf.data.Dataset.from_tensor_slices(tf.range(10)).repeat(3).batch(7)
for item in dataset:
    print(item)
print("----------")
dataset = tf.data.Dataset.from_tensor_slices(tf.range(10)).repeat(3).batch(7).shuffle(5)
for item in dataset:
    print(item)
tf.Tensor([0 1 2 3 4 5 6], shape=(7,), dtype=int32)
tf.Tensor([7 8 9 0 1 2 3], shape=(7,), dtype=int32)
tf.Tensor([4 5 6 7 8 9 0], shape=(7,), dtype=int32)
tf.Tensor([1 2 3 4 5 6 7], shape=(7,), dtype=int32)
tf.Tensor([8 9], shape=(2,), dtype=int32)
----------
tf.Tensor([4 5 6 7 8 9 0], shape=(7,), dtype=int32)
tf.Tensor([0 1 2 3 4 5 6], shape=(7,), dtype=int32)
tf.Tensor([8 9], shape=(2,), dtype=int32)
tf.Tensor([1 2 3 4 5 6 7], shape=(7,), dtype=int32)
tf.Tensor([7 8 9 0 1 2 3], shape=(7,), dtype=int32)
お分かりいただけただろうか。要はこの場合BatchをShuffleしています。
非直感的な例
dataset = tf.data.Dataset.from_tensor_slices(tf.range(10)).shuffle(10).batch(7)
for item in dataset:
    print(item)
tf.Tensor([0 4 7 8 1 3 2], shape=(7,), dtype=int32)
tf.Tensor([5 9 6], shape=(3,), dtype=int32)
これはまぁいいとして、次がちょっと不思議に思う人もいるかもしれないです。
dataset = tf.data.Dataset.from_tensor_slices(tf.range(10)).shuffle(10).batch(7).repeat(3)
for item in dataset:
    print(item)
tf.Tensor([8 5 7 3 4 6 9], shape=(7,), dtype=int32)
tf.Tensor([2 1 0], shape=(3,), dtype=int32)
tf.Tensor([2 7 8 3 9 5 4], shape=(7,), dtype=int32)
tf.Tensor([0 1 6], shape=(3,), dtype=int32)
tf.Tensor([4 2 8 1 5 6 3], shape=(7,), dtype=int32)
tf.Tensor([7 9 0], shape=(3,), dtype=int32)
この結果を見ると、shuffle→batch→repeatと言う順番でそれぞれ塊ごとに処理しているという訳ではないことがわかります。
つまり何が言いたいのかというと、これはあくまでパイプラインであって、チェインメソッドごとに一気に処理している訳ではない。ということなのです。
map
ここからが本題です。.map(op)では値を直接変えるパイプラインを組むことができます。
dataset = tf.data.Dataset.from_tensor_slices(tf.range(10)).map(lambda x: x**4)
for item in dataset:
    print(item)
tf.Tensor(0, shape=(), dtype=int32)
tf.Tensor(1, shape=(), dtype=int32)
tf.Tensor(16, shape=(), dtype=int32)
tf.Tensor(81, shape=(), dtype=int32)
tf.Tensor(256, shape=(), dtype=int32)
tf.Tensor(625, shape=(), dtype=int32)
tf.Tensor(1296, shape=(), dtype=int32)
tf.Tensor(2401, shape=(), dtype=int32)
tf.Tensor(4096, shape=(), dtype=int32)
tf.Tensor(6561, shape=(), dtype=int32)
分岐も可能
dataset = tf.data.Dataset.from_tensor_slices(tf.range(10)).map(lambda x: (x,x**2))
for item1,item2 in dataset:
    print(item1,item2)
tf.Tensor(0, shape=(), dtype=int32) tf.Tensor(0, shape=(), dtype=int32)
tf.Tensor(1, shape=(), dtype=int32) tf.Tensor(1, shape=(), dtype=int32)
tf.Tensor(2, shape=(), dtype=int32) tf.Tensor(4, shape=(), dtype=int32)
tf.Tensor(3, shape=(), dtype=int32) tf.Tensor(9, shape=(), dtype=int32)
tf.Tensor(4, shape=(), dtype=int32) tf.Tensor(16, shape=(), dtype=int32)
tf.Tensor(5, shape=(), dtype=int32) tf.Tensor(25, shape=(), dtype=int32)
tf.Tensor(6, shape=(), dtype=int32) tf.Tensor(36, shape=(), dtype=int32)
tf.Tensor(7, shape=(), dtype=int32) tf.Tensor(49, shape=(), dtype=int32)
tf.Tensor(8, shape=(), dtype=int32) tf.Tensor(64, shape=(), dtype=int32)
tf.Tensor(9, shape=(), dtype=int32) tf.Tensor(81, shape=(), dtype=int32)
画像におけるMap
例えば、MNISTにおける回転のDataAugmentationを行いたいと考えたときに、具体的にどういうコードになるのかというと、以下のコードになります。
import matplotlib.pyplot as plt
import numpy as np
from scipy import ndimage

def rotate(image):
    return ndimage.rotate(image, np.random.uniform(-30, 30), reshape=False)

@tf.function
def rotate_tf(image):
    rotated = tf.py_function(rotate,[image],[tf.int32])
    return rotated[0]


(train_x, train_y), (test_x, test_y) =  keras.datasets.mnist.load_data()
train_x = train_x.reshape(-1,28,28,1)
train_ds = tf.data.Dataset.from_tensor_slices(train_x)
batched_train_ds = train_ds.map(rotate_tf).batch(16) #ここが肝心のMap


# pick images in first batch
first_batch = next(iter(batched_train_ds))
sample_images = first_batch.numpy().reshape((-1,28,28))

plt.figure(facecolor="white")
for i, sample_image in enumerate(sample_images):
  plt.subplot(4,4,i+1)
  plt.imshow(sample_image)
  plt.grid(False)
plt.show()

py_functionと@tf.functionというものが出てきましたね、
これついては、かなり闇の技術というか、謎な部分が多いので詳細な説明は避けますが、
三行で説明すると、
- 本来tf系オペレーションで構成すると処理は早くなる。
- けどそれだけだとカバーしきれない処理は多いので、
-
py_functionと@tf.functionを使うと、コード解釈してtfオペレーションで実行してくれる
という感じです。解釈してくれるので再代入とか、解釈の難しいコードを突っ込むと謎のエラーで死にます(3敗)
もちろん、@tf.functionも高速ですが、できる限り自分のコードでtfオペレーションを組んで、
Augmentaionなどをすると速度的にも、保守運用的にも非常にいいです。
(preprocessという名前で@tf.functionを作ると死ぬので注意です:2敗)
TFオペレーションに書き換えた例を紹介しましょう。
import tensorflow_addons as tfa
import numpy as np
@tf.function
def rotate_tf(image):
    if image.shape.__len__() ==4:

        random_angles = tf.random.uniform(shape = (tf.shape(image)[0], ), minval = -30*np
        .pi / 180, maxval = 30*np.pi / 180)
    if image.shape.__len__() ==3:
        random_angles = tf.random.uniform(shape = (), minval = -30*np
        .pi / 180, maxval = 30*np.pi / 180)

    return tfa.image.rotate(image,random_angles)
(train_x,train_y),(test_x,test_y) =  keras.datasets.mnist.load_data()
train_x=train_x.reshape(-1,28,28,1)
train_ds=tf.data.Dataset.from_tensor_slices(train_x)
train_ds=train_ds.map(rotate_tf).batch(512)
for x in train_ds:
    X = x.numpy().reshape((-1,28,28))
plt.figure(facecolor="white")
for i in range(16):
    plt.subplot(4,4,i+1)
    plt.imshow(X[i,:])
    plt.grid(False)
plt.show()
Map高速化
例えば、先ほどのMNISTの画像加工にかかる時間、
これが遅いと全体のトレーニング時間にも影響してくるはずです。
そこで、高速化テクニックをここでご紹介しましょう。
scipy VS TF_addons
先ほど、オペレーションはTF系に任せた方が早いと述べましたが本当でしょうか?
検証してみましょう。
%%time
import matplotlib.pyplot as plt
import numpy as np
from scipy import ndimage

def rotate(image):
    return ndimage.rotate(image, np.random.uniform(-30, 30), reshape=False)

@tf.function
def rotate_tf(image):
    rotated = tf.py_function(rotate,[image],[tf.int32])
    return rotated[0]

(train_x, train_y), (test_x, test_y) =  keras.datasets.mnist.load_data()
train_x = train_x.reshape(-1,28,28,1)
train_ds = tf.data.Dataset.from_tensor_slices(train_x)
batched_train_ds = train_ds.map(rotate_tf).batch(512)

for imgs in batched_train_ds:
    imgs
CPU times: user 47.5 s, sys: 2.81 s, total: 50.3 s
Wall time: 36.7 s
一方、tf_addonsでは
%%time
import tensorflow_addons as tfa
import numpy as np
@tf.function
def rotate_tf(image):
    if image.shape.__len__() ==4:

        random_angles = tf.random.uniform(shape = (tf.shape(image)[0], ), minval = -30*np
        .pi / 180, maxval = 30*np.pi / 180)
    if image.shape.__len__() ==3:
        random_angles = tf.random.uniform(shape = (), minval = -30*np
        .pi / 180, maxval = 30*np.pi / 180)

    return tfa.image.rotate(image,random_angles)

(train_x, train_y), (test_x, test_y) =  keras.datasets.mnist.load_data()
train_x = train_x.reshape(-1,28,28,1)
train_ds = tf.data.Dataset.from_tensor_slices(train_x)
batched_train_ds = train_ds.map(rotate_tf).batch(512)

for imgs in batched_train_ds:
    imgs
CPU times: user 4.81 s, sys: 372 ms, total: 5.18 s
Wall time: 3.32 s
圧倒的にTFAの方が早いですね。
Batch化を先にした場合との比較
他にどうすれば高速化するかというと、Batchファーストでやると早くなります。
%%time
import tensorflow_addons as tfa
import numpy as np
@tf.function
def rotate_tf(image):
    if image.shape.__len__() ==4:

        random_angles = tf.random.uniform(shape = (tf.shape(image)[0], ), minval = -30*np
        .pi / 180, maxval = 30*np.pi / 180)
    if image.shape.__len__() ==3:
        random_angles = tf.random.uniform(shape = (), minval = -30*np
        .pi / 180, maxval = 30*np.pi / 180)

    return tfa.image.rotate(image,random_angles)

(train_x, train_y), (test_x, test_y) =  keras.datasets.mnist.load_data()
train_x = train_x.reshape(-1,28,28,1)
train_ds = tf.data.Dataset.from_tensor_slices(train_x)
batched_train_ds = train_ds.batch(512).map(rotate_tf)

for imgs in batched_train_ds:
    imgs
CPU times: user 1.36 s, sys: 19.1 ms, total: 1.38 s
Wall time: 440 ms
これには理由があって、Batchを最後に持ってくるとmapではbatch_size=1で処理するので遅いです。
どうせBatch化するなら最初にやっておくとお得ということですね。
prefetch機能
詳しくは公式ガイドがもっともわかりやすいのですが、解説すると、
GPUが計算している間にBatchデータをCPU側で用意しておくという機能です。
-
not prefetch

-
prefetch

(公式ガイドより引用)
これを使うとI/OやDataAugmentationでボトルネックになっていた学習も早く終わります。
こちら、実験したかったのですが、どうもKeras.fit_generatorとtf.data.datasetがうまくかみ合わず、
うまくいくサンプルも発見できなかったため、後日の内容とさせていただきます。
まとめ
- tf.dataset.Datasetを使うとデータパイプラインを構築できる。
-
.mapはやり方によって速度が大きく変わる。 - DataAugmentationのパフォーマンスを大きくあげられる
明日はこれを用いて、自作TrainingLoopを作成していきます!