概要
以前の記事でVOICEVOX(Docker)とバックエンドとしてNode.js(Express)を構築していましたが、フロントエンドとの連携テストのたびにdocker-composeコマンドとnodeコマンドをたたくのがとても手間でした。
そこでdocker-compose up -dだけでVOICEVOX(Docker)とNode.js(Express)が同時に立ち上がるように構築したので備忘録として残します。
変更前
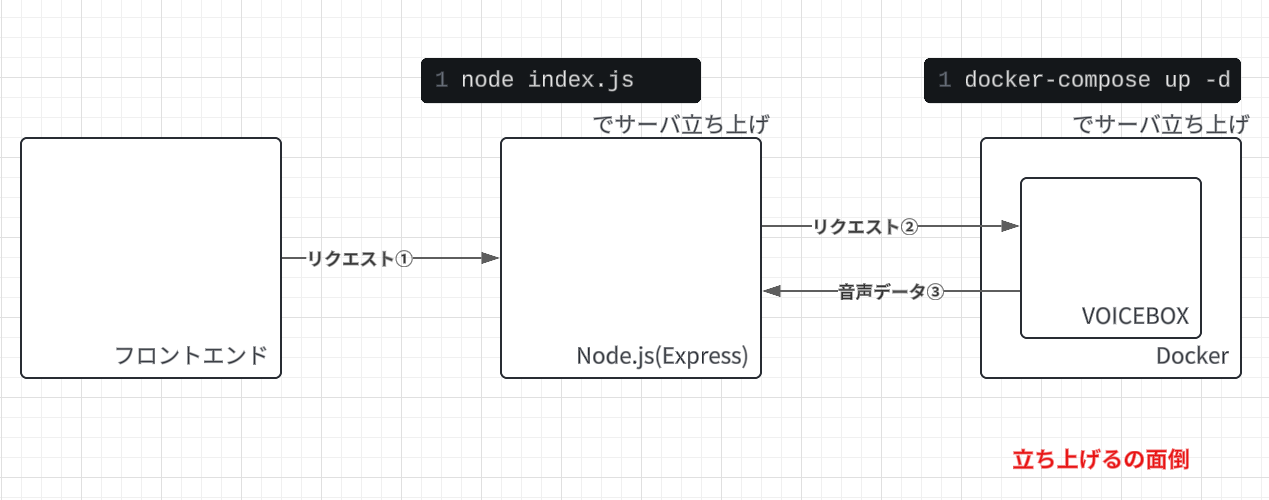
変更後

フロントエンドもまとめるか考えましたが、使用するフレームワークによっては使用するDockerイメージが変わるため、あえて分離しています。
githubで公開しております。
https://github.com/TorresTatsuya/Voicevox_Express
docker-compose.ymlの準備
全体のファイル構成
+---Voicevox_Express
    |   docker-compose.yml
    |
    \---backend
        |   index.js
        |   package-lock.json
        |   package.json
        |
        \---services
                voicevoxAPI.js
version: "3.8"
services:

  voicevox:
    image: "voicevox/voicevox_engine:cpu-latest"
    container_name: voicevox
    # ports:
    #   - "50021:50021"
    stdin_open: true
    tty: true
    restart: always

  backend:
    image: "node:20-alpine"
    container_name: nodejs
    working_dir: /home/node/backend
    environment:
      - VOICEVOX_URL=http://voicevox:50021
      - EXPRESS_PORT=8000
    volumes:
      - ./backend:/home/node/backend
    ports:
      - "8000:8000"
    tty: true
    depends_on:
      - voicevox
    command: sh -c "npm i && node index.js"

networks:
  default:
    name: backend
補足
backendサービス(Node.js)に環境変数environment:を設定しています。
- VOICEVOX_URL=Node.jsからVOICEVOXコンテナへリクエストするURLです。
- EXPRESS_PORT=Node.jsのExpressでのListenのポート番号です。
environment:で設定された環境変数はNode.js側で下記のようにdotenvをインストールしなくても値を参照することができます。
const port = process.env.EXPRESS_PORT;
dockerネットワークでコンテナのIPアドレスが分からなくても、コンテナ名で名前解決できるようです。
/home/node/backend # ping voicevox
PING voicevox (172.18.0.2): 56 data bytes
64 bytes from 172.18.0.2: seq=0 ttl=64 time=0.170 ms
64 bytes from 172.18.0.2: seq=1 ttl=64 time=0.087 ms
Node.js(Express)の動作
ファイル構成
\---backend
    |   index.js
    |   package-lock.json
    |   package.json
    |
    \---services
                voicevoxAPI.js
コード
const express = require("express");
const app = express();
const voicevoxApi = require("./services/voicevoxAPI");
const cors = require("cors");

const port = process.env.EXPRESS_PORT;

const corsOpt = {
  origin: "http://localhost:3000"
}

app.use(express.json());
app.use(cors(corsOpt))

app.post("/synthesize", async (req, res) => {
  try {
    const voiceText = req.body.text;
    const speakerID = req.body.speaker;
    const audiodata = await voicevoxApi(voiceText, speakerID)
    res.status(200).send(audiodata);
  } catch (error) {
    res.status(500).send("error");
  }
})

app.listen(port, () => {
  console.log(`Listening at http://localhost:${port}`);
})
const fs = require("fs");
const axios = require("axios");
const voicevoxURL = process.env.VOICEVOX_URL;

const generateAudioFile = async (voiceText, speakerID) => {
  try {
    const queryJson = await requestQueryJsonData(voiceText, speakerID);
    const audioData = await requestAudioData(queryJson, speakerID);
    console.log('音声ファイルが生成されました');
    return audioData;
  } catch (error) {
    console.log('音声ファイルが生成に失敗しました', error);

  }
}

const requestQueryJsonData = async (voiceText, speakerID) => {
  try {
    const params = new URLSearchParams({
      text: voiceText,
      speaker: speakerID
    });

    const response = await axios({
      method: "post",
      url: `${voicevoxURL}/audio_query?${params.toString()}`
    });

    return JSON.stringify(response.data);
  } catch (error) {
    console.log(error);
  }
}

const requestAudioData = async (queryJson, speakerID) => {
  try {
    const response = await axios({
      method: 'post',
      url: `${voicevoxURL}/synthesis`,
      params: {
        speaker: speakerID
      },
      headers: {
        'Content-Type': 'application/json'
      },
      data: queryJson,
      responseType: 'arraybuffer'
    });

    return response.data;
  } catch (error) {
    console.log(error);
  }
}

module.exports = generateAudioFile;
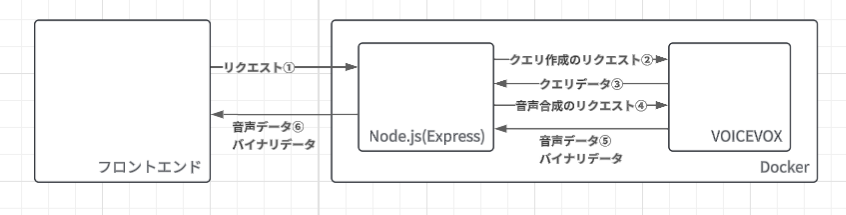
http://localhost/synthesizeにpostリクエストが来るとVOICEVOXに音声データを生成してもらい、リクエスト元に音声データを返す仕組みとなっています。
図にすると以下のような感じです。
実際に使ってみる
docker-compose.ymlがあるフォルダに下記コマンドを実行します。
docker-compose up -d
しばらくするとコンテナが立ち上がります。

Node.jsのコンテナに対して下記POSTリクエストを送ると音声データ(バイナリ)が返されます。
音声データをaudio.wavにすることで音声ファイルが出来上がります。
curl -s \
    -H "Content-Type: application/json" \
    -X POST \
    -d '{"text": "こんにちは", "speaker": 1}' \
    "http://localhost:8000/synthesize" \
    >audio.wav
まとめ
docker-composeのコマンド一つでVOICEVOXとNode.js(Express)を同時に立ち上げるようになりました。現時点では、VOICEVOXで生成された音声データをそのままリクエスト元に返すだけでNode.js(Express)はいらないのではと思いますが、他APIサービスの連携を想定して環境を構築しています。
次回はフロントエンドを用意して、ブラウザで音声を再生する等をやってみたいと思います。
参考