概要
VOICEVOX(Docker)とNode.jsのExpressを使って、Express側にリクエストが来たら声を合成してもらう仕組みを構築します。
かなり大雑把ですが、イメージとしては下記の図の通りです。

現時点では一体何をしたいのか分からない構成ですが、これらをフロントエンドと連携させたり、ChatGPTとExpressを連携させてChatGPTが生成したテキストを音声合成するなどの応用を想定しています。
前提
Dockerがインストールされていること
Node.jsで使用するフレームワーク・ライブラリ
docker-compose.ymlの準備(VOICEVOX側)
docker-composeですぐにVOICEVOXが立ち上がるようdocker-compose.ymlを作成します。
GithubのReadmeに記載されている以下のコマンドをもとにdokcer-compose.ymlへ落としこんでいきます。今回はCPU版を使用しようかと思います。
- 元コード
docker run --rm -it -p '127.0.0.1:50021:50021' voicevox/voicevox_engine:cpu-latest
- コマンドからdokcer-compose.ymlへ置き換えたもの
version: "3.8"
services:
  voicevox:
    image: "voicevox/voicevox_engine:cpu-latest"
    container_name: voicevox
    ports:
      - "50021:50021"
    stdin_open: true
    tty: true
    restart: always
voicevoxを立ち上げる時は以下のコマンドで実行します。
docker-compose up -d
docker-composeの概要や説明については割愛いたします。
下記の方の記事が分かりやすかったので、ご参考ください。
https://qiita.com/gon0821/items/77369def082745d19c38
Node.js側の準備
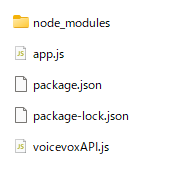
以下のようなファイル構成で作成を進めます。
Node.jsのプロジェクトフォルダを作成します。
npm init
必要なフレームワーク・ライブラリのインストールします。
npm i express fs axios
コード
const express = require("express");
const app = express();
const voicevoxApi = require("./voicevoxAPI");

const port = 8000;

//リクエストボディにあるJsonコンテンツを解析するのに必要
app.use(express.json());

app.post("/synthesize", async (req, res) => {
  try {
    const voiceText = req.body.text;
    const speakerID = req.body.speaker;
    await voicevoxApi(voiceText, speakerID)
    res.status(200).send("success");
  } catch (error) {
    res.status(500).send("error");
  }
})

app.listen(port, () => {
  console.log(`Listening at http://localhost:${port}`);
})
const fs = require("fs");
const axios = require("axios");
const voicevoxURL = "http://localhost:50021"
const saveAudioFilePath = "./audio.wav"

const generateAudioFile = async (voiceText, speakerID) => {
  try {
    const queryJson = await requestQueryJsonData(voiceText, speakerID);
    const audioData = await requestAudioData(queryJson, speakerID);
    fs.writeFileSync(saveAudioFilePath, audioData);
    console.log('音声ファイルが生成されました');
  } catch (error) {
    console.log('音声ファイルが生成に失敗しました', error);

  }
}

const requestQueryJsonData = async (voiceText, speakerID) => {
  try {
    const params = new URLSearchParams({
      text: voiceText,
      speaker: speakerID
    });

    const response = await axios({
      method: "post",
      url: `${voicevoxURL}/audio_query?${params.toString()}`
    });

    return JSON.stringify(response.data);
  } catch (error) {
    console.log(error);
  }
}

const requestAudioData = async (queryJson, speakerID) => {
  try {
    const response = await axios({
      method: 'post',
      url: `${voicevoxURL}/synthesis`,
      params: {
        speaker: speakerID
      },
      headers: {
        'Content-Type': 'application/json'
      },
      data: queryJson,
      responseType: 'arraybuffer'
    });

    return response.data;
  } catch (error) {
    console.log(error);
  }
}

module.exports = generateAudioFile;
補足
VOICEVOXのAPIドキュメントを参考に、音声合成に必要なクエリを作ってもらい、そのクエリをもとに音声合成のリクエストを送っている流れとなります。
そのため、VOICEVOXのサーバには音声合成までに2回リクエストを送っていることになります。

実際に使ってみる
VOICEVOX(Docker)とNode.js(Express)をそれぞれ立ち上げます。
準備したdokcer-compose.ymlがあるフォルダまで移動し、下記コマンドを実行します。
docker-compose up -d
準備したnode.jsのフォルダに移動し、下記コマンドを実行します。
node .\app.js
立ち上げたExpressに対してリクエストを送るわけですが、検証としてVScodeにインストールできるThunder Client for VS Codeを使っていきます。
New Requestから下記のようにリクエストを作ります。
Headersは特にいじっていません。

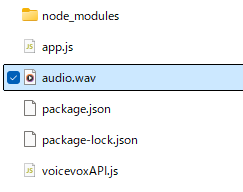
Sendを押してしばらくすると、app.jsと同じ階層に音声ファイルが生成されました。
まとめ
VOICEVOX(Docker)とNode.jsのExpressを使って音声ファイルを生成することができました。
ただ、DockerとExpressをそれぞれ立ち上げるのは面倒なので、Express側をコンテナにしてVOICEVOXのdocker-composeにまとめてしまうのもありかなと感じました。
音声ファイルについてはファイル名が固定のため、生成時に上書きされてしまう点があります。そのため、音声ファイルの管理方法についても検討する必要がありそうです。
参考