NativeBaseとは?
ReactNative用のUIライブラリ

 環境構築
環境構築
yarnを使ってライブラリをインストール
$ yarn add native-base
 実装
実装
試しに、リスト表示+クリックした箇所をログ表示するまでをやってみます。
リスト表示
App.tsx
import { Platform } from "react-native";
import {
  createAppContainer,
  createStackNavigator,
  NavigationContainer
} from "react-navigation";
import Home from "./screens/home";

const headerNavigationOptions = {
  headerStyle: {
    backgroundColor: "gray",
    marginTop: Platform.OS === "android" ? 24 : 0
  },
  headerTitleStyle: { color: "white" },
  headerTintColor: "white"
};

const AppNavigator: NavigationContainer = createStackNavigator({
  Home: {
    screen: Home,
    navigationOptions: {
      ...headerNavigationOptions,
      headerTitle: "サンプル"
    }
  }
});

export default createAppContainer(AppNavigator);
Home.tsx
import {
  Container,
  Content,
  List,
  ListItem,
  Text,
  Body,
  Right,
  Icon
} from "native-base";
import React from "react";

// tslint:disable-next-line: no-empty-interface
interface IProps {}
export default class Home extends React.Component<IProps> {
  public render() {
    // 表示するデータ
    const items: string[] = ["itemA", "itemB", "itemC"];
    return (
      <Container>
        <Content>
          <List
            dataArray={items}
            renderRow={item => (
              <ListItem
                button={true}
                onPress={() => console.log(`onPress ${item}`)}
              >
                <Body>
                  <Text>{item}</Text>
                </Body>
                <Right>
                  <Icon name="arrow-forward" />
                </Right>
              </ListItem>
            )}
          />
        </Content>
      </Container>
    );
  }
}
実行してiPhoneシュミレータで確認すると、以下の様な感じになりました ![]()

アイテムをクリックするとコンソールログに出力されます ![]()
クリップボードに長押ししたテキストを保存する
clipboard操作に関しては以下のモジュールを使用します。

ライブラリをインストール
$ yarn add @react-native-community/react-native-clipboard
clips.tsx
...
      <Container>
        <Content>
          <List
            dataArray={items}
            renderRow={item => (
              <ListItem
                button={true}
                onPress={() => console.log(`onPress ${item}`)}
                onLongPress={() => this.onLongClick(item)}
              >
                ...
            )}
          />
        </Content>
      </Container>
...

  private onLongClick(item: string) {
    Clipboard.setString(item);
    Alert.alert("information", `「${item}」をクリップボードにコピーしました。`);
  }
}
これで長押しするとクリップボードに選択した文字列が設定されるようになりました ![]()
タブバーを下部に設置する
Footer Tabsを使用する
- まずはサンプル通りに実装
export default class Home extends React.Component<IProps> {
  public render() {
    return (
      <Container>
        <Content />
        <Footer>
          <FooterTab>
            <Button vertical={true}>
              <Icon name="clipboard" />
              <Text>タブ1</Text>
            </Button>
            <Button vertical={true}>
              <Icon name="settings" />
              <Text>タブ2</Text>
            </Button>
          </FooterTab>
        </Footer>
      </Container>
    );
  }
}
iOSシュミレータでの実行結果

表示だけは出来ました。![]()
次はタブの切り替えや、現在表示されているタブが分かるようにしたいと思います。
import {
  Body,
  Button,
  Container,
  Content,
  Footer,
  FooterTab,
  Icon,
  Text
} from "native-base";
import React from "react";

import Tab1 from "./clips";
import Tab2 from "./settings";

interface IState {
  selectedTab: string;
}

// tslint:disable-next-line: no-empty-interface
interface IProps {}

export default class Home extends React.Component<IProps, IState> {
  constructor(props: IProps) {
    super(props);

    this.state = {
      selectedTab: "clips"
    };
  }

  public renderSelectedTab() {
    switch (this.state.selectedTab) {
      case "clips":
        return <Tab1 />;
      case "settings":
        return <Tab2 />;
      default:
    }
  }

  public render() {
    return (
      <Container>
        <Content>{this.renderSelectedTab()}</Content>
        <Footer>
          <FooterTab>
            <Button
              vertical={true}
              active={this.state.selectedTab === "clips"}
              onPress={() => this.setState({ selectedTab: "clips" })}
            >
              <Icon name="clipboard" />
              <Text>タブ1</Text>
            </Button>
            <Button
              vertical={true}
              active={this.state.selectedTab === "settings"}
              onPress={() => this.setState({ selectedTab: "settings" })}
            >
              <Icon name="settings" />
              <Text>タブ2</Text>
            </Button>
          </FooterTab>
        </Footer>
      </Container>
    );
  }
}
clips.tsx と settings.tsx を別ページとして作成し、FooterTabの Button が
押された時に state でどのページを表示するか管理しています。
iOSシュミレータでの実行結果

タブ切り替えもちゃんと出来てます ![]()

Androidの場合
上のコードをAndroidで動かすと以下のようになりました。
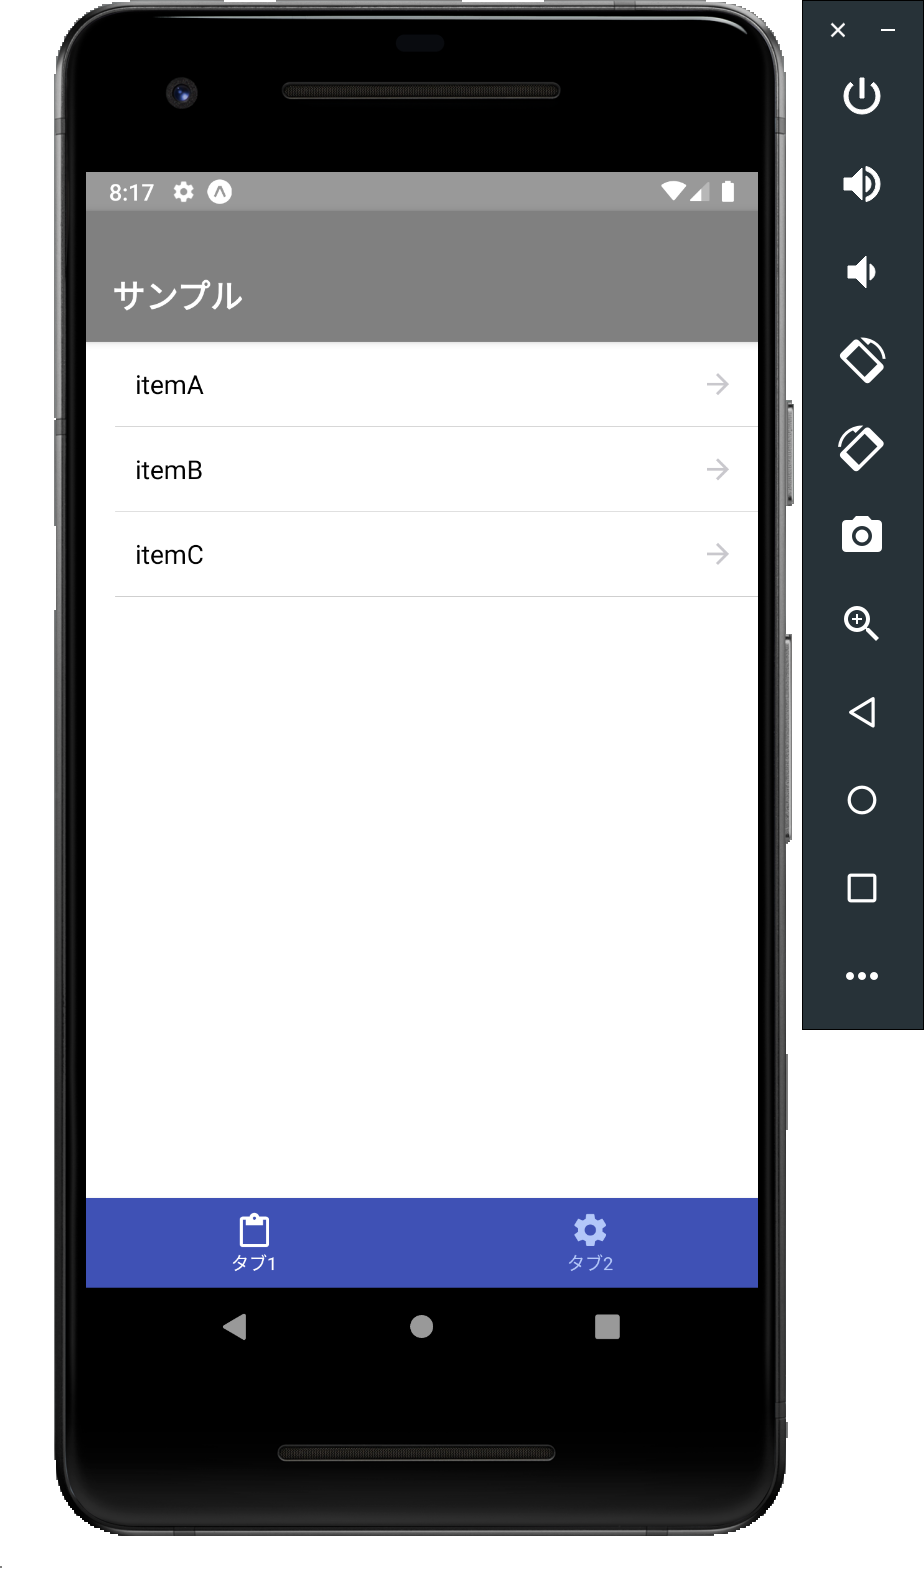
タブバーの色等細かい所は調整が必要そうです ![]()