Windowsで実行する場合にはこちらを参照。
検証環境
- CentOS 7.4(1708) 64bit
- Fedora 27 Server 64bit
- Avorion v0.15.7 日本語化済み
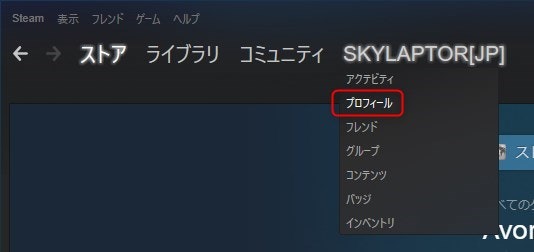
自身のSteamIDを取得する
Avorionサーバー実行時に管理者IDとしてSteamIDを指定する必要があるため、事前に取得しておく。
Steamを実行し、"自分の名前"の配下にある"プロフィール"を選択する。
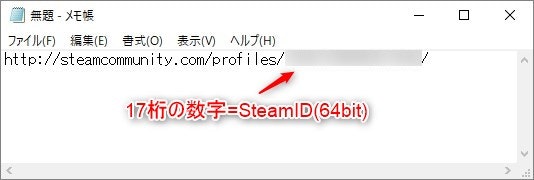
表示されたページのどこかを右クリックし、"ページのURLをコピーする"を選択する。

メモ帳などを起動してコピーしたURLを張り付けると、SteamIDを確認することができる。
サーバー環境を用意する
Steamゲーム実行用ユーザーを作成する。
# useradd steam
# passwd steam
ユーザー steam のパスワードを変更。
新しいパスワード: 任意のパスワード
必要なモジュールをインストールする。
# yum install glibc libstdc++ glibc.i686 libstdc++.i686 screen
SteamCMDを用意する。
# su - steam
$ mkdir Steam
$ cd Steam
$ curl -sqL "http://media.steampowered.com/installer/steamcmd_linux.tar.gz" | tar -zxf -
サーバーディレクトリを適当な場所に作成する。ここでは例として、"<ホームディレクトリ>/Avorion" をサーバーディレクトリとして用意しているものとする。
$ mkdir ~/Avorion
サーバーディレクトリに移動し、steamcmd.shに引数(+login anonymous +force_install_dir <サーバーディレクトリ> +app_update 565060 validate +exit)を追加して実行する。
$ cd ~/Avorion
$ ~/Steam/steamcmd.sh +login anonymous +force_install_dir ~/Avorion +app_update 565060 validate +exit
...
Connecting anonymously to Steam Public...Logged in OK
Waiting for user info...OK
 Update state (0x3) reconfiguring, progress: 0.00 (0 / 0)
 Update state (0x61) downloading, progress: 1.34 (1048576 / 78197159)
 Update state (0x61) downloading, progress: 58.84 (46008719 / 78197159)
 Update state (0x0) unknown, progress: 100.00 (20084528 / 20084528)
Success! App '565060' fully installed.
$ ls -l
合計 21128
drwxrwxr-x 2 steam steam       70  1月  6 22:56 bin
drwxrwxr-x 7 steam steam       91  1月  6 22:56 data
drwxrwxr-x 2 steam steam        6  1月  6 22:58 galaxies
-rwxrwxr-x 1 steam steam       17  1月  6 22:56 launcher.sh
drwxrwxr-x 2 steam steam       28  1月  6 22:56 linux64
-rwxrwxr-x 1 steam steam      185  1月  6 22:56 server.sh
-rwxrwxr-x 1 steam steam        7  1月  6 22:56 steam_appid.txt
drwxrwxr-x 5 steam steam      112  1月  6 22:56 steamapps
-rwxrwxr-x 1 steam steam 21621476  1月  6 22:56 steamclient.so
サーバーディレクトリ内にマップディレクトリを作成する。ここでは例として、"<サーバーディレクトリ>/galaxies" をマップディレクトリとして用意したものとする。
$ mkdir galaxies
サーバー起動スクリプトを実行するとマップデータが生成される。なお、SteamIDは事前に取得しておいた17桁の数字であることに注意すること。
$ ./server.sh --galaxy-name <マップ名> --admin <SteamID> --datapath galaxies
Warning: No RCON password set. RCON disabled.
Server startup complete.
Server connected to Steam successfully
Server is VAC Secure!
Game Server Steam ID: XXXXXXXXXXXXXXXXXX
サーバーに接続する
スクリプトファイルを実行した時点で、サーバーの起動も実行されている。
Avorionを起動し、"マルチプレイ"から"IP経由で参加"を選択する。

新たに建てたサーバーを追加する必要がある。必要な項目を入力後、"サーバーを追加"ボタンで追加する。
- IPアドレス: サーバーのIPアドレス
- サーバー名: 好きなサーバー名

なお、追加した直後はなぜか正常に認識されない。一度メインメニューに戻り、もう一度"IP経由で参加"を開くと正常に認識される。

問題がなければ広大な宇宙に放り出される。

サーバーを停止する
/saveと入力後に続けて/stopと入力する。セッションをCtrl+Cで強制終了させないこと。
備考:マップ設定を変更する
マップ設定は生成直後ではデフォルト設定になっている。
設定を変えたい場合は、マップディレクトリ内のマップ名ディレクトリを開き、"server.ini"を変更すればよい。
細かい設定項目は以下のURLを参考にする。
https://avorion.gamepedia.com/Server#Server_Configuration_Options
備考:Avorionの通信をファイアウォールで許可する
firewalldが有効な環境では、Avorion通信ポートを許可しておく必要がある。
# vi /usr/lib/firewalld/services/avorion.xml
# firewall-cmd --add-service=avorion --permanent
# firewall-cmd --reload
<?xml version="1.0" encoding="utf-8"?>
<service>
  <short>Avorion</short>
  <description>Avorion default ports.</description>
  <!-- ServerPort(Default) -->
  <port protocol="tcp" port="27000"/>
  <port protocol="udp" port="27000"/>
  <!-- Server status query -->
  <port protocol="udp" port="27003"/>
  <!-- Connection establish -->
  <port protocol="tcp" port="27020"/>
  <port protocol="udp" port="27020"/>
  <port protocol="tcp" port="27021"/>
  <port protocol="udp" port="27021"/>
</service>
参考
https://avorion.gamepedia.com/Setting_up_a_server
https://developer.valvesoftware.com/wiki/SteamCMD