0.Prologue
タイトルに偽りなくネタ記事です![]()
Elixirで手軽に DNN inferenceを行うことを目標に、Tensorflow lite,ONNX Runtime,Libtorchと展開してきた拙作の*Interpシリーズですが、そろそろ次のステージに移行しようと決めました。そう統合版 NNInterpへの集約です。故に TflInterp,OnnxInterpは近い将来に発展的開発終了となります。
そこで、その記念として初代TflInterpの開発の発端となった YOLO系物体検出モデルを一堂に集めデモってみようと思った次第です。以下の本文では、YOLOv2~7,YOLOXの推論モジュールを OnnxInterpで実装したコードがずらずら~っと並んでいるだけです。簡単な説明は付けますが、技術的な掘り下げはありません。
そうです。時間の無駄なので、ここでこの記事を閉じることを強くお薦めします![]()
特に MacOSな方はここでお引き取り願います。MacではOnnxInterpは動きません、きっぱり![]() [*1]
[*1]
[*1]OnnxInterpの CMakeLists.txtをちょこちょこっと改造すれば、MacOS用の OnnxRuntimeライブラリがリンクでき利用可能だとは思うが……
1.YOLOv2
Joseph Redmon氏による元祖 YOLOの二代目に当たるモデルです。
YOLOの再現率(recall)と領域分離(localization)精度の改善を目的に開発されました。
デモの実装に用いたモデルはコアの機能しか持っていないため、バウンディング・ボックスとスコアのデコードは後処理の一部として自前で用意しました(extract_box/1, extract_scores/1)。そして、最後にNMSに掛けてドンッ!です(OnnxInterp.non_max_suppression_multi_class/5)。
defmodule YOLOv2 do
  alias OnnxInterp, as: NNInterp
  use NNInterp, label: "./model_bank/coco.label",
    model: "./model_bank/yolov2-coco-9.onnx",
    url: "https://media.githubusercontent.com/media/onnx/models/main/vision/object_detection_segmentation/yolov2-coco/model/yolov2-coco-9.onnx"

  @width   416
  @height  416

  def apply(img) do
    # preprocess
    input0 = img
      |> CImg.resize({@width, @height})
      |> CImg.to_binary([:nchw])

    # prediction
    output0 = __MODULE__
      |> NNInterp.set_input_tensor(0, input0)
      |> NNInterp.invoke()
      |> NNInterp.get_output_tensor(0)
      |> Nx.from_binary(:f32) |> Nx.reshape({5, 85, 13, 13})

    # postprocess
    output0 = Nx.transpose(output0, axes: [1, 0, 2, 3]) |> Nx.reshape({85, :auto})
      # output0 => [box(4),box_score(1),class_score(80)]x[anchor0[13x13],anchor1[13x13],..,anchor4[13x13]]

    boxes  = extract_boxes(output0)
    scores = extract_scores(output0)

    NNInterp.non_max_suppression_multi_class(__MODULE__,
      Nx.shape(scores), Nx.to_binary(boxes), Nx.to_binary(scores)
    )
  end

  @grid    PostDNN.meshgrid({@width, @height}, 32, [:transpose, :normalize]) |> Nx.tile([5])
  @anchors Nx.tensor([[0.57273, 0.677385], [1.87446, 2.06253], [3.33843, 5.47434], [7.88282, 3.52778], [9.77052, 9.16828]])

  defp extract_boxes(t) do
    # decode box center coordinate on {1.0, 1.0}
    center = Nx.sigmoid(t[0..1])
      |> Nx.multiply(@grid[2..3])  # * pitch(x,y)
      |> Nx.add(@grid[0..1])    # + grid(x,y)
      |> Nx.transpose()

    # decode box size
    size = Nx.exp(t[2..3])
      |> Nx.multiply(@grid[2..3]) # * pitch(x,y)
      # multiply @anchors
      |> Nx.reshape({2, 5, :auto})
      |> Nx.transpose(axes: [2, 1, 0])
      |> Nx.multiply(@anchors)
      # get a transposed box sizes.
      |> Nx.transpose(axes: [1, 0, 2])
      |> Nx.reshape({:auto, 2})

    Nx.concatenate([center, size], axis: 1)
  end

  defp extract_scores(t) do
    # decode box confidence
    confidence = Nx.sigmoid(t[4])

    # decode class scores: (softmax normalized class score)*(box confidence)
    then(Nx.exp(t[5..-1//1]), fn exp -> Nx.divide(exp, Nx.sum(exp, axes: [0])) end) # apply softmax on each class score
    |> Nx.multiply(confidence)
    |> Nx.transpose()
  end
end
2.YOLOv3
YOLOv2から少し進化して、画像予測部が3つの異なるスケールを持ち(Feature Pyramid Networksみたいなもの?)、認識物体の大きさが異なっても対応できるように工夫されました。
そして残念なことに、YOLOの生みの親Joseph Redmon氏は、このバージョンを最後に研究から手を引くことになりました。
ここで用いたモデルは、先の YOLOv2と違って随分と使い易くなっています。NMSを除いてほぼ後処理が必要ありません。ただ、何故か出力のバウンディング・ボックスの X,Y座標が入れ替わっていました…![]()
defmodule YOLOv3 do
  @moduledoc """
  Original work:
    tensorflow-yolov4-tflite - https://github.com/hunglc007/tensorflow-yolov4-tflite
  """

  alias OnnxInterp, as: NNInterp
  use NNInterp, label: "./model_bank/coco.label",
    model: "./model_bank/yolov3-416.onnx",
    url: "https://drive.google.com/uc??authuser=0&export=download&confirm=t&id=1NIYVUtWbYEZuhEfvIm5S5R01T0J4F69Q"

  @width  416
  @height 416

  def apply(img) do
    # preprocess
    input0 = img
      |> CImg.resize({@width, @height})
      |> CImg.to_binary(range: {0.0, 1.0})

    # prediction
    output0 = __MODULE__
      |> NNInterp.set_input_tensor(0, input0)
      |> NNInterp.invoke()
      |> NNInterp.get_output_tensor(0)
      |> Nx.from_binary(:f32) |> Nx.reshape({:auto, 84})

    # postprocess
    boxes  = extract_boxes(output0)
    scores = extract_scores(output0)

    NNInterp.non_max_suppression_multi_class(__MODULE__,
      Nx.shape(scores), Nx.to_binary(boxes), Nx.to_binary(scores),
      boxrepr: :corner
    )
  end

  defp extract_boxes(t) do
    Nx.concatenate(
      [
        Nx.slice_along_axis(t, 1, 1, axis: 1),
        Nx.slice_along_axis(t, 0, 1, axis: 1),
        Nx.slice_along_axis(t, 3, 1, axis: 1),
        Nx.slice_along_axis(t, 2, 1, axis: 1)
      ],
      axis: 1
    )
  end

  defp extract_scores(t), do:
    Nx.slice_along_axis(t, 4, 80, axis: 1)
end
3.YOLOv4
Joseph Redmon氏の後を引き継いだ Alexey Bochkovsky氏によって開発されたモデルです。
この頃には Object Detectionのモデルは、画像の特徴を抽出する Backboneと、対象物の位置とその評価値を求めるHead、そしてそれらを繋ぐ Neckと言う構成のアーキテクチャが主流となっていました。YOLOv4も多分に漏れずそのようなアーキテクチャで高精度/高速性を追求しました。
ここで用いたモデルは、今回のデモ祭りに集めたモデルの中で二番目に後処理が要らないモデルでした。出力はバウンディング・ボックスとスコアの二つのtensorで、何ら処理を加えずそのまま NMSの入力とすることができます![]()
defmodule YOLOv4 do
  @moduledoc """
  Original work:
    Pytorch-YOLOv4 - https://github.com/Tianxiaomo/pytorch-YOLOv4
  """

  alias OnnxInterp, as: NNInterp
  use NNInterp, label: "./model_bank/coco.label",
    model: "./model_bank/yolov4_1_3_608_608_static.onnx",
    url: "https://drive.google.com/uc?authuser=0&export=download&confirm=t&id=1oY9Pv4Q_MfPolG4sRhydf1GGFnv7556c"

  @width  608
  @height 608

  def apply(img) do
    # preprocess
    input0 = img
      |> CImg.resize({@width, @height})
      |> CImg.to_binary([{:range, {0.0, 1.0}}, :nchw])

    # prediction
    outputs = __MODULE__
      |> NNInterp.set_input_tensor(0, input0)
      |> NNInterp.invoke()

    # postprocess
    boxes  = extract_boxes(outputs)
    scores = extract_scores(outputs)

    NNInterp.non_max_suppression_multi_class(__MODULE__,
      Nx.shape(scores), Nx.to_binary(boxes), Nx.to_binary(scores),
      boxrepr: :corner
    )
  end

  defp extract_boxes(outputs), do:
    NNInterp.get_output_tensor(outputs, 0) |> Nx.from_binary(:f32) |> Nx.reshape({:auto, 4})

  defp extract_scores(outputs), do:
    NNInterp.get_output_tensor(outputs, 1) |> Nx.from_binary(:f32) |> Nx.reshape({:auto, 80})
end
4.YOLOv5
YOLOv5は、本家本元のDarknetグループとは縁も所縁もない ultralytics社からリリースされたモデルです。ultralytics社は YOLOv3のPytorchバージョンを開発していたようで、YOLOv5は YOLOv3の影響を色濃く受けた YOLOv4ライクなモデルだそうです。
モデルの出力は YOLOv3と同じく、バウンディング・ボックスとスコアを繋いだ一つの tensorです。YOLOv3とは異なり、スコアは対象物の有無の確率と cocoの 80カテゴリに属する確率の二つから成ります。
defmodule YOLOv5 do
  @moduledoc """
  Original work:
    YOLOv5 - https://github.com/ultralytics/yolov5
  """

  alias OnnxInterp, as: NNInterp
  use NNInterp, label: "./model_bank/coco.label",
    model: "./model_bank/yolov5s.onnx",
    url: "https://drive.google.com/uc?authuser=0&export=download&confirm=t&id=1685GlkjJfBVx1yw_U0wdLwnpUNSd6Kom"

  @width  640
  @height 640

  def apply(img) do
    # preprocess
    input0 = img
      |> CImg.resize({@width, @height})
      |> CImg.to_binary([{:range, {0.0, 1.0}}, :nchw])

    # prediction
    output0 = __MODULE__
      |> NNInterp.set_input_tensor(0, input0)
      |> NNInterp.invoke()
      |> NNInterp.get_output_tensor(0)
      |> Nx.from_binary(:f32) |> Nx.reshape({:auto, 85})

    # postprocess
    boxes  = extract_boxes(output0)
    scores = extract_scores(output0)

    NNInterp.non_max_suppression_multi_class(__MODULE__,
      Nx.shape(scores), Nx.to_binary(boxes), Nx.to_binary(scores)
    )
  end

  defp extract_boxes(t), do:
    Nx.slice_along_axis(t, 0, 4, axis: 1) |> Nx.divide(Nx.tensor([@width, @height, @width, @height]))

  defp extract_scores(t), do:
    Nx.multiply(Nx.slice_along_axis(t, 4, 1, axis: 1), Nx.slice_along_axis(t, 5, 80, axis: 1))
end
5.YOLOX
YOLOv2で導入されたアンカーを捨てたモデルです。「アンカーフリー」「Multi Positives」「SimOTA」をキーアイデアとしたモデルだそうです。技術内容に興味がある方は下記の参考文献(Qiita)をお勧めします。
モデルの出力のバウンディング・ボックスは、グリッドに相対な座標値となっているのでデコードが必要です。
defmodule YOLOX do
  @moduledoc """
  Original work:
    YOLOX - https://github.com/Megvii-BaseDetection/YOLOX
  """

  alias OnnxInterp, as: NNInterp
  use NNInterp, label: "./model_bank/coco.label",
    model: "./model_bank/yolox_s.onnx",
    url: "https://github.com/Megvii-BaseDetection/YOLOX/releases/download/0.1.1rc0/yolox_s.onnx"

  @width  640
  @height 640

  def apply(img) do
    # preprocess
    input0 = img
#      |> CImg.resize({@width, @height}, :ul, 114)
      |> CImg.resize({@width, @height})
      |> CImg.to_binary([{:range, {0.0, 255.0}}, :nchw])

    # prediction
    output0 = __MODULE__
      |> NNInterp.set_input_tensor(0, input0)
      |> NNInterp.invoke()
      |> NNInterp.get_output_tensor(0)
      |> Nx.from_binary(:f32) |> Nx.reshape({:auto, 85})

    # postprocess
    output0 = Nx.transpose(output0)

    boxes  = extract_boxes(output0)
    scores = extract_scores(output0)

    NNInterp.non_max_suppression_multi_class(__MODULE__,
      Nx.shape(scores), Nx.to_binary(boxes), Nx.to_binary(scores)
    )
    #|> PostDNN.adjust2letterbox(CImg.Util.aspect(img))
  end


  @grid PostDNN.meshgrid({@width, @height}, [8, 16, 32], [:transpose, :normalize])

  defp  extract_boxes(t) do
    # decode box center coordinate on {1.0, 1.0}
    center = t[0..1]
      |> Nx.multiply(@grid[2..3])  # * pitch(x,y)
      |> Nx.add(@grid[0..1])    # + grid(x,y)

    # decode box size
    size = t[2..3]
      |> Nx.exp()
      |> Nx.multiply(@grid[2..3]) # * pitch(x,y)

    Nx.concatenate([center, size]) |> Nx.transpose()
  end

  defp extract_scores(t) do
    Nx.multiply(t[4], t[5..-1//1])
    |> Nx.transpose()
  end
end
6.YOLOv6
これまた Darknetグループからではなく Meituan Vision AI Departmentからリリースされたモデルです。YOLOv6は YOLOXを改良したモデルの様です。
モデルの入出力はYOLOv5と瓜二つでした。
defmodule YOLOv6 do
  @moduledoc """
  Original work:
    YOLOv6 - https://github.com/meituan/YOLOv6
  """

  alias OnnxInterp, as: NNInterp
  use NNInterp, label: "./model_bank/coco.label",
    model: "./model_bank/yolov6s.onnx",
    url: "https://github.com/meituan/YOLOv6/releases/download/0.2.0/yolov6s.onnx"

  @width  640
  @height 640

  def apply(img) do
    # preprocess
    input0 = img
      |> CImg.resize({@width, @height})
      |> CImg.to_binary([{:range, {0.0, 1.0}}, :nchw])

    # prediction
    output0 = __MODULE__
      |> NNInterp.set_input_tensor(0, input0)
      |> NNInterp.invoke()
      |> NNInterp.get_output_tensor(0)
      |> Nx.from_binary(:f32) |> Nx.reshape({:auto, 85})

    # postprocess
    boxes  = extract_boxes(output0)
    scores = extract_scores(output0)

    NNInterp.non_max_suppression_multi_class(__MODULE__,
      Nx.shape(scores), Nx.to_binary(boxes), Nx.to_binary(scores)
    )
  end

  defp extract_boxes(t), do:
    Nx.slice_along_axis(t, 0, 4, axis: 1) |> Nx.divide(Nx.tensor([@width, @height, @width, @height]))

  defp extract_scores(t), do:
    Nx.multiply(Nx.slice_along_axis(t, 4, 1, axis: 1), Nx.slice_along_axis(t, 5, 80, axis: 1))
end
7.YOLOv7
Darknetグループによるアンカーボックスなモデルです。やっと本家本元の再登場ですね。
ELAN&E-ELAN、複合スケーリングetc.と何やら新しげな技術が搭載されています。詳しくは下記の参考文献をどうぞ。
このモデルは NMSの機能を含んでいて、物体検出の最終的な結果が出力として得られます。外付けの部品が要らないお手軽なモデルですね![]()
defmodule YOLOv7 do
  @moduledoc """
  Original work:
    Official YOLOv7 - https://github.com/WongKinYiu/yolov7
  """

  alias OnnxInterp, as: NNInterp
  use NNInterp,
    model: "./model_bank/yolov7.onnx",
    url: "https://drive.google.com/uc?authuser=0&export=download&confirm=t&id=1T5jP4UZ3Aona4bhv_uGAf91cuHieEPE7"

  @label  (for item <- File.stream!("./model_bank/coco.label") do String.trim_trailing(item) end)
           |> Enum.with_index(&{&2, &1})
           |> Enum.into(%{})

  @width  640
  @height 640

  def apply(img) do
    # preprocess
    input0 = img
      |> CImg.resize({@width, @height})
      |> CImg.to_binary([{:range, {0.0, 1.0}}, :nchw])

    # prediction
    output0 = __MODULE__
      |> NNInterp.set_input_tensor(0, input0)
      |> NNInterp.invoke()
      |> NNInterp.get_output_tensor(0)
      |> Nx.from_binary(:f32) |> Nx.reshape({:auto, 7})

    # postprocess
    {:ok, reformat(output0)}
  end

  def reformat(t) do
    n = Nx.axis_size(t, 0)
    Enum.reduce(0..(n-1), %{}, fn i, map ->
      [_, x1, y1, x2, y2, item, score] = Nx.to_flat_list(t[i])
      label = @label[round(item)]
      box   = [score, x1/@width, y1/@height, x2/@width, y2/@height, i]
      Map.update(map, label, [box], fn boxes -> [box|boxes] end)
    end)
  end
end
8.舞台設営
歴代の YOLOの推論モジュールをサラッと見て来ました。それでは、彼女&彼らに踊ってもらう舞台を用意します。
YOLOsの推論結果は、入力画像上に検出したオブジェクトの矩形を描画して確かめることにしましょう。そう、プレゼンテーション性に優れた Livebookの出番ですね![]() 。でも今回はちょっと変わったことをします。実はYOLO推論モジュールたちはGenServerなのでどこかで一度起動する必要があるのです。総数7個のモジュールなので、Livebookのコードセルで一つ々々起動するのは面倒ですね。そこで、YOLO推論モジュールたちを起動するMixプロジェクト(アプリケーション)を作り、それをLivebookから取り込むようにします。具体的に見ていきましょう。
。でも今回はちょっと変わったことをします。実はYOLO推論モジュールたちはGenServerなのでどこかで一度起動する必要があるのです。総数7個のモジュールなので、Livebookのコードセルで一つ々々起動するのは面倒ですね。そこで、YOLO推論モジュールたちを起動するMixプロジェクト(アプリケーション)を作り、それをLivebookから取り込むようにします。具体的に見ていきましょう。
§1. Mixプロジェクトの準備
いつものように mixプロジェクトを作成します。名前は yolosでいいかな。
mix new yolos --sup
上の YOLO推論モジュールたちをサブディレクトリlibに置きます。
yolos
├── YOLOs.livemd
├── data
│   └── dog.jpg
├── lib
│   ├── yolos
│   ├── yolos.ex
│   ├── yolov2.ex
│   ├── yolov3.ex
│   ├── yolov4.ex
│   ├── yolov5.ex
│   ├── yolov6.ex
│   ├── yolov7.ex
│   └── yolox.ex
├── mix.exs
├── mix.lock
└── model_bank
    ├── coco.label
    ├── yolov2-coco-9.onnx
    ├── yolov3-416.onnx
    ├── yolov4_1_3_608_608_static.onnx
    ├── yolov5s.onnx
    ├── yolov6s.onnx
    ├── yolov7.onnx
    └── yolox_s.onnx
YOLO推論モジュールたちが使用している外部モジュールを mix.exsの depsリストに記述します。
  defp deps do
    [
      {:onnx_interp, "~> 0.1.8"},
      {:nx, "~> 0.4.0"},
      {:cimg, "~> 0.1.14"},
      {:postdnn, "~> 0.1.4"}
    ]
  end
YOLO推論モジュールたちを起動するように lib/yolos/application.exを修正します。
defmodule YOLOs.Application do
  @moduledoc false

  use Application

  @impl true
  def start(_type, _args) do
    children = yolos()

    opts = [strategy: :one_for_one, name: YOLOs.Supervisor]
    Supervisor.start_link(children, opts)
  end

  def yolos() do
    [
      YOLOv2, YOLOv3, YOLOv4, YOLOv5, YOLOX, YOLOv6, YOLOv7
    ]
  end
end
mixプロジェクトの準備は以上です。
§2. Livebookの準備
プレゼンテーションを行う LivebookのノートYOLOs.livemdは上の yolosプロジェクトのルートに置きます。
準備した yolosプロジェクトを取り込みたいので、Setupセルは次のように書きます。
セルの実行ボタンを押し、セットアップが完了すると、YOLO推論モジュールたちが起動して舞台袖で待機します。
File.cd!(__DIR__)
# for windows JP
System.shell("chcp 65001")

Mix.install([
  {:onnx_interp, "~> 0.1.8"},
  {:yolos, path: "."},
  {:kino, "~> 0.7.0"}
])
YOLO推論モジュールたちを画像に適用し、推論結果を描画するコードは下記の通りです。
run_all/1は、引数pathに与えた画像ファイルを全ての YOLOでガラガラガラッと推論します。
run/2は、引数yoloに指定した YOLOだけで推論します。
defmodule LiveYOLOs do
  @palette CImg.Util.rand_palette("./model_bank/coco.label")

  def run_all(path) do
    img = CImg.load(path)
    Enum.map(YOLOs.Application.yolos(), &run(&1, img))
  end

  def run(yolo, path) when is_binary(path) do
    run(yolo, CImg.load(path))
  end

  def run(yolo, %CImg{} = img) do
    with {:ok, res} <- yolo.apply(img) do
      Enum.reduce(res, CImg.builder(img), &draw_item(&1, &2))
      |> CImg.draw_text(15, 15, Atom.to_string(yolo), 20, :white, :blue)
      |> CImg.display_kino(:jpeg)
    end
  end

  defp draw_item({item, boxes}, canvas) do
    color = @palette[item]

    Enum.reduce(boxes, canvas, fn [_score, x1, y1, x2, y2, _index], canvas ->
      [x1, y1, x2, y2] = PostDNN.clamp([x1, y1, x2, y2], {0.0, 1.0})

      CImg.fill_rect(canvas, x1, y1, x2, y2, color, 0.35)
    end)
  end
end
9.祭りだ、祭りだぁ
さぁ、祭りの本番だぁぁぁ![]()
…ん! モデル・ファイルはどうした?
大丈夫![]() サブディレクトリmodel_bankに所定のモデル・ファイルが見つからなかった場合は、指定のURLからダウンロードするように仕組んでいます。万が一の場合は下記から取ってきましょう。
サブディレクトリmodel_bankに所定のモデル・ファイルが見つからなかった場合は、指定のURLからダウンロードするように仕組んでいます。万が一の場合は下記から取ってきましょう。
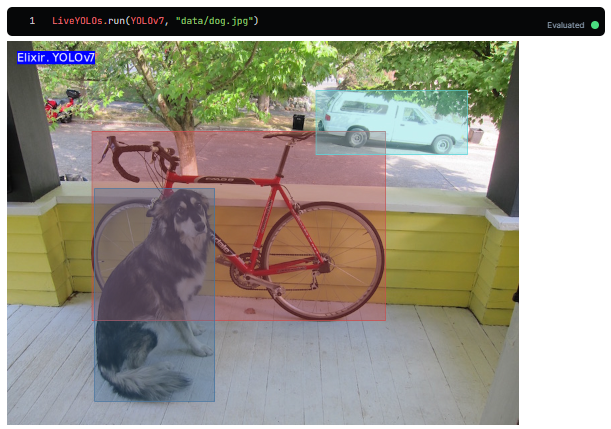
さぁ~て、小手調べに、YOLOv7だけを実行してみましょう。
ふむ、良さそうですね![]()
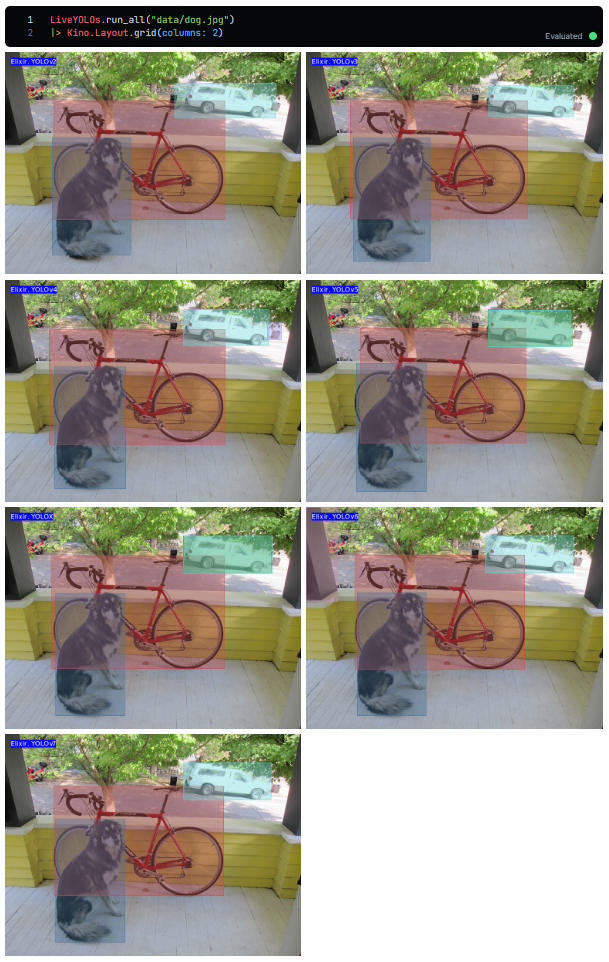
では、YOLOv2,YOLOv3,YOLOv4,YOLOv5,YOLOX,YOLOv6,YOLOv7をガラガラと回してみましょう。
やーッ!!
Goodのようで![]()
10.Epilogue
お疲れさまでした。
*Interpの開発ステージ移行のけじめとして、(因縁の)YOLO系物体検出を総なめにしてみました。
今回起こしたコードは、*Interpファミリー(TflInterp,NNInterp/Libtorch,AxonInterp)ではほぼ修正なしに流用できると思います。これでYOLOからは卒業かな![]()
それではまた。