この記事について
クラウドを経由せず、TwinMakerからローカルPCのデータを直接参照する方法を紹介します
どうやって?
- TwinMakerの接続先をローカルに切り替えるオプションがあります
- FastAPIを使って、ローカルPC上にTwinMaker互換のWebサーバを立てます
何が嬉しいの?
- どれだけヘビーに使っても、TwinMakerの利用料金が0になります
- ブラウザから端末方向への取得リクエストができるようになります
- セキュリティの都合でインターネットに送れないデータも、デジタルツインで可視化できます
動作しているところ(GIF画像)
気温センサーが38度を超えると、タグの色が赤くなって、MMDのキャラクターが手を振るように設定しています。Echonet Liteのシミュレータ(萌花電ルーム)の気温を変更すると、ほぼリアルタイムに連動してTwinMakerに反映されます。
ソースコード
プロジェクトのソースコードはこちらに置いています
https://github.com/ShotaOki/twinmaker-echonet-direct
構成図
本来のTwinMakerのデータの流れ
本来のTwinMakerは、クラウド(主にSiteWise)にデータを保管します。
TwinMakerは保管したデータをリアルタイムに表示しています。
ローカルで動かす
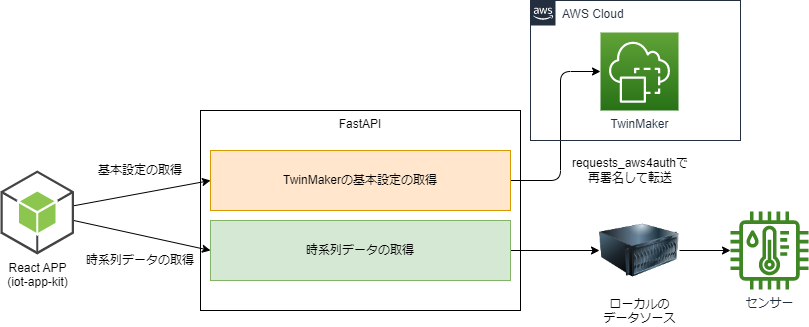
この記事では、下のようにフローを切り替える方法を紹介します。
前提条件
- AWSのiot-app-kitを利用します
実装方法(React側)
iot-app-kitでTwinMakerに接続するときに、認証情報とリージョンを渡しています。
  // TwinMakerのシーンを読み込む
  const twinmaker = initialize(process.env.REACT_APP_AWS_WORKSPACE_NAME ?? "", {
    awsCredentials: {
      accessKeyId: process.env.REACT_APP_AWS_ACCESS_KEY_ID ?? "",
      secretAccessKey: process.env.REACT_APP_AWS_SECRET_ACCESS_KEY ?? "",
    },
    awsRegion: process.env.REACT_APP_AWS_REGION ?? "",
  });
これを、以下のように書き変えます。
IoTTwinMakerClientを作成して、initialize関数の引数に渡します。
  // ローカル環境にエンドポイントが向いたTwinMakerClientを作成する
  const twinMakerClient = new IoTTwinMakerClient({
    endpoint: "http://localhost:8000", // localhostを接続先にする
    region: process.env.REACT_APP_AWS_REGION ?? "",
    credentials: {
      accessKeyId: "xxxxxxx", // ダミー文字列(未指定だとエラーになるので適当な文字を入れる)
      secretAccessKey: "xxxxxx", // ダミー文字列(未指定だとエラーになるので適当な文字を入れる)
    },
  });

  // TwinMakerのシーンを読み込む
  const twinmaker = initialize(process.env.REACT_APP_AWS_WORKSPACE_NAME ?? "", {
    iotTwinMakerClient: twinMakerClient, // これを追加:: TwinMakerの接続先を変更する
    awsCredentials: {
      accessKeyId: process.env.REACT_APP_AWS_ACCESS_KEY_ID ?? "",
      secretAccessKey: process.env.REACT_APP_AWS_SECRET_ACCESS_KEY ?? "",
    },
    awsRegion: process.env.REACT_APP_AWS_REGION ?? "",
  });
これでlocalhostからデータを取るようになります。
実装方法(サーバ側)
取りに行った先で正しいデータを返す必要があります。
FastAPIを使って、ローカル環境(localhost:8000)にサーバを作ります。
必要な依存ライブラリは以下の通りです。
fastapi
hypercorn
requests_aws4auth
python -m pip install -r requirements.txt
リクエストへの返答を全て実装してもよいのですが、時系列データの取得と基本設定の取得が飛んでくるため、全部作るのは手間がかかります。今回は時系列データの取得リクエストだけをローカルで処理して、それ以外のリクエストはAWSにスルーパスします。
ソースコードは以下のようになります。
from fastapi import FastAPI, Request
from starlette.middleware.cors import CORSMiddleware
from pydantic import BaseModel
import requests_aws4auth
import requests
from datetime import datetime

class AwsAccessInfo(BaseModel):
    region: str
    access_key: str
    secret_access_key: str

class ApiProxy:
    _cache: dict
    def __init__(self) -> None:
        self._cache = {}

    def request_api(self, request: Request, aws_access_info: AwsAccessInfo):
        """
        TwinMakerの時系列データの取得以外の処理を実施する
        """
        twinmaker_domain = f"iottwinmaker.{aws_access_info.region}.amazonaws.com"
        original_url: str = request.url._url
        url = original_url.replace(f"localhost:{request.url.port}", twinmaker_domain).replace("http://", "https://")
        # AWSから取得したデータは変更されるものではないため、キャッシュする
        if url in self._cache:
            return self._cache[url]
        # リクエストのヘッダにV4署名をつける
        auth = requests_aws4auth.AWS4Auth(
            aws_access_info.access_key,
            aws_access_info.secret_access_key,
            aws_access_info.region,
            'iottwinmaker',
        )
        # リクエストを転送する
        # 基本情報の取得はGetリクエストなので、URLだけ参照すればよい
        response = requests.get(url, auth=auth)
        result = response.json()

        self._cache[url] = result
        return result


class HistoryInput(BaseModel):
    """
    リクエストとして受け取るPOST Bodyのデータ構造
    """
    componentName:str
    endTime: str
    entityId: str
    orderByTime: str
    selectedProperties: List[str]
    startTime: str

app = FastAPI()
app.add_middleware(
    CORSMiddleware,
    allow_origins=["*"],
    allow_credentials=True,
    allow_methods=["*"],
    allow_headers=["*"]
)

api_proxy = ApiProxy()
@app.get("/{path:path}")
async def proxy(request: Request):
    """
    基本設定の取得リクエストを処理する
    """
    return api_proxy.request_api(request, AwsAccessInfo(
        access_key="xxxxxxxxxxxxxxxxxxxx",
        secret_access_key="xxxxxxxxxxxxxxxxxxxxxxxxx",
        region="us-east-1"
    ))

@app.post("/workspaces/{workspace_id}/entity-properties/history")
async def history(workspace_id: str, item: HistoryInput):
    """
    時系列データの取得リクエストを横取りする
    """
    value = 0.0 # TwinMakerに表示する値を取得して、valueに格納する
    return {
        'propertyValues': [
            {
                "entityPropertyReference": {
                    "componentName": item.componentName,
                    "entityId": item.entityId,
                    "propertyName": property
                },
                "values": [{
                    "time": datetime.now().isoformat(),
                    "value": {
                        "doubleValue": value
                    }
                }]
            }
            for property in item.selectedProperties
        ]
    }
上のソースコードを、ローカルPC上で動かせばOKです。実行コマンドは以下の通りです。
hypercorn main:app
TwinMakerから直接Echonet Liteを実行してみる
上の手順を応用して、TwinMakerからEchonet Liteを直接実行してみます。
実機でEchonet Liteに対応した家電があればそれを使ってもよいのですが、今回はSonyのシミュレータ(萌花電ルーム)を使います。SonyCSLのgithubを開いて、Download executablesにあるWin64+Java Runtimeの実行ファイルをダウンロードします。
※萌花電はKadecotのプロジェクト(https://www.sonycsl.co.jp/tokyo/347/ )の一部ですが、Kadecotは2018年に終了したため、後継プロジェクトのPicoGWに移行しました。ドメインが第三者に取られているので、githubとSonyCSLのページ以外を踏むときは気を付けてください。
Echonet Liteの通信をPythonでゼロから書くとなかなかの大仕事になるので、Node.jsのPicoGWを使って動かします。REST APIをEchonet Liteのソケット通信に変換してくれるサービスです。Windows上では動かないので、Macを用意して動かします。
導入方法
Mac上で以下のコマンドを実行すると、インストールされます。
npm install picogw -g
npm install picogw-plugin-echonet -g
実行は以下のコマンドで行います。
picogw
もし(setMulticastLoopback)でエラーが出るようなら、インストールされたライブラリ(/usr/local/lib/node_modules/picogw/node_modules/echonet-lite/index.js)を手で編集します。bindの完了前にコールバックが呼ばれているので、完了したことをeventsCountで判定してから後続処理を流すようにします。
		EL.sock4.bind( {'address': '0.0.0.0', 'port': EL.EL_port}, function () {
			EL.sock4.setMulticastLoopback(true);
			EL.sock4.addMembership(EL.EL_Multi);
		});
		EL.sock4.bind( {'address': '0.0.0.0', 'port': EL.EL_port}, function () {
            if (EL.sock4._eventsCount == 1) { // <- APPEND
    			EL.sock4.setMulticastLoopback(true);
    			EL.sock4.addMembership(EL.EL_Multi);
            }
		});
PicoGWが立ち上がったら、FastAPIのリクエスト部分に取得処理を書きます。
MoekadenRoomの温度センサーを取得しています。
def read_history_data(parameter: DirectAccessParameter):
    # 気温センサーの接続情報を指定する
    device_name = "temperaturesensor_1"
    property_name = "temperaturemeasurementvalue"
    # PicoGWにリクエストを投げる
    response = requests.get(f"{picogw_info.picogw_domain}/v1/echonet/{device_name}/{property_name}")
    # 結果を取得する
    value = [v.get("value", 0.0) for v in response.json().values()][0]
    return [{
        "time": datetime.now().isoformat(),
        "value": {
            "doubleValue": value
        }
    }]
PicoGWを立ち上げて、実際にTwinMakerを動かしたGIFがこちらです。
データベースやSiteWiseを間に挟まず、Echonet Liteを直接実行して、その結果でタグの色が変わっています。
まとめ
- iot-app-kitの実装をほとんど触らずに柔軟にデータソースを切り替えられること
- Echonet Liteの資産とTwinMakerがそのまま連携できること
- TwinMakerの料金がかかる部分も、構成によっては無料になること
が伝われば幸いです。


