概要
エディタ拡張(CustomPropertyDrawer)でTextFieldのオートコンプリート(入力補完)をしたい。候補は提示されるけど、自由入力も可能にしたい。
- スクリプトからtooltip風なポップアップを出したい
- ポップアップを出しても現在のTextFieldフォーカスを奪われないようにしたい
- TextField 入力中に動的にtooltipの内容を変えたい
オートコンプリートぐらい誰かが実装してるはず、と思ってAssetStoreとかネット検索してみたけど、探し方が悪いのか見つからず、自前で作ってみることにしました。
本記事ではポップアップ表示するところまで、選択して入力する部分は【後編】で。
Qiitaのようなタグコレクションが欲しい
Unityエディタ上でモデルに任意のタグコレクションを設定できるようにしたいと思いました。
Unityには既にタグの概念がありますが、これはあくまでゲームオブジェクトに対して1つだけ付与できるもので、自分が欲しかったのはQiitaの記事につけるタグのように、一つのオブジェクトに任意の数付与できるもの(タグのコレクション)、既存のタグを使い回せるが、新しく追加することも出来るもの、です。
これはもちろん、単純なstringの配列またはリストで実装することもできますが、使い勝手を良くするために、TextField に現在入力中の値から、既存のタグの候補を表示できるようにしたいと考えました。
タグコレクションとエディタ拡張の実装
使い勝手の拡張はPropertyDrawerでやるとして、当初はListを持つTagCollectionクラスを作って、それに対するドロワーを定義しようと思いましたが、リストの機能までエディタ拡張で作るのが面倒だったので、 string をラップしたCustomTagクラスとそれに対するドロワーを定義することにしました。
モデルの準備 CustomTag, CustomTagRepositoryクラス
まずはタグのクラス。CustomTagはstringそのものとほとんど同じ感覚で使える用に、相互に暗黙変換できるようにしてます。
using System;
using System.Diagnostics;

[Serializable, DebuggerDisplay("{ToString()}")]
public class CustomTag
{
    public string Tag;

    public CustomTag(string str)
    {
        Tag = str;
    }

    public override string ToString()
    {
        return Tag;
    }

    public static implicit operator string(CustomTag obj)
    {
        return obj.Tag;
    }

    public static implicit operator CustomTag(string str)
    {
        return new CustomTag(str);
    }

    public override bool Equals(object obj)
    {
        var other = obj as CustomTag;
        if (other == null) return false;
        return Tag.Equals(other.Tag);
    }

    public override int GetHashCode()
    {
        return Tag.GetHashCode();
    }
}
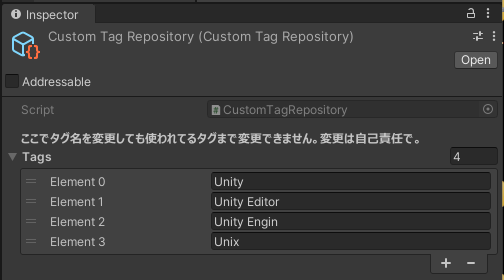
そして、候補を保存するCustomTagRepositoryクラス、これは登録済みのタグの候補を出すため、全てのタグのリストを管理するもので、シングルトンのScriptableObjectにしてます。
using System.Linq;
using UnityEngine;
using System.Collections.Generic;
#if UNITY_EDITOR
using UnityEditor;
#endif

[CreateAssetMenu(menuName = "Sample/CustomTagRepository")]
/// <summary>
/// CustomTag のマスターリポジトリ
/// </summary>
public class CustomTagRepository : ScriptableObject
{
    private static CustomTagRepository _repository = null;

    public static CustomTagRepository Instance
    {
        get
        {
#if UNITY_EDITOR
            if (_repository == null)
            {
                _repository =
                    AssetDatabase.LoadAssetAtPath<CustomTagRepository>(
                        "Assets/Game/Scripts/Sample/CustomTagRepository.asset");
            }
#endif
            return _repository;
        }
    }

#if UNITY_EDITOR
    public static List<string> GetCandidates(string currentText)
    {
        return Instance.GetAllTags().Where(t => t.IndexOf(currentText) != -1).ToList();
    }
#endif

    [SerializeField, Header("ここでタグ名を変更しても使われてるタグまで変更できません。変更は自己責任で。")]
    private List<string> _tags = new List<string>();

    public static bool Contains(string tag)
    {
        return Instance._tags.Contains(tag);
    }

    public void AddNewTag(string name)
    {
        if (_tags.Contains(name)) return;
        _tags.Add(name);
    }

    public IEnumerable<string> GetAllTags()
    {
        return _tags;
    }
}
GetCandidatesメソッドは、エディタのTextFieldで入力中の文字が含まれるタグだけを返すためのものです。
Unityエディタのメニューに Create > Sample > CustomTagRepository が追加されるので、それを使ってアセットを作成します。(画像はサンプルタグを適当に登録済み)
AssetDatabase.LoadAssetAtPathの引数の文字列は、実際に作成したアセットのパスを指定してください(右クリックメニューからCopy Path)。

最後に、使用例としてタグを保持するゲームオブジェクト(Component)も作りました。
using System.Collections;
using System.Collections.Generic;
using UnityEngine;

public class SampleComponent : MonoBehaviour
{
    [SerializeField]
    private List<CustomTag> customTags = new List<CustomTag>();
}
これを適当なプレハブ作ってComponent追加した状態が下の画像です。

エディタ拡張実装にあたっての課題
この後、CustomTagに対してオートコンプリート機能付きのカスタムPropertyDrawerを実装し、
オブジェクトにCustomTagのリストまたは配列を定義すれば、各要素は専用のドロワーで描画されるはずです。
実装に当たっては以下の二つの問題の解決が必要でした。
ツールチップの動的更新
エディタ拡張で固定のツールチップを出す方法は今更説明するまでもないと思いますが、 TooltipAttribute を使うか、エディタ拡張(CustomEditor, CustomPropertyDrawer)を自作する場合は、GUIContentの引数 に指定する方法があります。
ただ、これらは基本的に動的にtooltipの中身を変えられません。GUIContentを使ってOnGUIで毎回最新の値を設定しても反映されませんでした。どうやらツールチップは一度表示したら、一旦消えるまでは内容が更新されないようです。
フォーカスを奪われないように
色々調べましたが、Unityエディタ標準のツールチップとして出す限りは、更新タイミングなどを調整するのは難しそうだったので、下記の記事を参考に擬似的なツールチップを出すことにしました。
ただ、この方法だと確かに見た目はツールチップなのですが、表示した瞬間にTextFieldからフォーカスが外れてしまうことがわかりました。
色々調べたあげく下記の記事に突き当たりました。
そのままでは上手く適用できなかったのですが、記事からヒントを得て非パブリックなメソッドを調べてみると、Initメソッドの第5引数でフォーカス制御が出来そうなことがわかりました。
        internal static void Show(Rect activatorRect, PopupWindowContent windowContent, PopupLocation[] locationPriorityOrder, ShowMode showMode)
        {
            Object[] array = Resources.FindObjectsOfTypeAll(typeof(PopupWindow));
            if (array != null && array.Length != 0)
            {
                PopupWindow popupWindow = array[0] as PopupWindow;
                if (popupWindow != null && popupWindow.m_WindowContent != null && windowContent != null && popupWindow.m_WindowContent.GetType() == windowContent.GetType())
                {
                    popupWindow.CloseWindow();
                    return;
                }
            }

            if (ShouldShowWindow(activatorRect))
            {
                PopupWindow popupWindow2 = ScriptableObject.CreateInstance<PopupWindow>();
                if (popupWindow2 != null)
                {
                    popupWindow2.Init(activatorRect, windowContent, locationPriorityOrder, showMode, giveFocus: true);
                }

                if (Event.current != null)
                {
                    GUIUtility.ExitGUI();
                }
            }
        }
エディタ拡張:カスタムPropertyDrawerと疑似ツールチップ
まずはツールチップ風ポップアップがこちら。
コンストラクタで現在のtextFieldの値を受取り、それを含むタグの一覧を取得、candidatesに保持しています。
OnGUIではそのリストを順番にラベルとして描画してるだけですが、ちょっとした工夫として、現在のtextFieldの値に一致する部分をRichTextを使って色を変えています。
OpenModlessメソッドは前述した非公開のInitメソッドを使ってポップアップ表示する処理です。
using System;
using UnityEngine;
using UnityEditor;
using System.Collections.Generic;
using System.Reflection;
public class CustomTagCandiudatePopup : PopupWindowContent
{
static private GUIStyle labelStyle;
static CustomTagCandiudatePopup()
{
labelStyle = new GUIStyle(EditorStyles.label);
labelStyle.richText = true;
}
private string currentText;
private List<string> candidates;
public CustomTagCandiudatePopup(string currentText)
{
if (currentText == null || currentText.Length == 0)
{
this.currentText = "";
candidates = new List<string>();
}
else
{
this.currentText = currentText;
candidates = CustomTagRepository.GetCandidates(currentText);
}
}
public override Vector2 GetWindowSize()
{
return new Vector2(300, EditorGUIUtility.singleLineHeight * candidates.Count);
}
/// <summary>
/// GUI描画
/// </summary>
public override void OnGUI(Rect rect)
{
Rect line = new Rect(rect);
line.height = EditorGUIUtility.singleLineHeight;
foreach (var t in candidates)
{
var txt = currentText.Length == 0 ? t : t.Replace(currentText, $"<color=cyan
>{currentText}</color>");
EditorGUI.LabelField(line, new GUIContent(txt), labelStyle);
line.y += EditorGUIUtility.singleLineHeight;
}
}
public void OpenModeless(Rect position)
{
// PopupWindow.Init(activatorRect, windowContent, locationPriorityOrder, showMode, giveFocus: true);
var method = typeof(PopupWindow).GetMethod("Init", BindingFlags.Instance | BindingFlags.NonPublic);
PopupWindow popWin = ScriptableObject.CreateInstance<PopupWindow>();
if (popWin != null)
{
var showMode = Enum.Parse(method.GetParameters()[3].ParameterType, "PopupMenu");
method.Invoke(popWin, new object[] { position, this, null, showMode, false });
}
}
}
最後に、CustomTagクラス用のPropertyDrawerです。
using UnityEngine;
using UnityEditor;

/// <summary>
/// Control Editor of SkillCategoryTagCollection
/// </summary>
[CustomPropertyDrawer(typeof(CustomTag), true)]
public class CustomTagDrawer : PropertyDrawer
{
    private CustomTagCandiudatePopup toolTip;
    static private GUIContent registButton = new GUIContent("Regist", "このタグをリポジトリに登録");
    static private GUIStyle attentionStyle;
    private int index = -1;
    static CustomTagDrawer()
    {
        attentionStyle = new GUIStyle(EditorStyles.textField);
        var orange = new Color(0.9f, 0.4f, 0);
        attentionStyle.normal.textColor = orange;
        attentionStyle.focused.textColor = orange;
        attentionStyle.hover.textColor = orange;
    }

    private string lastControlForPopup;
    public override void OnGUI(Rect position, SerializedProperty property, GUIContent label)
    {
        if (property == null || property.serializedObject == null) return;

        // フォーカス制御のため名前をつける
        string control_name = "Tag" + GUIUtility.GetControlID(FocusType.Keyboard).ToString();
        GUI.SetNextControlName(control_name);

        var tag = GetChildProperty(property, "Tag");
        using (var check = new EditorGUI.ChangeCheckScope())
        {
            // 左側に表示するボタンの領域
            var buttonArea = new Rect(position);
            buttonArea.width = EditorStyles.toolbarButton.CalcSize(registButton).x;

            // メインのTextFieldの領域
            var mainArea = new Rect(position);
            var shift = buttonArea.width + EditorGUIUtility.standardVerticalSpacing;
            mainArea.x += shift;
            mainArea.width -= shift;

            // 既存のタグに一致するかどうか
            var contains = tag.stringValue.Length == 0 || CustomTagRepository.Contains(tag.stringValue);
            // テキストフィールドの描画、既存のタグかどうかでスタイル切り替え
            tag.stringValue = EditorGUI.TextField(mainArea, tag.stringValue, contains ? EditorStyles.textField : attentionStyle);

            string focused_name = GUI.GetNameOfFocusedControl();
            if (check.changed)
            {
                if (tag.stringValue.Length != 0)
                {
                    // 候補のツールチップ表示
                    var popRect = new Rect(position);
                    toolTip = new CustomTagCandiudatePopup(tag.stringValue);
                    toolTip.OpenModeless(popRect);
                    // フォーカスを再設定する
                    GUI.FocusControl(focused_name);
                    lastControlForPopup = focused_name;
                }
            }
            else if (toolTip != null && focused_name != lastControlForPopup)
            {
                // 不要なツールチップを消す
                toolTip.editorWindow.Close();
            }

            // 未登録のタグなら、登録ボタンを出し、押したらリポジトリに登録できるようにする。
            if (!contains && GUI.Button(buttonArea, registButton))
            {
                CustomTagRepository.Instance.AddNewTag(tag.stringValue);
            }
        }
    }

    public override float GetPropertyHeight(SerializedProperty property, GUIContent label)
    {
        return EditorGUIUtility.singleLineHeight;
    }

    private static SerializedProperty GetChildProperty(SerializedProperty parent, string name)
    {
        SerializedProperty child = parent.Copy();
        child.Next(true);
        do
        {
            if (child.name == name) return child;
        }
        while (child.Next(false));
        return null;
    }
}
・・・実は、上記のOpenModelessメソッドを使って開くだけではフォーカスが失われる問題は解決しませんでした。PopupWindowの側にフォーカスは移動しなくなったような感じではあるのですが、TextFiledからはフォーカスが失われてしまいます。
こちらの記事を参考に、TextField のドロワー側でGUI.SetNextControlName, GUI.FocusControlなどを使ってフォーカスを戻す処理を追加することで、継続して入力できるようになりました。
なお、このフォーカスを再設定する処理があれば、PopupWindowの非公開メソッドを使わなくてもよくなるか、というとそうではありません。結局両方の対策が必要でした。
また、GetChildPropertyメソッドはこちらから拝借しました。
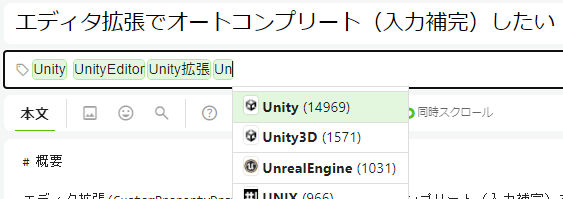
結果
こんな仕上がりになりました。
TextFieldでタイプ中、同じ文字列が含まれる候補一覧がポップアップ表示されます。
ポップアップ内の各候補は入力中の文字列と一致する部分がハイライト表示されます。
また、TextFieldの値に一致する既存タグがない場合、文字がオレンジ色で表示され、左側に[Regist]ボタンが出ます。

[Regist]ボタンを押すと、このようにタグリポジトリに登録され、以後は候補一覧にも表示されるようになります。
これだけでもだいぶマシですが、選んだ候補をTextFieldの値に設定できるようにしたいですね。
ということで、後編に続きます。