概要
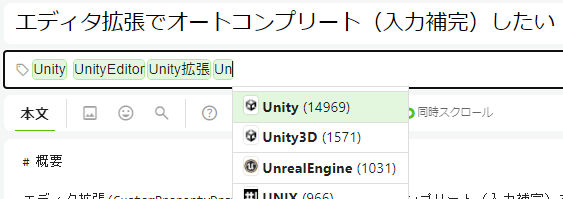
エディタ拡張(CustomPropertyDrawer)でTextFieldのオートコンプリート(入力補完)をしたい。候補は提示されるけど、自由入力も可能にしたい。
要するに Qiita の記事のタグみたいなやつですね。
そんなの既にあるのではと思って探したけれど、見つからないので自作しました。
前回、候補ポップアップ表示は可能になりましたが、結局一文字づつ入力しなければならなかったので、今回はポップアップ上で候補を選択すればTextFieldに値が入るようにしました。
【前編】はこちら
候補ポップアップの改良
修正のメインは候補一覧を表示するツールチップ風ポップアップになります。
まず、タグへ書き戻せるようにするため、OpenModelessの引数にSerializedProperty tagを追加して、ドロワーから受け取ってフィールドに保存するようにしました。
 using System;
 using UnityEngine;
 using UnityEditor;
 using System.Collections.Generic;
 using System.Reflection;

 public class CustomTagCandiudatePopup : PopupWindowContent
 {
     static private GUIStyle labelStyle;
     static CustomTagCandiudatePopup()
     {
         labelStyle = new GUIStyle(EditorStyles.label);
         labelStyle.richText = true;
     }
     private string currentText;
     private List<string> candidates;
+    private SerializedProperty tag;
+    private float width;

     public CustomTagCandiudatePopup(string currentText)
     {
         if (currentText == null || currentText.Length == 0)
         {
             this.currentText = "";
             candidates = new List<string>();
         }
         else
         {
             this.currentText = currentText;
             candidates = CustomTagRepository.GetCandidates(currentText);
         }
     }

     public override Vector2 GetWindowSize()
     {
-        return new Vector2(300, EditorGUIUtility.singleLineHeight * candidates.Count);
+        return new Vector2(width, EditorGUIUtility.singleLineHeight * candidates.Count);
     }

     /// <summary>
     /// GUI描画
     /// </summary>
     public override void OnGUI(Rect rect)
     {
         Rect line = new Rect(rect);
         line.height = EditorGUIUtility.singleLineHeight;
         foreach (var t in candidates)
         {
             var txt = currentText.Length == 0 ? t : t.Replace(currentText, $"<color=cyan>{currentText}</color>");
             EditorGUI.LabelField(line, new GUIContent(txt), labelStyle);
+            if (Event.current.type == EventType.MouseDown && line.Contains(Event.current.mousePosition))
+            {
+                tag.SetObjectOfProperty(t);
+                editorWindow.Close();
+            }

             line.y += EditorGUIUtility.singleLineHeight;
         }
     }

-    public void OpenModeless(Rect position)
+    public void OpenModeless(SerializedProperty tag, Rect position)
     {
+        this.tag = tag;
+        width = position.width;
         // PopupWindow.Init(activatorRect, windowContent, locationPriorityOrder, showMode, giveFocus: true);
         var method = typeof(PopupWindow).GetMethod("Init", BindingFlags.Instance | BindingFlags.NonPublic);

         PopupWindow popWin = ScriptableObject.CreateInstance<PopupWindow>();
         if (popWin != null)
         {
             var showMode = Enum.Parse(method.GetParameters()[3].ParameterType, "PopupMenu");
             method.Invoke(popWin, new object[] { position, this, null, showMode, false });
         }
     }
 }
ついでに細かな改良として、ポップアップの幅と位置を元のTextFieldに合わせるため、OpenModelessで受け取ったpositonのwidthを保存して、GetWindowSizeメソッド内で使うようにしました。
ポップアップにフォーカスがなくてもマウス反応させたい
この部分が、候補をクリックしたらタグのSerializedPropertyにその値を反映して、自身のポップアップを閉じる処理になります。
            if (Event.current.type == EventType.MouseDown && line.Contains(Event.current.mousePosition))
            {
                tag.SetObjectOfProperty(t);
                editorWindow.Close();
            }
当初はラベルをボタン化する方法を試しましたが、一度目のクリックに反応しない問題が起こりました。
これは敢えてポップアップにフォーカスを与えないようにしてるため、一度目のクリックはポップアップがフォーカスを獲得するために使われてしまい、ボタンを反応させるにはもう一度クリックが必要になるためだと思われます。
なので、直接マウスイベントを調べて、ラベルのエリア内でクリックMouseDownイベントを検出したら、押されたものと判断するようにしました。
最後に、PropertyDrawerの方ですが、こちらはOpenModelessの引数に書き戻し対象となるSerializedPropertyを追加し、ポップアップの位置と幅調整のためpopRectの複製元をmainAreaに変更しただけです。
using UnityEngine;
using UnityEditor;

/// <summary>
/// Control Editor of SkillCategoryTagCollection
/// </summary>
[CustomPropertyDrawer(typeof(CustomTag), true)]
public class CustomTagDrawer : PropertyDrawer
{
    private CustomTagCandiudatePopup toolTip;
    static private GUIContent registButton = new GUIContent("Regist", "このタグをリポジトリに登録");
    static private GUIStyle attentionStyle;
    private int index = -1;
    static CustomTagDrawer()
    {
        attentionStyle = new GUIStyle(EditorStyles.textField);
        var orange = new Color(0.9f, 0.4f, 0);
        attentionStyle.normal.textColor = orange;
        attentionStyle.focused.textColor = orange;
        attentionStyle.hover.textColor = orange;
    }

    private string lastControlForPopup;
    public override void OnGUI(Rect position, SerializedProperty property, GUIContent label)
    {
        if (property == null || property.serializedObject == null) return;

        // フォーカス制御のため名前をつける
        string control_name = "Tag" + GUIUtility.GetControlID(FocusType.Keyboard).ToString();
        GUI.SetNextControlName(control_name);

        var tag = GetChildProperty(property, "Tag");
        using (var check = new EditorGUI.ChangeCheckScope())
        {
            // 左側に表示するボタンの領域
            var buttonArea = new Rect(position);
            buttonArea.width = EditorStyles.toolbarButton.CalcSize(registButton).x;

            // メインのTextFieldの領域
            var mainArea = new Rect(position);
            var shift = buttonArea.width + EditorGUIUtility.standardVerticalSpacing;
            mainArea.x += shift;
            mainArea.width -= shift;

            // 既存のタグに一致するかどうか
            var contains = tag.stringValue.Length == 0 || CustomTagRepository.Contains(tag.stringValue);
            // テキストフィールドの描画、既存のタグかどうかでスタイル切り替え
            tag.stringValue = EditorGUI.TextField(mainArea, tag.stringValue, contains ? EditorStyles.textField : attentionStyle);

            string focused_name = GUI.GetNameOfFocusedControl();
            if (check.changed)
            {
                if (tag.stringValue.Length != 0)
                {
                    // 候補のツールチップ表示
-                   var popRect = new Rect(position);
+                   var popRect = new Rect(mainArea);
                    toolTip = new CustomTagCandiudatePopup(tag.stringValue);
-                   toolTip.OpenModless(popRect);
+                   toolTip.OpenModless(tag, popRect);
                    // フォーカスを再設定する
                    GUI.FocusControl(focused_name);
                    lastControlForPopup = focused_name;
                }
            }
            else if (toolTip != null && focused_name != lastControlForPopup)
            {
                // 不要なツールチップを消す
                toolTip.editorWindow.Close();
            }

            // 未登録のタグなら、登録ボタンを出し、押したらリポジトリに登録できるようにする。
            if (!contains && GUI.Button(buttonArea, registButton))
            {
                CustomTagRepository.Instance.AddNewTag(tag.stringValue);
            }
        }
    }

    public override float GetPropertyHeight(SerializedProperty property, GUIContent label)
    {
        return EditorGUIUtility.singleLineHeight;
    }

    private static SerializedProperty GetChildProperty(SerializedProperty parent, string name)
    {
        SerializedProperty child = parent.Copy();
        child.Next(true);
        do
        {
            if (child.name == name) return child;
        }
        while (child.Next(false));
        return null;
    }
}
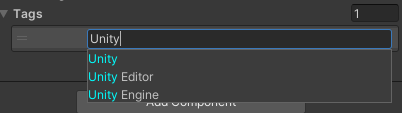
結果
候補ポップアップでクリックで選んだ物をTextFieldに設定できるようになりました。
これでなんとかオートコンプリート機能としての体裁が整ったと思います。
欲を言えばキー操作でも選択できたりするといいのですが、そこそこ面倒そうなので別の機会があれば・・・