経緯
コンピュートシェーダー(ComputeShader)を学ぶため、自動車を動かす交通シミュレーターみたいなものを作ってみようと思いました。個々の自動車がそれぞれ衝突を回避しつつ適切な経路で目的地に移動できるようになるのが目標です。
前回は道路の描画について書きましたが、今回は ComputeShader は一応車を動かすのに使ってますが、GPUインスタンシングの練習も兼ねて geometry シェーダーで動的に自動車のつもりポリゴンを生成させてみましたので、主にそれについて書いています。(ローポリで最低限進行方向がわかればいい、というレベル)
◀【その1:道路を描く】
▶【その3:車に道路上を走らせる+パーティクル版】
C#側実装
車の定義
サイズと色は車種を規定するプロパティです。それ以外は車の状態を表すプロパティです。停止中も方向は維持しないといけないので、向きと速度(スカラー値)は分離しています。
/// <summary>
/// 車の構造体
/// </summary>
struct Car
{
    /// <summary>
    /// サイズ
    /// </summary>
    public Vector3 size;

    /// <summary>
    /// 色
    /// </summary>
    public Color color;

    /// <summary>
    /// 座標
    /// </summary>
    public Vector2 pos;

    /// <summary>
    /// 向き(進行方向)
    /// </summary>
    public Vector2 direction;

    /// <summary>
    /// 速度
    /// </summary>
    public float velocity;

    /// <summary>
    /// コンストラクタ
    /// </summary>
    public Car(Vector3 size, Color color, Vector2 pos, Vector2 velocity)
    {
        this.pos = pos;
        this.size = size;
        this.color = color;
        this.direction = velocity.normalized;
        this.velocity = velocity.magnitude;
    }

    /// <summary>
    /// コンストラクタ
    /// </summary>
    public Car(Vector3 size, Color color, Vector2 pos, Vector2 direction, float velocity)
    {
        this.pos = pos;
        this.size = size;
        this.color = color;
        this.direction = direction;
        this.velocity = velocity;
    }
}
コントローラー(コンポーネント)
車の構造体を初期化して、シェーダーを使ってポリゴンを描画するコンポーネントです。
/// <summary>
/// 沢山の車を管理するクラス
/// </summary>
public class CarsController : MonoBehaviour
{
    /// <summary>
    /// 車をレンダリングするシェーダー
    /// </summary>
    public Shader carShader;

    /// <summary>
    /// 車の移動を行うコンピュートシェーダー
    /// </summary>
    public ComputeShader carComputeShader;

    /// <summary>
    /// 車のマテリアル
    /// </summary>
    Material material;

    /// <summary>
    /// 車のコンピュートバッファ
    /// </summary>
    ComputeBuffer carsBuffer;

    /// <summary>
    /// 破棄
    /// </summary>
    void OnDisable()
    {
        // コンピュートバッファは明示的に破棄しないと怒られます
        carsBuffer.Release();
    }

    /// <summary>
    /// 初期化
    /// </summary>
    void Start()
    {
        material = new Material(carShader);
        InitializeComputeBuffer();
    }

    /// <summary>
    /// 更新処理
    /// </summary>
    void Update()
    {
        carComputeShader.SetBuffer(0, "Cars", carsBuffer);
        carComputeShader.SetFloat("DeltaTime", Time.deltaTime);
        carComputeShader.Dispatch(0, carsBuffer.count / 8 + 1, 1, 1);
    }

    /// <summary>
    /// コンピュートバッファの初期化
    /// </summary>
    void InitializeComputeBuffer()
    {
        var count = 1000;
        // 車数は千個
        carsBuffer = new ComputeBuffer(count, Marshal.SizeOf(typeof(Car)));

        // 配列に初期値を代入する
        Car[] bullets = new Car[count];
        for (int i = 0; i < count; i++)
        {
            bullets[i] =
                new Car(
                    new Vector3(Random.Range(4, 6), Random.Range(2, 4), Random.Range(3, 6)*2),
                    Color.white,
                    new Vector2(Random.Range(-10.0f, 10.0f) * 10, Random.Range(-10.0f, 10.0f) * 10),
                    new Vector2(Random.Range(-1.0f, 1.0f)*3, Random.Range(-1.0f, 1.0f)*3)
                );
        }

        // バッファに適応
        carsBuffer.SetData(bullets);
    }

    /// <summary>
    /// レンダリング
    /// </summary>
    void OnRenderObject()
    {
        // テクスチャ、バッファをマテリアルに設定
        material.SetBuffer("Cars", carsBuffer);
        // レンダリングを開始
        material.SetPass(0);
        // オブジェクトをレンダリング
        Graphics.DrawProcedural(MeshTopology.Points, carsBuffer.count);
    }
}
最初に適当な乱数でCar構造体を初期化して ComputeBuffer にセットします。その後は Update で ComputeShader を呼んで車の移動処理をして、OnRenderObject で結果を反映します。
シェーダー実装
描画用シェーダー
Computeではない従来のシェーダーです。ジオメトリシェーダーを記述して、車のポリゴンを動的に生成します。
 Shader "Custom/CarsShader" {
	SubShader {
        Tags {"Queue" = "Geometry" "RenderType" = "Opaque"}

        Pass {
	        Tags {"LightMode" = "ForwardBase"}
			LOD 200

			CGPROGRAM

	        // シェーダーモデルは5.0を指定
	        #pragma target 5.0

	        // シェーダー関数を設定
	        #pragma vertex vert fullforwardshadows
			#pragma geometry geom
	        #pragma fragment frag

	        #include "UnityCG.cginc"

	        // テクスチャ
        	sampler2D _MainTex;

			// 光源
			fixed4 _LightColor0;

        	// 車の構造体
			struct Car
			{
				float3 size;
				float4 col;
				float2 pos;
				float2 dir;
				float velocity;
			};

        	// 車の構造化バッファ
        	StructuredBuffer<Car> Cars;

	        // 頂点シェーダからの出力
	        struct VSOut {
	            float4 pos : SV_POSITION;
	            float2 tex : TEXCOORD0;
	            float4 col : COLOR;
	        };

	        // 頂点シェーダ
			VSOut vert (uint id : SV_VertexID)
	       	{
				Car car = Cars[id];
				// idを元に、車の情報を取得
	            VSOut output;
	            output.pos = float4(car.pos.x, 1, car.pos.y, 1);
	            output.tex = float2(id, 0);
	            output.col = car.col;

	            return output;
	       	}

			// 頂点設定
			inline void setVertex(inout VSOut output, in float4 pos, in float3 offset, in float4 col, in float2x2 mat)
			{
			    // 色
			    output.col = col;
				// テクスチャ座標
			    output.tex = normalize(offset.xy);

			    // 頂点位置を計算
				output.pos = pos + float4(mul(offset.xz, mat), offset.y, 1).xzyw;
			    output.pos = mul (UNITY_MATRIX_VP, output.pos);
			}

			// ライティング設定
			inline void setLighting(inout VSOut output, in half3 normal)
			{
				half3 worldNormal = UnityObjectToWorldNormal(normal);
				// 適用量
                half nl = max(0, dot(worldNormal, _WorldSpaceLightPos0.xyz));
                fixed4 diff = nl * _LightColor0;
			    diff.rgb += ShadeSH9(half4(worldNormal, 1));
			    // 色を補正
				output.col = output.col* diff;
			}

			// ベクトルY軸回転
			inline half3 rotate2d(in half3 normal, in float2x2 mat)
			{
				return half3(mul(normal.xz, mat), normal.y).xzy;
			}


	       	// ジオメトリシェーダ
		   	[maxvertexcount(21)]
		   	void geom (point VSOut input[1], inout TriangleStream<VSOut> outStream)
		   	{
		     	VSOut output;

		   		// 全ての頂点で共通の値を計算しておく
		      	float4 pos = input[0].pos;
				float2 dir = Cars[input[0].tex.x].dir;
				float3 size =  Cars[input[0].tex.x].size;
		      	float4 clBody = input[0].col;
				float4 clWind = float4(0.1,0.1,0.1,1.0);

			    // Y軸回転の行列を作る
				float angle = atan2(-dir.x, -dir.y);
				float sina, cosa;
                sincos(angle, sina, cosa);
                float2x2 _matrix = float2x2(cosa, -sina, sina, cosa);

				// 法線を準備
				half3 up = half3(0,1,0);
				half3 front = rotate2d(half3(0,0,-1), _matrix);
				half3 left = rotate2d(half3(-1,0,0), _matrix);
				half3 right = rotate2d(half3(1,0,0), _matrix);
				half3 back = rotate2d(half3(0,0,1), _matrix);

		      	outStream.RestartStrip();

				// ポリゴン生成

				// 背面
				setVertex(output, pos, float3(0, 0.1, 0.5) * size, clBody, _matrix);
				setLighting(output, back);
				outStream.Append (output);
				setVertex(output, pos, float3(0.5, 1.0, 0.5) * size, clBody, _matrix);
				setLighting(output, back);
				outStream.Append (output);
				setVertex(output, pos, float3(-0.5, 1.0, 0.5) * size, clBody, _matrix);
				setLighting(output, back);
				outStream.Append (output);

				// 上面
				setVertex(output, pos, float3(0, 1.0, -0.5) * size, clBody, _matrix);
				setLighting(output, up);
				outStream.Append (output);
				setVertex(output, pos, float3(0.5, 1.0, 0.5) * size, clBody, _matrix);
				setLighting(output, up);
				outStream.Append (output);
				setVertex(output, pos, float3(-0.5, 1.0, 0.5) * size, clBody, _matrix);
				setLighting(output, up);
				outStream.Append (output);

				// 前面
				setVertex(output, pos, float3(0, 1.0, -0.5) * size, clBody, _matrix);
				setLighting(output, front);
				outStream.Append (output);
				setVertex(output, pos, float3(0.5, 0.1, -0.5) * size, clBody, _matrix);
				setLighting(output, front);
				outStream.Append (output);
				setVertex(output, pos, float3(-0.5, 0.1, -0.5) * size, clBody, _matrix);
				setLighting(output, front);
				outStream.Append (output);

				// 左側面
				setVertex(output, pos, float3(-0.5, 0.1, -0.5) * size, clBody, _matrix);
				setLighting(output, left);
				outStream.Append (output);
				setVertex(output, pos, float3(-0.5, 1.0, 0.5) * size, clBody, _matrix);
				setLighting(output, left);
				outStream.Append (output);
				setVertex(output, pos, float3(-0.5, 0.1, 0.5) * size, clBody, _matrix);
				setLighting(output, left);
				outStream.Append (output);

				// 右側面
				setVertex(output, pos, float3(0.5, 0.1, -0.5) * size, clBody, _matrix);
				setLighting(output, right);
				outStream.Append (output);
				setVertex(output, pos, float3(0.5, 1.0, 0.5) * size, clBody, _matrix);
				setLighting(output, right);
				outStream.Append (output);
				setVertex(output, pos, float3(0.5, 0.1, 0.5) * size, clBody, _matrix);
				setLighting(output, right);
				outStream.Append (output);

		      	// トライアングルストリップを終了
		      	outStream.RestartStrip();

				left = rotate2d(half3(-1,-1,-0.5), _matrix);
				right = rotate2d(half3(1,-1,0.5), _matrix);

				// 右斜面
				setVertex(output, pos, float3(0, 1, -0.5) * size, clWind, _matrix);
				setLighting(output, left);
				outStream.Append (output);
				setVertex(output, pos, float3(0.5, 1, 0.5) * size, clWind, _matrix);
				setLighting(output, left);
				outStream.Append (output);
				setVertex(output, pos, float3(0.5, 0.1, -0.5) * size, clWind, _matrix);
				setLighting(output, left);
				outStream.Append (output);

				// 左斜面
				setVertex(output, pos, float3(0, 1, -0.5) * size, clWind, _matrix);
				setLighting(output, right);
				outStream.Append (output);
				setVertex(output, pos, float3(-0.5, 1, 0.5) * size, clWind, _matrix);
				setLighting(output, right);
				outStream.Append (output);
				setVertex(output, pos, float3(-0.5, 0.1, -0.5) * size, clWind, _matrix);
				setLighting(output, right);
				outStream.Append (output);

		      	// トライアングルストリップを終了
				outStream.RestartStrip();
		   	}

			// ピクセルシェーダー
	        fixed4 frag (VSOut i) : COLOR
	        {
		        // 色を返す
	            return i.col;
	        }

	        ENDCG
	    }
		UsePass "Legacy Shaders/VertexLit/SHADOWCASTER"
     }
 }
長いですが、そんな特殊なことはやっていません。頂点シェーダー(vert)では単にデータの受け渡しをしているだけです。ピクセルシェーダー(フラグメントシェーダー/frag)はそのまま頂点カラーを返しているだけです。
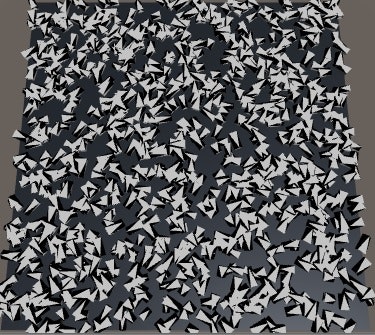
ジオメトリシェーダー(geom)は長いですが、大部分はポリゴン生成です。一つの頂点情報から21個の頂点=7個の三角形を作成して、以下のような進行方向がわかる直方体っぽい物を作っています。今回見栄えはそこまで重要視してないので、このくらいで十分だろうという判断です。
各座標は車の向きに応じたY軸回転を付与しています。まず direction から2x2回転行列を作り...
	// Y軸回転の行列を作る
	float angle = atan2(-dir.x, -dir.y);
	float sina, cosa;
	sincos(angle, sina, cosa);
	float2x2 _matrix = float2x2(cosa, -sina, sina, cosa);

	// ...中略...

	half3 front = rotate2d(half3(0,0,-1), _matrix);
下記メソッドを使って回転させてます。2x2行列は2次元ベクトル用なのですが、Y軸回転させたいので、一旦zとyを入れ替えた2次元で回転させて、xzyで再度正しい3次元ベクトルに戻しています。
【参考:Rotating mesh in vertex shader】
	// ベクトルY軸回転
	inline half3 rotate2d(in half3 normal, in float2x2 mat)
	{
		return half3(mul(normal.xz, mat), normal.y).xzy;
	}
setLightingで法線に応じた陰影をつけていますが、黒い部分の法線は適当です。(どうせほぼ黒だからわからないでしょう)
ライティングは以下の記事を参考に書きました
Unity:Geometry Shader を使って100万キューブ/立方体/Cubeを描画する!
[Unity] Cgでのライティングについてメモ
移動計算シェーダー
ComputeShaderです。今回はとりあえず現在の速度に応じて進行方向にまっすぐ進むだけです。
# pragma kernel CSMain

// 車の構造体
struct Car
{
	float3 size;
	float4 col;
	float2 pos;
	float2 dir;
	float velocity;
};

// 前回の更新からの経過時間
float DeltaTime;

// 車の構造化バッファ
RWStructuredBuffer<Car> Cars;

// (8, 1, 1)のスレッドで回す
[numthreads(8,1,1)]
void CSMain (uint3 id : SV_DispatchThreadID)
{
	// それぞれの位置情報に移動ベクトルを加算
    Cars[id.x].pos += Cars[id.x].dir * Cars[id.x].velocity * DeltaTime;
}
結果
これがムズムズ動くと羽虫の群れみたいでちょっとキモイ・・・
Macではジオメトリシェーダーとコンピュートシェーダーは同時に使えない!?
メインは Windows で開発してるのですが、Mac で動作確認したところ、Shaderのエラーが出て車が表示されません。
色々調べてみたら、題記の通り方や Metalでは ジオメトリシェーダーが使えず、方や Metalでないと コンピュートシェーダーが使えない、ということで詰みました😱
Unity: Macでジオメトリーシェーダーを使ったプロジェクトを動作させたいとき - Kilimanjaro Warehouse
【Unity】compute shaderをMacのGame Viewで使う場合 - Qiita
・・・次回、ジオメトリシェーダーを使わない方法も検討してみます。
気づいたこと、まとめ
ComputeBuffer でやりとりする構造体はC# ⇔ shader 間で矛盾があってもコンパイラは構文チェックができない。例えば float3 が float4 になってたりすると、バッファーオーバーランみたいなことになって一見訳のわからないバグが起きたりする。
ComputeBuffer は確保した数だけ埋める必要がある。あとでセット数を減らすと、以前のデータが残る(少なくともUnityの再生・停止ぐらいでは消えない)模様。
当たり前だが、SetDataした後の配列を保持しておいてもGetDataしない限り、GPU側の変更をCPU側で見ることはできない。でも、GetDataしなくても ComputeBuffer 自体をシェーダー間で受け渡すことはできる。
おまけ
スクショ動画撮るときに使った、配置した場所でひたすら回転するコード(ComputeShader)
[numthreads(8,1,1)]
void CSMain (uint3 id : SV_DispatchThreadID)
{
	// それぞれの位置情報に移動ベクトルを加算
    //Cars[id.x].pos += Cars[id.x].dir * Cars[id.x].velocity * DeltaTime;

	float sina, cosa;
	sincos(0.02, sina, cosa);
	float2x2 _matrix = float2x2(cosa, -sina, sina, cosa);
	float2 dir = Cars[id.x].dir;
	Cars[id.x].dir =  mul(dir, _matrix);
}