最初に
「非同期通信」(Ajax)というものに興味がありJavaのアプリケーションに組み込んで実装してみました。
検索しても丁度良い記事があまり見つからなかったので実装方法を記事にしようと思います。
後々編集、削除、検索機能の記事も投稿出来たらと思います。
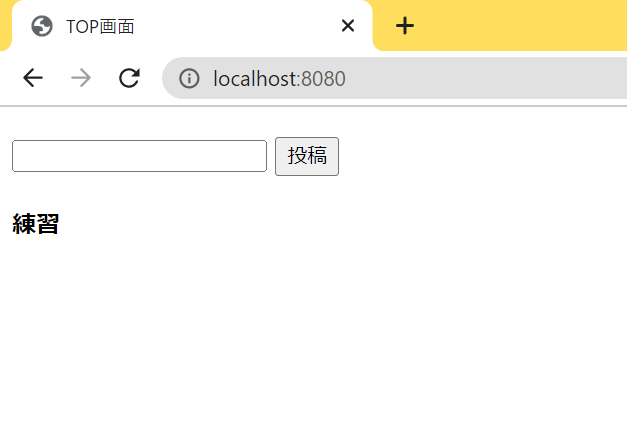
本記事の完成ページ
<参考サイト>
Spring Boot で Ajax を実装する単純なサンプル
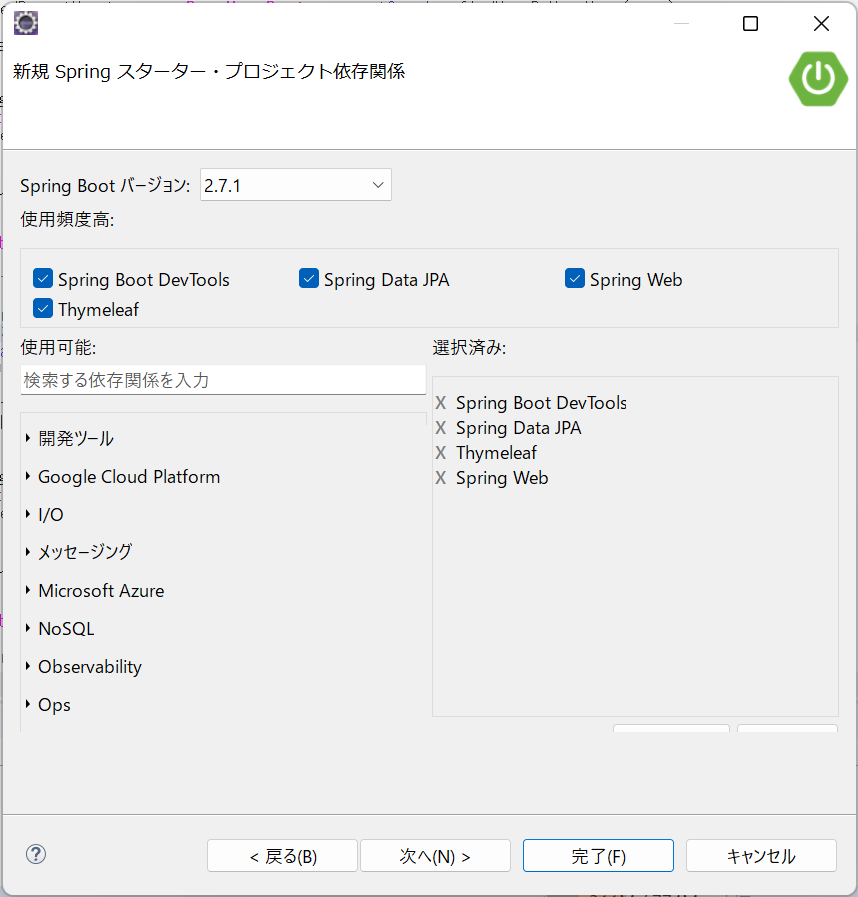
1. プロジェクト作成方法
本プロジェクトはEclipse上で下記の画像の環境で作成しました。

2. サンプルコード
2.1 環境構築
本プロジェクトではDBには「PostgreSQL」に使用したいのでpom.xmlの<dependencies>に記載していきます。
また、今回はA5M2を使用してPostgreSQLに接続していきます。
<dependency>
	<groupId>org.postgresql</groupId>
	<artifactId>postgresql</artifactId>
	<scope>runtime</scope>
</dependency>

<!-- getter,setter 省略するため -->
<dependency>
	<groupId>org.projectlombok</groupId>
	<artifactId>lombok</artifactId>
	<version>1.18.8</version>
	<scope>provided</scope>
</dependency>
<!-- getter,setter 省略 -->
DBに接続するためにapplication.proretiesにも記載していきます。
spring.jpa.database=POSTGRESQL
spring.datasource.url=jdbc:postgresql://localhost:5432/practice
spring.datasource.username=[ユーザー名]
spring.datasource.password=[パスワード]
spring.mvc.hiddenmethod.filter.enabled=true
作成するDBは以下の通りです。
create table public.report (
  id serial not null,
 content character varying(200) not null,
  created_date timestamp(6) without time zone default CURRENT_TIMESTAMP not null,
  updated_date timestamp(6) without time zone default CURRENT_TIMESTAMP not null,
  primary key (id)
);
<参考サイト>
A5M2使い方
A5M2ダウンロード
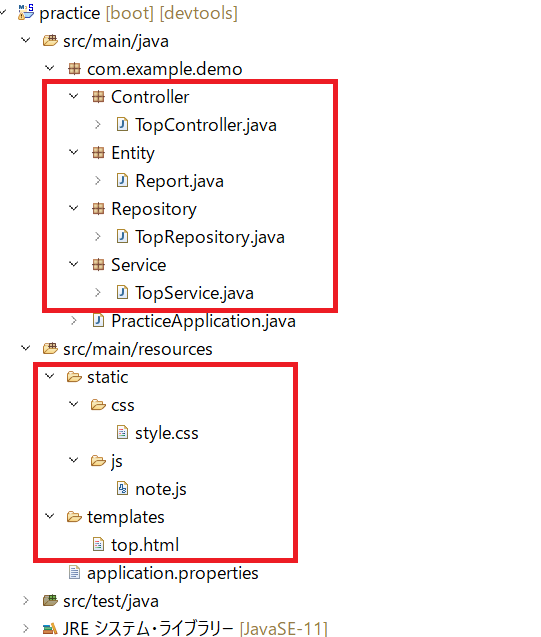
2.2 作成するファイル
パッケージ、フォルダ、ファイル等は下記の写真の赤枠の通りです。
※今回の記事ではCSSファイルは使用しません。次回以降の記事で使用します。
2.3 コード
2.3.1 HTMLファイル
<!DOCTYPE html>
<html>
	<head>
		<meta charset="UTF-8">
		<title>TOP画面</title>
		<link href="/css/style.css" rel="stylesheet" type="text/css">
		<script src="https://ajax.googleapis.com/ajax/libs/jquery/3.6.0/jquery.min.js"></script>
		<script src="/js/note.js"></script>
	</head>
	<body>
		<form method="post" action="/add" style="margin: 20px 0;">
		    <input type="text" name="content" size="20" maxlength="200" class="content"/>
		    <button type="button" id="submit">投稿</button>
		</form>

		<div th:each="content : ${contents}" id="addContent">
			<h4 th:text="${content.content}"></h4>
		</div>
	</body>
</html>
<補足>
<script src="https://ajax.googleapis.com/ajax/libs/jquery/3.6.0/jquery.min.js"></script>でjQueryを読み込みます。
【2022年版】jQuery最新は3.6.0
<div th:each="content : ${contents}" id="addContent"><h4 th:text="${content.content}"></h4></div>の箇所でDBから持ってきた内容を表示します。
2.3.2 JavaScriptファイル
jQuery を使用して Ajax の処理を書くと次のようになります。
$(document).ready(function(){
	$('#submit').on('click', function(){
		var content = $(".content").val();

		$.ajax({
			url: "/add",  // リクエストを送信するURLを指定(action属性のurlを抽出)
			type: "POST",  // HTTPメソッドを指定(デフォルトはGET)
			data: {
				"content" : content
			},
			dataType: "json"
		})
		.done(function(data) {
			var data_stringify = JSON.stringify(data);
			var data_json = JSON.parse(data_stringify);
			var data_id = data_json["id"];
			var content = data_json["content"];

			$("#addContent").prepend(`<h4>${content}</h4>`);
			$(".content").val("");
		})
		.fail(function(jqXHR, textStatus, errorThrown) {
			alert("error!");  //
			console.log("jqXHR          : " + jqXHR.status);
			console.log("textStatus     : " + textStatus);
			console.log("errorThrown    : " + errorThrown.message);
		})
	})
})
<補足>
jQuery要素追加、削除 簡易まとめ
2.3.3 Controllerファイル
package com.example.demo.Controller;

import java.util.List;

import org.springframework.beans.factory.annotation.Autowired;
import org.springframework.stereotype.Controller;
import org.springframework.web.bind.annotation.GetMapping;
import org.springframework.web.bind.annotation.PostMapping;
import org.springframework.web.bind.annotation.RequestParam;
import org.springframework.web.bind.annotation.ResponseBody;
import org.springframework.web.servlet.ModelAndView;

import com.example.demo.Entity.Report;
import com.example.demo.Service.TopService;
import com.fasterxml.jackson.core.JsonProcessingException;
import com.fasterxml.jackson.databind.ObjectMapper;


@Controller
public class TopController {

	@Autowired
	TopService topService;

	@GetMapping
	public ModelAndView top() {
		ModelAndView mav = new ModelAndView();
		// 投稿を全件取得
		List<Report> contentData = topService.findAllReport();
		// 画面遷移先を指定
		mav.setViewName("/top");
		// 投稿データオブジェクトを保管
		mav.addObject("contents", contentData);

		return mav;
	}

	@PostMapping("/add")
	@ResponseBody
	public String addContent(@RequestParam String content) {

		Report report = new Report();
		report.setContent(content);
		// 投稿をテーブルに格納
		topService.saveReport(report);

		// コメントを取得
		Report LatestPost = topService.findSelectedPost();

		return GetJson(LatestPost);
	}

    private String GetJson(Report LatestPost){
        String retVal = null;
        ObjectMapper objectMapper = new ObjectMapper();
        try{
            retVal = objectMapper.writeValueAsString(LatestPost);
        } catch (JsonProcessingException e) {
            System.err.println(e);
        }
        return retVal;
    }

}
<補足>
@ResponseBodyアノテーションを付けることで戻り値をコンテンツとして反映させることができます。
private String GetJsonのメソッドで戻り値の型をJSON型に変形させます。
2.3.4 Serviceファイル
package com.example.demo.Service;

import java.util.List;

import org.springframework.beans.factory.annotation.Autowired;
import org.springframework.stereotype.Service;

import com.example.demo.Entity.Report;
import com.example.demo.Repository.TopRepository;

@Service
public class TopService {

	@Autowired
	TopRepository topRepository;

	// レコード全件取得
	public List<Report> findAllReport() {
		// 降順に変更
		return topRepository.findAllByOrderByUpdatedDateDesc();
	}

	// レコード追加
	public void saveReport(Report report) {
		topRepository.save(report);
	}

	// レコード1件取得 (最新データ)
	public Report findSelectedPost() {
		return topRepository.findlatest();
	}

}
2.3.5 Repositoryファイル
package com.example.demo.Repository;

import java.util.List;

import org.springframework.data.jpa.repository.JpaRepository;
import org.springframework.data.jpa.repository.Query;
import org.springframework.stereotype.Repository;

import com.example.demo.Entity.Report;


@Repository
public interface TopRepository extends JpaRepository<Report, Integer> {

	List<Report> findAllByOrderByUpdatedDateDesc();

	 @Query(nativeQuery = true, value = "select * from report order by id desc limit 1 ")
	Report findlatest();

}
2.3.5 Entityファイル
package com.example.demo.Entity;

import java.util.Date;

import javax.persistence.Column;
import javax.persistence.Entity;
import javax.persistence.GeneratedValue;
import javax.persistence.GenerationType;
import javax.persistence.Id;
import javax.persistence.PreUpdate;
import javax.persistence.Table;

import lombok.Getter;
import lombok.Setter;

@Entity
@Table(name = "report")
@Getter
@Setter
public class Report {
	@Id
	@Column
	@GeneratedValue(strategy = GenerationType.IDENTITY)
	private int id;

	@Column
	private String content;

	@Column(name = "created_date", insertable = false, updatable = false)
	private Date createdDate;

	@Column(name = "updated_date", insertable = false, updatable = true)
	private Date updatedDate;

	@PreUpdate
	public void onPrePersist() {
		Date date = new Date();
		this.updatedDate = date;
	}

}
3. 最後に
上記のコードをコピペすれば簡易的掲示板が作成できます。
次は「Ajaxを用いた編集、削除機能」の記事を作ろうと思います!
Jacksonなどまだまだ完璧に理解しているわけではないので引き続き勉強していこうと思います。