以前Xでポストしたこれ
リプで「Unity6.3が出たらqiitaを書くかも」と書いたので
有言実行という事で記事化しようと思います
前提
- Unity6000.3.1f1
- Windows
- Gitリポジトリはプロジェクトのフォルダ(Assetsフォルダの一つ上)にあるものとする
環境での実装となります
準備
せっかくなのでgitのアイコンを調達しましょう。
公式サイトのアイコン配布ページ
から、とりあえず白抜きアイコンをゲット
DLしたら、Assetsフォルダの直下に「Editor Default Resources」フォルダを作成して、そちらに保存しましょう

保存したらInspectorからテクスチャの
- TextureType を Default
しておきましょう(多分Importした段階でそうなっているはず?
では準備が出来たので、コードを記載します
コード
ではコードです
using UnityEditor;
using UnityEditor.Toolbars;
using UnityEngine;

namespace ScreenPocket.Core.Editor
{
    /// <summary>
    /// ツールバーにGitのDropDownを追加
    /// </summary>
    public static class MainToolbarGitDropDown
    {
        private const string GitDirectoryPath = ".git";
        private const string ElementPath = "ScreenPocket/Git";

        /// <summary>
        /// DropDown作成
        /// </summary>
        /// <returns></returns>
        [MainToolbarElement(ElementPath, defaultDockPosition = MainToolbarDockPosition.Left)]
        private static MainToolbarElement CreateDropdown()
        {
            var icon = (Texture2D)EditorGUIUtility.Load("Git-Icon-White.png");
            var branchName = GetBranchName();
            var toolTip = "現在のGitブランチを表示します";
            var content = new MainToolbarContent(branchName, icon, toolTip);
            return new MainToolbarDropdown(content, null);
        }

        /// <summary>
        /// ブランチ名を取得
        /// </summary>
        /// <returns>ブランチ名</returns>
        private static string GetBranchName()
        {
            var headPath = System.IO.Path.Combine(GitDirectoryPath, "HEAD");
            using var reader = new System.IO.StreamReader(headPath);
            var refs = reader.ReadLine();
            if (refs == null)
            {
                return string.Empty;
            }

            return refs.StartsWith("ref: refs/heads/") ? refs["ref: refs/heads/".Length..] : "No Branch";
        }
    }
}
たったの47行!
ブランチ名の取得は下記の記事を参考にさせてもらいました
単純に「.gitフォルダ内の現在のブランチ名を引いてきた」だけなのでシンプルですね。
シンプル過ぎて記事としてはちょっと物足りないので、せっかくですし「クリックしたらブランチ一覧を表示」できるようにしてみましょう。
ブランチの表示
↑のコードを修正して、クリックしたらgitを叩いてブランチ一覧を取得&表示してみましょう
using System.Diagnostics;
using System.Text;
using UnityEditor;
using UnityEditor.Toolbars;
using UnityEngine;
using Debug = UnityEngine.Debug;

namespace ScreenPocket.Core.Editor
{
    /// <summary>
    /// ツールバーにGitのDropDownを追加
    /// </summary>
    public static class MainToolbarGitDropDown
    {
        private const string GitDirectoryPath = ".git";
        private const string ElementPath = "ScreenPocket/Git";

        /// <summary>
        /// DropDown作成
        /// </summary>
        /// <returns></returns>
        [MainToolbarElement(ElementPath, defaultDockPosition = MainToolbarDockPosition.Left)]
        private static MainToolbarElement CreateDropdown()
        {
            var icon = (Texture2D)EditorGUIUtility.Load("Git-Icon-White.png");
            var branchName = GetBranchName();
            var toolTip = "現在のGitブランチです。クリックするとgit branchを実行しブランチ一覧を表示します";
            var content = new MainToolbarContent(branchName, icon, toolTip);
            return new MainToolbarDropdown(content, ShowDropdownMenu);
        }

        /// <summary>
        /// ブランチ名を取得
        /// </summary>
        /// <returns>ブランチ名</returns>
        private static string GetBranchName()
        {
            var headPath = System.IO.Path.Combine(GitDirectoryPath, "HEAD");
            using var reader = new System.IO.StreamReader(headPath);
            var refs = reader.ReadLine();
            if (refs == null)
            {
                return string.Empty;
            }

            return refs.StartsWith("ref: refs/heads/") ? refs["ref: refs/heads/".Length..] : "No Branch";
        }

        /// <summary>
        /// DropDownを押された時のコールバック
        /// </summary>
        /// <param name="dropDownRect"></param>
        private static void ShowDropdownMenu(Rect dropDownRect)
        {
            var startInfo = new ProcessStartInfo
            {
                FileName = "git", Arguments = "branch",
                CreateNoWindow = true,
                RedirectStandardError = true, RedirectStandardOutput = true, UseShellExecute = false,
                StandardErrorEncoding = Encoding.UTF8, StandardOutputEncoding = Encoding.UTF8
            };

            using var process = Process.Start( startInfo );
            if (process == null)
            {
                Debug.LogError("Failed to start git process.");
                return;
            }

            //念のためプログレス表示
            EditorUtility.DisplayProgressBar("Git", "git branch", 0f);
            process.WaitForExit();
            EditorUtility.ClearProgressBar();

            var branchListText = process.StandardOutput.ReadToEnd();
            if (string.IsNullOrEmpty(branchListText))
            {
                Debug.LogError("ブランチ一覧を取得できませんでした");
                return;
            }

            var branchTexts = branchListText.Split("\n");
            if (branchTexts.Length == 0)
            {
                Debug.LogWarning("ブランチが1つも無いです");
                return;
            }

            //ブランチ一覧をメニュー項目に並べる
            var menu = new GenericMenu();
            foreach (var branchText in branchTexts)
            {
                menu.AddItem(new GUIContent(branchText), false, () =>
                {
                    //選択時の処理
                });
            }
            menu.DropDown(dropDownRect);
        }
    }
}

こんな感じ
コードの修正点としては
- ShowDropdownMenuメソッドを追加
- ShowDropdownMenuメソッドをMainToolbarDropdownに登録
- git branchを叩いてブランチ一覧を取得
- 取得できたブランチ一覧をDropDownのアイテムに登録
となります。
選択時にチェックアウトできるようにしても良いかもですが、
ちょっとDropDownだけで完結させるには荷が重いかな?
新しくEditorWindowを作ってその上でgit操作できるようにした方が良いかもですね
使い方
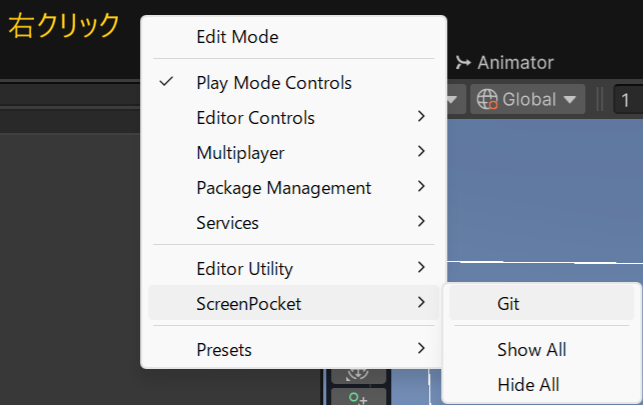
メインツールバー部分を右クリックし、「ScreenPocket > Git」を選択してください。
表示後に、Ctrlを押しながらドラッグすると位置を変更することが出来ます。
終わりに
よくあるエディタ拡張としては、シーン選択機能を置いてみたりしても良いかもですね。
今まで非公式ではツールバーをカスタムできましたが、ようやく公式にサポートしてもらえて嬉しいですね。
Unity触りだして3~4年目くらい(10年前くらい?)に、Unityの中の人に「ツールバーをカスタムしたいです!」と陳情したこともあった のですが、ようやく10年越しにそれが叶って感無量です。
色々カスタムを試してみたいですね~