本日は
コードを打ちすぎでちょっと手首が痛くなっていました・・・
-
@fuloru169 さんの記事
[Python]Z3で数独パズルを解く
を読む - [Python]Z3で数独パズルを解くをリファクタリング にて上記の記事のコードをリファクタリング.
- GUI作成 (今ここ)
PythonでGUI
GUIのフレームワークは標準ので tkinter がありますがせっかくなので勉強中のKivyで書いていきたいと思います.
本家サイトにあるように Kivy の特徴の一つとして
Business Friendly
Kivy is 100% free to use, under an MIT license (starting from 1.7.2) and LGPL 3 for the previous versions. The toolkit is professionally developed, backed and used. You can use it in a commercial product.
The framework is stable and has a well documented API, plus a programming guide to help you get started.
があります.ライセンスがMITで商用でも使えるのがお仕事でPythonを使っている人にはとても嬉しいのではないでしょうか.
well documented API
の感じ方は人それぞれだと思いますが,個人的にはAPIのExampleがもっと欲しいところ,
動かせるアプリケーションは本家にも色々あるのでそこで補ってということでしょうか.
英語が苦手な人は日本語に翻訳しているサイトがあるので探してみると良いかもしれません.
実装例
sudoku.kv
kivyには kv (kyではない!!!!) を拡張子名とするファイルにKivy言語で記述することでGUIの見た目を設計することができます.ロジックをはじめとしたイベントハンドラはPythonのファイルに書きます.tkinterとは違って見た目を記述するコードと動作を記述するロジックを(ある程度)分離することができるのも魅力的です.もちろんPythonのコードで見た目も全て記述することができます.
# :set padding 20

<MainGrid@GridLayout>:
    rows:9
    cols:9

<CustomButton@Button>:
    size_hint_x: 1
    size_hint_y: 1
    font_size: '30dp'

FloatLayout:
    BoxLayout:
        pos_hint: {'center_x': 0.5, 'center_y': 0.5}
        size_hint: (None, None)
        center: root.center
        size: [min(root.width, root.height) - 2 * padding] * 2
        orientation: 'vertical'
        BoxLayout:
            id:blayout
            orientation: 'horizontal'
            size_hint_y: 0.5
            Label:
                size_hint_x: 0.5
                text:'SudokuSolver'
            Button:
                id:reset
                size_hint_x: 0.25
                text:'Reset'
                on_press:app.reset()
            Button:
                id:solve
                size_hint_x: 0.25
                text:'Solve'
                on_press:app.solve()
        MainGrid:
            id:main_grid
            size_hint_y: 9
            center: root.center
            size: [min(root.width, root.height) - 2 * padding] * 2
(` で囲む時に適当なシンタックスハイライトが見つからなかったのでpythonをタグにしました.)
sudoku.py
from itertools import product
import numpy as np
import z3
from z3solver import Z3Solver
from kivy.app import App
from kivy.uix.button import Label, Button
from kivy.uix.gridlayout import GridLayout
from kivy.uix.behaviors import FocusBehavior
from kivy.uix.boxlayout import BoxLayout


class MainGrid(FocusBehavior, GridLayout):

    def __init__(self, **kwargs):
        super(MainGrid, self).__init__(**kwargs)
        self.shift_down = False

    def keyboard_on_key_down(self, window, keycode, text, modifiers):
        """Based on FocusBehavior that provides automatic keyboard
        access, key presses will be used to select children.
        """
        if 'shift' in keycode[1]:
            self.shift_down = True

    def keyboard_on_key_up(self, window, keycode):
        """Based on FocusBehavior that provides automatic keyboard
        access, key release will be used to select children.
        """
        if 'shift' in keycode[1]:
            self.shift_down = False

    def add_widget(self, widget):
        """ Override the adding of widgets so we can bind and catch their
        *on_touch_down* events. """
        widget.bind(on_touch_down=self.button_touch_down)
        return super(MainGrid, self).add_widget(widget)

    def button_touch_down(self, button, touch):
        """ Use collision detection to select buttons when the touch occurs
        within their area. """
        if button.collide_point(*touch.pos):
            self.update_button_text(button)

    def update_button_text(self, button):
        if self.shift_down:
            button.countdown()
        else:
            button.countup()


class CustomButton(Button):
    DIC = {0: "*", 1: "1", 2: "2", 3: "3", 4: "4",
           5: "5", 6: "6", 7: "7", 8: "8", 9: "9"}

    def __init__(self, **kwargs):
        super(CustomButton, self).__init__(**kwargs)
        self.counter = 0
        self.text = CustomButton.DIC[0]

    def countup(self):
        self.counter = (self.counter+1) % 10
        self.text = CustomButton.DIC[self.counter]

    def countdown(self):
        self.counter = (self.counter-1) % 10
        self.text = CustomButton.DIC[self.counter]


class SudokuApp(App):

    def on_start(self):
        main_grid = self.root.ids.main_grid
        for (k, l) in product(range(9), repeat=2):
            main_grid.add_widget(CustomButton(
                id="v_{}_{}".format(str(k), str(l))))

    def solve(self):
        grid = lambda i, j: z3.Int("grid[%d,%d]" % (i, j))
        print("Start to solve")
        children = self.root.ids.main_grid.children
        problem = [[0]*9 for _ in range(9)]
        for child in children:
            i, j = child.id.split("_")[1:]
            i, j = int(i), int(j)
            if child.text.isnumeric():
                problem[i][j] = int(child.text)
            else:
                problem[i][j] = 0
        solver = Z3Solver(problem)
        result = solver.solve()
        if result == z3.sat:
            model = solver.model()
            for child in children:
                i, j = child.id.split("_")[1:]
                i, j = int(i), int(j)
                child.text = str(model[grid(i, j)])
        else:
            print(result)

    def reset(self):
        print("Reset")
        children = self.root.ids.main_grid.children
        for child in children:
            child.text = "*"


def main():
    SudokuApp().run()


if __name__ == '__main__':
    main()
https://kivy.org/docs/api-kivy.uix.behaviors.compoundselection.html
のサンプルコードを参考に作りました.
sudoku.ky はSudokuApp クラスの見た目を記述します.Kivyにはクラス名の末尾のAppを取り除いた文字(ここではSudoku)を小文字にしたワードをファイルの名前として.kvにするという決まりがあるようです.
実行例
まずしかるべき方法で kivy をインストールします.
sudoku.kyとsudoku.pyは同じ階層に配置して
$ python sudoku.py
を実行すると画面が立ち上がります.

9x9のマスが各々ボタンになっており,クリックの回数で 不定 * から1,2,3,4,5,6,7,8,9 を選べます. Shift キーを押しながらクリックすると番号を減らすことができる自称親切設計です.
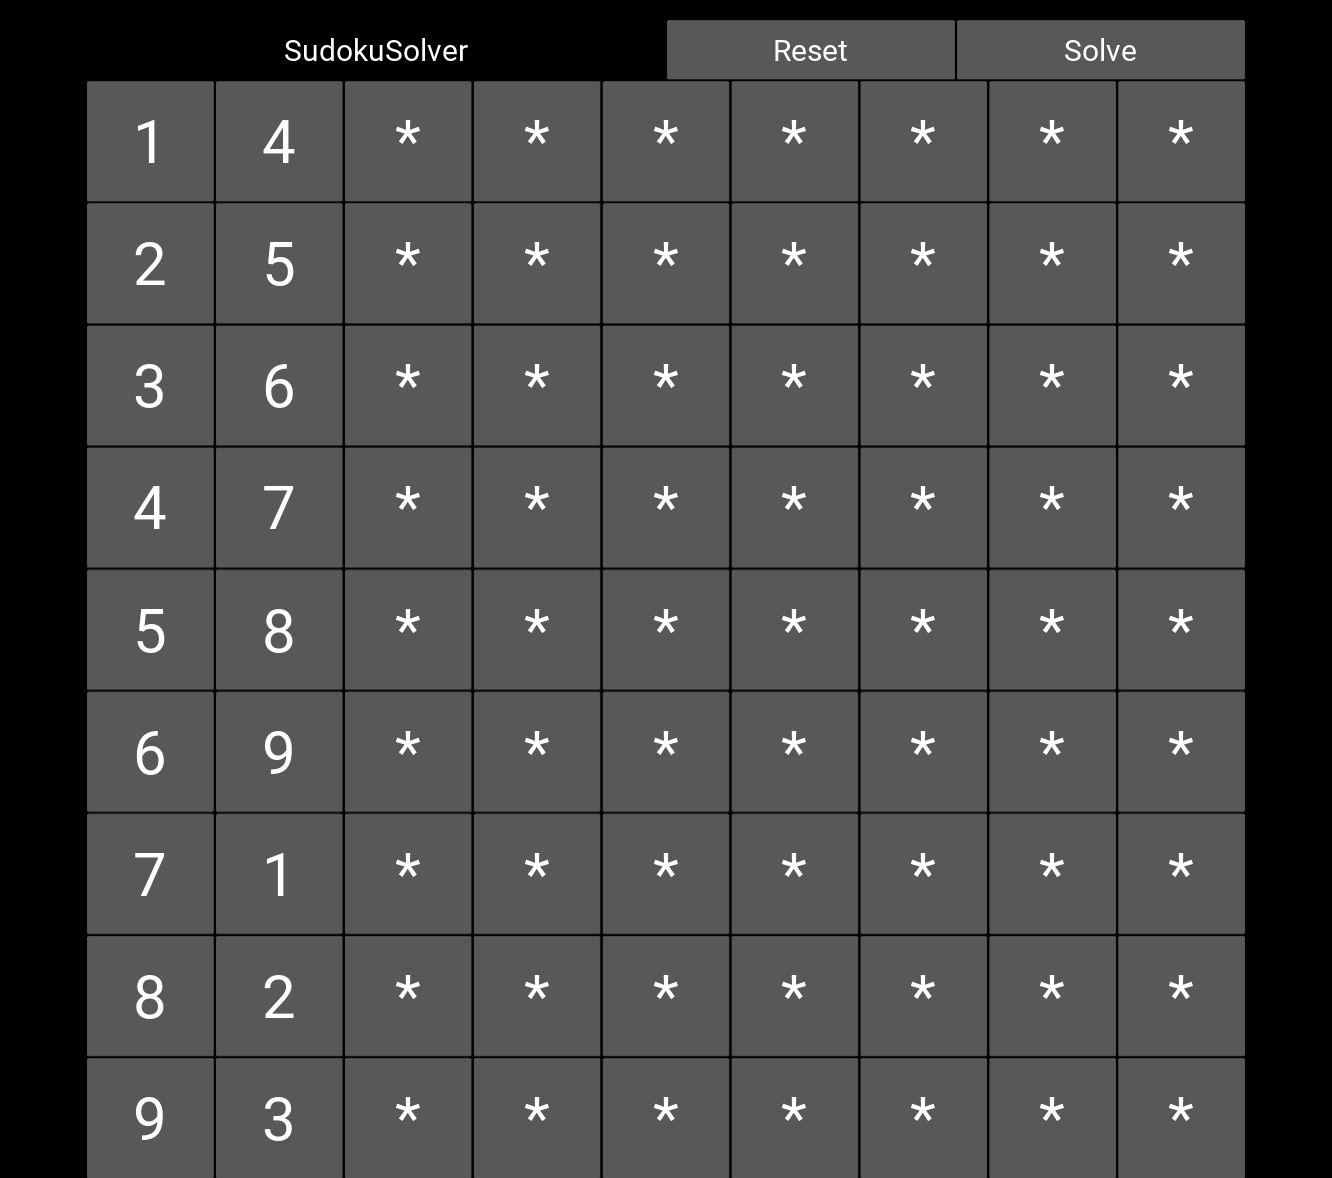
とりあえずボタンを押して見た様子です.
ここから右上のSolveという名前のボタンをクリックするとバックでソルバーが働いて

と結果が出ます.今のところunsatの場合は何もしない作りになっています.
Reset ボタンでマスを全て * に初期化します.
改良すべき点
これ自体はアルファ版なので改良すべき点が多くあります.例えば
- デザイン:普通の数独では3x3の小さいブロックの区切りがあるのでそれを区切る境界線を描画したい.
MainGridだけじゃなくてSubGridというクラスを作っていく良さそう. - 初期値の設定を行う時に矛盾する配置を検知する:現状では任意の値を初期設定として配置してしまい,Solveボタンを押してもunsatとなるので答えが出ません.
- 初期設定を増やすたびに * からその他番号の候補を絞り込みたい:これで上の問題は解決できそう.
- ソルバーが働く処理をスレッドを立てて計算させる. 今の設計では計算が非常に長いとGUIの応答がない状態になリマス.GUI初心者あるあるですね.こういう経験を踏むことでスレッドのありがたみを知ることができるはず.
などです.
今日はここまで, 続きどなたか作ってくれないかしら.
-> 追記 β版作りました. https://qiita.com/SatoshiTerasaki/items/e1bb2fe450636e93a0bf