本日は
Julia アドベントカレンダーの $N=10$ 日目です.
Julia のコードを WebAssembly に変換しブラウザで実行する話です.例として生命維持活動として行なっている推しの自炊をしているので作ったものを飾るギャラリーを作る技術として採用しました(かなり後付け).
Julia の IR(中間表現) から WebAssembly を作る
試みの解説は3年前に下記の記事を書きました.
ただし,簡単な足し算しかできてませんでした.
最近の動向
クリスさんの投稿でかなり進化していることがわかりました.
例
WebAssemblyCompiler.jl にある例を見てみましょう.スマホだとみられなかったのでPCでご覧ください.
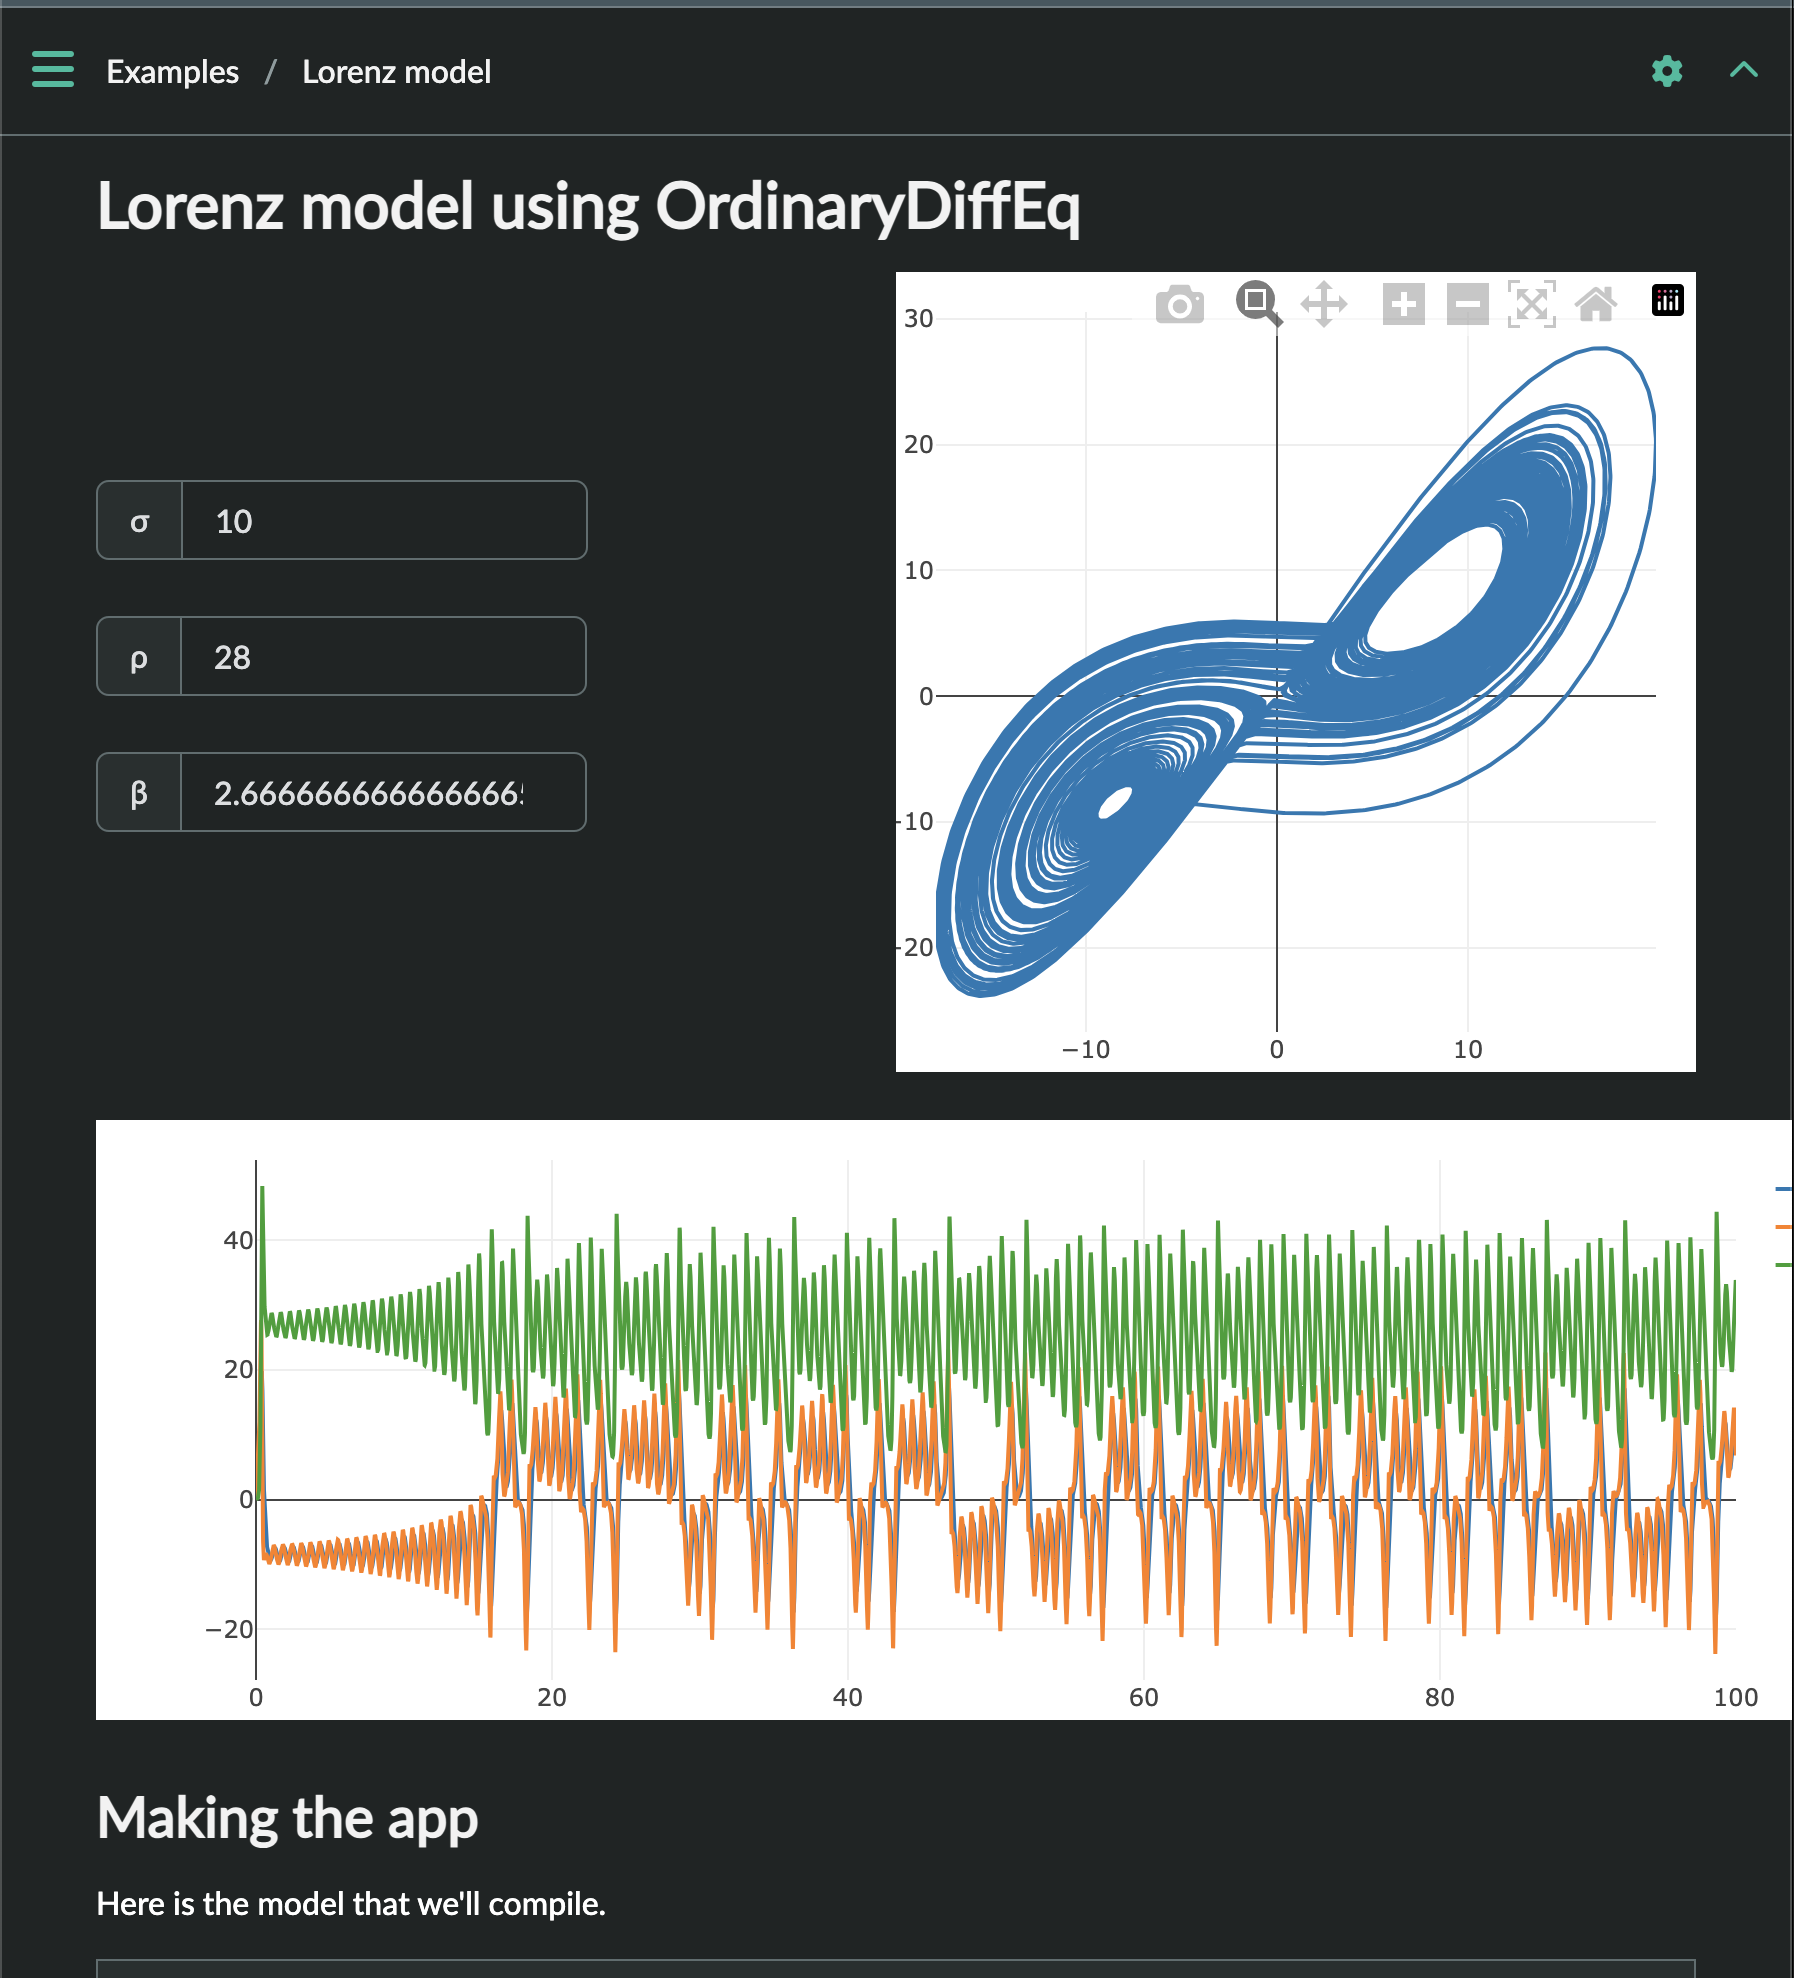
上記のスクショは GitHub 上でホスティングされた Documenter.jl のページです.まずすごいのが思ったよりも本格的なことがデモページで公開されていることです.パラメータ $\sigma, \rho, \beta$ は「変更する」ことができて,「それに応じて動かせる」ことができます.パッケージのユーザに新しい体験を提供してくれます.上記のページは下記の Julia のコードを wasm に変換したものが動作しています.
using OrdinaryDiffEq
using WebAssemblyCompiler

function lorenz!(du,u,p,t)
    σ,ρ,β = p
    du[1] = σ*(u[2]-u[1])
    du[2] = u[1]*(ρ-u[3]) - u[2]
    du[3] = u[1]*u[2] - β*u[3]
end

u0 = [1.0,0.0,0.0]
tspan = (0.0,100.0)
p = (10.0,28.0,8/3)
prob = ODEProblem{true, SciMLBase.FullSpecialize}(lorenz!,u0,tspan,p)  # try to avoid FunctionWrappers with FullSpecialize

const integ = init(prob, Tsit5(), dense = true)
https://github.com/SciML/OrdinaryDiffEq.jl は Julia の微分方程式のパッケージで割と規模が大きいものです.その機能を使って微分方程式を解く様子をブラウザ上で見せることができるのです.
グラフの描画は JavaScript ライブラリの Plotly に Julia の配列データを渡して実現しています.jscall マクロによってデータの橋渡しをしています.
# これは Julia のコード
function update()
    OrdinaryDiffEq.reinit!(integ)
    integ.p = update_params() # ユーザの入力を受け取る
    sol = solve!(integ) # 微分方程式を解く
    # 解いた結果を配列にする
    t = collect(0:0.001:100)
    u1 = Float64[sol(tt)[1] for tt in t]
    u2 = Float64[sol(tt)[2] for tt in t]
    u3 = Float64[sol(tt)[3] for tt in t]
    update_output(t, u1, u2, u3)
    nothing
end

@inline function update_output(t, u1, u2, u3)
    # Julia のデータを可視化する場所
    # JavaScript ライブラリ Plotly のインターフェースに合わせて整えていく
    xydata = ((x = u1, y = u2, type = "line", name = "x"),)
    xylayout = (width = 400.0, height = 400.0, margin = (t = 20., b = 20., l = 20., r = 20.))
    config = (responsive = true,)
    plotly("xyplot", xydata, xylayout, config)
    tdata = ((x = t, y = u1, type = "line", name = "x"),
             (x = t, y = u2, type = "line", name = "y"),
             (x = t, y = u3, type = "line", name = "z"))
    tlayout = (width = 900.0, height = 300.0, margin = (t = 20., b = 20.))
    plotly("timeplot", tdata, tlayout, config)
    nothing
end

# Julia と JS の橋渡しをする Julia の関数
plotly(id, data, layout, config) =
    @jscall("(id, data, layout, config) => Plotly.newPlot(id, data, layout, config)",
        Nothing, Tuple{Externref, Externref, Externref, Externref},
        JS.object(id), data, layout, config)
パラメータの受けたわすためのライブラリは WebAssemblyCompiler の中の人と同じ tshort さんが書いています.https://github.com/tshort/mdpad-js
UI/フロントエンド側の処理は次のようになっています.
   <script src="js/mdpad.js" ></script>
   <script src="image/image.wasm.js"></script>
   <script>
      mdpad = {seed: 1}
      setTimeout(function() {
          x = document.getElementById("myDiv")
          if (x.innerHTML === "") {
              x.innerHTML = "<bold>Unsupported browser.</bold> Chrome v119 or Firefox v120 or better should work."
          }
        }, 500)
      async function mdpad_init() {
          const fetchPromise = fetch('image/image.wasm');
          const { instance } = await WebAssembly.instantiateStreaming(fetchPromise, jsexports);
          wasm = instance.exports;
      }
      function mdpad_update() {
          wasm.update()
      }
   </script>
ユーザが mdpad-js が提供しているUIコンポーネントのパラメータの変更をすると mdpad_update 関数が呼び出されます.wasm.update を実行しています.この update は Julia 側の微分方程式を解く update 関数と対応しています.したがって,mdpad-js に限らず読者がフロントエンド側で特定の JavaScript の関数を呼び出す仕組みを作る技術を持っていればいろんなUIライブラリと連携できる(はず)です.
自分も何か作ってみよう
WebAssemblyCompiler のサンプルの作りはやや高度なのでもう少しシンプルなものを書いてみようと思い,画像のビューワを作りました.
コード: https://github.com/terasakisatoshi/WitchViewer.jl
デモサイト: https://terasakisatoshi.github.io/WitchViewer.jl/
デモサイトに行くと下記のようなページに遷移します.Index と書かれている箇所をぽちぽち押すと画像が切り替わります.
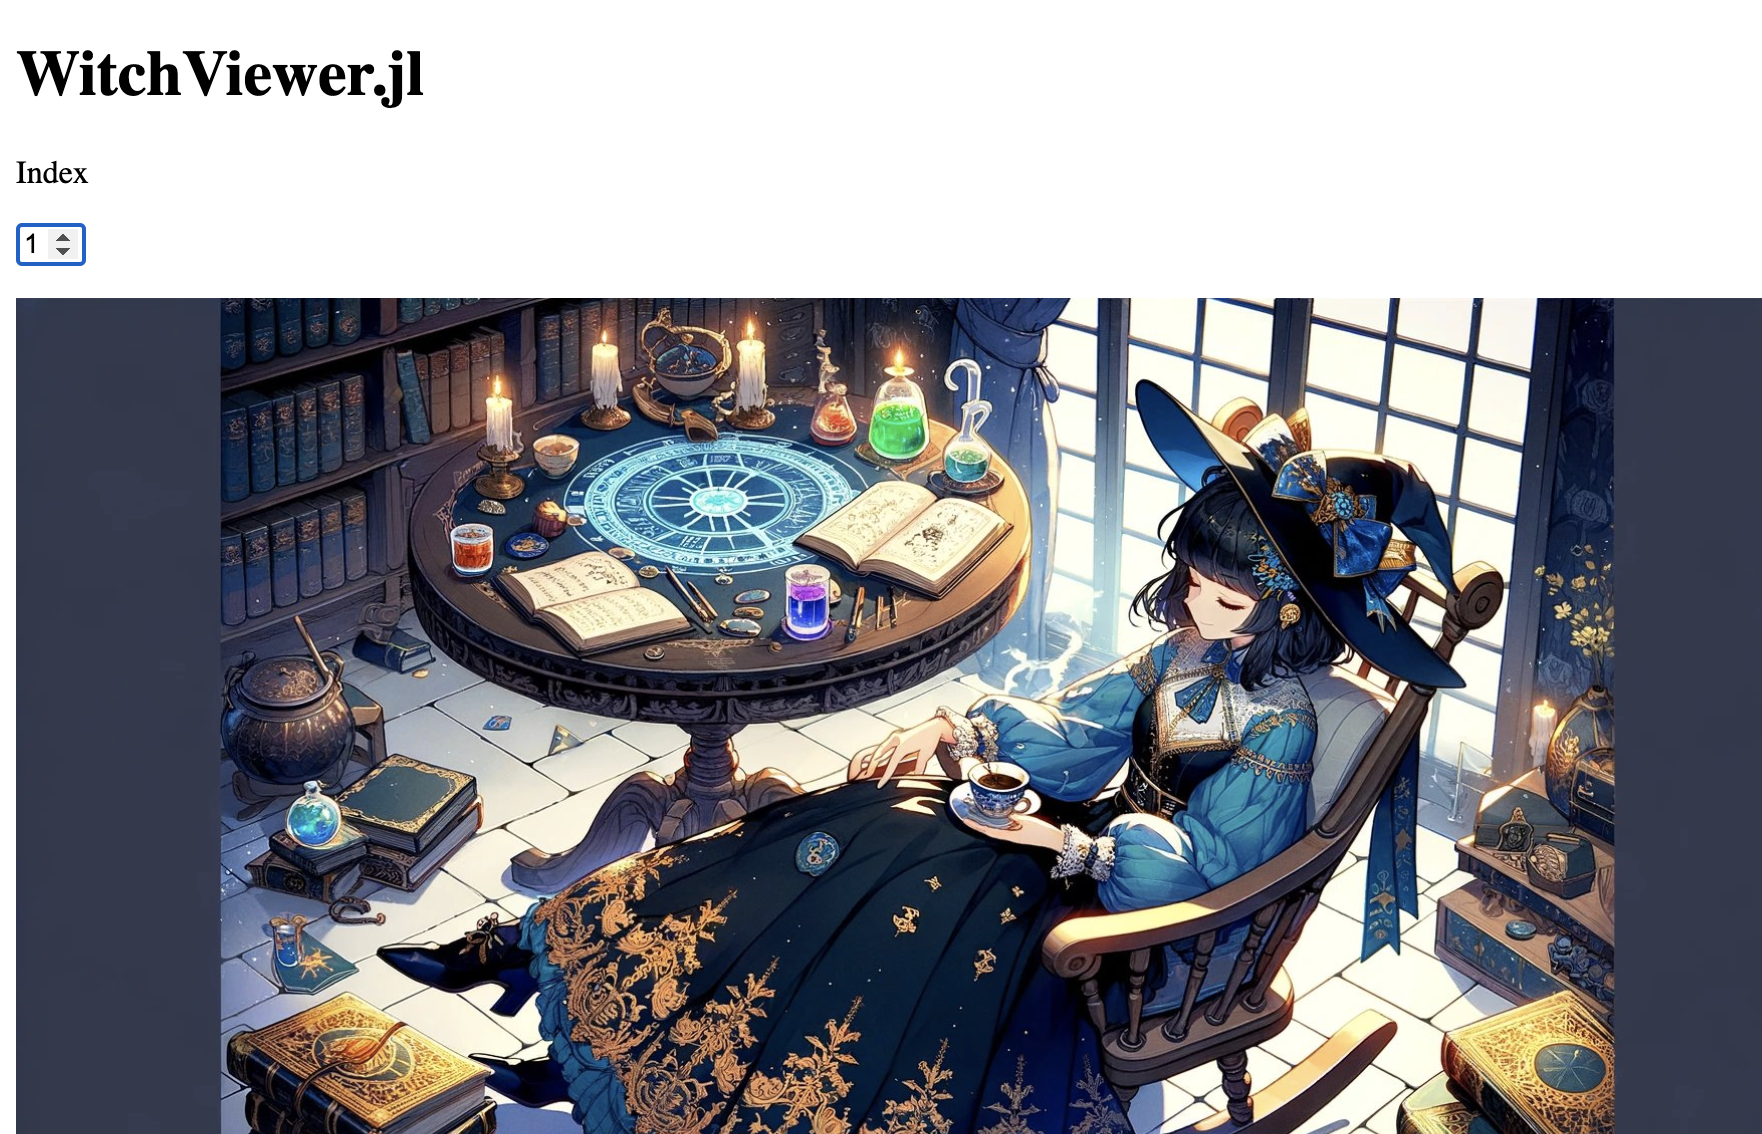
画像は ChagGPT Plus のプラグイン DALLE-3 で作った画像を Twitter にアップロードしています.Twitterのリンクに対応した画像タグ <img src=...> を表示させる仕組みにしています.本当は base64 でエンコードしたものを見せるのがかっこいいと思うでしょう.
本当はそうしたかったんだよ!
ボタンポチッとおしてランダムに表示でいたらかっこいいじゃん?
本当はそうしたかったんだよ!
残念ながら画像データを扱う N0f8 に対するコードのコンパイルが失敗するので泣く泣く画像の直リンクを指定しJS/ブラウザの機能を用いて画像を表示させています.
制限事項として下記のようなシードを指定するコードは動きません.
using Random

function f(seed::Int)
    rng = Xoshiro(seed)
    r = rand(rng, [1,2,3])
    ...
    ...
    ...
end
一方で r = rand() のように素朴な方法で乱数を生成することはできます.ソースから察するに Julia の Base.rand を JS の Math.random() に置き換える処理を実装しているからだと思います.(多分これ↓)
N0f8 型を理解できるように WebAssemblyCompiler.jl が賢くなれば応用は広がるはずです.今後に期待.
WitchViewer.jl のなかみ
index.html は下記のようになっています.Documenter.jl が生成した HTML ファイルを切りはりしているので不恰好ですが,まぁ動きます.ちゃんと理解している人が別のアプリケーションを書いてくれると嬉しいです.
<!DOCTYPE html>
<html>
   <script src="js/mdpad.js" ></script>
   <script src="image/image.wasm.js"></script>
   <script>
      mdpad = {seed: 1}
      setTimeout(function() {
          x = document.getElementById("myDiv")
          if (x.innerHTML === "") {
              x.innerHTML = "<bold>Unsupported browser.</bold> Chrome v119 or Firefox v120 or better should work."
          }
        }, 500)
      async function mdpad_init() {
          const fetchPromise = fetch('image/image.wasm');
          const { instance } = await WebAssembly.instantiateStreaming(fetchPromise, jsexports);
          wasm = instance.exports;
      }
      function mdpad_update() {
          wasm.update()
      }
   </script>
   <body>
      <!DOCTYPE html>
      <h1 id="WitchViewer.jl">
        WitchViewer.jl
      </h1>
      <div>
      <div class=" columns is-vcentered">
         <div class=" column">
            <form>
               <div class=" field has-addons">
                  <p class=" control"><a class=" button is-static">Index</a></p>
                  <p class=" control"><input class=" input" type="number" mdpad="index" step="1" value="1", min="1", max="7"></input></p>
               </div>
            </form>
         </div>
      </div>
      <div id="myOshi"></div>
   </body>
</html>
Julia 側,wasm ファイルを作るコードは下記の通りです.
using Base64
using WebAssemblyCompiler     # prep some input #hideall
const W = WebAssemblyCompiler
W.setdebug(:offline)

# These utilities update the page inputs.
mdpadnum(x) = @jscall("x => mdpad[x]", Float64, Tuple{Externref}, JS.object(x))
update_params() = mdpadnum("index")

function update_image(id, src)
    @jscall(
        "(id, src)=> document.getElementById(id).innerHTML=src",
        Nothing,
        Tuple{Externref,Externref},
        JS.object(id),
        src
    )
end

# This function plots the results.
@inline function update_output(index)
    # 直接 sample_url[index] はダメっぽい
    idx::Int = index

    WITCH_IMAGES = [
        # https://x.com/MathSorcerer/status/1732058284285411795?s=20
        "https://pbs.twimg.com/media/GAmBjZSa4AAapN9?format=jpg&name=large",
        "https://pbs.twimg.com/media/GAmBmIRbEAAyHXc?format=jpg&name=large",
        "https://pbs.twimg.com/media/GAmBpDFbgAAhD_7?format=jpg&name=large",
        # https://x.com/MathSorcerer/status/1732057090657804303?s=20
        "https://pbs.twimg.com/media/GAl_-CraUAAmgVJ?format=jpg&name=large",
        "https://pbs.twimg.com/media/GAmAAloa4AAzmB2?format=jpg&name=large",
        "https://pbs.twimg.com/media/GAmAdV1akAA_zwZ?format=jpg&name=large",
        "https://pbs.twimg.com/media/GAmAt7aa4AAERBE?format=jpg&name=large",
    ]
    u = WITCH_IMAGES[idx]

    update_image("myOshi", """<img width=900 src="$u">""")
    nothing
end

"""
    update()

My WASM interface
"""
function update()
    index = update_params()
    update_output(index)
    nothing
end

# Compile `update` to WebAssembly:
compile((update,); filepath = "image/image.wasm", validate = true)
ローレンツアトラクタのコードを切り端して作ったので update をエントリーポイントとしてみていけば何をやっているかはわかると思います.画像の候補は WITCH_IMAGES という配列にリンクを直に書いています.リンクを自動収集できたらかっこいいですよね(´・ω・`).
そして
update_image("myOshi", """<img width=900 src="$u">""")
と index.html にある <div id="myOshi"></div> が対応しています.これで Julia 側で書いたロジックとフロントエンドが結びつきます.
作った感想
自分のツールで自分が作った推しを鑑賞できるのは思ったよりも癒し効果が高い.最近疲れてるので推しを作らないと生きていけません.今頃この世にいなかったかもしれません.
自分は絵の技術はないですが,ChatGPT によって自分の頭の中にある世界観を表現し他者と共有できるようになりました.
Julia の動作環境を用意しなくてもいいので GCP のようなクラウドサービスを利用しなくても対話環境を用意できるのは嬉しいです.簡単なデモであれば GitHub のエコシステムで閉じることができそうです.
もう少し真面目なことを言えば,数値計算系のものはそれなりに動くはずなので研究者が対話的なデモを作るための手段として WebAssembly を使う時代が来たのかもしれないです.
今後の発展が楽しみです.