はじめに
1枚の画像から3Dモデルを作成するPIFuをやってみました!CPUでも動くよ。
システム環境
- Windows 10
- Anaconda 2020.02
- Python 3.7
- MeshLab
導入
Anacondaをインストールします。pyenv派の人やもともとpython入ってる人(macとか)は、環境ぶっ壊すのでやめてね。
https://github.com/shunsukesaito/PIFu からクローンします。
Anaconda Promptを開き、PIFu環境を作ります。
$ cd PIFu-master
$ conda create -n PIFu python=3.7
$ conda activate PIFu
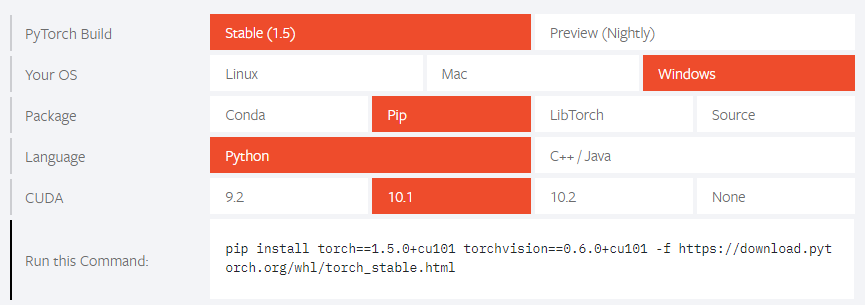
Pytorch環境を作ります。 https://pytorch.org/ のpipコマンドを参考にしましょう。あとは必要なライブラリもインストールします。

$ pip install torch==1.5.0+cu101 torchvision==0.6.0+cu101 -f https://download.pytorch.org/whl/torch_stable.html
$ pip install pillow
$ pip install scikit-image
$ pip install tqdm
$ pip install opencv-python
./scripts/download_trained_model.sh を実行します。もしくは、checkpointsフォルダを作成し、net_G、net_Cをダウンロードし、そこに置きます。
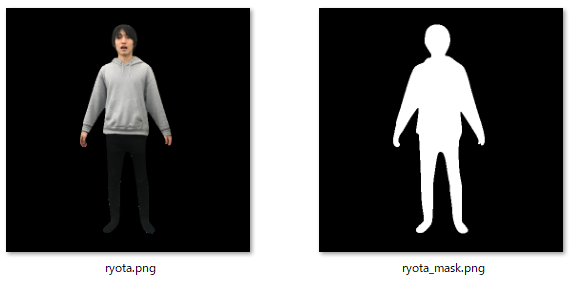
人が移っているやつとマスクしたやつの2枚をsample_imagesの下に置きます。今回は、サンプルの画像を用います。画像形式は.pngのみ対応で、画像サイズは512×512などにしてください。(例えば、505×730の画像だったとしたら、512×720みたいな)

※ペイント3Dでもマスク画像を作れます。マジック選択して対象の人の領域を切り取り、黒い背景の画像に貼り付け、保存。そのあと、それをコピーしたものを開き、マジック選択して、切り取る際に背景のオートフィルのチェックを外せば、切り取った部分が白く塗りつぶされたマスク画像ができちゃいます!
./scripts/test.shを実行します。もしくは下記を実行します。
$ python ./apps/eval.py --name pifu_demo --batch_size 1 --mlp_dim 257 1024 512 256 128 1 --mlp_dim_color 513 1024 512 256 128 3 --num_stack 4 --num_hourglass 2 --resolution 256 --hg_down ave_pool --norm group --norm_color group --test_folder_path ./sample_images --load_netG_checkpoint_path ./checkpoints/net_G --load_netC_checkpoint_path ./checkpoints/net_C --gpu_id 0
CPU(i7-8750H)で50秒くらいで完了しました。
結果はresults/pifu_demoフォルダに入っているので、できた.objファイルをMeshLabで開きます。
サンプルのりょうたさん#PIFu #MeshLab #3D #リアルアバター pic.twitter.com/fIVMnUEuZh
— 藤本賢志(ガチ本)@pixivFANBOXはじめました (@sotongshi) April 23, 2020
PIFuで出力したモデルの頂点カラーをテクスチャにベイクする
PIFuで出力したモデルは、頂点カラーとなっており、テクスチャの画像がありません。頂点カラーからテクスチャを生成するためには、ベイクする必要があります。こちらの動画にまとめました。
https://youtu.be/98mE9LyiAMs
1.PIFuで出力したモデル(.obj)をMeshLabで開き、.plyに変換する
2.変換したモデル(.ply)をblenderで開く
3.Blender2.8で頂点カラーをテクスチャにベイクするを参考にテクスチャを生成
4.テクスチャとモデル(.fbx)を保存
5.モデル(.fbx)をUnityで開き、マテリアルを設定
VRChatやclusterで遊べるようにする
リアルアバターにしてVRChatやclusterで用いる方法はこちら。
お疲れ様でした。