はじめに
こんにちは。MYJLab Advent Calendar 2025の17日目を担当します、4年佐藤です。
今回はMediaPipeを使って顔のランドマークを表示していこうと思います。
まずMediaPipeとはGoogle社が開発した機械学習と画像処理の機能が搭載されたフレームワークです。画像や動画データから、人間の顔や、手、姿勢、さらには物体の検出を行うことができます。特にリアルタイムでの処理を効率的に行うためのツールとして利用されています。
今回はその中で顔のランドマーク検出を行います。
詳細は公式ドキュメントを参照してください。
準備
必要なライブラリをインストールします。
pip install mediapipe opencv-python numpy
mediapipe公式モデルをダウンロードし同じフォルダに置きます。
ソースコード
import cv2
import numpy as np
from mediapipe import solutions
from mediapipe.framework.formats import landmark_pb2
import mediapipe as mp
from mediapipe.tasks import python
from mediapipe.tasks.python import vision


# ランドマーク描画関数
def draw_landmarks_on_image(rgb_image, detection_result):
    face_landmarks_list = detection_result.face_landmarks
    annotated_image = np.copy(rgb_image)

    for idx in range(len(face_landmarks_list)):
        face_landmarks = face_landmarks_list[idx]

        face_landmarks_proto = landmark_pb2.NormalizedLandmarkList()
        face_landmarks_proto.landmark.extend([
            landmark_pb2.NormalizedLandmark(x=landmark.x, y=landmark.y, z=landmark.z)
            for landmark in face_landmarks
        ])

        # Tesselation(細かい三角形メッシュ)
        solutions.drawing_utils.draw_landmarks(
            image=annotated_image,
            landmark_list=face_landmarks_proto,
            connections=mp.solutions.face_mesh.FACEMESH_TESSELATION,
            landmark_drawing_spec=None,
            connection_drawing_spec=mp.solutions.drawing_styles
            .get_default_face_mesh_tesselation_style())

        # Contours(輪郭・眉・唇など)
        solutions.drawing_utils.draw_landmarks(
            image=annotated_image,
            landmark_list=face_landmarks_proto,
            connections=mp.solutions.face_mesh.FACEMESH_CONTOURS,
            landmark_drawing_spec=None,
    connection_drawing_spec=mp.solutions.drawing_styles.get_default_face_mesh_contours_style()
        )

        # Iris(虹彩)
        solutions.drawing_utils.draw_landmarks(
            image=annotated_image,
            landmark_list=face_landmarks_proto,
            connections=mp.solutions.face_mesh.FACEMESH_IRISES,
            landmark_drawing_spec=None,
            connection_drawing_spec=mp.solutions.drawing_styles.get_default_face_mesh_iris_connections_style()
        )

    return annotated_image


# メイン処理(Webカメラ)
model_path = "face_landmarker.task"
base_options = python.BaseOptions(model_asset_path=model_path)
options = vision.FaceLandmarkerOptions(
    base_options=base_options,
    num_faces=1,
    running_mode=vision.RunningMode.VIDEO  # VIDEOモード
)
landmarker = vision.FaceLandmarker.create_from_options(options)

# Webカメラを開く
cap = cv2.VideoCapture(0)
frame_count = 0

while True:
    ret, frame = cap.read()
    # BGRからRGBに変換
    rgb_frame = cv2.cvtColor(frame, cv2.COLOR_BGR2RGB)
    # MediaPipe Imageに変換
    mp_image = mp.Image(image_format=mp.ImageFormat.SRGB, data=rgb_frame)
    timestamp_ms = frame_count * 33
    # 顔検出を実行
    detection_result = landmarker.detect_for_video(mp_image, timestamp_ms)
    # ランドマークを描画
    annotated_image = draw_landmarks_on_image(rgb_frame, detection_result)
    # RGBからBGRに戻して表示
    annotated_bgr = cv2.cvtColor(annotated_image, cv2.COLOR_RGB2BGR)
    cv2.imshow('Face Landmarks', annotated_bgr)
    frame_count += 1

    if cv2.waitKey(1) & 0xFF == ord('q'):
        break

cap.release()
cv2.destroyAllWindows()
これでWebカメラを使用してリアルタイムで顔のランドマーク点を表示することができます。
ちなみに画像にランドマーク点を表示させようとすると以下のようなコードになります。
import cv2
import numpy as np
from mediapipe import solutions
from mediapipe.framework.formats import landmark_pb2
import mediapipe as mp
from mediapipe.tasks import python
from mediapipe.tasks.python import vision


def draw_landmarks_on_image(rgb_image, detection_result):
    face_landmarks_list = detection_result.face_landmarks
    annotated_image = np.copy(rgb_image)

    for face_landmarks in face_landmarks_list:

        face_landmarks_proto = landmark_pb2.NormalizedLandmarkList()
        face_landmarks_proto.landmark.extend([
            landmark_pb2.NormalizedLandmark(x=landmark.x, y=landmark.y, z=landmark.z)
            for landmark in face_landmarks
        ])

        solutions.drawing_utils.draw_landmarks(
            image=annotated_image,
            landmark_list=face_landmarks_proto,
            connections=mp.solutions.face_mesh.FACEMESH_TESSELATION,
            landmark_drawing_spec=None,
            connection_drawing_spec=mp.solutions.drawing_styles.get_default_face_mesh_tesselation_style()
        )

        solutions.drawing_utils.draw_landmarks(
            image=annotated_image,
            landmark_list=face_landmarks_proto,
            connections=mp.solutions.face_mesh.FACEMESH_CONTOURS,
            landmark_drawing_spec=None,
            connection_drawing_spec=mp.solutions.drawing_styles.get_default_face_mesh_contours_style()
        )

        solutions.drawing_utils.draw_landmarks(
            image=annotated_image,
            landmark_list=face_landmarks_proto,
            connections=mp.solutions.face_mesh.FACEMESH_IRISES,
            landmark_drawing_spec=None,
            connection_drawing_spec=mp.solutions.drawing_styles.get_default_face_mesh_iris_connections_style()
        )

    return annotated_image

# 画像を解析して描画する部分
def process_image(image_path):

    model_path = "face_landmarker.task"

    # 画像読み込み
    bgr_image = cv2.imread(image_path)
    rgb_image = cv2.cvtColor(bgr_image, cv2.COLOR_BGR2RGB)
    mp_image = mp.Image(image_format=mp.ImageFormat.SRGB, data=rgb_image)

    base_options = python.BaseOptions(model_asset_path=model_path)
    options = vision.FaceLandmarkerOptions(
        base_options=base_options,
        output_face_blendshapes=False,
        output_facial_transformation_matrixes=False,
        num_faces=1
    )
    landmarker = vision.FaceLandmarker.create_from_options(options)

    # 検出
    detection_result = landmarker.detect(mp_image)
    # 描画
    annotated = draw_landmarks_on_image(rgb_image, detection_result)

    return cv2.cvtColor(annotated, cv2.COLOR_RGB2BGR)


output = process_image("face2.jpg")

cv2.imshow("Face Landmarks", output)
cv2.waitKey(0)
cv2.destroyAllWindows()
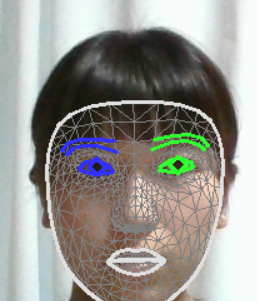
これを行うと

この画像が

このように顔のランドマーク点が表示されるようになります。
おわりに
今回は顔のランドマーク点を表示させましたが、顔だけではなく手や姿勢、物体検出なども行うことができます。
また、今回の顔のランドマーク点は表情認識や顔認証、瞬き検出など様々な用途に利用することができます。
実際に私は瞬き検出に使用しました!
機会があれば使ってみてください!
拙い内容でしたが最後まで読んでいただきありがとうございました。