chibi:bitとは
chibi:bitは、BBC(英国放送協会)が主体となって作っている教育向けマイコンボードBBC micro:bitの互換機です。
仕様はmicro:bitと同じです。25個のLED、2個のボタンスイッチのほか、加速度センサーと磁力センサー、BLE機能を搭載したマイコンボードです。
micro:bitはBLE機能が日本の技適が通っていない為使用ができない しかも 電源入れると自動的にBLEが起動するので、電源も入れられなので、日本で使う場合はchibi:bitをお勧めします。
chibi:bit専用の開発環境を用意されています。
もちろんmicro:bitの開発環境で書いたプログラムも書き込み可能です。
chibi:bit購入
スイッチサイエンス
Unityとchibi:bitの連携
今回はchibi:bitのセンサーの値をシリアル通信でUnityに値を送信してオブジェクト動かす所までやりたいと思います。
開発環境
・Windows10
・Unity5.5.0
セットアップ
micro:bitの公式サイトのリファレンスを参考
https://www.microbit.co.uk/td/serial-library
1、デバイスドライバーのインストール
サイトのDownload latest driverをクリック
2、ターミナルエミュレーターのインストール(PCの導通確認時に必要)
Tera TermのDownloadから.exeをダウンロード
公式では4.88をインストールしてと書いてあるが、当方は最新の4.93でも動きました。
chibi:bit側の実装
chibi:bit専用の開発環境を開きます。
プログラムはブロックエディタを使わず直接JavaScriptを書くようにします。理由はブロックエディタだとキャストが使えなかったので
コードは簡単に書くと
//アップデート
basic.forever(() => {
    serial.writeLine("pitch=" + input.rotation(Rotation.Pitch))//ジャイロセンサーのピッチを送信
    serial.writeLine("roll=" + input.rotation(Rotation.Roll))//ジャイロセンサーのロールを送信
})
でhexファイルをダウンロードしてきて、chibi:bitをusb接続してストレージとしてPC上に出てきたら、先ほど
ダウンロードしてきたhexファイルをコピペして焼き付ける。
シリアル通信の動作確認
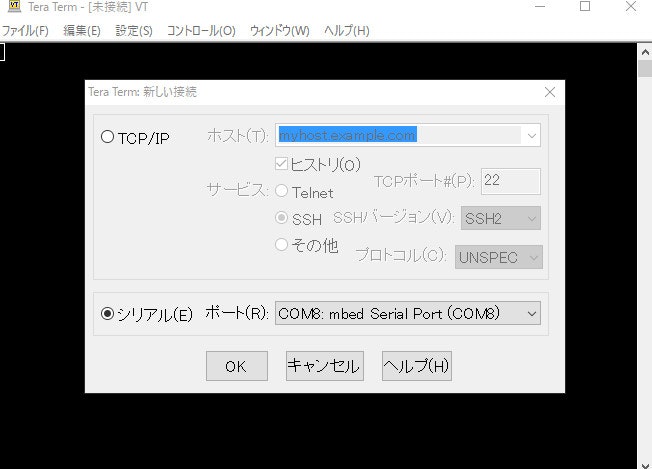
セットアップでインストールしたTera Termを起動する
1、ファイル→新しい接続を選択しTCP/IPとシリアルの項目があるので、シリアルを選択してokをクリック
ちなみにポート番号はあとでUnityの実装で使うのでメモしておく
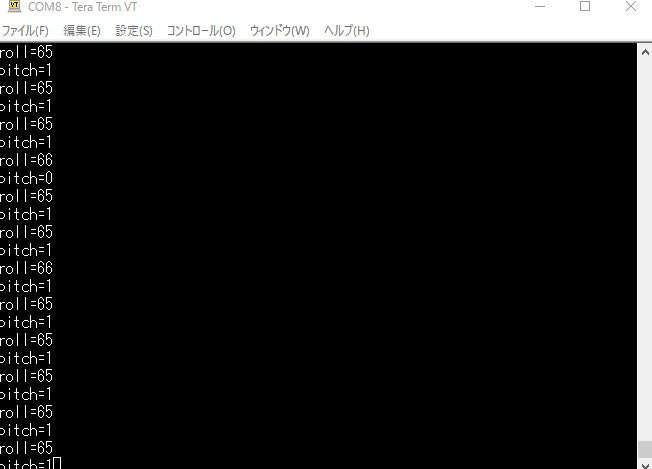
2、設定→シリアルポート設定を選択し ボー・レートを「115200」を選択しokをクリックすると
下記の画像にログが出ればシリアル通信の成功になります
Unity側の実装
最初にシリアル通信の受信部分のスクリプトの実装します。
参考にしたもの
http://tips.hecomi.com/entry/2014/07/28/023525
using System.Collections;
using System.Collections.Generic;
using UnityEngine;
using System.IO.Ports;
using System.Threading;
using System.Runtime.InteropServices;

public class SerialHandler : MonoBehaviour {
	public delegate void SerialDataReceivedEventHandler(string message);
	public event SerialDataReceivedEventHandler OnDataReceived;

	public string portName = "COM8";
	public int baudRate    = 115200;

	private SerialPort serialPort_;
	private Thread thread_;
	private bool isRunning_ = false;

	public string message_;
	private bool isNewMessageReceived_ = false;


	void Awake()
	{
		Open();

	}

	void Update()
	{
	}

	void OnDestroy()
	{
		Close();
	}

	private void Open()
	{
		serialPort_ = new SerialPort(portName, baudRate, Parity.None, 8, StopBits.One);

		serialPort_.Open();

		isRunning_ = true;

		thread_ = new Thread(Read);
		thread_.Start();
	}

	private void Close()
	{
		isRunning_ = false;

		if (thread_ != null && thread_.IsAlive) {
			thread_.Join();
		}

		if (serialPort_ != null && serialPort_.IsOpen) {
			serialPort_.Close();
			serialPort_.Dispose();
		}
	}

	private void Read()
	{
		while (isRunning_ && serialPort_ != null && serialPort_.IsOpen) {
			try {
				message_ = serialPort_.ReadLine();
				isNewMessageReceived_ = true;
				Debug.LogError(message_);
			} catch (System.Exception e) {
				Debug.LogWarning(e.Message);
			}
		}
	}

	public void Write(string message)
	{
		try {
			serialPort_.Write(message);
			Debug.LogError(message);
		} catch (System.Exception e) {
			Debug.LogWarning(e.Message);
		}
	}
}
ここで重要なのは
・public変数の string portNameをシリアル通信の動作確認でメモしといたものと置き換える
・public変数の int baudRateを115200に固定する
このスクリプト適当にシーンのオブジェクトにアタッチする
次にオブジェクトにシリアル通信の値を反映するスクリプトの実装します
ここではジャイロセンサーの値をオブジェクトの回転に反映しています
using System.Collections;
using System.Collections.Generic;
using UnityEngine;

public class ObjRotation : MonoBehaviour {

	public SerialHandler _SerialHandler; //SerialHandler.csの参照
	Vector3 rotation;

	// Update is called once per frame
	void Update () {
		objRotation(_SerialHandler.message_);
	}

	void objRotation(string message)
	{
		string[] a;

		a = message.Split("="[0]);
		if(a.Length != 2) return;
		int v = int.Parse( a[1]);
		switch(a[0])
		{
		case "pitch":
			rotation = new Vector2(v, rotation.y);
			break;
		case "roll":
			rotation = new Vector2( rotation.x, v);
			break;
		}
		Quaternion AddRot = Quaternion.identity;
		AddRot.eulerAngles = new Vector3( -rotation.x, 0, -rotation.y );

		transform.rotation = AddRot;
	}
}
動かしたいオブジェクトにObjRotation.csをアタッチして、
Playするとエディタ上のオブジェクトとchibi:bitの動きが反映されたら成功です。
unityとchibi:bitの連携 (シリアル通信) pic.twitter.com/GbD6mfIUNx
— SASE (@SaseKubrick) 2017年1月8日