

はじめに
Qiskitで実験を行う際,量子回路の形はそのままで,ゲートのパラメータを少しずつずらしながら実行したい場合がある.Qiskitにはこのようなケースに有用な Parameter オブジェクトというものが提供されているためそれを紹介したい.
環境
| 項目 | バージョン |
|---|---|
| qiskit | 2.2.1 |
| qiskit-ibm-runtime | 0.43.0 |
Parameterとは
公式ドキュメントでは,Parameter は以下のような説明がされている.
A compile-time symbolic parameter.
The value of aParametermust be entirely determined before a circuit begins execution. Typically this will mean that you should supply values for allParametersin a circuit usingQuantumCircuit.assign_parameters(), though certain hardware vendors may allow you to give them a circuit in terms of these parameters, provided you also pass the values separately.
This is the atom ofParameterExpression, and is itself an expression. The numeric value of a parameter need not be fixed while the circuit is being defined.
『Parameter とはコンパイル時の記号的なパラメータである.』 よくわからない.
ChatGPTにきいたところ,
数値ではなく,「後で数値が決まることを前提とした記号」として量子回路の中に存在します.
らしい.
つまり,量子回路を定義する段階で値が決まっていなくてもよい.
公式ドキュメントでは,以下のような例が示されている.
from qiskit.circuit import QuantumCircuit, Parameter

# create the parameter
phi = Parameter("phi")
qc = QuantumCircuit(1)

# parameterize the rotation
qc.rx(phi, 0)
qc.draw("mpl")

# bind the parameters after circuit to create a bound circuit
bc = qc.assign_parameters({phi: 3.14})
bc.measure_all()
bc.draw("mpl")
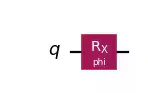
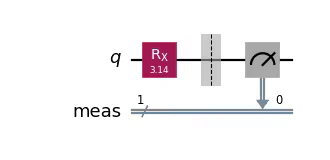
量子回路 pc に含まれている Parameter に assign_parameters() によって phi $=3.14$ という数値を与えている.
この例では測定前に数値を与えているが,与えていなくても良い(下の図の$3.14$がphiになるだけ).
回路実行前に値が決まってさえすれば良い.
良い点
qc を使いまわせる
先述のとおり,量子回路に変数を含ませることができるため,量子回路の作成が1回で済む.
例えば,与えたい数値が複数ある場合は,
from qiskit.circuit import QuantumCircuit, Parameter

# create the parameter
phi = Parameter("phi")
qc = QuantumCircuit(1)

# parameterize the rotation
qc.rx(phi, 0)
qc.draw("mpl")

# 数値のリスト
assign_values = [0, 3.14/2, 3.14]

# bind the parameters after circuit to create a bound circuit
for assign_value in assign_values:
    bc = qc.assign_parameters({phi: assign_value})
    bc.measure_all()
    bc.draw("mpl")
このように,数値のリストを作成し,for 文で順番に与えることができる.
これを単純な for 文のみで行おうとすると,
from qiskit.circuit import QuantumCircuit, Parameter

# 数値のリスト
assign_values = [0, 3.14/2, 3.14]

# bind the parameters after circuit to create a bound circuit
for assign_value in assign_values:
    qc = QuantumCircuit(1)
    qc.rx(assign_value, 0)
    qc.draw("mpl")
このように都度 qc を宣言して1から量子回路を作成しなければならないため,効率が悪い.
説明用の量子回路が出力できる
上は先程示したもの再掲であるが,文字でおかれていた方が,変動する値であるということが明示でき,「この$phi$にはこんな数値が入りますよ~」という説明もしやすい.
IBMQでの利用
公式ドキュメントの例にしたがった使い方
from math import pi

import matplotlib.pyplot as plt
from qiskit.circuit import Parameter, QuantumCircuit
from qiskit.transpiler.preset_passmanagers import generate_preset_pass_manager
from qiskit_ibm_runtime import QiskitRuntimeService
from qiskit_ibm_runtime import SamplerV2 as Sampler

# create the parameter
theta = Parameter("theta")
phi = Parameter("phi")
lam = Parameter("lambda")
qc = QuantumCircuit(1)

# parameterize the rotation
qc.u(theta, phi, lam, 0)
qc.measure_all()

assign_values = [
    {theta: 0, phi: 0, lam: 0},
    {theta: pi / 2, phi: pi / 2, lam: 0},
    {theta: pi, phi: 0, lam: pi / 2},
]

service = QiskitRuntimeService(
    channel="ibm_quantum_platform",
    instance=<インスタンス>,
    token=<APIキー>,
)
backend = service.backend(<利用する実機名(ibm_...)>)

pm = generate_preset_pass_manager(backend=backend, optimization_level=3)
isa_qc = pm.run(qc)

sampler = Sampler(backend)

for assign_value in assign_values:
    # bind the parameters after circuit to create a bound circuit
    bc = isa_qc.assign_parameters(assign_value)
    job = sampler.run([(bc)])
公式ドキュメントの例のとおり,Parameter に数値を代入した量子回路を宣言し,ジョブを提出するということを繰り返すことで,回路構造はそのままに,$U$ ゲートのパラメータを変更しながらの実験ができる.
でも,ジョブがいっぱい
先述のとおり,公式ドキュメントの例にしたがうと,ジョブの提出を繰り返すことになる.
そのため,一回の実験で大量のジョブが発生することになり,結果の取得や管理が大変になる.
推奨(ここがメイン)
引用の2文目最後,
though certain hardware vendors may allow you to give them a circuit in terms of these
parameters, provided you also pass the values separately.
のとおり,1つの量子回路 と 数値のリスト を一緒に与えることができる場合がある.
そして,IBMQではそれが可能である.
from math import pi

import matplotlib.pyplot as plt
from qiskit.circuit import Parameter, QuantumCircuit
from qiskit.transpiler.preset_passmanagers import generate_preset_pass_manager
from qiskit_ibm_runtime import QiskitRuntimeService
from qiskit_ibm_runtime import SamplerV2 as Sampler

# create the parameter
theta = Parameter("theta")
phi = Parameter("phi")
lam = Parameter("lambda")
qc = QuantumCircuit(1)

# parameterize the rotation
qc.u(theta, phi, lam, 0)
qc.measure_all()

# 逆順になることに注意!
assign_values = [[0, 0, 0], [0, pi / 2, pi / 2], [pi / 2, 0, pi]]

service = QiskitRuntimeService(
    channel="ibm_quantum_platform",
    instance=<インスタンス>,
    token=<APIキー>,
)
backend = service.backend(<利用する実機名(ibm_...)>)

pm = generate_preset_pass_manager(backend=backend, optimization_level=3)
isa_qc = pm.run(qc)
isa_qc.draw("mpl")

sampler = Sampler(backend)

job = sampler.run([(isa_qc, assign_values)])
以下は差分である.
...
- assign_values = [
-     {theta: 0, phi: 0, lam: 0},
-     {theta: pi / 2, phi: pi / 2, lam: 0},
-     {theta: pi, phi: 0, lam: pi / 2},
- ]
+ assign_values = [[0, 0, 0], [0, pi / 2, pi / 2], [pi / 2, 0, pi]]
...
- for assign_value in assign_values:
-     # bind the parameters after circuit to create a bound circuit
-     bc = isa_qc.assign_parameters(assign_value)
-     bc.draw("mpl")
-     job = sampler.run([(bc)])
+ job = sampler.run([(isa_qc, assign_values)])
...
Sampler の run() に,量子回路と数値のリストを与えている.
この方法を用いることで,1つのジョブで複数の数値に対する実験を行うことができる.
- 数値のリストの型は,
dictではなくlist[list[flost]]にしてください - 数値のリストの要素の順番が逆順になることに注意してください
最後に
Qiskitを利用されている方の参考になれば幸いです.