Djangoフレームワークのプロジェクトに、アプリケーションを追加する手順の一例をまとめました。
前提条件
- 「urls.pyをアプリケーションごとに配置する」手法を採用しています。
これは、akiyokoさんの書籍や、下記サイトで紹介されています。
DJangoメモ:はじめから(URLConfの単純化と分割)
- 最低限の実装と動作確認を目的とした流れなので、forms.pyやtest.pyの実装は省略しています。
環境
- Windows10、Python3.7.2
- 作成済みのプロジェクト直下で、コンソールが起動した状態
1.アプリケーションの雛型を追加
コンソールで、以下のコマンドを実行します。
> python manage.py startapp myappA
プロジェクトフォルダの下に、「myappA」フォルダが作成され、その中に以下のファイルやフォルダが作成されます。
- migrationsフォルダ
- __init__.py
- admin.py
- apps.py
- models.py
- tests.py
- views.py
2.setting.pyの修正
INSTALLED_APPS定義に、アプリケーション名を追記します。
INSTALLED_APPS = [
    'django.contrib.admin',
    'django.contrib.auth',
    'django.contrib.contenttypes',
    'django.contrib.sessions',
    'django.contrib.messages',
    'django.contrib.staticfiles',
    'otherapps',
    'myappA' #←今回追加
]
3.models.pyの定義
データベースのテーブルに該当する、modelの中身を定義します。
ここでは極力シンプルな「人物」モデルを作成しました。
from django.db import models

class Person(models.Model):      # 人物モデル
    class Meta:
        db_table = 'person'

    name = models.CharField(verbose_name='名前', max_length=255)
    age = models.IntegerField(verbose_name='年齢')

    def __str__(self):
        ret = str(self.name) + '(' + str(self.age) + '才)'
        return ret
4.views.pyの定義
ここでは、人物をリスト形式で表示する定義を追加しました。
from django.views.generic import ListView
from . import models

class PersonListView(ListView):
    model = models.Person
5.urls.pyの追加と修正
アプリケーションごとのurls.pyは、「startapp」コマンドでは追加されないため、「myappA」フォルダ内に手動で作成します。
from django.urls import path
from . import views

app_name = 'person'
urlpatterns = [
    path('', views.PersonListView.as_view())
]
また、myappAの大元のurls.pyに、myappAの定義を追加します。
from django.contrib import admin
from django.urls import include, path
from . import views

urlpatterns = [
    path('admin/', admin.site.urls),
    path('myappA/', include('myappA.urls')) #今回追加
]
6.apps.pyの確認
次のように自動で定義されていることを確認します。
from django.apps import AppConfig

class MyappAConfig(AppConfig):
    name = 'myappA'
7.templatesの定義
templatesフォルダの下に「myappA」フォルダを作成し、さらにその中に「person_list.html」を作成します。
(HTMLの名称('_list')については、Djangoの汎用ビュー入門(ListView)などを参照)
<!DOCTYPE html>
<html lang="ja">
<head>
    <meta charset="UTF-8"><title>Title</title></head>
<body>
    <p>人物リスト</p>
    <ul>
    {% for item in object_list %}
    <li>{{ item }}</li>
    {% endfor %}
    </ul>
</body>
</html>
8.admin.pyの定義
必須ではありませんが、管理画面にmyappAテーブルを表示するための定義です。
from django.contrib import admin
from .models import Person

admin.site.register(Person)
9.DBへの反映コマンド実行
詳しい説明は、いまさら振り返る Django Migration(その1)などへ。
> python manage.py makemigrations   #コマンド1
Migrations for 'myappA':
  myappA\migrations\0001_initial.py
    - Create model Person
    -
> python manage.py migrate myappA   #コマンド2
Operations to perform:
  Apply all migrations: myappA
Running migrations:
  Applying myappA.0001_initial… OK
10.動作検証
> python manage.py runserver   #コマンド3
~省略~
Starting development server at http://127.0.0.1:8000/
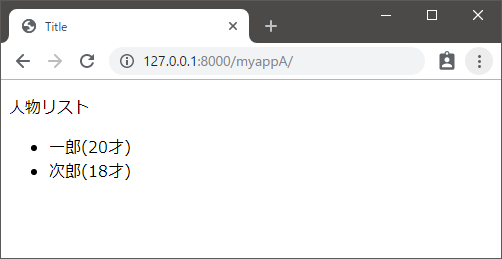
ブラウザで上記のメッセージを確認後、管理画面でmyappAのテストデータを登録し、127.0.0.1:8000/myappA/へアクセスします。
余談
書籍によって、pytyonコマンドが「python3 manage.py ...」と当たり前に記述されていますが、Windows環境で実行する環境によっては「python manage.py ...」となります。
# 自分自身が初っ端ハマって苦労したので、メモ書き
