【概要】
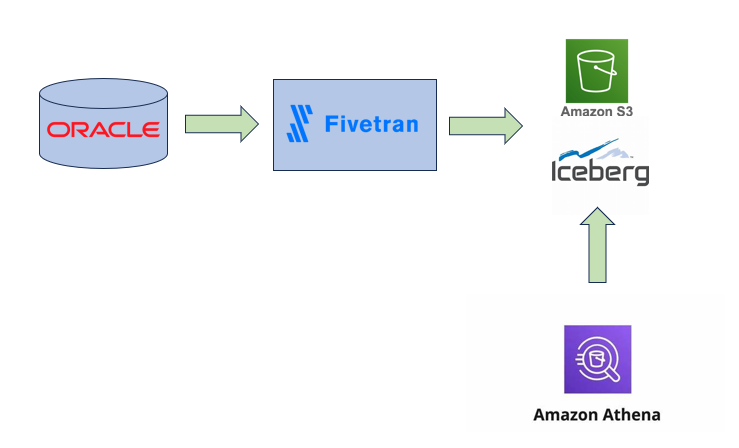
Fivetran、S3(Icebergテーブル)、OracleDBを用いてELTを実施いたします。今回記事ではまずFivetranとS3の疎通確認を行います。
【イメージ図】
【Fivetranとは?】
Fivetranとはデータ統合自動化サービスです。
データベース、ファイル等のデータソースからデータ抽出し、データ同期先へのロードを自動化することが可能です。
変換/加工処理をデータ同期先であるデータウェアハウス上で行うこともできます。
【Fivetran⇔S3疎通作業】
①Icebergテーブルの作成
AWS_Athenaからクエリを実行し、IcebergテーブルをS3上に作成します。
CREATE TABLE 【作成するテーブル名】 (
  id int,
  data string,
  category string)
PARTITIONED BY (category, bucket(16,id))
LOCATION 's3://【バケット名称】/【ディレクトリ名称】'
TBLPROPERTIES (
  'table_type'='ICEBERG',
  'format'='parquet',
  'write_compression'='snappy',
  'optimize_rewrite_delete_file_threshold'='10'
)
②Fivetran接続作業
②-2: Destination名を入力し、左下の「Add」を押下する。

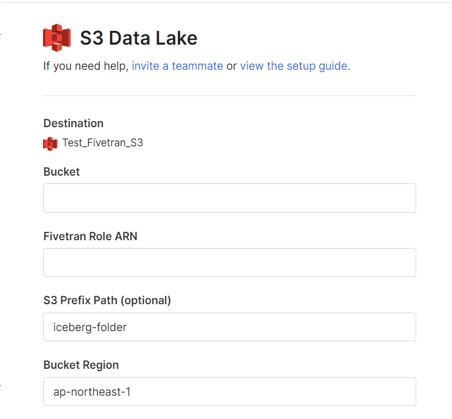
②-4: 各項目を入力していく。
【Bucket】
対象のS3バケット名を入力する。
【Fivetran Role ARN】
AWS上でFivetranからAWS上で必要なサービスへの許可Roleを作成し、FivetranにRoleを割り当てる。
※後ほどRoleの設定方法を記載いたします。
【S3 Prefix Path(optional)】
対象のS3バケット配下のディレクトリのパスを入力する。
【Bucket Region】
対象のS3バケットのリージョン名を入力する。
例)東京リージョンの場合:ap-northeast-1

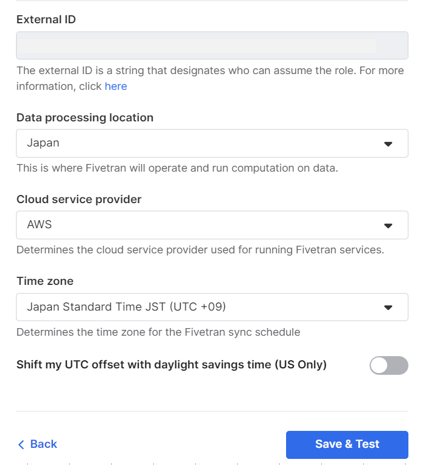
【External ID】
AWSでRoleを作成する際に使用します。
デフォルトで入力されています。
【Data processing location】
Japanを選択します。
【Cloud service provider】
AWSのS3を使用するため、AWSを選択します。
※デフォルトでAWSになっていると思います。
【Time zone】
Japan Standard Time JSTを選択します。
②-5: AWSでRoleを作成する。
下記ポリシーを二つ作成する。
{
    "Version": "2012-10-17",
    "Statement": [
        {
            "Sid": "AllowListBucketOfASpecificPrefix",
            "Effect": "Allow",
            "Action": [
                "s3:ListBucket"
            ],
            "Resource": [
                "arn:aws:s3:::【バケット名称】"
            ],
            "Condition": {
                "StringLike": {
                    "s3:prefix": [
                        "iceberg-folder/*"
                    ]
                }
            }
        },
        {
            "Sid": "AllowAllObjectActionsInSpecificPrefix",
            "Effect": "Allow",
            "Action": [
                "s3:DeleteObjectTagging",
                "s3:ReplicateObject",
                "s3:PutObject",
                "s3:GetObjectAcl",
                "s3:GetObject",
                "s3:DeleteObjectVersion",
                "s3:PutObjectTagging",
                "s3:DeleteObject",
                "s3:PutObjectAcl"
            ],
            "Resource": [
                "arn:aws:s3:::【バケット名称】/iceberg-folder/*"
            ]
        }
    ]
}
{
    "Version": "2012-10-17",
    "Statement": [
        {
            "Sid": "SetupFormTest",
            "Effect": "Allow",
            "Action": [
                "glue:DeleteDatabase"
            ],
            "Resource": [
                "arn:aws:glue:【リージョン】:【アカウントID】:database/fivetran*",
                "arn:aws:glue:【リージョン】:【アカウントID】:catalog",
                "arn:aws:glue:【リージョン】:【アカウントID】:table/fivetran*/*",
                "arn:aws:glue:【リージョン】:【アカウントID】:userDefinedFunction/fivetran*/*"
            ]
        },
        {
            "Sid": "AllConnectors",
            "Effect": "Allow",
            "Action": [
                "glue:GetDatabase",
                "glue:UpdateDatabase",
                "glue:CreateTable",
                "glue:GetTables",
                "glue:CreateDatabase",
                "glue:UpdateTable",
                "glue:BatchDeleteTable",
                "glue:DeleteTable",
                "glue:GetTable"
            ],
            "Resource": [
                "arn:aws:glue:【リージョン】:【アカウントID】:*"
            ]
        }
    ]
}
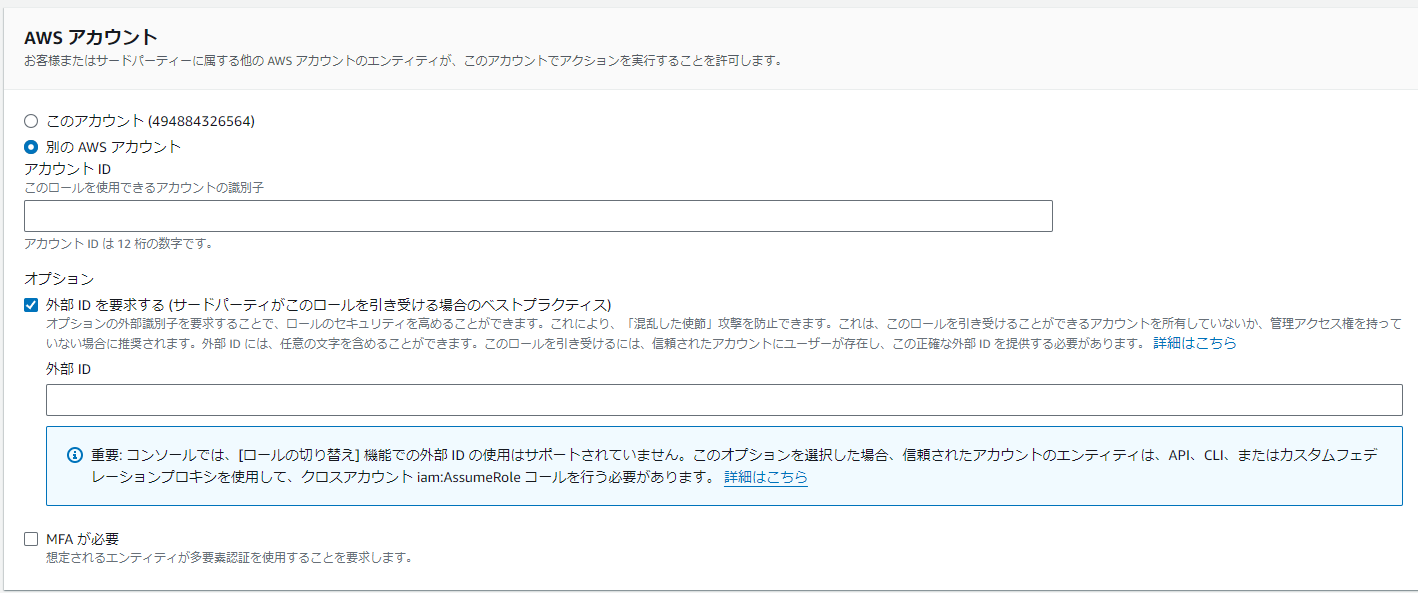
②-6: ②-5で作成したポリシーをアタッチしたロールを作成する。
「別のAWS アカウント」の「アカウントID」欄に、セットアップガイドに記載のあるFivetranのアカウントID「834469178297」を入力しますを入力します。
また、[外部IDを要求する]にチェックを選択します。
入力する外部IDは、②-4のセットアップの画面に表示されたExternal IDを入力します。設定後、[次へ]を押下します。
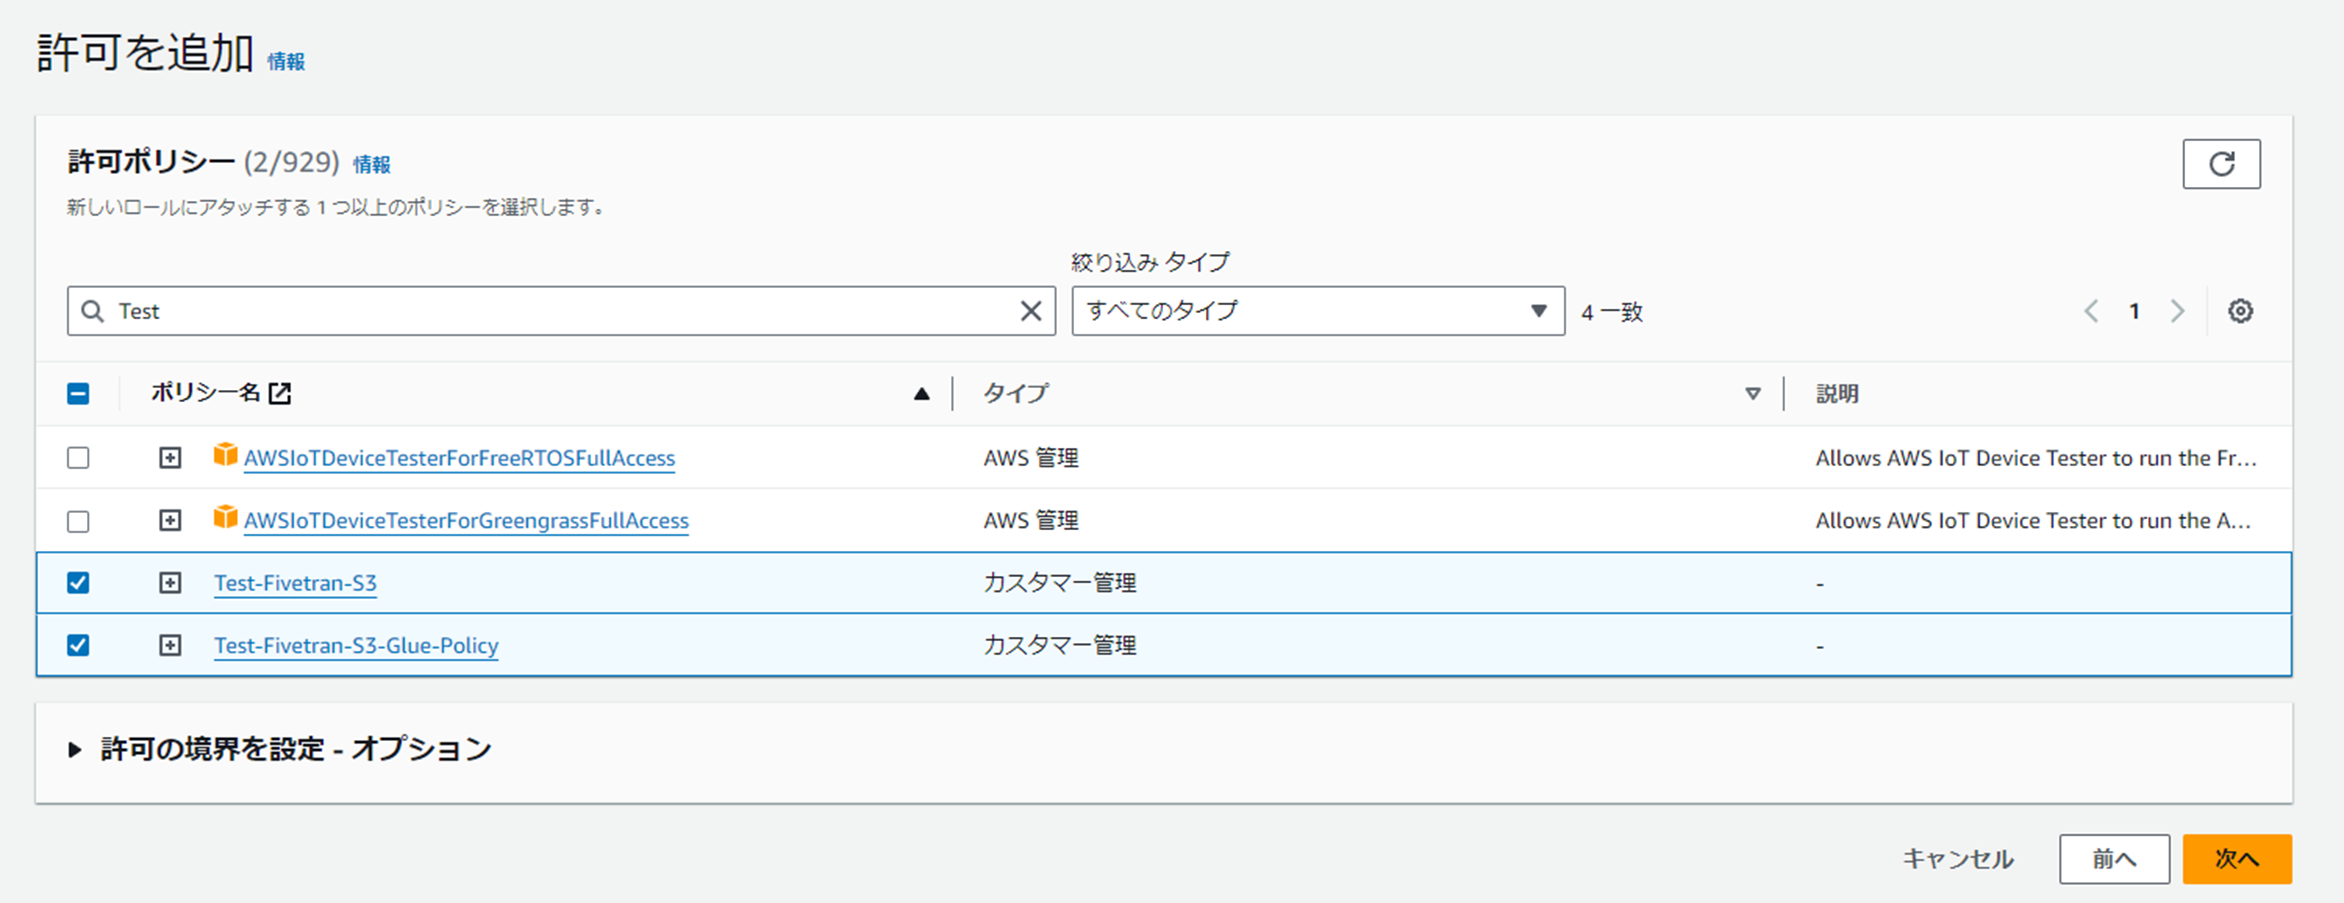
②-7: 許可ポリシーとして先ほど作成した2つのIAMポリシーを選択し、[次へ]を押下します。
②-8: ロール名を記入し、[ロールを作成]を押下します。
②-10: Fivetranの設定画面に戻り、「Fivetran Role ARN」の欄に②-9でコピーしたARNを貼り付け、「Save & Test」を押下する。
②-11:「All connection tests passed!」と表示されれば接続テスト完了です。

【まとめ】
ここまででFivetranとS3との連携は完了です。
次回はFivetarnとOracleデータベースの連携作業に移ります。
株式会社ジールでは、「ITリテラシーがない」「初期費用がかけられない」「親切・丁寧な支援がほしい」「ノーコード・ローコードがよい」「運用・保守の手間をかけられない」などのお客様の声を受けて、オールインワン型データ活用プラットフォーム「ZEUSCloud」を月額利用料にてご提供しております。
ご興味がある方は是非下記のリンクをご覧ください:
https://www.zdh.co.jp/products-services/cloud-data/zeuscloud/?utm_source=qiita&utm_medium=referral&utm_campaign=qiita_zeuscloud_content-area
