はじめに
今回はGitHub Projects(V2)のロードマップを Google Calendar に自動同期する仕組みを GitHub Actions で構築したのでその概要を紹介します。
この記事で作るもの
GitHub Projects でタスクに「Start date」や「Target date」を設定すると、自動的に Google Calendar にイベントとして反映される仕組みを作ります。
同期は GitHub → Google Calendar の一方向で、6時間ごとに自動実行されます。Priority(優先度)を設定していれば、カレンダー上で色分けもされます。
GitHub Projects (V2)
        │
        ▼ GitHub Actions(6時間ごと自動実行)
   Node.js スクリプト
        │
        ▼ Google Calendar API
  Google Calendar にイベント作成/更新/削除
前提条件
この記事の手順を進めるには、以下が必要です。
- GitHub アカウントと、同期したいプロジェクトがあるリポジトリ
- GitHub Projects V2(新しい Projects)を使用していること
- Google アカウント
それでは、順番に設定していきましょう。
Step 1: Google Cloud プロジェクトの作成と Calendar API の有効化
まず、Google Calendar API を使うために Google Cloud でプロジェクトを作成します。
1.1 Google Cloud Console にアクセス
ブラウザで Google Cloud Console を開きます。Google アカウントでログインしていない場合はログインしてください。
1.2 新しいプロジェクトを作成
画面上部のプロジェクト選択ドロップダウン(「プロジェクトを選択」と表示されている部分)をクリックし、「新しいプロジェクト」を選択します。
プロジェクト名は何でも構いません(例:github-calendar-sync)。組織は個人アカウントの場合「組織なし」で問題ありません。「作成」をクリックして、プロジェクトが作成されるのを待ちます。
作成が完了したら、そのプロジェクトが選択されていることを確認してください。
1.3 Google Calendar API を有効化
左側のナビゲーションメニューから「APIとサービス」→「ライブラリ」を選択します。
検索バーに「Google Calendar API」と入力して検索し、表示された「Google Calendar API」をクリックします。
「有効にする」ボタンをクリックして、API を有効化します。有効化には数秒かかる場合があります。
Step 2: サービスアカウントの作成
GitHub Actions から Google Calendar API を呼び出すために、サービスアカウントを作成します。サービスアカウントは、人間ではなくアプリケーションが使う専用のアカウントです。
2.1 認証情報ページを開く
左側のナビゲーションメニューから「APIとサービス」→「認証情報」を選択します。
2.2 サービスアカウントを作成
ページ上部の「認証情報を作成」ボタンをクリックし、「サービスアカウント」を選択します。
サービスアカウント名を入力します(例:calendar-sync)。サービスアカウント ID は自動的に生成されます。説明は省略可能です。「作成して続行」をクリックします。
「このサービスアカウントにプロジェクトへのアクセスを許可する」と「ユーザーにこのサービスアカウントへのアクセスを許可」の2つのステップは、今回は設定不要なので「完了」をクリックしてスキップします。
2.3 サービスアカウントのメールアドレスを確認
作成したサービスアカウントが一覧に表示されます。「メール」列に表示されているメールアドレス(calendar-sync@your-project.iam.gserviceaccount.com のような形式)をメモしておいてください。後で Google Calendar の共有設定で使います。
2.4 認証キー(JSON)をダウンロード
サービスアカウントの一覧から、作成したサービスアカウントのメールアドレスをクリックします。
「キー」タブを選択し、「鍵を追加」→「新しい鍵を作成」をクリックします。
キーのタイプは「JSON」を選択し、「作成」をクリックします。
JSON ファイルが自動的にダウンロードされます。このファイルは認証情報が含まれているため、Git にコミットしたり、他人と共有しないでください。後で GitHub Secrets に登録します。
Step 3: Google Calendar でサービスアカウントにアクセス権を付与
サービスアカウントが Google Calendar にアクセスできるように、カレンダーの共有設定を行います。
3.1 Google Calendar を開く
ブラウザで Google Calendar を開きます。
3.2 同期先のカレンダーを決める
左側のカレンダー一覧から、GitHub Projects を同期したいカレンダーを選びます。メインのカレンダーでも、新しく作成した専用カレンダーでも構いません。
専用カレンダーを作りたい場合は、「他のカレンダー」の横にある「+」をクリックし、「新しいカレンダーを作成」を選択して作成できます。
3.3 カレンダーの設定を開く
同期先のカレンダー名の横にある「⋮」(縦三点)アイコンをクリックし、「設定と共有」を選択します。
3.4 サービスアカウントとカレンダーを共有
設定画面をスクロールして「特定のユーザーまたはグループと共有する」セクションを見つけます。
「ユーザーやグループを追加」をクリックし、Step 2.3 でメモしたサービスアカウントのメールアドレスを入力します。
権限は「予定の変更」を選択してください。「予定の表示」だけではイベントを作成できません。
「送信」をクリックして共有設定を完了します。
3.5 カレンダー ID を確認
同じ設定画面で「カレンダーの統合」セクションまでスクロールします。
「カレンダー ID」という項目があります。これをコピーしてメモしておいてください。
メインのカレンダーの場合は、カレンダー ID はあなたの Gmail アドレス(例:yourname@gmail.com)になります。
別のカレンダーの場合は、xxxxxxxxxxxxxxx@group.calendar.google.com のような長い文字列になります。
Step 4: GitHub Personal Access Token の作成
GitHub Actions から GitHub Projects のデータを読み取るために、Personal Access Token(PAT)を作成します。
4.1 GitHub の設定ページを開く
GitHub にログインした状態で、右上のプロフィールアイコンをクリックし、「Settings」を選択します。
4.2 Developer settings を開く
左側のサイドバーを一番下までスクロールし、「Developer settings」をクリックします。
4.3 Fine-grained token を作成
「Personal access tokens」→「Fine-grained tokens」を選択し、「Generate new token」をクリックします。
以下の項目を設定します:
-
Token name: わかりやすい名前(例:
project-calendar-sync) - Expiration: トークンの有効期限(90日や1年など、お好みで)
- Repository access: 「Only select repositories」を選び、同期スクリプトを置くリポジトリを選択
-
Permissions:
- 「Account permissions」を展開
- 「Projects」を探して「Read-only」を選択
「Generate token」をクリックしてトークンを生成します。
生成されたトークンは一度しか表示されないので、必ずコピーしてメモしておいてください。
補足: gh コマンドを使っている場合
ローカルで gh コマンド(GitHub CLI)を使っている場合は、以下のコマンドで現在の認証トークンを取得できます:
gh auth token
ただし、このトークンに Projects の読み取り権限がない場合は、以下のコマンドで権限を追加する必要があります:
gh auth refresh -s project --hostname github.com
Step 5: 同期スクリプトの作成
ここからは実際のコードを書いていきます。リポジトリ内に automation/sync-to-gcal.mjs というファイルを作成します。
#!/usr/bin/env node
// automation/sync-to-gcal.mjs
// GitHub Projects → Google Calendar 同期スクリプト

import { google } from 'googleapis';

// ===== 設定 =====
// ここを自分の情報に書き換えてください
const PROJECT_OWNER = 'your-github-username';  // GitHub ユーザー名
const PROJECT_NUMBER = 1;  // プロジェクト番号(プロジェクトURLの末尾の数字)

// ===== GitHub Projects からアイテムを取得 =====
async function fetchProjectItems() {
  const query = `
    query {
      user(login: "${PROJECT_OWNER}") {
        projectV2(number: ${PROJECT_NUMBER}) {
          items(first: 100) {
            nodes {
              id
              fieldValues(first: 20) {
                nodes {
                  ... on ProjectV2ItemFieldTextValue {
                    text
                    field { ... on ProjectV2Field { name } }
                  }
                  ... on ProjectV2ItemFieldDateValue {
                    date
                    field { ... on ProjectV2Field { name } }
                  }
                  ... on ProjectV2ItemFieldSingleSelectValue {
                    name
                    field { ... on ProjectV2SingleSelectField { name } }
                  }
                }
              }
              content {
                ... on DraftIssue {
                  title
                  body
                }
                ... on Issue {
                  title
                  body
                  number
                }
              }
            }
          }
        }
      }
    }
  `;

  const response = await fetch('https://api.github.com/graphql', {
    method: 'POST',
    headers: {
      'Authorization': `Bearer ${process.env.GITHUB_TOKEN}`,
      'Content-Type': 'application/json',
    },
    body: JSON.stringify({ query }),
  });

  const data = await response.json();
  if (data.errors) {
    console.error('GraphQL errors:', data.errors);
    throw new Error('Failed to fetch project items');
  }

  return data.data.user.projectV2.items.nodes;
}

// ===== プロジェクトアイテムをパース =====
function parseProjectItem(item) {
  const result = {
    id: item.id,
    title: item.content?.title || 'Untitled',
    body: item.content?.body || '',
    startDate: null,
    targetDate: null,
    status: null,
    priority: null,
  };

  for (const field of item.fieldValues.nodes) {
    if (!field.field) continue;
    const fieldName = field.field.name;

    if (fieldName === 'Start date' && field.date) {
      result.startDate = field.date;
    } else if (fieldName === 'Target date' && field.date) {
      result.targetDate = field.date;
    } else if (fieldName === 'Status' && field.name) {
      result.status = field.name;
    } else if (fieldName === 'Priority' && field.name) {
      result.priority = field.name;
    }
  }

  return result;
}

// ===== Google Calendar サービスを初期化 =====
async function getCalendarService() {
  const credentials = JSON.parse(process.env.GOOGLE_SERVICE_ACCOUNT_KEY);

  const auth = new google.auth.GoogleAuth({
    credentials,
    scopes: ['https://www.googleapis.com/auth/calendar'],
  });

  return google.calendar({ version: 'v3', auth });
}

// ===== Google Calendar に同期 =====
async function syncToCalendar(items) {
  const calendar = await getCalendarService();
  const calendarId = process.env.GOOGLE_CALENDAR_ID;

  // このスクリプトで作成したイベントを取得(source=github-project タグで識別)
  const existingEvents = await calendar.events.list({
    calendarId,
    privateExtendedProperty: 'source=github-project',
    maxResults: 100,
  });

  const existingByProjectId = new Map();
  for (const event of existingEvents.data.items || []) {
    const projectItemId = event.extendedProperties?.private?.projectItemId;
    if (projectItemId) {
      existingByProjectId.set(projectItemId, event);
    }
  }

  for (const item of items) {
    // 日付が設定されていないアイテムはスキップ
    if (!item.startDate && !item.targetDate) {
      console.log(`Skipping "${item.title}" - no dates set`);
      continue;
    }

    // 完了済み(Done)のアイテムはスキップ
    if (item.status === 'Done') {
      console.log(`Skipping "${item.title}" - already done`);
      continue;
    }

    const startDate = item.startDate || item.targetDate;
    const endDate = item.targetDate || item.startDate;

    // イベントの説明文を組み立て
    let description = item.body || '';
    if (item.status) description += `\n\nStatus: ${item.status}`;
    if (item.priority) description += `\nPriority: ${item.priority}`;
    description += `\n\n---\nSynced from GitHub Projects`;

    const eventData = {
      summary: item.title,
      description,
      start: { date: startDate },
      end: { date: addDays(endDate, 1) }, // Google Calendar の終了日は「その日を含まない」ので +1 日
      extendedProperties: {
        private: {
          source: 'github-project',
          projectItemId: item.id,
        },
      },
    };

    // Priority に応じて色を設定
    if (item.priority === 'Urgent') {
      eventData.colorId = '11'; // 赤
    } else if (item.priority === 'Important') {
      eventData.colorId = '5'; // 黄
    }

    const existing = existingByProjectId.get(item.id);
    if (existing) {
      // 既存のイベントを更新
      await calendar.events.update({
        calendarId,
        eventId: existing.id,
        requestBody: eventData,
      });
      console.log(`Updated: ${item.title}`);
      existingByProjectId.delete(item.id);
    } else {
      // 新しいイベントを作成
      await calendar.events.insert({
        calendarId,
        requestBody: eventData,
      });
      console.log(`Created: ${item.title}`);
    }
  }

  // GitHub側で削除されたアイテムに対応するイベントを削除
  for (const [projectItemId, event] of existingByProjectId) {
    await calendar.events.delete({
      calendarId,
      eventId: event.id,
    });
    console.log(`Deleted: ${event.summary}`);
  }
}

// ===== ユーティリティ関数 =====
function addDays(dateStr, days) {
  const date = new Date(dateStr);
  date.setDate(date.getDate() + days);
  return date.toISOString().split('T')[0];
}

// ===== メイン処理 =====
async function main() {
  console.log('Fetching GitHub Project items...');
  const rawItems = await fetchProjectItems();

  console.log(`Found ${rawItems.length} items`);
  const items = rawItems.map(parseProjectItem);

  console.log('Syncing to Google Calendar...');
  await syncToCalendar(items);

  console.log('Sync complete!');
}

main().catch(err => {
  console.error(err);
  process.exit(1);
});
重要: スクリプト冒頭の PROJECT_OWNER と PROJECT_NUMBER を自分の情報に書き換えてください。
-
PROJECT_OWNER: GitHub のユーザー名 -
PROJECT_NUMBER: プロジェクトの番号(プロジェクト URLhttps://github.com/users/username/projects/3の末尾の数字)
Step 6: GitHub Actions ワークフローの作成
.github/workflows/sync-to-gcal.yml を作成します。
name: sync-to-gcal

on:
  schedule:
    # 6時間ごとに実行(UTC時間: 0時, 6時, 12時, 18時)
    - cron: '0 */6 * * *'
  # 手動実行を許可
  workflow_dispatch:

jobs:
  sync:
    runs-on: ubuntu-latest
    steps:
      - uses: actions/checkout@v4

      - uses: actions/setup-node@v4
        with:
          node-version: 20

      - name: Install dependencies
        run: npm install googleapis

      - name: Sync to Google Calendar
        env:
          GITHUB_TOKEN: ${{ secrets.PROJECT_READ_TOKEN }}
          GOOGLE_SERVICE_ACCOUNT_KEY: ${{ secrets.GOOGLE_SERVICE_ACCOUNT_KEY }}
          GOOGLE_CALENDAR_ID: ${{ secrets.GOOGLE_CALENDAR_ID }}
        run: node automation/sync-to-gcal.mjs
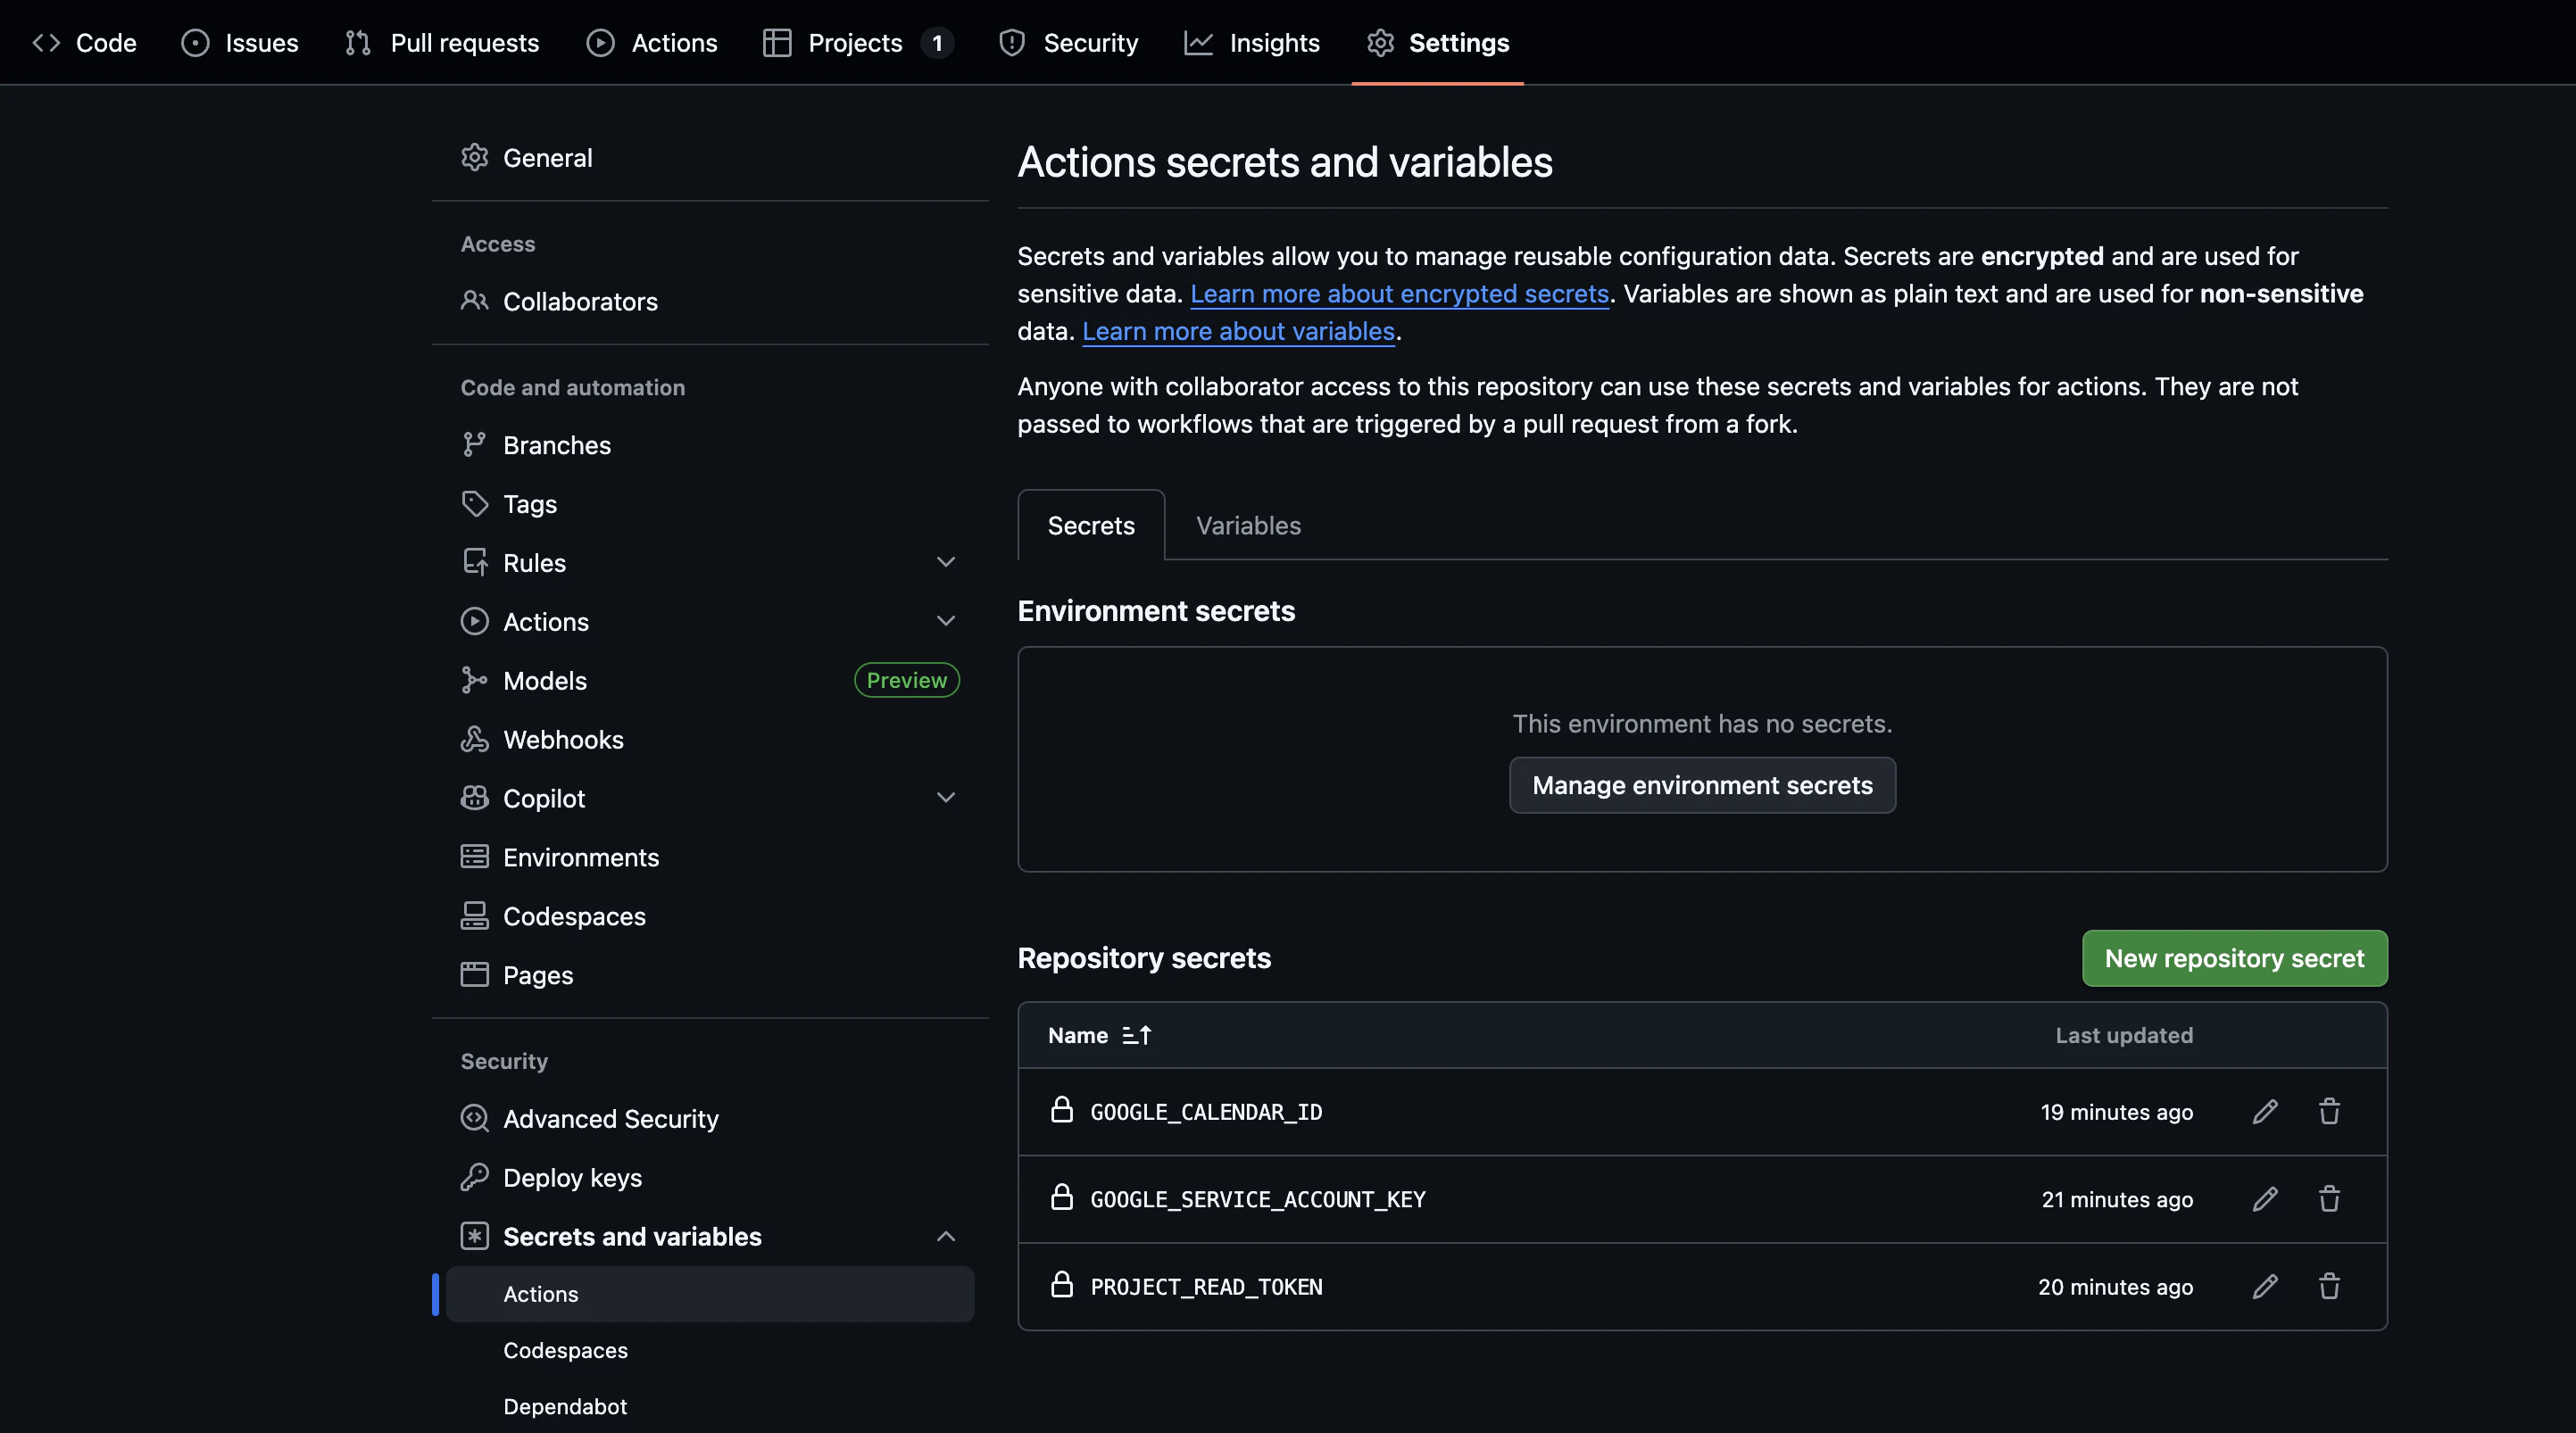
Step 7: GitHub Secrets の設定
GitHub Actions で使う認証情報を Secrets として登録します。
7.1 リポジトリの Settings を開く
GitHub でリポジトリを開き、「Settings」タブをクリックします。
7.2 Secrets ページを開く
左側のサイドバーから「Secrets and variables」→「Actions」を選択します。
7.3 Secrets を追加
「New repository secret」ボタンをクリックして、以下の3つの Secret を追加します。
1つ目: PROJECT_READ_TOKEN
- Name:
PROJECT_READ_TOKEN - Secret: Step 4 で作成した GitHub Personal Access Token
2つ目: GOOGLE_SERVICE_ACCOUNT_KEY
- Name:
GOOGLE_SERVICE_ACCOUNT_KEY - Secret: Step 2.4 でダウンロードした JSON ファイルの中身をすべてコピー&ペースト
3つ目: GOOGLE_CALENDAR_ID
- Name:
GOOGLE_CALENDAR_ID - Secret: Step 3.5 でメモしたカレンダー ID
Step 8: 動作確認
設定が完了したら、実際に動作確認をしてみましょう。
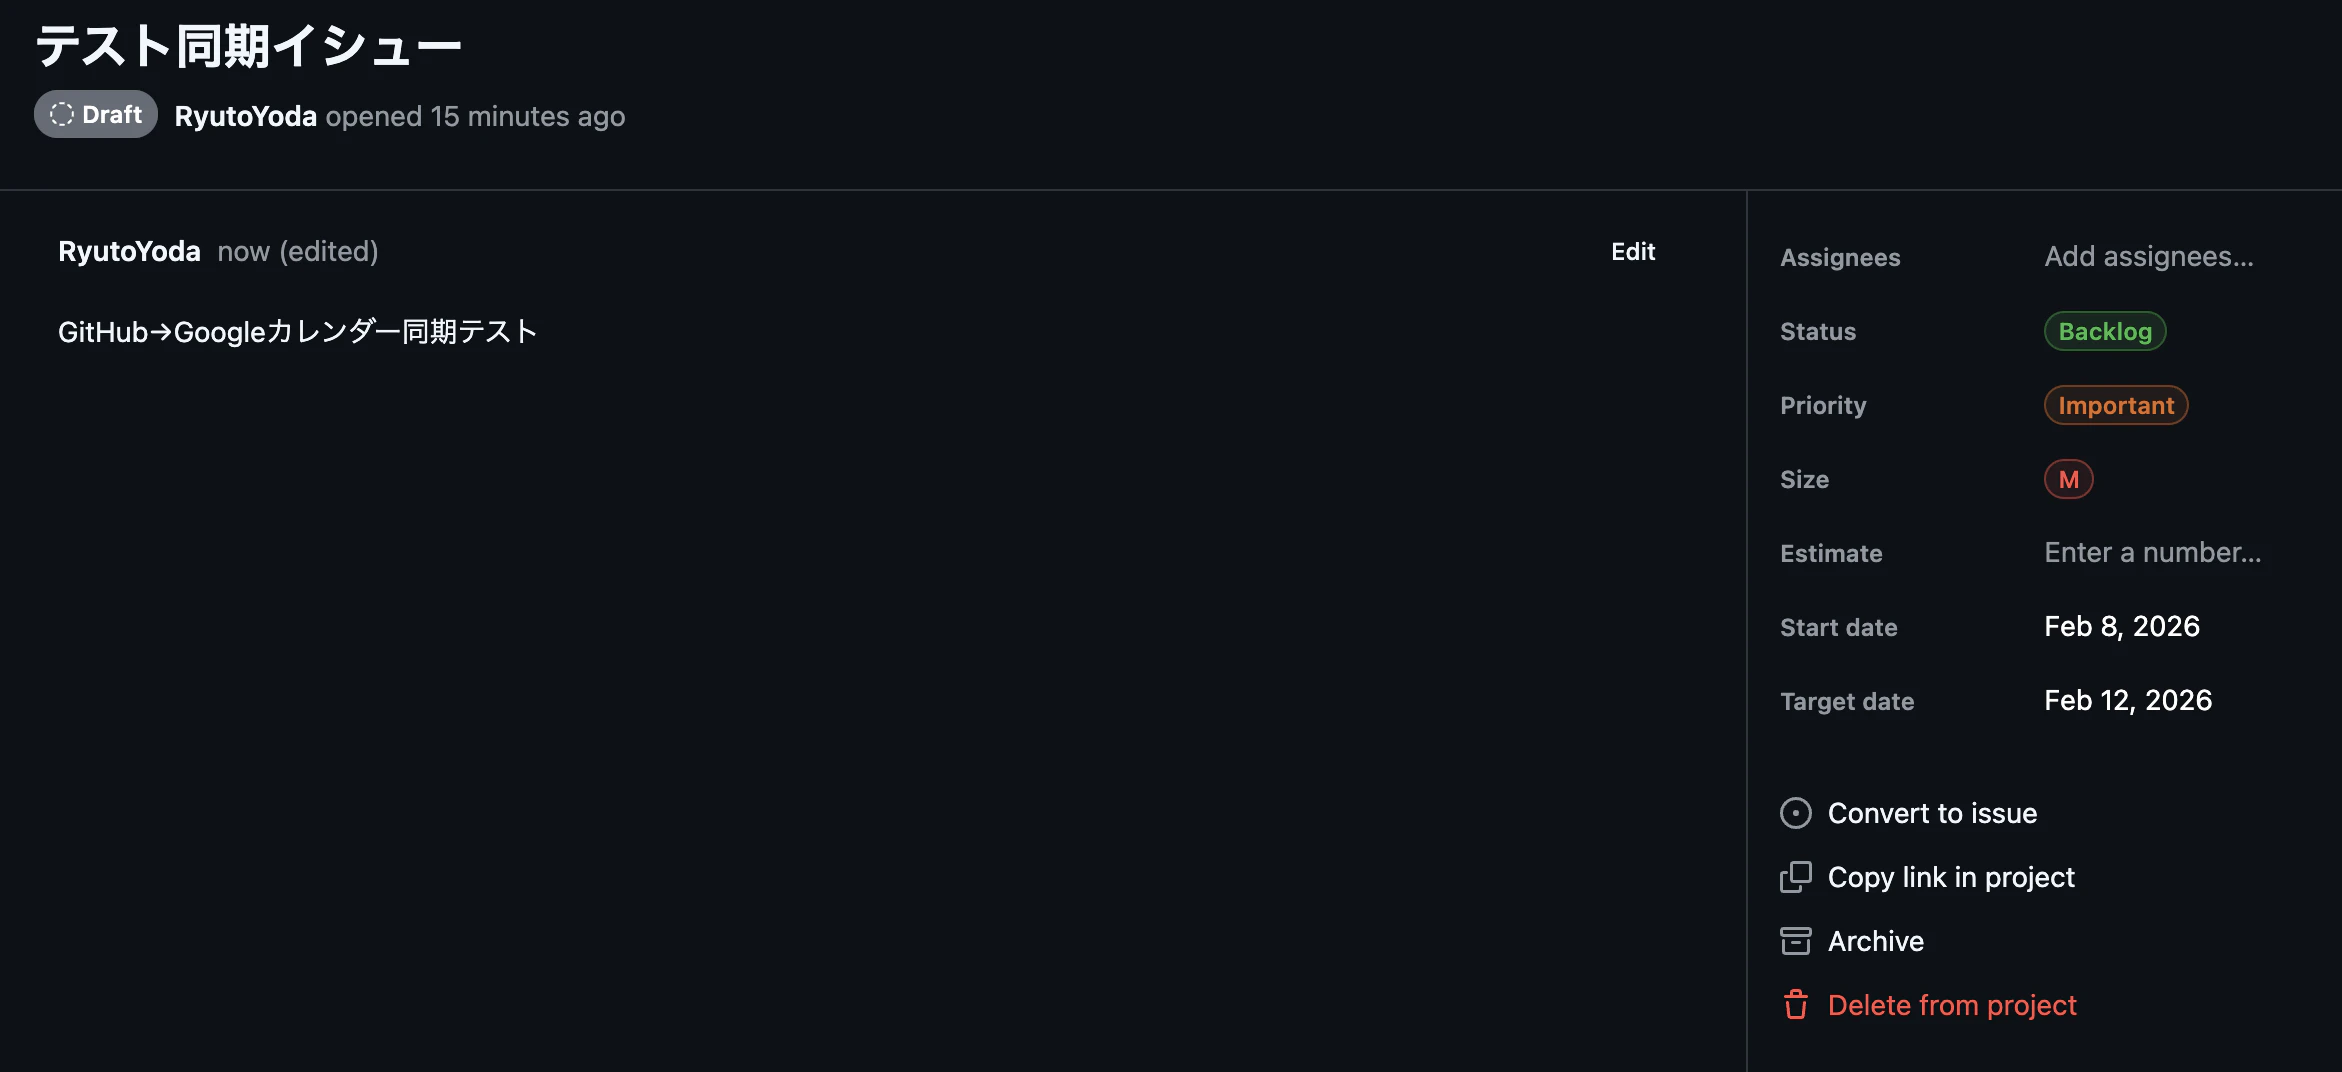
8.1 GitHub Projects にテスト用アイテムを作成
GitHub Projects を開き、新しいアイテムを作成します。「Start date」と「Target date」を設定してください。日付が設定されていないアイテムは同期されません。
8.2 ワークフローを手動実行
リポジトリの「Actions」タブを開きます。
左側のワークフロー一覧から「sync-to-gcal」を選択します。
「Run workflow」ボタンをクリックし、「Run workflow」を再度クリックして実行します。
8.3 実行結果を確認
ワークフローの実行が完了したら、実行結果をクリックして詳細を確認します。
「Sync to Google Calendar」ステップを展開すると、以下のようなログが表示されるはずです:
Fetching GitHub Project items...
Found 3 items
Syncing to Google Calendar...
Created: テストタスク
Sync complete!
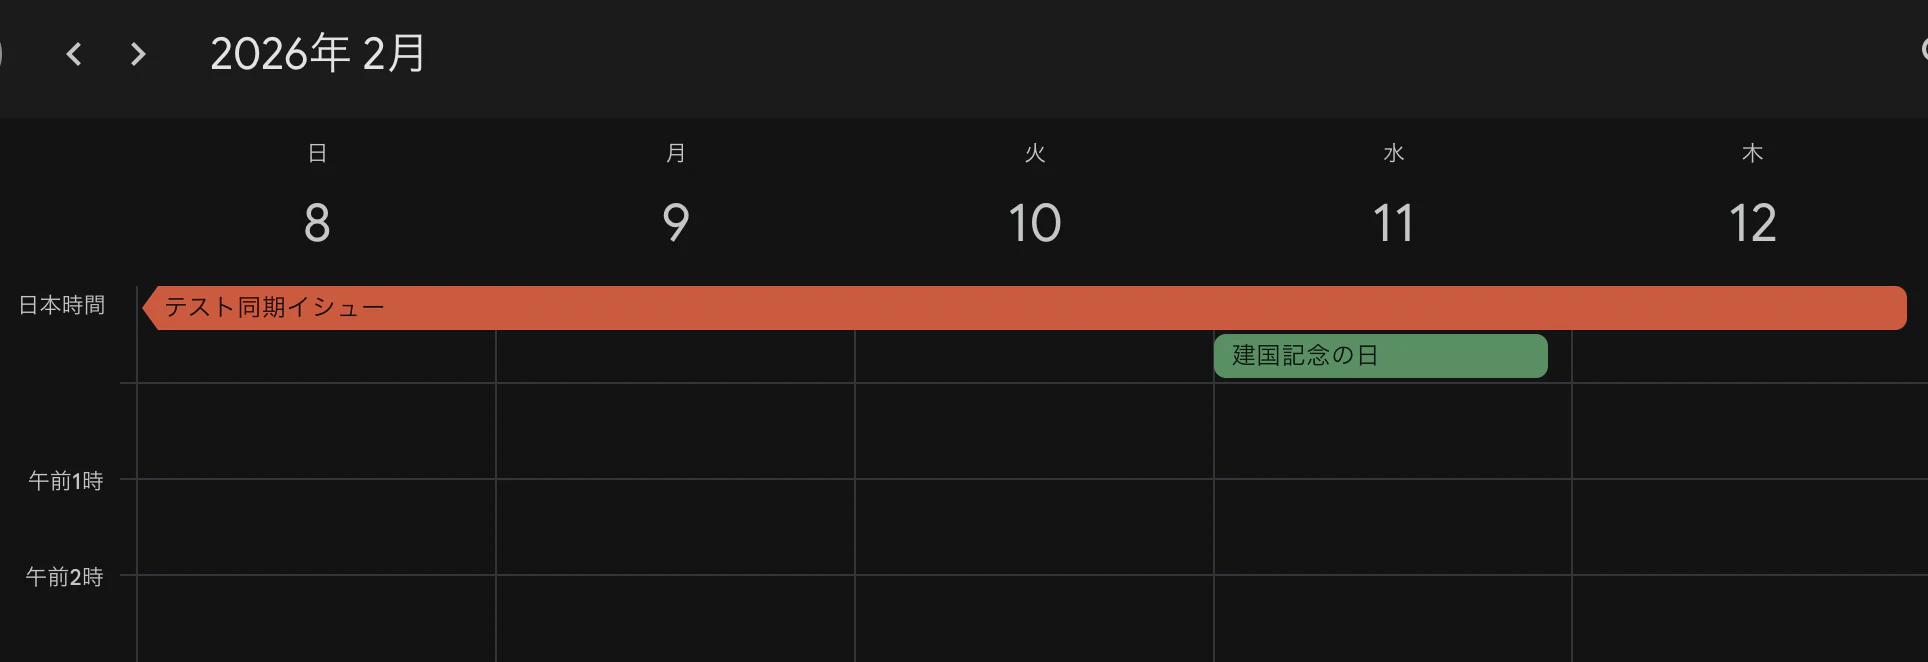
8.4 Google Calendar を確認
Google Calendar を開いて、イベントが作成されていることを確認します。
同期の仕様
このスクリプトは以下のルールで動作します。
| 条件 | 動作 |
|---|---|
| Start date または Target date が設定されている | 同期対象 |
| 両方の日付が未設定 | スキップ |
| Status が「Done」 | スキップ(カレンダーから削除) |
| GitHub側でアイテム削除 | カレンダーからも削除 |
| Priority が「Urgent」 | カレンダーで赤色表示 |
| Priority が「Important」 | カレンダーで黄色表示 |
Priority のフィールド名や値が異なる場合は、スクリプト内の該当箇所を修正してください。
カスタマイズ例
同期頻度を変更する
.github/workflows/sync-to-gcal.yml の cron 式を変更します。
# 1時間ごと
- cron: '0 * * * *'

# 毎日9時(UTC、日本時間18時)
- cron: '0 9 * * *'

# 12時間ごと
- cron: '0 */12 * * *'
まとめ
GitHub Projects と Google Calendar を連携させることで、タスク管理の情報をカレンダーでも確認できるようになりました。
この仕組みのメリットは、外部の連携サービス(Zapier や Make など)を使わずに、GitHub リポジトリ内で完結する点です。無料で運用でき、コードもすべて自分で管理できます。
必要に応じて同期頻度や色分けのルールをカスタマイズして、自分のワークフローに合った形で活用してみてください。