はじめに
この投稿は、2015年12月時点の内容となっています。
Visual Studio Code、そして利用するAssetのバージョンアップに伴い、この設定の仕方が変更になる可能性があります。何かありましたら公式サイト等を参照してください。
本投稿で利用しているエディタ拡張(v2.30)は、Unity 4.6以上、VisualStudioCode 0.10.1以上を対象としています。
設定方法
公式サイトでは、@Reapazorさんの作ったVSCodeというエディタ拡張を利用する方法をお勧めしています。本投稿でも、この方法を紹介します。
エディタ拡張の入手
まず、ターミナルでVSCodeをクローンします。
git clone https://github.com/dotBunny/VSCode.git
そしてクローンしてきた、Plugins/Editor/dotBunnyをUnityプロジェクトのAssetsディレクトリに置きます。
ちなみに、AssetStoreからも入手可能です。
設定の有効化
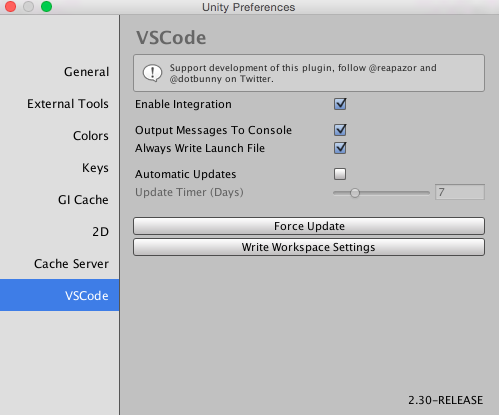
メニューのUnity>Preferencesを選択するとウィンドウが出てきます。ウィンドウ左部の一番下のタブのVSCodeを選択します。
Enable Integrationにチェックを入れてください。
任意ですが、Output Messages To Consoleにチェックを入れると出力をUnityのコンソールにも表示できます。
Unityのプロジェクトは*.metaファイルなどの、編集対象でないファイルも多数含んでいます。ウィンドウ中のWrite Workspace Settingsボタンを押すと、ViualStudioCodeで*.metaなどのファイルを表示させないようにする、設定ファイルが生成されます。
プロジェクトを開く
メニューのAssets > Open C# Project In Code.を選択して、プロジェクトを開きます。
さいごに
こちらの「UnityでVisual Studio Codeを使う」というの素敵な投稿の内容がバージョンアップに伴い、古くなっていて利用できなくなっていました。本投稿の内容も同様に、VisualStudioCodeのバージョンアップに伴い、古くなる可能性があるので、何かありましたら公式サイトをごらんください。
