はじめに
Docker Composeを使って、NGINX、uWSGI、PostgreSQLが動作するDocker コンテナを構築し、
Django(Python)で開発したWebアプリケーションをブラウザで動作確認するまでの手順を記載します。
※ 本投稿は、Mac OSを前提としています。
macOS Catalina 10.15.3で作業しています。
| No. | 項目 | 説明 |
|---|---|---|
| 1 | Docker Compose | 複数のDocker コンテナを一元管理するツールです。 本投稿では、NGINX、uWSGI、PostgreSQLが動作するDocker コンテナを 構築します。 |
| 2 | NGINX | Webサーバです。 本投稿では、ここに静的ファイルを配置します。 |
| 3 | uWSGI | アプリケーションサーバです。 Pythonで作成したWebアプリケーションを配置します。 |
| 4 | PostgreSQL | DBサーバです。 Webアプリケーションで利用するデータを保持します。 |
| 5 | Django | PythonのWebフレームワークです。 |
前提条件
Docker for Macをダウンロードする際、Dockerの公式サイトにログインする必要があります。
Dockerの公式サイトにログインするためのユーザを作成して下さい。
1. Docker for Mac
最初にDocker for Macのインストールを行います。
Docker Composeは、Docker for Macに含まれています。
1-1. ダウンロード
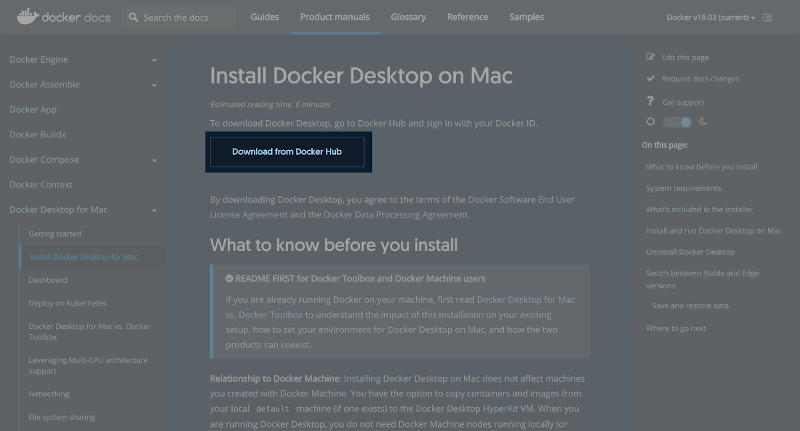
以下のサイトからダウンロードします。
https://docs.docker.com/docker-for-mac/install/
(1) 「Download from Docker Hub」ボタンを押下します。
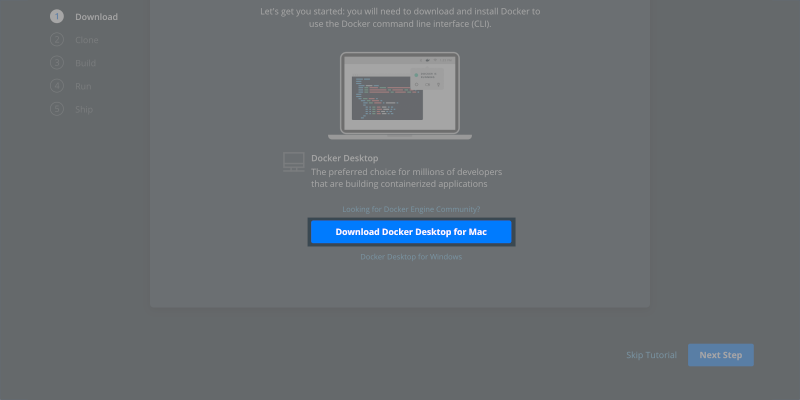
(2) 「Download Docker Desktop for Mac」ボタンを押下します。
Docker.dmg がダウンロードされます。
1-2. インストール
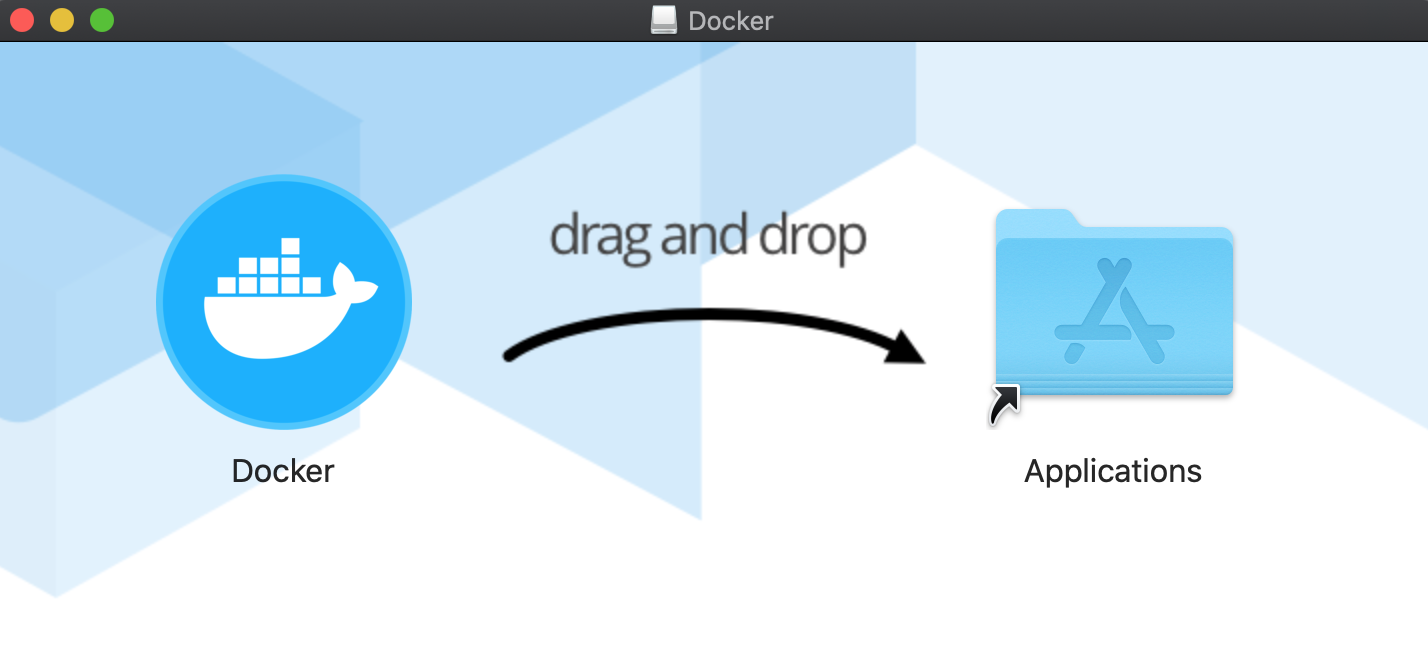
(1) Docker.dmgの実行
ダウンロードした Docker.dmg を実行して下さい。
(2) Applicationsに移動
DockerをApplicationsに移動させます。
(3) Dockerの実行
アプリケーションからDockerを実行して下さい。
1-3. 確認
(1) ターミナルを開き、"docker --version"を実行します。
インストールしたDockerのバージョンを確認します。
$ docker --version
Docker version 19.03.5, build 633a0ea
(2) 次に、"docker-compose --version"を実行します。
Docker Composeのバージョンを確認します。
$ docker-compose --version
docker-compose version 1.25.4, build 8d51620a
2. Docker コンテナの構築
NGINX、uWSGI、PostgreSQLが動作するDocker コンテナを構築します。
2-1. 作業ディレクトリの作成
任意の作業ディレクトリを作成して下さい。
本投稿では、"django"を作成します。
$ mkdir django
2-2. ファイル/ディレクトリの準備
Docker Composeの実行に必要なファイル、Webアプリケーションのソースコードを
配置するディレクトリなどを準備します。
(1) 作業ディレクトリへの移動
$ cd django
(2) requirements.txt の作成
$ touch requirements.txt
(3) Dockerfile の作成
$ touch Dockerfile
(4) docker-compose.yml の作成
$ touch docker-compose.yml
(5) nginx ディレクトリの作成
$ mkdir nginx
(6) nginx/conf ディレクトリの作成
$ mkdir nginx/conf
(7) nginx/conf/mainproject_nginx.conf の作成
$ touch nginx/conf/mainproject_nginx.conf
(8) nginx/uwsgi_params の作成
$ touch nginx/uwsgi_params
(9) src ディレクトリの作成
$ mkdir src
(10) src/static ディレクトリの作成
$ mkdir src/static
(11) dbdata ディレクトリの作成
$ mkdir dbdata
[ファイル/ディレクトリの説明]
| No. | 名称 | 説明 |
|---|---|---|
| 1 | requirements.txt | 利用するPythonのパッケージ(ライブラリ)を指定するファイル |
| 2 | Dockerfile | Docker コンテナの構成情報を記述するためのファイル |
| 3 | docker-compose.yml | アプリケーションを動かすための処理を記述するファイル |
| 4 | nginx | NGINXのルートディレクトリ |
| 5 | nginx/conf | NGINXの設定ファイルを配置するディレクトリ |
| 6 | nginx/conf/mainproject_nginx.conf | NGINXの設定を記述するためのファイル ※ ファイル名は任意です、拡張子は".conf"にして下さい。 |
| 7 | nginx/uwsgi_params | NGINXとuWSGIを連携させるためのファイル |
| 8 | src | Webアプリケーションを配置するディレクトリ |
| 9 | src/static | css、JavaScript、画像などの静的ファイルを配置するディレクトリ |
| 10 | dbdata | PostgreSQLのデータファイルを保持するディレクトリ |
[ここまでのファイル構成]
$ tree .
.
├── Dockerfile
├── dbdata
├── docker-compose.yml
├── nginx
│   ├── conf
│   │   └── mainproject_nginx.conf
│   └── uwsgi_params
├── requirements.txt
└── src
    └── static

5 directories, 5 files
2-3. requirements.txtの設定
requirements.txtを開き、以下の内容を記述して保存します。
requirements.txtは、次に説明するDockerfileの中で利用しています。
("RUN pip install -r requirements.txt"の箇所)
Django
django-bootstrap4
uwsgi
psycopg2
[説明]
① Django
PythonのWebフレームワークのDjangoをインストールします。
② django-bootstrap4
DjangoでBootstrap4を利用するためのパッケージをインストールします。
※ Bootstrap4を利用しない場合、インストールする必要はありません。
最後にDjangoで作成したページにBootstrap4を適用する方法を参考に紹介します。
③ uwsgi
アプリケーションサーバをインストールします。
④ psycopg2
PythonからPostgreSQLに接続するためのドライバをインストールします。
2-4. Dockerfileの設定
Dockerfileを開き、以下の内容を記述して保存します。
Dockerfileは、次に説明するdocker-compose.ymlの中で利用しています。
("build: ."の箇所)
FROM python:3.7
ENV PYTHONUNBUFFERED 1
RUN mkdir /code
WORKDIR /code
COPY requirements.txt /code/
RUN pip install --upgrade pip
RUN pip install -r requirements.txt
COPY . /code/
[説明]
① FROM python:3.7
Docker のベースイメージに"python3.7"を指定
"Docker Hub"のイメージから作成します。
② ENV PYTHONUNBUFFERED 1
Python の標準出力、標準エラー出力をバッファに溜め込まない設定となります。
バッファが有効になっていると、標準出力の途中経過が表示されず、
全てのタスクが終わった後に纒めて表示されます。
③ RUN mkdir /code
コンテナ上にcodeディレクトリを作成します。
④ WORKDIR /code
コンテナの作業ディレクトリにcodeディレクトリを指定します。
⑤ COPY requirements.txt /code/
ローカルマシンのrequirements.txtをコンテナのcodeディレクトリに追加します。
⑥ RUN pip install --upgrade pip
コンテナ上のpipを最新のバージョンにします。
⑦ RUN pip install -r requirements.txt
requirements.txtに記載しているPythonのパッケージ(ライブラリ)を
コンテナ上インストールします。
⑧ ローカルマシンのカレントディレクトリの内容をコンテナのcodeディレクトリに追加します。
2-5. docker-compose.ymlの設定
docker-compose.ymlを開き、以下の内容を記述して保存します。
version: '3.7'

volumes:
  pgdata:
    driver_opts:
      type: none
      device: $PWD/dbdata
      o: bind
services:
  nginx:
    image: nginx
    container_name: container.nginx
    ports:
      - "8000:8000"
    volumes:
      - ./nginx/conf:/etc/nginx/conf.d
      - ./nginx/uwsgi_params:/etc/nginx/uwsgi_params
      - ./src/static:/static
      - ./nginx/log:/var/log/nginx
    depends_on:
      - web
  web:
    build: .
    container_name: container.uwsgi
    command: uwsgi --ini /code/mainproject/django.ini
    volumes:
      - ./src:/code
    expose:
      - "8001"
    depends_on:
      - db
  db:
    image: postgres
    restart: always
    container_name: container.postgres
    ports:
      - "5432:5432"
    environment:
      POSTGRES_DB: "postgresdb"
      POSTGRES_USER: "admin"
      POSTGRES_PASSWORD: "test"
      POSTGRES_INITDB_ARGS: "--encoding=UTF-8 --locale=C"
    volumes:
      - pgdata:/var/lib/postgresql/data
    hostname: postgres
[説明]
① version: '3.7'
docker-composeで使用するバージョンとなります。
バージョンによって、docker-compose.ymlの書き方が異なります。
※ Docker 本体のバージョンとの関連は「Compose file version 3 reference」を参照して下さい。
② volumes:
トップレベルのvolumesは、名前付きvolumeとなります。
ここでは、"pgdata"という名前付きvolumeを指定しています。
"device: $PWD/dbdata"は、ローカルマシンの作業ディレクトリ配下のdbdataディレクトリを表します。
③ services:
構築するコンテナを記述します。
ここでは、"nginx"、"web"、"db"を記述しています。
この名前は任意で指定が可能です。
例えば、"db"は、"database"などでも問題ありません。
③-1 nginx:
③-1-1 image: nginx
NGINXが動作するコンテナは、"Docker Hub"のイメージから作成します。
③-1-2 container_name: container.nginx
"container.nginx"という任意のコンテナ名を付けます。
③-1-3 ports:
NGINXのポート番号に8000ポートを指定します。
③-1-4 volumes:
ローカルマシンの作業ディレクトリ配下の各ファイル/ディレクトリと
NGINXのコンテナのファイル/ディレクトリのマウントを設定します。
a) ./nginx/conf:/etc/nginx/conf.d
これにより、"nginx/conf/mainproject_nginx.conf"が"/etc/nginx/conf.d"にマウントされます。
"/etc/nginx/conf.d"に配置した拡張子".conf"のファイルは、
親の設定ファイルにあたる"/etc/nginx/nginx.conf"によって読み込まれます。
* "/etc/nginx/nginx.conf"は、nginxのコンテナにデフォルトで存在します。
b) ./nginx/uwsgi_params:/etc/nginx/uwsgi_params
"/etc/nginx/uwsgi_params"は、次に説明する"nginx/conf/mainproject_nginx.conf"の中で利用しています。
("include /etc/nginx/uwsgi_params;"の箇所)
c) ./src/static:/static
静的ファイルを配置するディレクトリをマウントします。
cssなどをNGINXから配信するための設定となります。
d) ./nginx/log:/var/log/nginx
ログファイルを配置するディレクトリをマウントします。
これにより、ローカル上でログを確認できるようになります。
③-1-5 depends_on:
"web"、つまりuWSGIのコンテナが起動された後に、NGINXのコンテナを起動するという指定です。
③-2 web:
③-2-1 build: .
uWSGIが動作するコンテナは、Dockerfileに記述したコンテナの構成情報で作成します。
"build: ."は、ビルドに使用するDockerfileのパスを表します。
つまり、このコンテナは、Dockerfileに記載したコンテナの構成情報で作成します。
③-2-2 container_name: container.uwsgi
"container.uwsgi"という任意のコンテナ名を付けます。
③-2-3 command: uwsgi --ini /code/mainproject/django.ini
コンテナが起動した後に、uWSGIを設定ファイル"/code/mainproject/django.ini"の
内容に従って、起動させるということを表します。
③-2-4 volumes:
ローカルマシンの作業ディレクトリ配下の各ディレクトリと
uWSGIのコンテナのディレクトリのマウントを設定します。
③-2-5 expose:
uWSGIのポート番号に8001ポートを指定します。
③-2-6 depends_on:
"db"、つまりPostgreSQLのコンテナが起動された後に、uWSGIのコンテナを起動するという指定です。
③-3 db:
③-3-1 image: postgres
PostgreSQLが動作するコンテナは、"Docker Hub"のイメージから作成します。
③-3-2 restart: always
ホストOSを起動したタイミングでコンテナを自動起動するという指定です。
③-3-3 container_name: container.postgres
"container.postgres"という任意のコンテナ名を付けます。
③-3-4 ports:
PostgreSQLのポート番号に5432ポートを指定します。
③-3-5 environment:
a) POSTGRES_DB: "postgresdb"
コンテナ起動時に作成するデフォルトのDBの名称を指定します。
指定しない場合、POSTGRES_USERの値が使われます。
b) POSTGRES_USER: "admin"
スーパユーザの名称を指定します。
指定しない場合、"postgres"が使われます。
c) POSTGRES_PASSWORD: "test"
スーパユーザのパスワードを指定します。
指定しない場合、POSTGRES_USERの値が使われます。
d) POSTGRES_INITDB_ARGS: "--encoding=UTF-8 --locale=C"
DBを作成するコマンド(postgres initdb)を実行する際に渡す引数を指定します。
エンコーディングに"UTF-8"、ロケールに"C"を指定しています。
※ environmentの詳細は、「Supported tags and respective Dockerfile links 」を参照して下さい。
③-3-6 volumes:
名前付きvolumeの"pgdata"と
PostgreSQLコンテナの"/var/lib/postgresql/data"のマウントを設定します。
この設定により、DBのデータが永続化されます。
(コンテナを削除してもデータがローカルマシン上に残ります。)
③-3-7 hostname:
"postgres"という任意のホスト名を付けます。
2-6. nginx/conf/mainproject_nginx.confの設定
nginx/conf/mainproject_nginx.confを開き、以下の内容を記述して保存します。
# the upstream component nginx needs to connect to
upstream django {
    ip_hash;
    server web:8001;
}

# configuration of the server
server {
    # the port your site will be served on
    listen      8000;
    # the domain name it will serve for
    server_name 127.0.0.1; # substitute your machine's IP address or FQDN
    charset     utf-8;

    # max upload size
    client_max_body_size 75M;   # adjust to taste

    location /static {
        alias /static;
    }

    # Finally, send all non-media requests to the Django server.
    location / {
        uwsgi_pass  django;
        include     /etc/nginx/uwsgi_params; # the uwsgi_params file you installed
    }
}
[説明]
① upstream django
細かい設定方法は割愛しますが、"server web:8001;"については、
docker-compose.ymlに記載したweb(ポート番号は、8001)を指しています。
つまり、uWSGIを指しています。
② server
こちらも細かい設定方法は割愛しますが、"location / {"については、
NGINXのルートにアクセスがあった場合、①で説明したuWSGIに処理を渡すという設定になります。
また、③-1-4で説明した/etc/nginx/uwsgi_paramsの設定ファイルに基づいて連携しています。
"location /static {"については、
静的ファイルについては、NGINXのstaticディレクトリに配置したものを使用するという設定です。
2-7. nginx/uwsgi_paramsの設定
nginx/uwsgi_paramsを開き、以下の内容を記述して保存します。
uwsgi_param  QUERY_STRING       $query_string;
uwsgi_param  REQUEST_METHOD     $request_method;
uwsgi_param  CONTENT_TYPE       $content_type;
uwsgi_param  CONTENT_LENGTH     $content_length;

uwsgi_param  REQUEST_URI        $request_uri;
uwsgi_param  PATH_INFO          $document_uri;
uwsgi_param  DOCUMENT_ROOT      $document_root;
uwsgi_param  SERVER_PROTOCOL    $server_protocol;
uwsgi_param  REQUEST_SCHEME     $scheme;
uwsgi_param  HTTPS              $https if_not_empty;

uwsgi_param  REMOTE_ADDR        $remote_addr;
uwsgi_param  REMOTE_PORT        $remote_port;
uwsgi_param  SERVER_PORT        $server_port;
uwsgi_param  SERVER_NAME        $server_name;
2-9. Djangoプロジェクトの作成
以下のコマンドを実行し、Djangoプロジェクトを作成します。
プロジェクト名は任意です。(ここでは、"mainproject"という名前にしました。)
$ docker-compose run --rm web django-admin startproject mainproject .
下記のようなWARNINGが出力されますが、「イメージが存在していなかったので、ビルドした」という
警告なので、問題ありません。
WARNING: Image for service web was built because it did not already exist. To rebuild this image you must use `docker-compose build` or `docker-compose up --build`.
[実行結果の確認①(ファイル構成)]
ファイル構成は以下の構成となります。
※ dbdata配下には、マウントしたPostgreSQLのデータ(/var/lib/postgresql/data)が
大量に作成されるので、省略しています。
$ tree .
.
├── Dockerfile
├── dbdata
│   ├── PG_VERSION
│   ├── base
│   │   └── ・・・ 省略
│   │   └── ・・・ 省略
│   └── ・・・ 省略
├── docker-compose.yml
├── nginx
│   ├── conf
│   │   └── mainproject_nginx.conf
│   └── uwsgi_params
├── requirements.txt
└── src
    ├── mainproject
    │   ├── __init__.py
    │   ├── asgi.py
    │   ├── settings.py
    │   ├── urls.py
    │   └── wsgi.py
    ├── manage.py
    └── static
[実行結果の確認②(Docker コンテナの状態)]
"docker ps -a"コマンドを実行し、Docker コンテナの状態を確認して下さい。
以下のようにPostgreSQLのコンテナが起動しています。
※ uWSGIのDocker コンテナについては、次に説明するuWSGIのiniファイルを作成していない為、
起動していません。(docker-compose.ymlの"command: uwsgi --ini /code/mainproject/django.ini"の箇所)
※ NGINXのDocker コンテナについては、uWSGIのDocker コンテナの起動が
前提条件となっていますので、こちらもまだ起動していません。
$ docker ps -a
CONTAINER ID        IMAGE               COMMAND                  CREATED             STATUS              PORTS                    NAMES
9d68d40adee0        postgres            "docker-entrypoint.s…"   25 hours ago        Up 25 hours         0.0.0.0:5432->5432/tcp   container.postgres
2-10. uWSGIのiniファイルを作成します。
src/mainproject/django.iniを新規に作成し、以下の内容を記述します。
[uwsgi]
socket = :8001
module = mainproject.wsgi
wsgi-file = /code/mainproject/wsgi.py
logto = /code/mainproject/uwsgi.log
py-autoreload = 1
[説明]
① socket = :8001
uWSGIを起動するポート番号を指定します。
② module = mainproject.wsgi
loadするwsgiモジュールを指定します。
③ wsgi-file = /code/mainproject/wsgi.py
loadするwsgiファイルを指定します。
④ logto = /code/mainproject/uwsgi.log
ログを出力する場所を指定します。
アプリケーションのエラーが発生した時などに確認するログとなります。
⑤ py-autoreload = 1
オートリロード機能の間隔を指定します。
この設定では、1秒ごとにリクエストがあればリロードするという設定になります。
※ 詳細は、「uWSGI Options 」を参照して下さい。
2-11. ALLOWED_HOST、DB及び静的ファイルの設定を行う。
src/mainproject/settings.pyを開き、以下の修正を行い保存します。
(1) import osの追加
下記の修正を行います。
先頭の概要コメントの後に追加します。
※ 2022/09/追加
これを追加しないとwsgi.py実行時にosライブラリが見つからないというエラーが発生する。
(修正前)
from pathlib import Path
(修正後)
import os
from pathlib import Path
(2) ALLOWED_HOSTの設定
下記の修正を行います。
公開するドメイン名を設定します。
※ Django 1.5以降のsettings.pyに、ALLOWED_HOSTSという項目が追加されました。
これを設定しない場合、デバックモードがtrueの時にエラーとなります。
(修正前)
ALLOWED_HOSTS = []
(修正後)
ALLOWED_HOSTS = ["*"]
(3) DBへの接続設定
下記の修正を行います。
docker-compose.ymlのdbのenvironmentに合わせます。
(修正前)
DATABASES = {
    'default': {
        'ENGINE': 'django.db.backends.sqlite3',
        'NAME': os.path.join(BASE_DIR, 'db.sqlite3'),
    }
}
(修正後)
DATABASES = {
    'default': {
        'ENGINE': 'django.db.backends.postgresql',
        'NAME': 'postgresdb',
        'USER': 'admin',
        'PASSWORD': 'test',
        'HOST': 'db',
        'PORT': 5432,
    }
}
(4) 静的ファイルの設定
下記の修正を行います。
(修正前)
# Static files (CSS, JavaScript, Images)
# https://docs.djangoproject.com/en/3.0/howto/static-files/

STATIC_URL = '/static/'
(修正後)
# Static files (CSS, JavaScript, Images)
# https://docs.djangoproject.com/en/3.0/howto/static-files/

# All applications can use Static files of this directory
STATICFILES_DIRS = (
    os.path.join(BASE_DIR, "mainproject/static/"),
)

# Collectstatic command put STATICFILES_DIRS and each application's Static files together into this directory
STATIC_ROOT = os.path.join(BASE_DIR, 'static/')

# Django template files read this directory to use Static files(example {% static 'style.css' %})
STATIC_URL = '/static/'
[説明]
① STATICFILES_DIRS
パスの指定先は任意です。
ここでは、「2-9. Djangoプロジェクトの作成」で説明した
Djangoプロジェクト(mainproject)配下のstaticディレクトリを指定しています。
このディレクトリには、各アプリケーションで共通の静的ファイルを配置します。
後術しますが、本投稿では、faviconを配置します。
② STATIC_ROOT
後術するCollectstaticコマンドを実行した際に、
STATICFILES_DIRSで指定した共通の静的ファイルと
各アプリケーション配下のstaticディレクトリの静的ファイルを
収集し、配置するディレクトリを指定します。
BASE_DIRは、作業ディレクトリ(src)のことなので、STATIC_ROOTは、src/staticとなります。
「2-5. docker-compose.ymlの設定」で説明したNGINXの静的ファイルのマウント元と一致します。
("- ./src/static:/static"の./src/staticの箇所)
③ STATIC_URL
後術するDjangoのテンプレートファイルが静的ファイルを読み込むディレクトリ先となります。
「2-5. docker-compose.ymlの設定」で説明したNGINXの静的ファイルのマウント先と一致します。
("- ./src/static:/static"の/staticの箇所)
※ 「Django Static Files 」を合わせて見ると理解しやすいと思います。
2-12. Docker コンテナを起動します。
以下のコマンドを実行します。
$ docker-compose up -d
[実行結果の確認①(Docker コンテナの状態)]
"docker ps -a"コマンドを実行し、Docker コンテナの状態を確認して下さい。
以下のようにNGINX、uWSGI、PostgreSQLのコンテナが起動しています。
$ docker ps -a
CONTAINER ID        IMAGE               COMMAND                  CREATED             STATUS              PORTS                            NAMES
f41f7a5b634d        nginx               "nginx -g 'daemon of…"   10 minutes ago      Up 10 minutes       80/tcp, 0.0.0.0:8000->8000/tcp   container.nginx
c12eee7ac189        django_web          "uwsgi --ini /code/m…"   10 minutes ago      Up 10 minutes       8001/tcp                         container.uwsgi
9d68d40adee0        postgres            "docker-entrypoint.s…"   27 hours ago        Up 27 hours         0.0.0.0:5432->5432/tcp           container.postgres
2-13. 動作確認
ブラウザを開き、"http://0.0.0.0:8000"にアクセスし、
Djangoのデフォルトのページが表示されることを確認します。
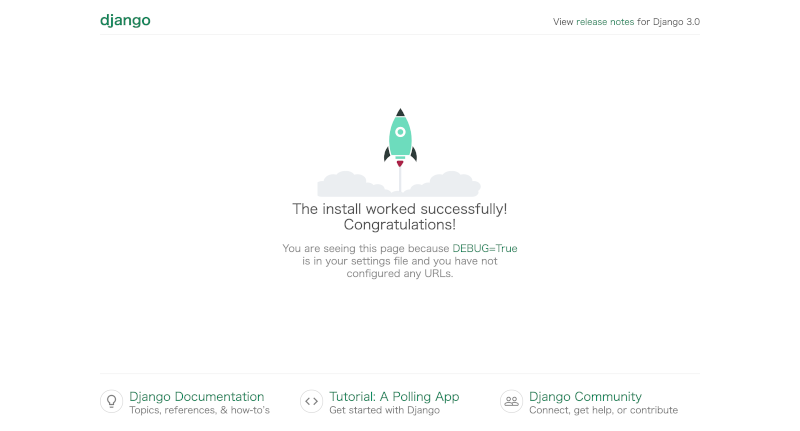
ここまでの手順で、NGINX、uWSGI、PostgreSQLが動作するDocker コンテナの構築が完了しました。
3. Django Webアプリケーションの作成
Djangoで"Hello world."を出力するWebアプリケーションを作成します。
3-1. Djangoアプリケーションの作成
以下のコマンドを実行し、Djangoアプリケーションを作成します。
アプリケーション名は任意です。(ここでは、"app"という名前にしました。)
$ docker-compose run --rm web python manage.py startapp app
[実行結果の確認①(ファイル構成)]
srcディレクトリ配下にappディレクトリが作成されます。
$ tree src
src
├── app
│   ├── __init__.py
│   ├── admin.py
│   ├── apps.py
│   ├── migrations
│   │   └── __init__.py
│   ├── models.py
│   ├── tests.py
│   └── views.py
├── mainproject
│   ├── __init__.py
│   ├── __pycache__
│   │   ├── __init__.cpython-37.pyc
│   │   ├── settings.cpython-37.pyc
│   │   ├── urls.cpython-37.pyc
│   │   └── wsgi.cpython-37.pyc
│   ├── asgi.py
│   ├── django.ini
│   ├── settings.py
│   ├── urls.py
│   ├── uwsgi.log
│   └── wsgi.py
├── manage.py
└── static

5 directories, 19 files
3-2. ビューの作成
"Hello world."を出力するファイルです。
src/app/views.pyを開き、以下の修正を行い保存します。
(修正前)
from django.shortcuts import render

# Create your views here.
(修正後)
from django.http import HttpResponse

def index(request):
    return HttpResponse("Hello world.")
3-3. URLの対応付け
作成したビューをブラウザからアクセスするために、 URLの対応付けを行う必要があります。
(1) appディレクトリの配下にurls.pyを新規作成します。
urls.pyを作成することで、URLの対応付けに必要なURLconfが作成されます。
以下の内容を記述します。
from django.urls import path
from . import views

urlpatterns = [
    path('', views.index, name='index'),
]
(2) mainprojectディレクトリの配下のurls.pyを更新します。
ルート(プロジェクト)のURLconfにapp.urlsモジュールの記述を反映させます。
具体的には、
① django.urls.includeのimportを追加
② urlpatternsのリストにinclude('app.urls')を挿入
を行います。
※ 以下の修正前後のファイルは、文頭のコメント部分は省略しています。
※ include()関数は他のURLconfへの参照が可能になります。
修正後の"path('app/', include('app.urls'))"の箇所は、
app/にアクセスがあった場合、app配下のURLconfを参照するということを表します。
(修正前)
from django.contrib import admin
from django.urls import path

urlpatterns = [
    path('admin/', admin.site.urls),
]
(修正後)
from django.contrib import admin
from django.urls import include, path

urlpatterns = [
    path('app/', include('app.urls')),
    path('admin/', admin.site.urls),
]
3-4. 動作確認
ブラウザを開き、"http://0.0.0.0:8000/app/"にアクセスし、
画面に"Hello world."が表示されることを確認します。
4. Databaseの設定
DjangoでDatabase(PostgreSQL)を利用するための設定を行います。
※ 私がCafe好きなので、Cafeの情報を例に説明します。
4-1. モデルの作成
Webアプリケーションで利用するモデルを最初に定義します。
ここでは、Area、Cafe、Utilityの3つのモデルを作成します。
src/app/models.pyを開き、以下の内容を記述して保存します。
(修正前)
from django.db import models

# Create your models here.
(修正後)
from django.db import models

class Area(models.Model):
    name = models.CharField(max_length=100)
    create_date = models.DateTimeField('date published')

    def __str__(self):
        return self.name;

class Cafe(models.Model):
    area = models.ForeignKey(Area, on_delete=models.CASCADE)
    name = models.CharField(max_length=100)
    memo = models.CharField(max_length=400)
    website = models.URLField()
    image_path = models.CharField(max_length=400)
    create_date = models.DateTimeField('date published')

    def __str__(self):
        return self.name;

class Utility(models.Model):
    key = models.CharField(max_length=100)
    value = models.CharField(max_length=100)
    create_date = models.DateTimeField('date published')

    def __str__(self):
        return self.key;
[説明]
① Area
Cafeのエリア情報(場所)を管理するマスタです。
② Cafe
Cafeの情報を保持するテーブルです。
※ ForeignKeyを使用してリレーションシップを定義しています。
各Cafeが1つのAreaに関連付けられています。
③ Utility
汎用的なデータを保持するマスタです。
今回は、表示方法の切り替えに利用します。
データの変更で、制御することで、毎回プログラムの変更を行う必要がなくなります。
4-2. モデルを有効にする。
(1) モデル有効化の準備
src/mainproject/settings.pyを開き、INSTALLED_APPSに「'app.apps.AppConfig',」を追加します。
後術するmigrateコマンドを実行すると、INSTALLED_APPSに記述されている
アプリケーションに対し、各アプリケーションに必要なテーブルを作成します。
※ app.apps.AppConfigは、src/app/apps.pyのAppConfigクラスを表します。
(修正前)
INSTALLED_APPS = [
    'django.contrib.admin',
    'django.contrib.auth',
    'django.contrib.contenttypes',
    'django.contrib.sessions',
    'django.contrib.messages',
    'django.contrib.staticfiles',
]
(修正後)
INSTALLED_APPS = [
    'app.apps.AppConfig',
    'django.contrib.admin',
    'django.contrib.auth',
    'django.contrib.contenttypes',
    'django.contrib.sessions',
    'django.contrib.messages',
    'django.contrib.staticfiles',
]
(2) マイグレーションファイルの作成
以下のコマンドを実行し、モデルの変更内容が記述されたマイグレーションファイルを作成します。
$ docker-compose run --rm web python manage.py makemigrations app
下記のようなメッセージが出力され、src/app/migrations/0001_initial.pyが作成されます。
※ src/app/migrations/0001_initial.pyは、手動で調整することも可能です。
$ docker-compose run --rm web python manage.py makemigrations app
Starting container.postgres ... done
Migrations for 'app':
  app/migrations/0001_initial.py
    - Create model Area
    - Create model Utility
    - Create model Cafe
(3) テーブルの作成
マイグレーションファイルを元にモデルのテーブルを作成する。
以下のコマンドを実行します。
$ docker-compose run --rm web python manage.py migrate
下記のようなメッセージが出力され、テーブルが作成されます。
$ docker-compose run --rm web python manage.py migrate
Starting container.postgres ... done
Operations to perform:
  Apply all migrations: admin, app, auth, contenttypes, sessions
Running migrations:
  Applying contenttypes.0001_initial... OK
  Applying auth.0001_initial... OK
  Applying admin.0001_initial... OK
  Applying admin.0002_logentry_remove_auto_add... OK
  Applying admin.0003_logentry_add_action_flag_choices... OK
  Applying app.0001_initial... OK
  Applying contenttypes.0002_remove_content_type_name... OK
  Applying auth.0002_alter_permission_name_max_length... OK
  Applying auth.0003_alter_user_email_max_length... OK
  Applying auth.0004_alter_user_username_opts... OK
  Applying auth.0005_alter_user_last_login_null... OK
  Applying auth.0006_require_contenttypes_0002... OK
  Applying auth.0007_alter_validators_add_error_messages... OK
  Applying auth.0008_alter_user_username_max_length... OK
  Applying auth.0009_alter_user_last_name_max_length... OK
  Applying auth.0010_alter_group_name_max_length... OK
  Applying auth.0011_update_proxy_permissions... OK
  Applying sessions.0001_initial... OK
(4) テーブルの確認
作成したテーブルをDBeaverというSQLクライアントツールを使って確認します。
DBeaverを使ったことがない方は、「DBeaverのインストールとPostgreSQLへの接続」を参考にして下さい。
① DBeaverを起動します。
② 新しい接続を作成します。
以下の画面で、PostgreSQLに接続するDatabase、User、Password、Portの入力を行います。
※ 「2-11. ALLOWED_HOSTの設定、DBへの接続設定を行う。」の(2)で設定した内容を入力します。

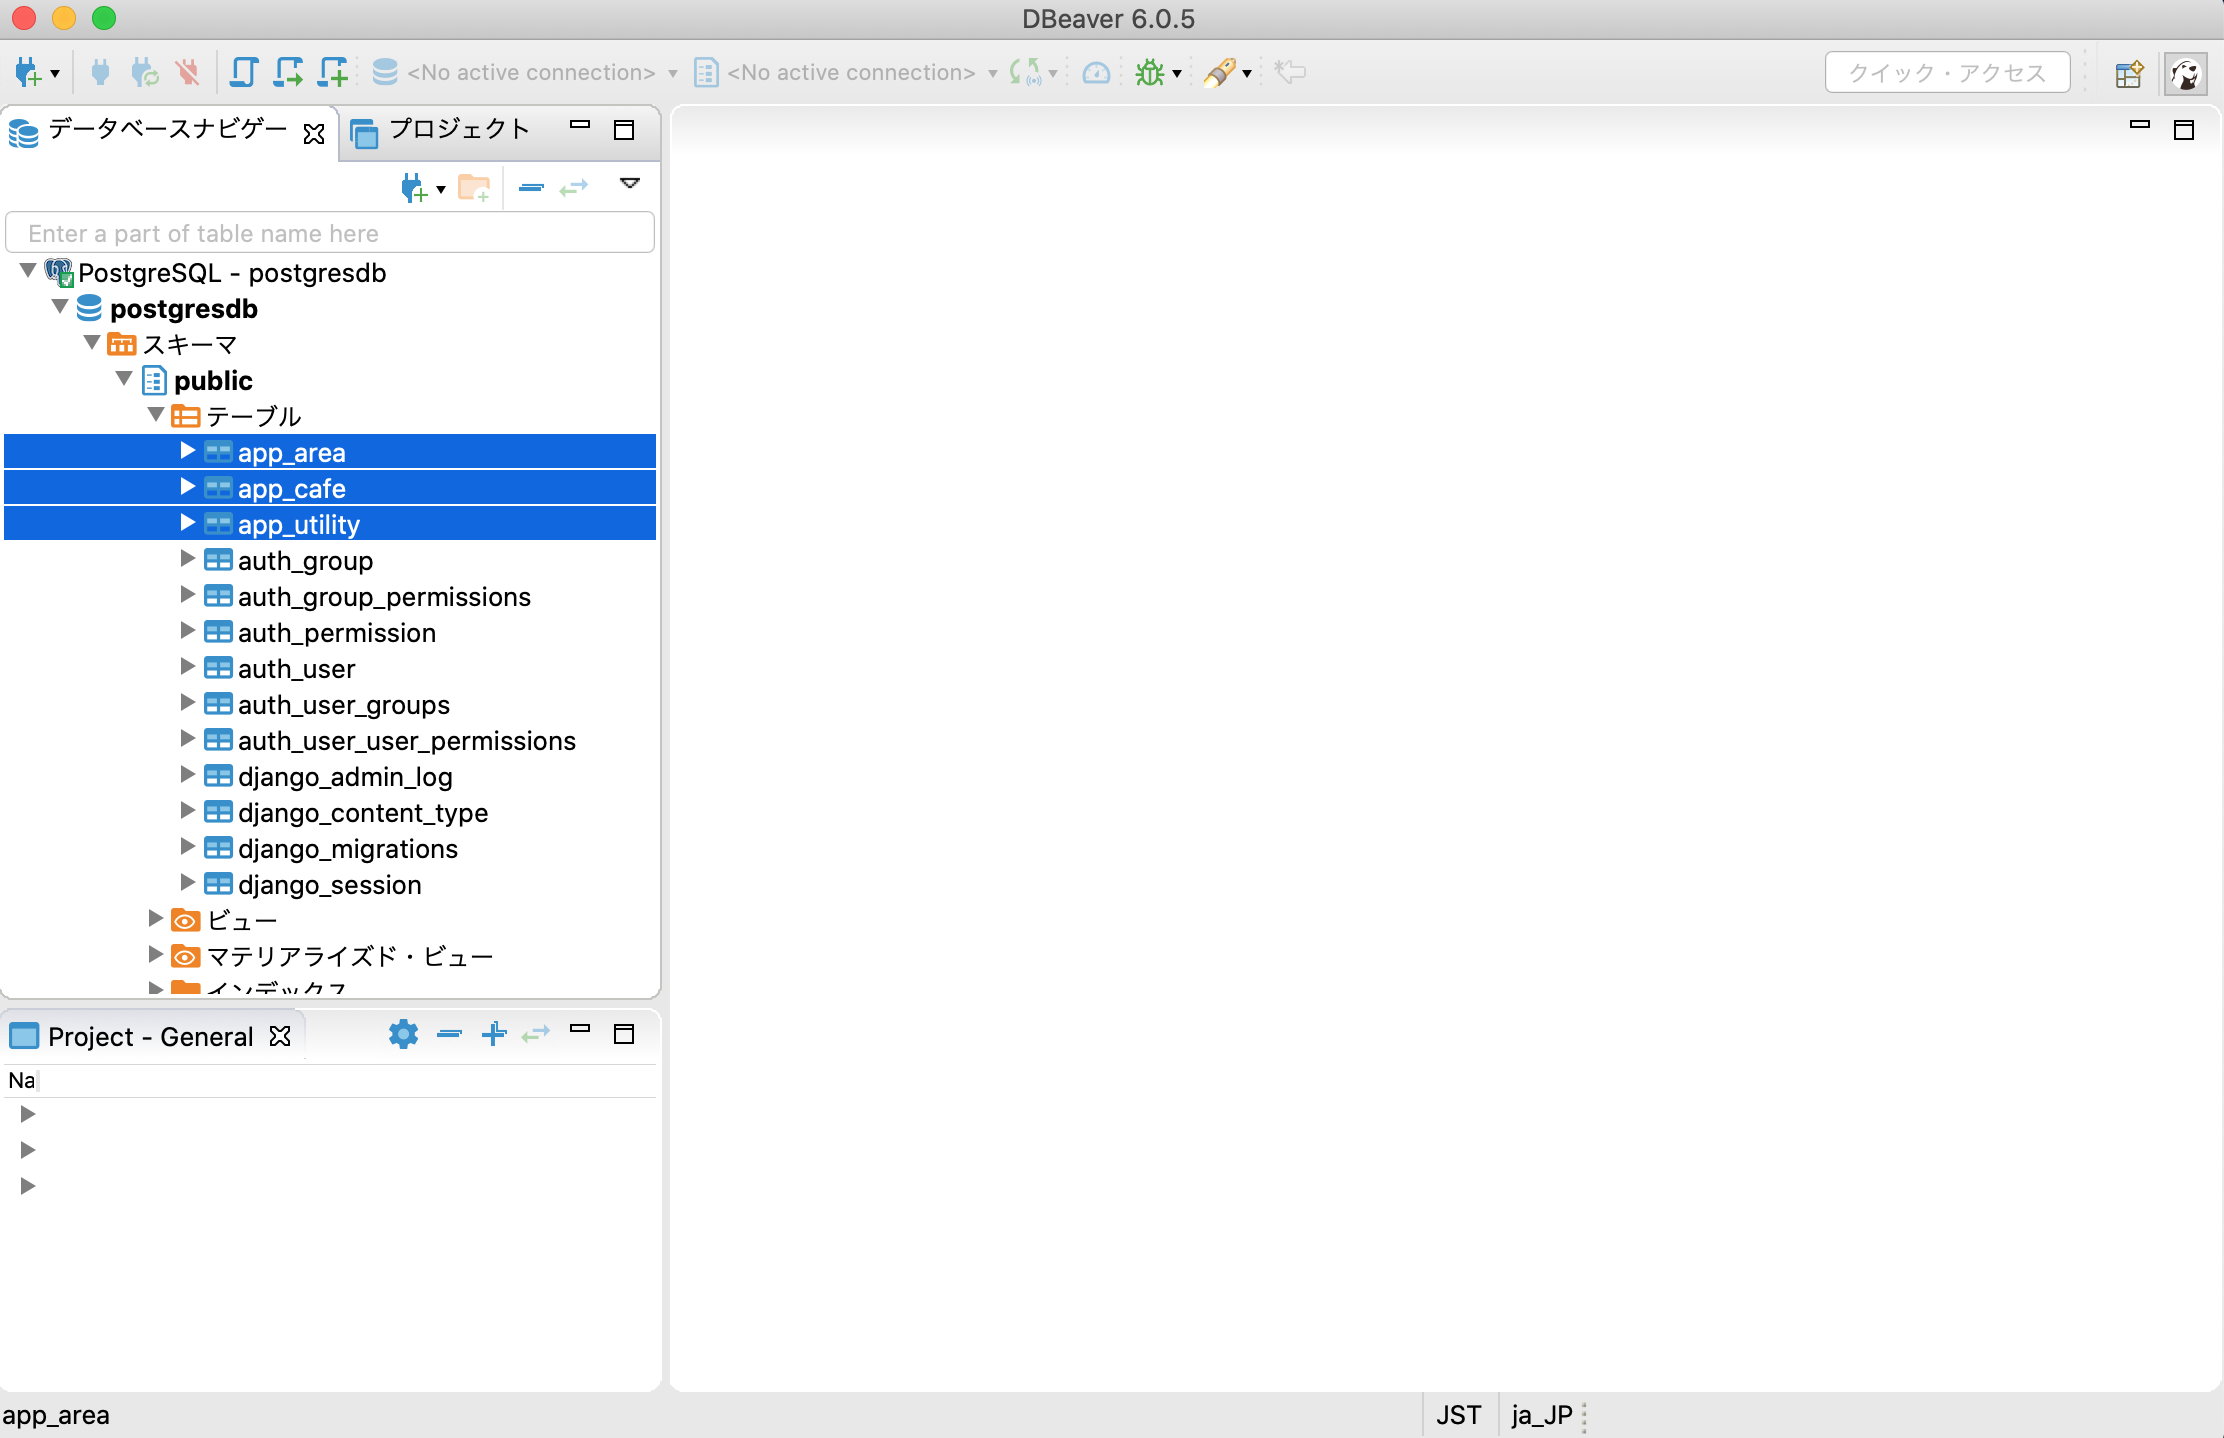
③ テーブルの確認
下記の通り、app_area、app_cafe、app_utilityテーブルが作成されています。
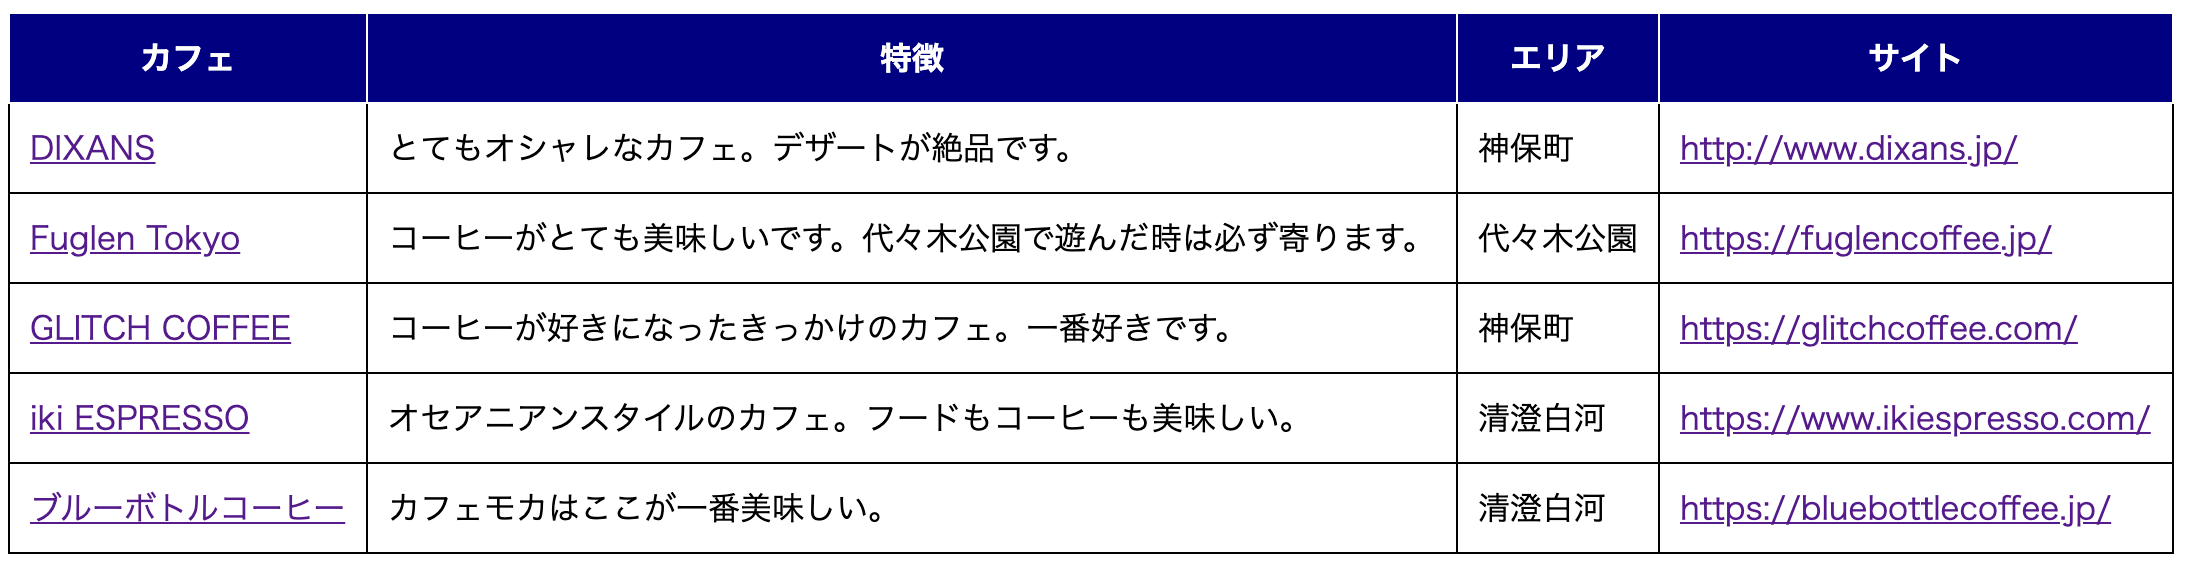
(5) データの登録
下記のようなSQLを実行し、初期データを登録して下さい。
insert into app_area (name, create_date) values ('清澄白河', now());
insert into app_area (name, create_date) values ('神保町', now());
insert into app_area (name, create_date) values ('代々木公園', now());
insert into app_cafe (name, memo, website, image_path, create_date, area_id) values ('ブルーボトルコーヒー', 'カフェモカはここが一番美味しい。', 'https://bluebottlecoffee.jp/', 'bluebottlecoffee_IMG.jpg', now(), '1');
insert into app_cafe (name, memo, website, image_path, create_date, area_id) values ('iki ESPRESSO', 'オセアニアンスタイルのカフェ。フードもコーヒーも美味しい。', 'https://www.ikiespresso.com/', 'ikiespresso_IMG.jpg', now(), '1');
insert into app_cafe (name, memo, website, image_path, create_date, area_id) values ('GLITCH COFFEE', 'コーヒーが好きになったきっかけのカフェ。一番好きです。', 'https://glitchcoffee.com/', 'glitchcoffee_IMG.jpg', now(), '2');
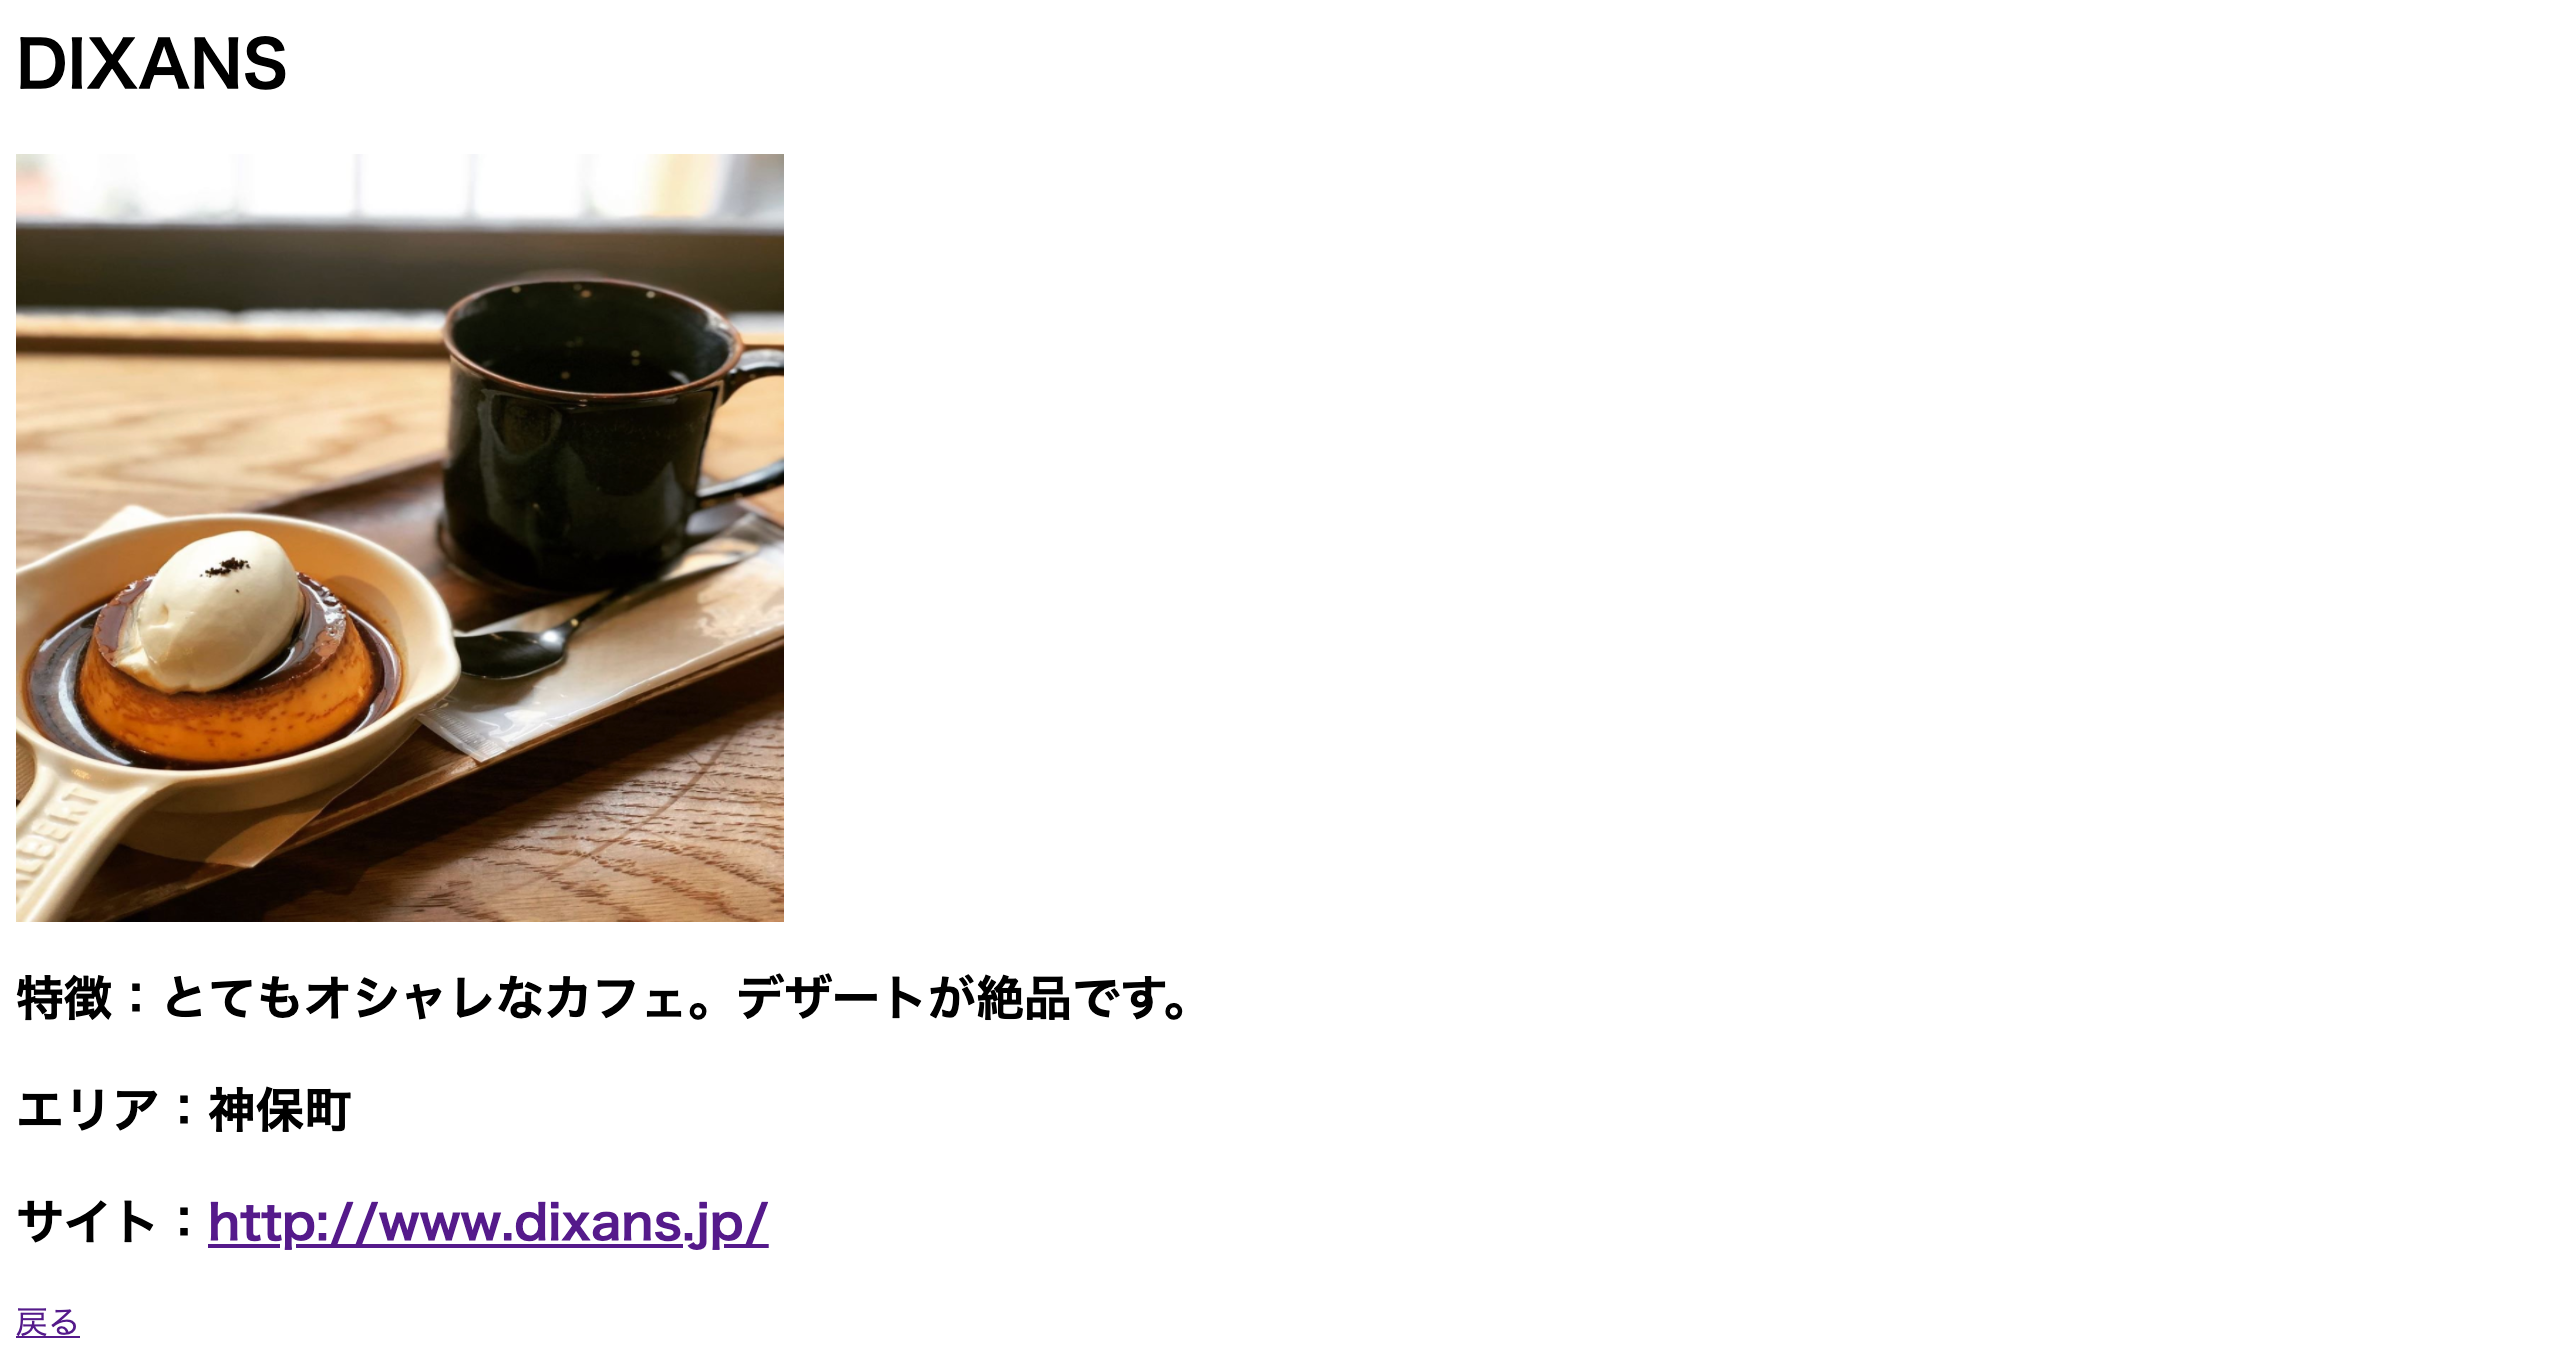
insert into app_cafe (name, memo, website, image_path, create_date, area_id) values ('DIXANS', 'とてもオシャレなカフェ。デザートが絶品です。', 'http://www.dixans.jp/', 'dixans_IMG.jpg', now(), '2');
insert into app_cafe (name, memo, website, image_path, create_date, area_id) values ('Fuglen Tokyo', 'コーヒーがとても美味しいです。代々木公園で遊んだ時は必ず寄ります。', 'https://fuglencoffee.jp/', 'fuglencoffee_IMG.jpg', now(), '3');
commit;
5. 画面の作成
Databaseに保持した情報を出力するWebアプリケーションを作成します。
簡単な一覧画面と詳細画面を作成します。
5-1. 一覧画面の作成
(1) src/appの配下に"templates"ディレクトリを作成し、
"templates"ディレクトリ配下に""list.html"を作成します。
$ mkdir -p src/app/templates
$ touch src/app/templates/list.html
(2) src/app/templates/list.htmlを開き、以下の内容で保存します。
{% load static %}

<html lang="ja">
<head>
  <meta charset="utf-8">
  <link rel="stylesheet" type="text/css" href="{% static 'app_css/style.css' %}">
  <link rel="shortcut icon" href="{% static 'pj_image/armx8-1ibhc-001.ico' %}" type="image/vnd.microsoft.icon">
</head>
<body>
<table border="1">
  <thead>
    <tr>
      <th>カフェ</th>
      <th>特徴</th>
      <th>エリア</th>
      <th>サイト</th>
    </tr>
  </thead>
  <tbody>
  {% for cafe in cafe_list %}
    <tr>
      <td><a href="{% url 'app:detail' cafe.id %}">{{ cafe.name }}</a></td>
      <td>{{ cafe.memo }}</td>
      <td>{{ cafe.area.name }}</td>
      <td><a href="{{ cafe.website }}">{{ cafe.website }}</a></td>
    </tr>
  {% endfor %}
  </tbody>
</table>
</body>
</html>
5-2. 詳細画面の作成
(1) src/app/templatesの配下に"detail.html"を作成します。
$ touch src/app/templates/detail.html
(2) src/app/templates/detail.htmlを開き、以下の内容で保存します。
{% load static %}

<html lang="ja">
<head>
  <meta charset="utf-8">
  <link rel="stylesheet" type="text/css" href="{% static 'app_css/style.css' %}">
  <link rel="shortcut icon" href="{% static 'pj_image/armx8-1ibhc-001.ico' %}" type="image/vnd.microsoft.icon">
</head>

<body>
<h1>{{ cafe.name }}</h1>
<h2><img src="{% static 'app_image/' %}{{ cafe.image_path }}" alt="{{ cafe.name }}のイメージ" title="{{ cafe.name }}のイメージ" width="384" height="384"></h2>
<h2>特徴:{{ cafe.memo }}</h2>
<h2>エリア:{{ cafe.area.name }}</h2>
<h2>サイト:<a href="{{ cafe.website }}">{{ cafe.website }}</a></h2>
<a href="{% url 'app:list' %}">戻る</a>
</body>
</html>
5-3. ビューの編集
3-2.で作成した"Hello world."を出力するファイルを編集します。
src/app/views.pyを開き、以下の修正を行い保存します。
(修正前)
from django.http import HttpResponse

def index(request):
    return HttpResponse("Hello world.")
(修正後)
from django.http import HttpResponse, HttpResponseRedirect
from django.shortcuts import get_object_or_404, render
from django.urls import reverse
from django.views import generic
from .models import Area, Cafe, Utility

class IndexView(generic.ListView):
    template_name = 'list.html'
    context_object_name = 'cafe_list'
    def get_queryset(self):
        """Return the last five published records."""
        return Cafe.objects.order_by('name')[:5]
class DetailView(generic.DetailView):
    model = Cafe
    template_name = 'detail.html'
5-4. URLの対応付け
3-3.で作成したURLを対応付けするファイルを編集します。
src/app/urls.pyを開き、以下の修正を行い保存します。
※ path()を追加し、新しいviewを app.urls モジュールと結びつけます。
(修正前)
from django.urls import path
from . import views

urlpatterns = [
    path('', views.index, name='index'),
]
(修正後)
from django.urls import path
from django.contrib.auth.views import LoginView
from . import views
app_name = 'app'
urlpatterns = [
    path('', views.IndexView.as_view(), name='list'),
    path('<int:pk>/', views.DetailView.as_view(), name='detail'),
]
5-5. 静的ファイルの設置
(1) appアプリケーションの静的ファイルのディレクトリを作成します。
$ mkdir -p src/app/static/app_css
$ mkdir -p src/app/static/app_image
$ mkdir -p src/app/static/app_js
(2) appアプリケーションのcssを作成します。
src/app/static/app_css/style.cssを新規に作成し、以下の内容を記述します。
table {
    background-color: #ffffff;
    border-collapse:  collapse;     /* セルの線を重ねる */
}
th {
    background-color: #000080;
    color: #ffffff;                 /* 文字色指定 */
}
th, td {
    border: solid 1px;              /* 枠線指定 */
    padding: 10px;                  /* 余白指定 */
}
(3) DBに登録したCafeの画像ファイルをsrc/app/static/app_imageに配置します。
※ 画像ファイルは何でも良いので用意して下さい。
無くても、画像ファイルが表示されないだけなのでスキップしても問題ありません。
(4) mainprojectプロジェクトの静的ファイルのディレクトリを作成します。
$ mkdir -p src/mainproject/static/pj_css
$ mkdir -p src/mainproject/static/pj_image
$ mkdir -p src/mainproject/static/pj_js
(5) faviconをsrc/mainproject/static/pj_imageに配置します。
※ faviconは何でも良いので用意して下さい。
無くても、faviconが表示されないだけなのでスキップしても問題ありません。
(6) 静的ファイルの収集を行う。
以下のコマンドを実行します。
$ docker-compose run web ./manage.py collectstatic
下記のようなメッセージが出力され、
「2-11. ALLOWED_HOST、DB及び静的ファイルの設定を行う。」で説明した通り、
STATICFILES_DIRSで指定した共通の静的ファイルと
各アプリケーション配下のstaticディレクトリの静的ファイルを収集します。
→ src/app/static/app_css/style.cssと
src/app/static/app_imageに配置した画像ファイルと
src/mainproject/static/pj_imageのfaviconが
src/staticにコピーされます。
$ docker-compose run web ./manage.py collectstatic
Starting container.postgres ... done

137 static files copied to '/code/static'.
5-6. 動作確認
ブラウザを開き、"http://0.0.0.0:8000/app/"にアクセスし、
一覧画面と詳細画面が下記のように表示されていることを確認します。
(1) 一覧画面
(2) 詳細画面
NGINX、uWSGI、PostgreSQLが動作するDocker コンテナで、
DjangoのWebアプリケーションを動作確認するまでの手順が完了です。
Webアプリケーションを作る上で、基本的なことは紹介できたと思いますので、
本投稿が役に立てば幸いです。
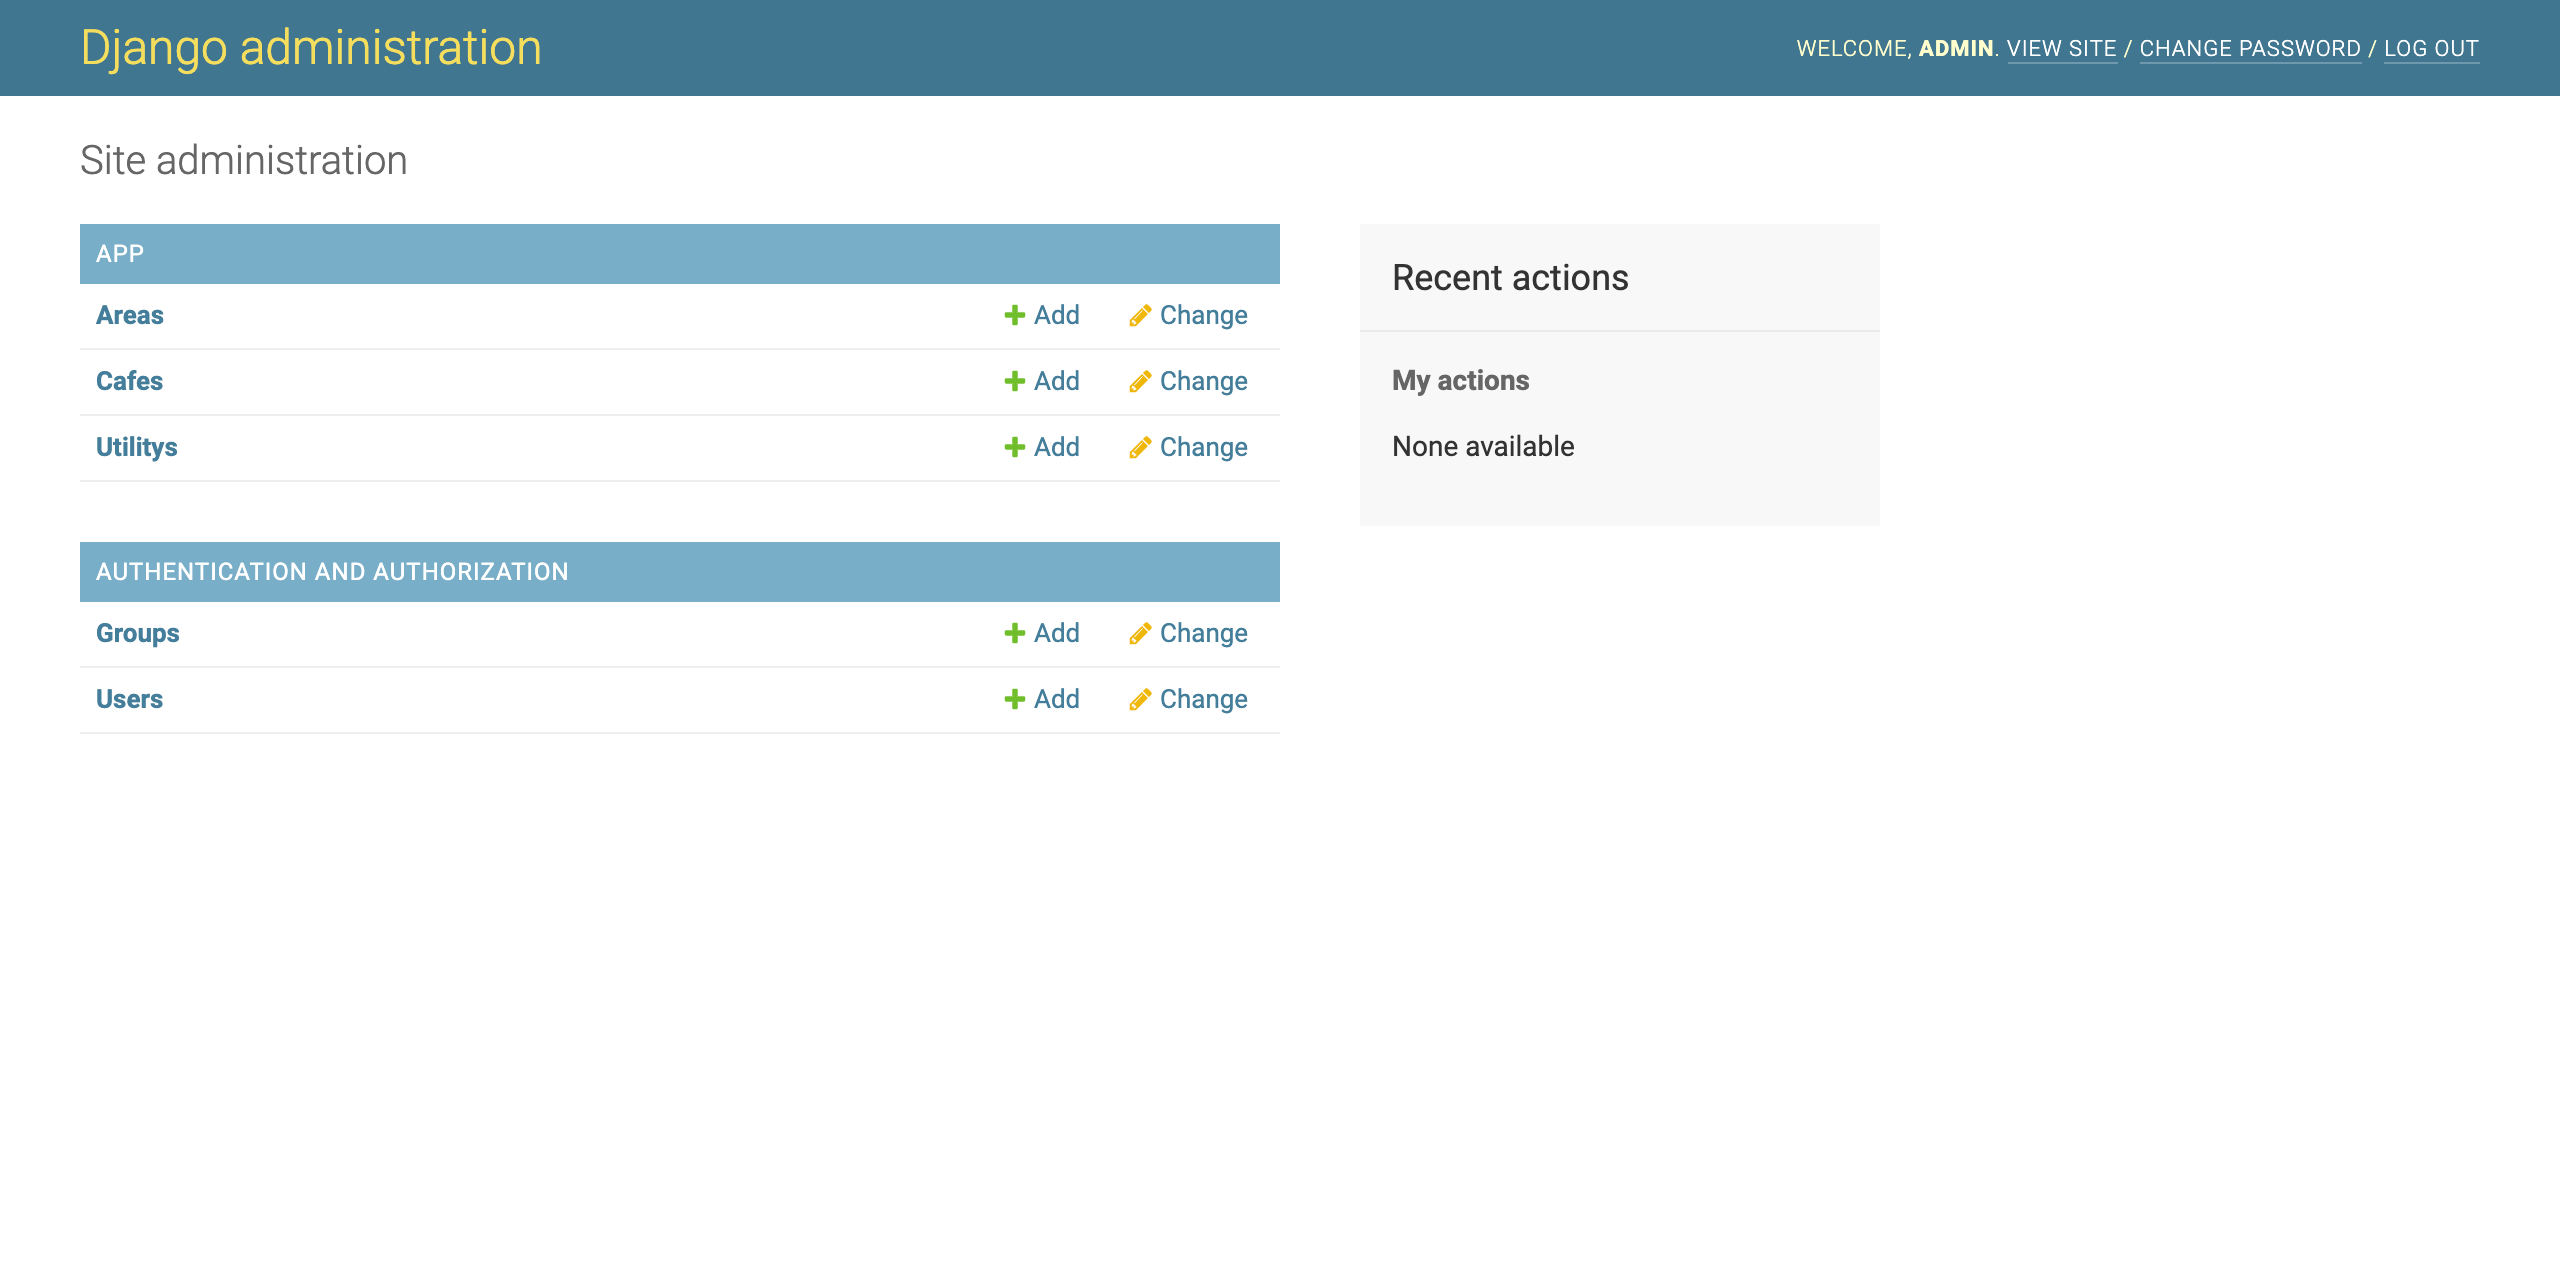
6. 参考情報(Django Admin)
本投稿では、DBeaverを使ってデータの登録を行いましたが、Django Adminという
Djangoに用意されている管理画面を使ってデータを登録することも可能です。
6-1. 管理ユーザの作成
以下のコマンドを実行します。
$ docker-compose run --rm web python manage.py createsuperuser
コマンドプロンプトで以下のように任意の情報を入力します。
Username:admin
Email address:admin@example.com
Password:admin
$ docker-compose run --rm web python manage.py createsuperuser
Starting container.postgres ... done
Username (leave blank to use 'root'): admin
Email address: admin@example.com
Password:
Password (again):
The password is too similar to the username.
This password is too short. It must contain at least 8 characters.
This password is too common.
Bypass password validation and create user anyway? [y/N]: y
Superuser created successfully.
6-2. モデルをDjango Adminに登録
「4-1. モデルの作成」で作成したモデルをDjango Adminで編集できるようにします。
src/app/admin.pyを開き、以下の修正を行い保存します。
(修正前)
from django.contrib import admin

# Register your models here.
(修正後)
from django.contrib import admin

from .models import Area
from .models import Cafe
from .models import Utility

admin.site.register(Area)
admin.site.register(Cafe)
admin.site.register(Utility)
6-3. 動作確認
ブラウザを開き、"http://0.0.0.0:8000/admin/"にアクセスします。
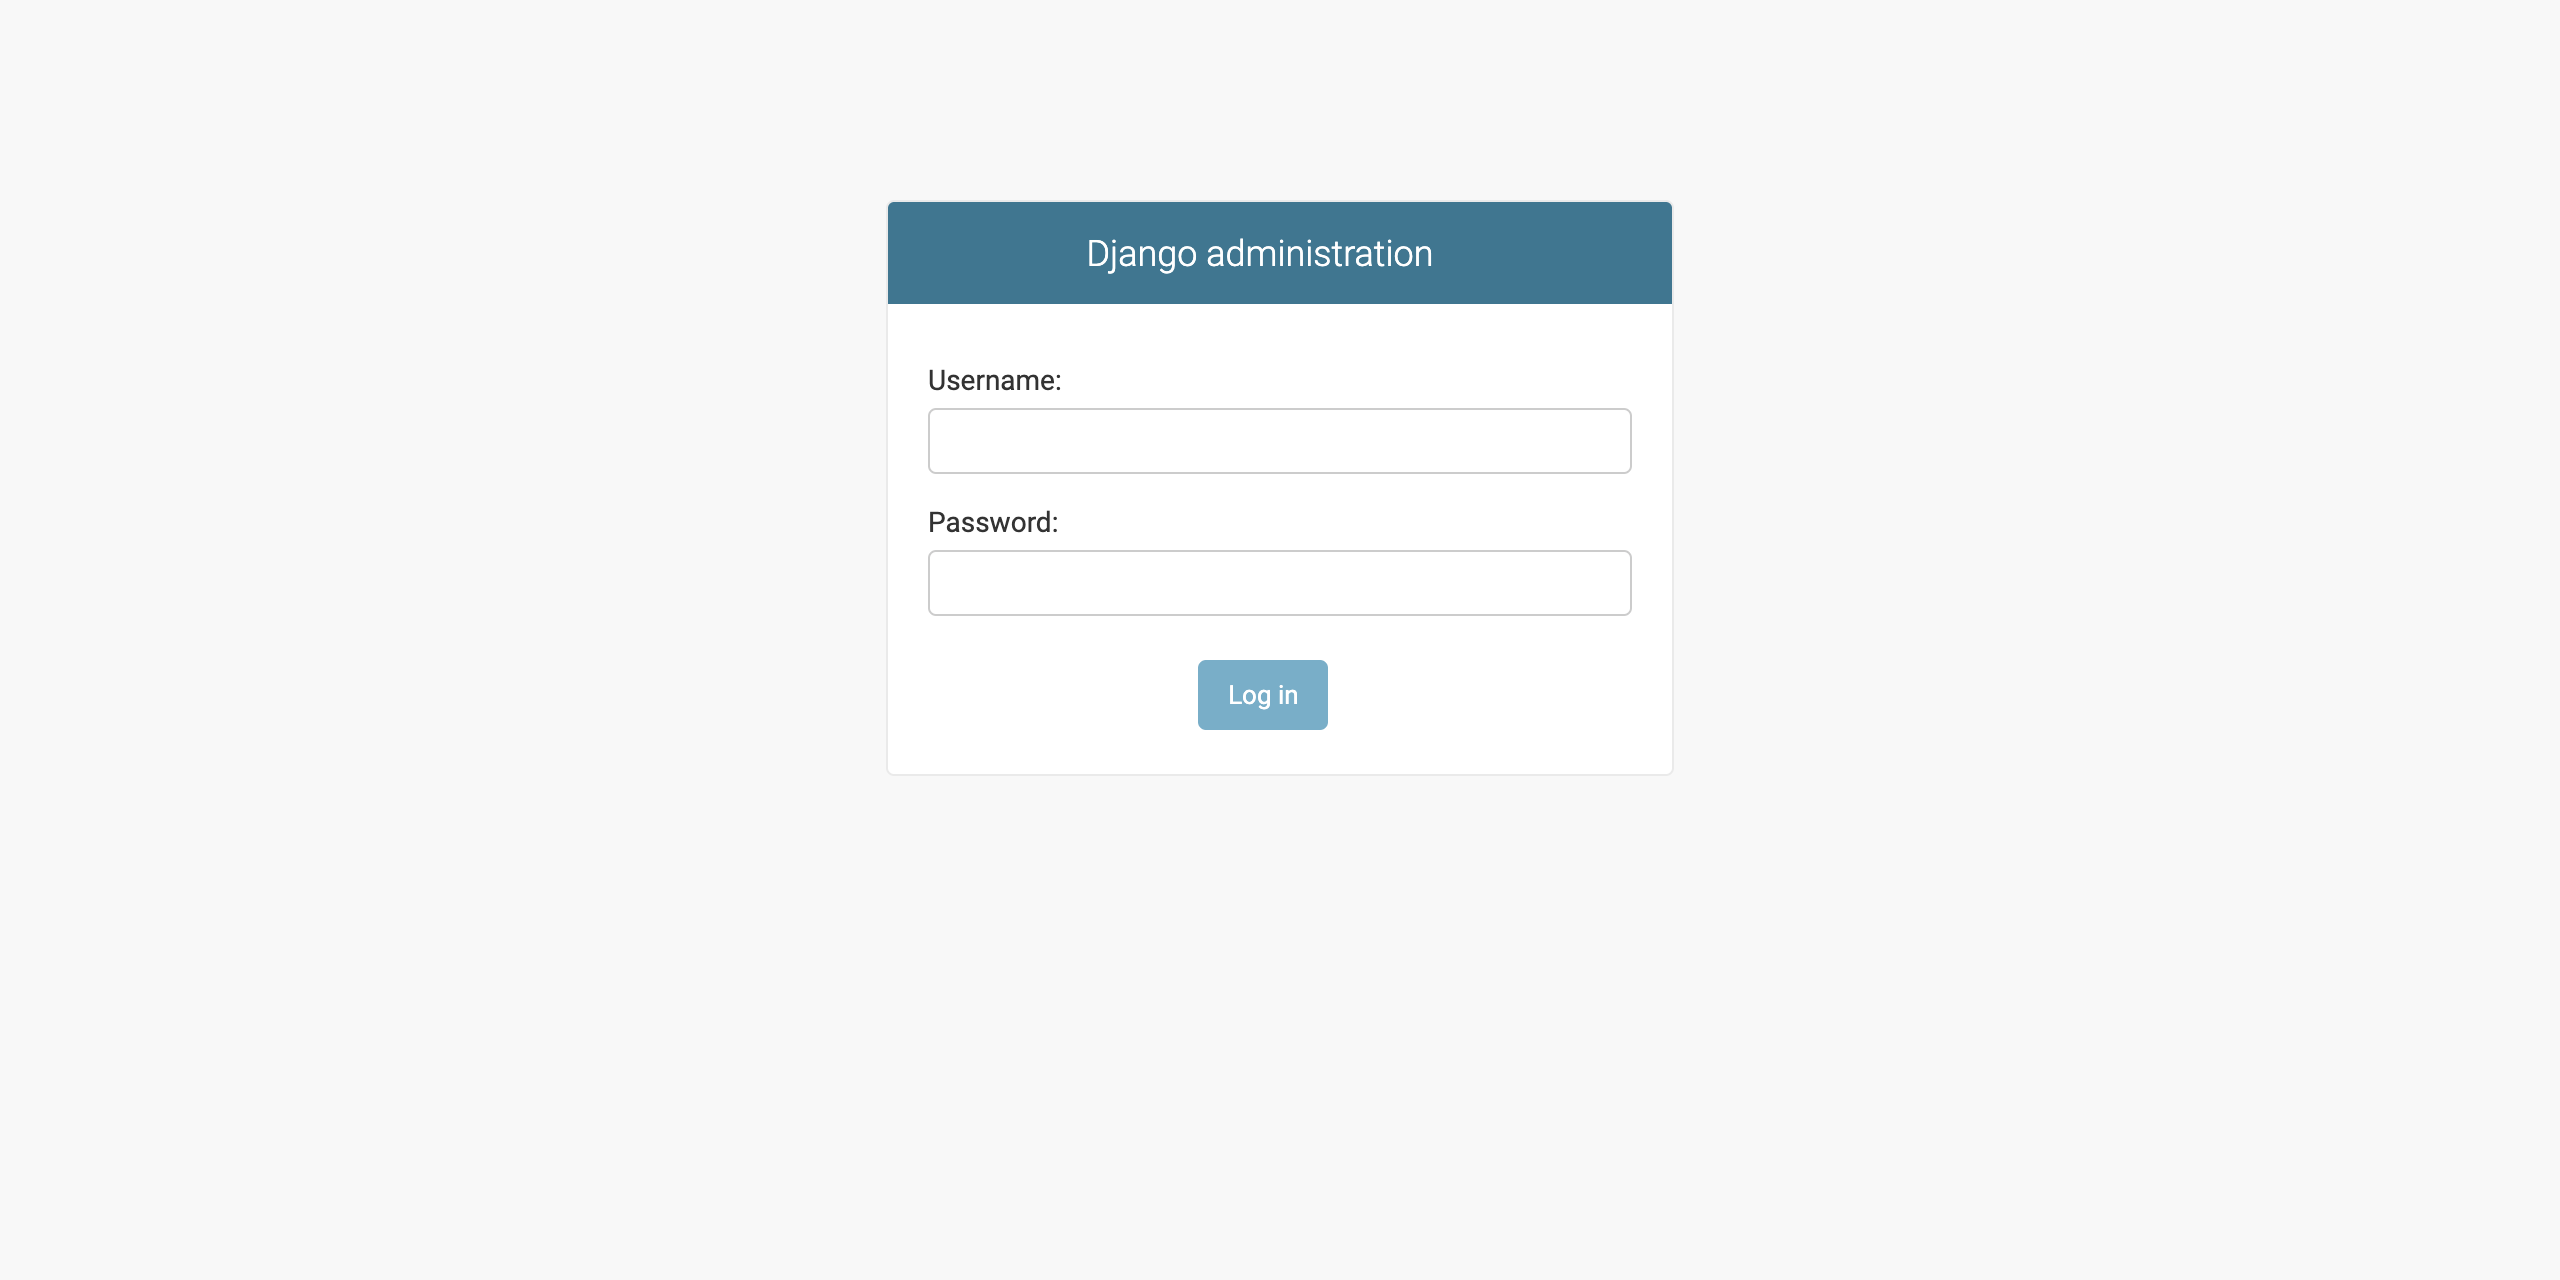
Django Adminのログイン画面が開くので、
「6-1. 管理ユーザの作成」で作成した管理ユーザでログインして下さい。
ログイン後、Area、Cafe、Utilityのモデルの参照、追加、更新が出来ることを確認して下さい。
(1) ログイン画面
(2) 管理画面
7. 参考情報(Bootstrap4)
Bootstrap4を使用する方法を説明します。
「2-3. requirements.txtの設定」で説明した通り、
DjangoでBootstrap4を利用するためのパッケージをインストールしていますので、
以下の手順を行うことで、Bootstrap4のcss、Javascriptの利用が可能です。
7-1. django-bootstrap4の設定
src/mainproject/settings.pyを開き、以下の修正を行い保存します。
(1) INSTALLED_APPSにdjango-bootstrap4を追加します。
(修正前)
INSTALLED_APPS = [
    'app.apps.AppConfig',
    'django.contrib.admin',
    'django.contrib.auth',
    'django.contrib.contenttypes',
    'django.contrib.sessions',
    'django.contrib.messages',
    'django.contrib.staticfiles',
]
(修正後)
INSTALLED_APPS = [
    'app.apps.AppConfig',
    'django.contrib.admin',
    'django.contrib.auth',
    'django.contrib.contenttypes',
    'django.contrib.sessions',
    'django.contrib.messages',
    'django.contrib.staticfiles',
    'bootstrap4',
]
(2) TEMPLATESのbuiltinsにbootstrap4.templatetags.bootstrap4を追加します。
※ これを追加することで、各htmlに{% load bootstrap4 %}を記述する必要がなくなります。
(修正前)
TEMPLATES = [
    {
        'BACKEND': 'django.template.backends.django.DjangoTemplates',
        'DIRS': [],
        'APP_DIRS': True,
        'OPTIONS': {
            'context_processors': [
                'django.template.context_processors.debug',
                'django.template.context_processors.request',
                'django.contrib.auth.context_processors.auth',
                'django.contrib.messages.context_processors.messages',
            ],
        },
    },
]
(修正後)
TEMPLATES = [
    {
        'BACKEND': 'django.template.backends.django.DjangoTemplates',
        'DIRS': [],
        'APP_DIRS': True,
        'OPTIONS': {
            'context_processors': [
                'django.template.context_processors.debug',
                'django.template.context_processors.request',
                'django.contrib.auth.context_processors.auth',
                'django.contrib.messages.context_processors.messages',
            ],
            'builtins':[
                'bootstrap4.templatetags.bootstrap4',
            ],
        },
    },
]
7-2. Utilityテーブルに制御フラグを追加(おまけ①)
UtilityテーブルにBootstrap4のcssを利用するかしないかを制御するデータを追加します。
このデータを使って、一覧画面のhtmlでBootstrap4のcssを読み込むか読み込まないか判別します。
* 使用しない場合、value列の値を”1”以外に設定します。
insert into app_utility (key, value, create_date) values ('bootstrap_flg', '1', now());
commit;
7-3. 一覧画面の修正
(1) src/app/views.pyを開き、以下の修正を行い保存します。(おまけ②)
get_context_dataを使って、「7-2. Utilityテーブルに制御フラグを追加」で
追加したデータをhtmlで利用できるようにしています。
(修正前)
from django.http import HttpResponse, HttpResponseRedirect
from django.shortcuts import get_object_or_404, render
from django.urls import reverse
from django.views import generic
from .models import Area, Cafe, Utility

class IndexView(generic.ListView):
    template_name = 'list.html'
    context_object_name = 'cafe_list'
    def get_queryset(self):
        """Return the last five published records."""
        return Cafe.objects.order_by('name')[:5]
class DetailView(generic.DetailView):
    model = Cafe
    template_name = 'detail.html'
(修正後)
from django.http import HttpResponse, HttpResponseRedirect
from django.shortcuts import get_object_or_404, render
from django.urls import reverse
from django.views import generic
from .models import Area, Cafe, Utility

class IndexView(generic.ListView):
    template_name = 'list.html'
    context_object_name = 'cafe_list'
    def get_queryset(self):
        """Return the last five published records."""
        return Cafe.objects.order_by('name')[:5]

    def get_context_data(self, **kwargs):
        context = super().get_context_data(**kwargs)
        context["bootstrap_flg"] = Utility.objects.all().filter(key='bootstrap_flg').first()
        return context

class DetailView(generic.DetailView):
    model = Cafe
    template_name = 'detail.html'
(2) src/app/templates/list.htmlを開き、以下の修正を行い保存します。
bootstrap_flg.value == "1"の時に、{% bootstrap_css %}を読み込むように記述しています。
今回、おまけ①②をすることで、テーブルのデータによって、
Bootstrap4のcssを読み込むか制御できるように対応しましたが、
単純に使用したい場合は、おまけ①②は飛ばし、{% bootstrap_css %}を
htmlに追加するだけで使用が可能です。
(修正前)
{% load static %}

<html lang="ja">
<head>
  <meta charset="utf-8">
  <link rel="stylesheet" type="text/css" href="{% static 'app_css/style.css' %}">
  <link rel="shortcut icon" href="{% static 'pj_image/armx8-1ibhc-001.ico' %}" type="image/vnd.microsoft.icon">
</head>
<body>
<table border="1">
  <thead>
    <tr>
      <th>カフェ</th>
      <th>特徴</th>
      <th>エリア</th>
      <th>サイト</th>
    </tr>
  </thead>
  <tbody>
  {% for cafe in cafe_list %}
    <tr>
      <td><a href="{% url 'app:detail' cafe.id %}">{{ cafe.name }}</a></td>
      <td>{{ cafe.memo }}</td>
      <td>{{ cafe.area.name }}</td>
      <td><a href="{{ cafe.website }}">{{ cafe.website }}</a></td>
    </tr>
  {% endfor %}
  </tbody>
</table>
</body>
</html>
(修正後)
{% load static %}

<html lang="ja">
<head>
  <meta charset="utf-8">
  <link rel="stylesheet" type="text/css" href="{% static 'app_css/style.css' %}">
  {% if bootstrap_flg.value == "1" %}
    {% bootstrap_css %}
  {% endif %}
  <link rel="shortcut icon" href="{% static 'pj_image/armx8-1ibhc-001.ico' %}" type="image/vnd.microsoft.icon">
</head>
<body>
<table border="1">
  <thead>
    <tr>
      <th>カフェ</th>
      <th>特徴</th>
      <th>エリア</th>
      <th>サイト</th>
    </tr>
  </thead>
  <tbody>
  {% for cafe in cafe_list %}
    <tr>
      <td><a href="{% url 'app:detail' cafe.id %}">{{ cafe.name }}</a></td>
      <td>{{ cafe.memo }}</td>
      <td>{{ cafe.area.name }}</td>
      <td><a href="{{ cafe.website }}">{{ cafe.website }}</a></td>
    </tr>
  {% endfor %}
  </tbody>
</table>
</body>
</html>
7-4. 動作確認
ブラウザを開き、"http://0.0.0.0:8000/app/"にアクセスし、
一覧画面にBootstrap4のcssが使用されていることを確認します。
参考元
Compose file version 3 reference
Docker Composeチュートリアル: herokuのPostgresをローカルにさくっとコピーする
Supported tags and respective Dockerfile links
はじめての Django アプリ作成、その 1
SQLのSELECT文を、DjangoのQuerySet APIで書いてみた
Djangoにおけるクラスベース汎用ビューの入門と使い方サンプル