3
1

Delete article

Deleted articles cannot be recovered.

Draft of this article would be also deleted.

Are you sure you want to delete this article?

Open InterpreterをVSCode(docker+python)で使ってみる。

Last updated at Posted at 2023-11-01

はじめに

Open Interpreterの使い方を説明します。

Open Interpreterは、大規模言語モデルを使って
コードの生成・実行を人間の代わりにしてくれますが、
必要となるライブラリのインストールも自動的に行います。
便利ですが、ローカル環境ではライブラリの管理が困難となったり、
システム環境が変わってしまうリスクもあるため、
Docker環境上でOpen Interpreterを使用する方法を説明します。

本投稿は、Mac OSを前提としています。
投稿時点のバージョン:macOS Monterey 12.4

※ Open Interpreter自体の特徴については、本投稿では割愛します。
 以下の記事がとても分かりやすかったです。
 Open Interpreterの使い方から実践までを解説【画像付き】

前提条件

(1) アプリケーション

VSCodeとDockerを使用するため、
以下のアプリケーションを事前にインストールして下さい。
 ① Docker for Mac
 ② VSCode
 参考ページ:
  以下の記事にDocker for Mac、VSCodeのインストール方法を記載しています。
  VSCodeとDockerで開発環境構築 (Python + PostgreSQL + Git)

(2) OpenAI 関連

① OpenAI API key
 API keyを利用するため、事前にOpenAI platform画面
 "View API keys"から作成して下さい。
② クレジットカード支払いの設定と上限金額の設定
 この設定をしておかないと、API利用時に以下のエラーが発生します。
 事前にOpenAI platform画面の"Billing overview"から設定して下さい。

openai.error.RateLimitError: You exceeded your current quota, please check your plan and billing details.

 ※ ChatGPTのAPI利用は、ChatGPT Plusとは別の機能のため、
  ChatGPT Plusの契約をしていても、利用できません。
  API利用を有効にするために、クレジットカード支払いの設定と
  上限金額の設定が必要となります。

 参考ページ:
  OpenAI APIのエラー(openai.error.RateLimitError)について


長くなりましたが、前提条件さえ満たしていれば、
これ以降の作業は簡単に終わります。

作業手順

以下の順で説明していきます。
 1. Docker コンテナの設定
 2. VSCodeでコンテナに接続
 3. 動作確認

1. Docker コンテナの設定

1-1. 作業ディレクトリの作成

任意のパスに作業ディレクトリを作成します。
例として、「openinterpreter-sample」という作業ディレクトリ名にしています。

mkdir openinterpreter-sample

1-2. 「.devcontainer」ディレクトリの作成

作業ディレクトリ直下に「.devcontainer」を作成します。

mkdir .devcontainer

1-3. 「Dockerfile」ファイルの作成

.devcontainerの直下に「Dockerfile」を作成します。

vi Dockerfile

以下の内容を記載します。

FROM python:3.11
ENV PYTHONUNBUFFERED 1
RUN pip install open-interpreter

[Dockerfileの説明]
 ① python:3.11
  Pythonを利用するためのライブラリ
  参考:PythonのVersion
   3.9ではopen-interpreterのインストール中に以下のエラーが発生します。
   3.10でも問題ありませんでしたが、本投稿では、3.11を指定します。

=> ERROR [dev_container_auto_added_stage_label 2/2] RUN pip install open

 ② open-interpreter
  open-interpreterを利用するためのライブラリ

1-4. 「devcontainer.json」ファイルの作成

.devcontainer直下に「devcontainer.json」を作成します。

vi devcontainer.json

以下の内容を記載します。

{
  "name": "Python Sample(Open interpreter)",
  // Dockerfileでイメージ・コンテナを作成
  "dockerFile": "Dockerfile",
  // リモート先のVS Codeにインストールする拡張機能
  "extensions": [
    "ms-python.python"
  ],
}

[devcontainer.jsonの説明]
 ① "name"は、VSCodeに表示される名前となります。(好きな名前を設定して下さい。)
 ② "dockerFile"は、実行するDockerfileを指定します。(作成したDockerfileと紐づきます)
 ③ "extensions"は、コンテナにインストールする拡張機能を指定します。
  後から手動でインストールも可能です。

1-5. ディレクトリ構成の確認

以下のコマンドを作業ディレクトリ直下で実行し、作業ディレクトリの内容を確認します。

tree -a .

以下のように表示されます。

.
└── .devcontainer
    ├── Dockerfile
    └── devcontainer.json

1 directory, 2 files

2. VSCodeでコンテナに接続

2-1. コンテナへの接続

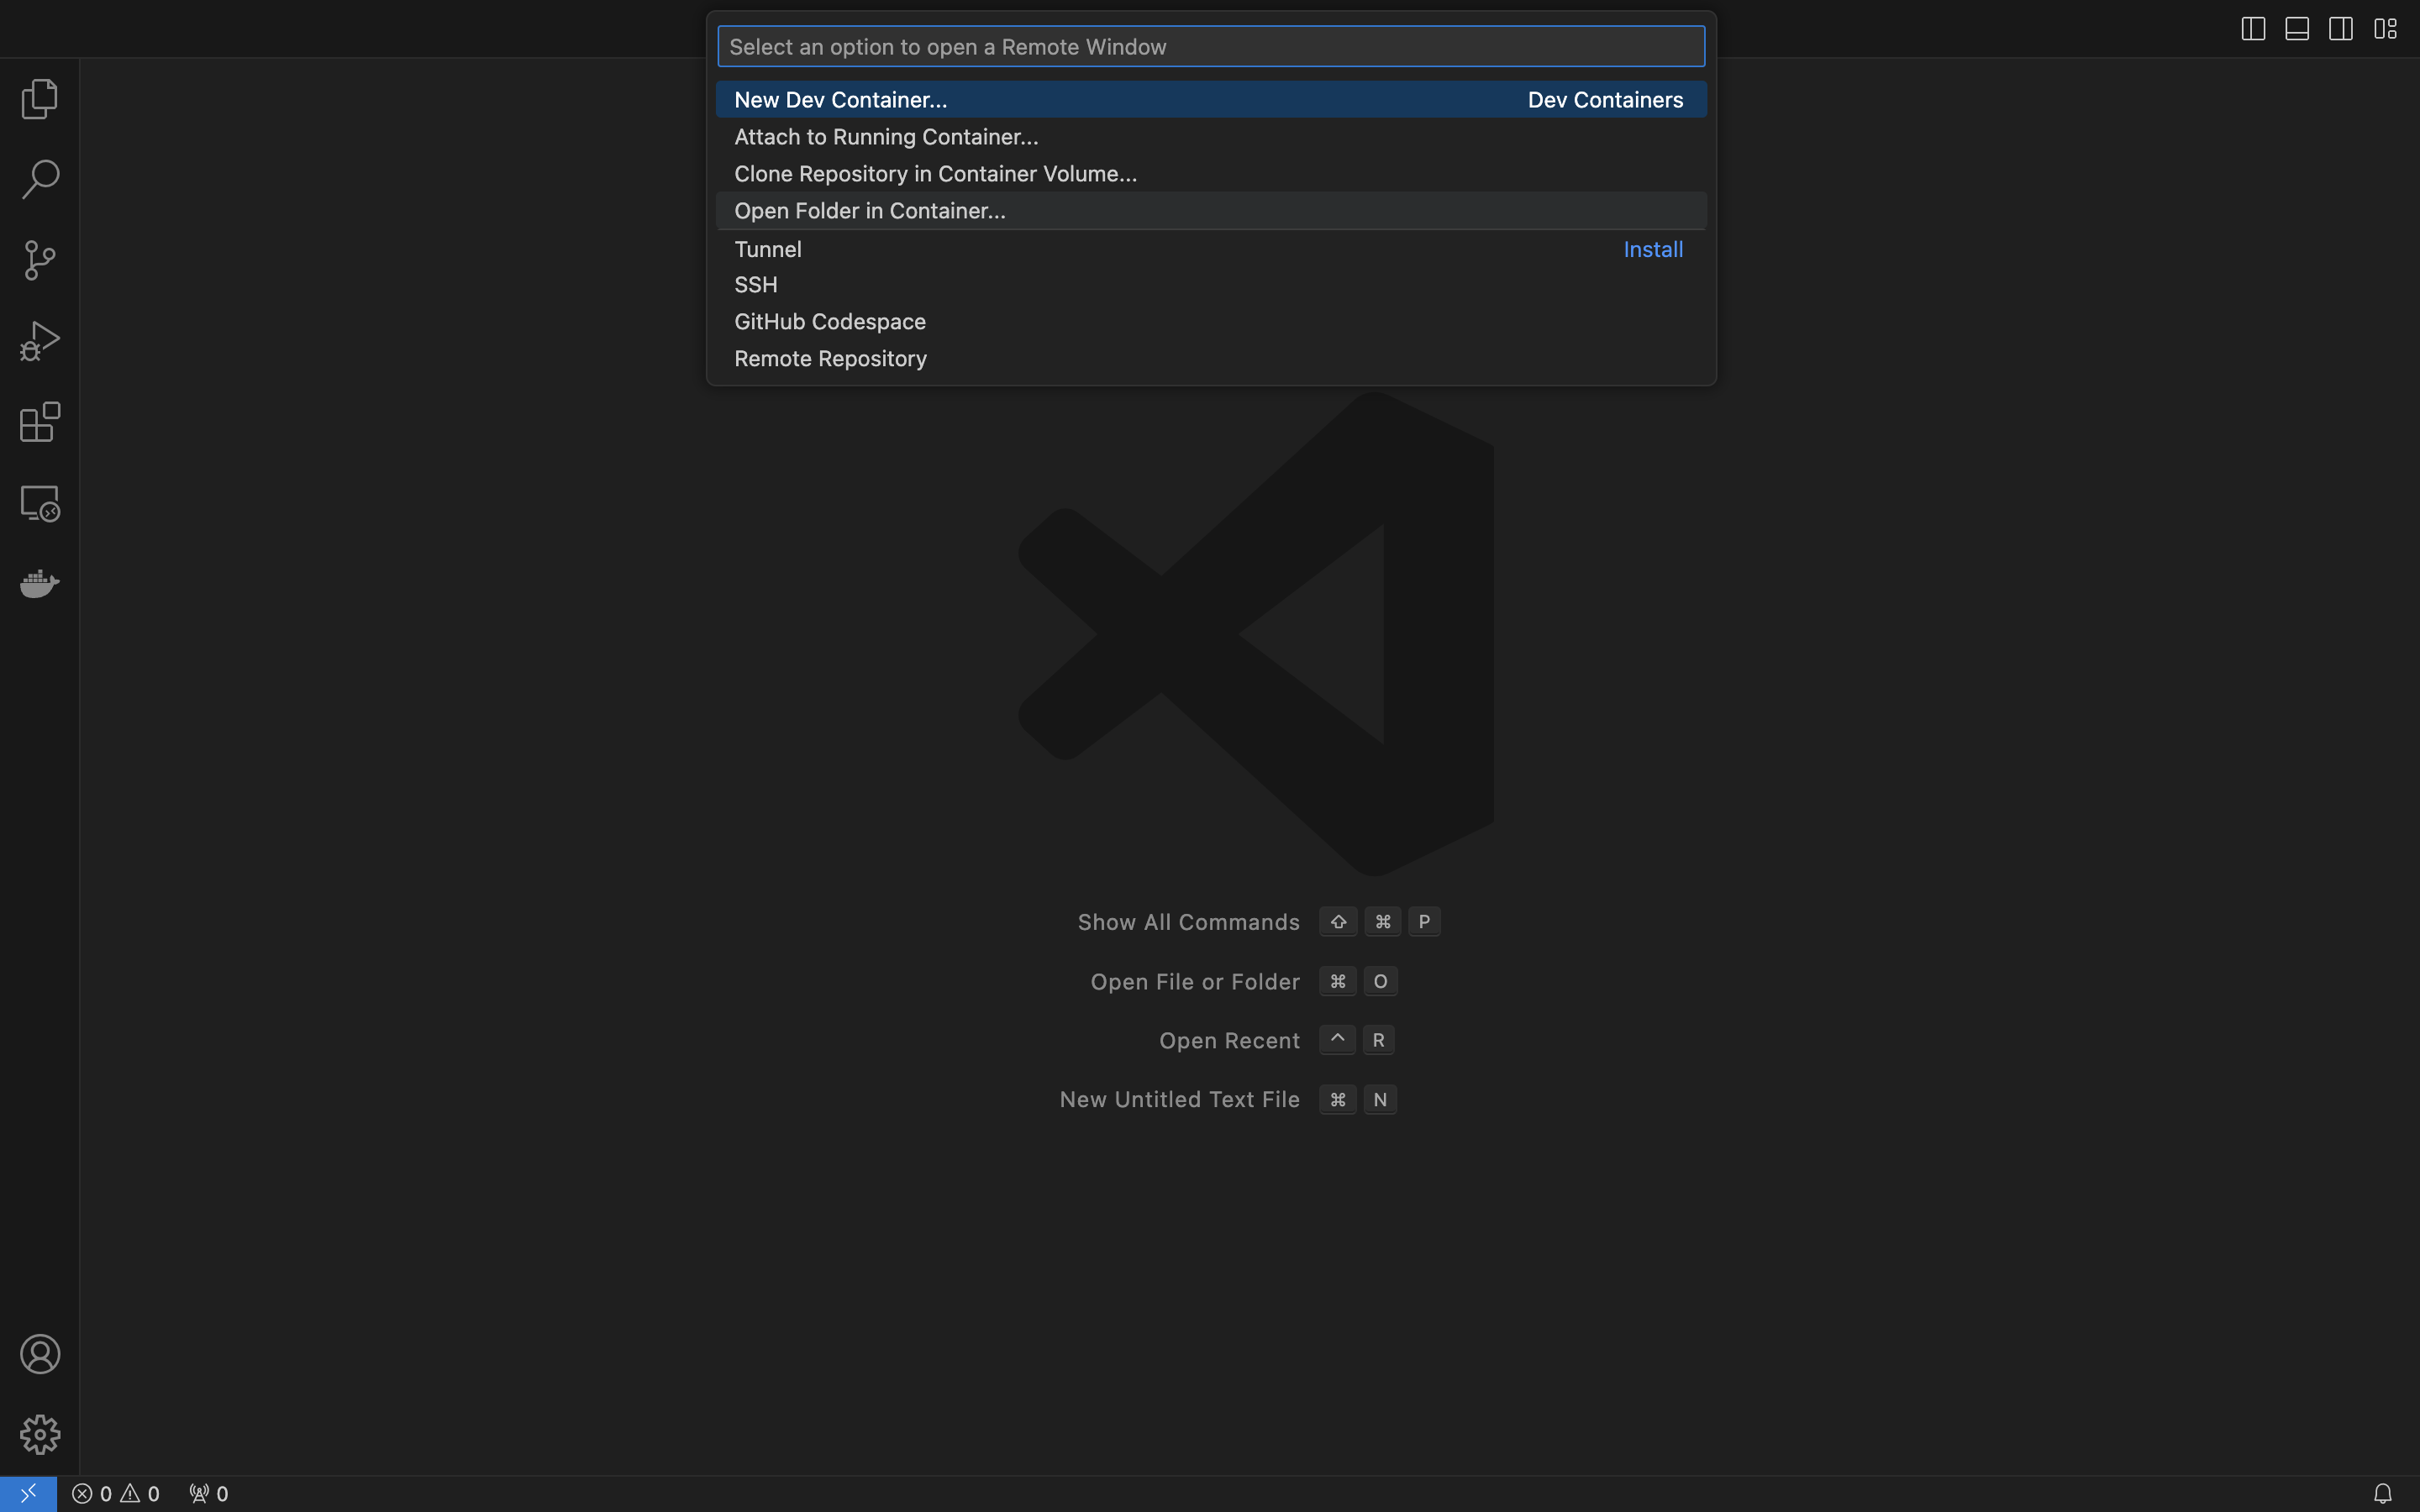
(1) VSCodeの左下の緑のアイコンをクリックし、「Open Folder in Container…」を選択します。
スクリーンショット 2023-10-31 20.08.45.png

(2) 作業ディレクトリを選択します。
「1-1. 作業ディレクトリの作成」で作成した作業ディレクトリを指定します。

2-2. リモート環境の確認

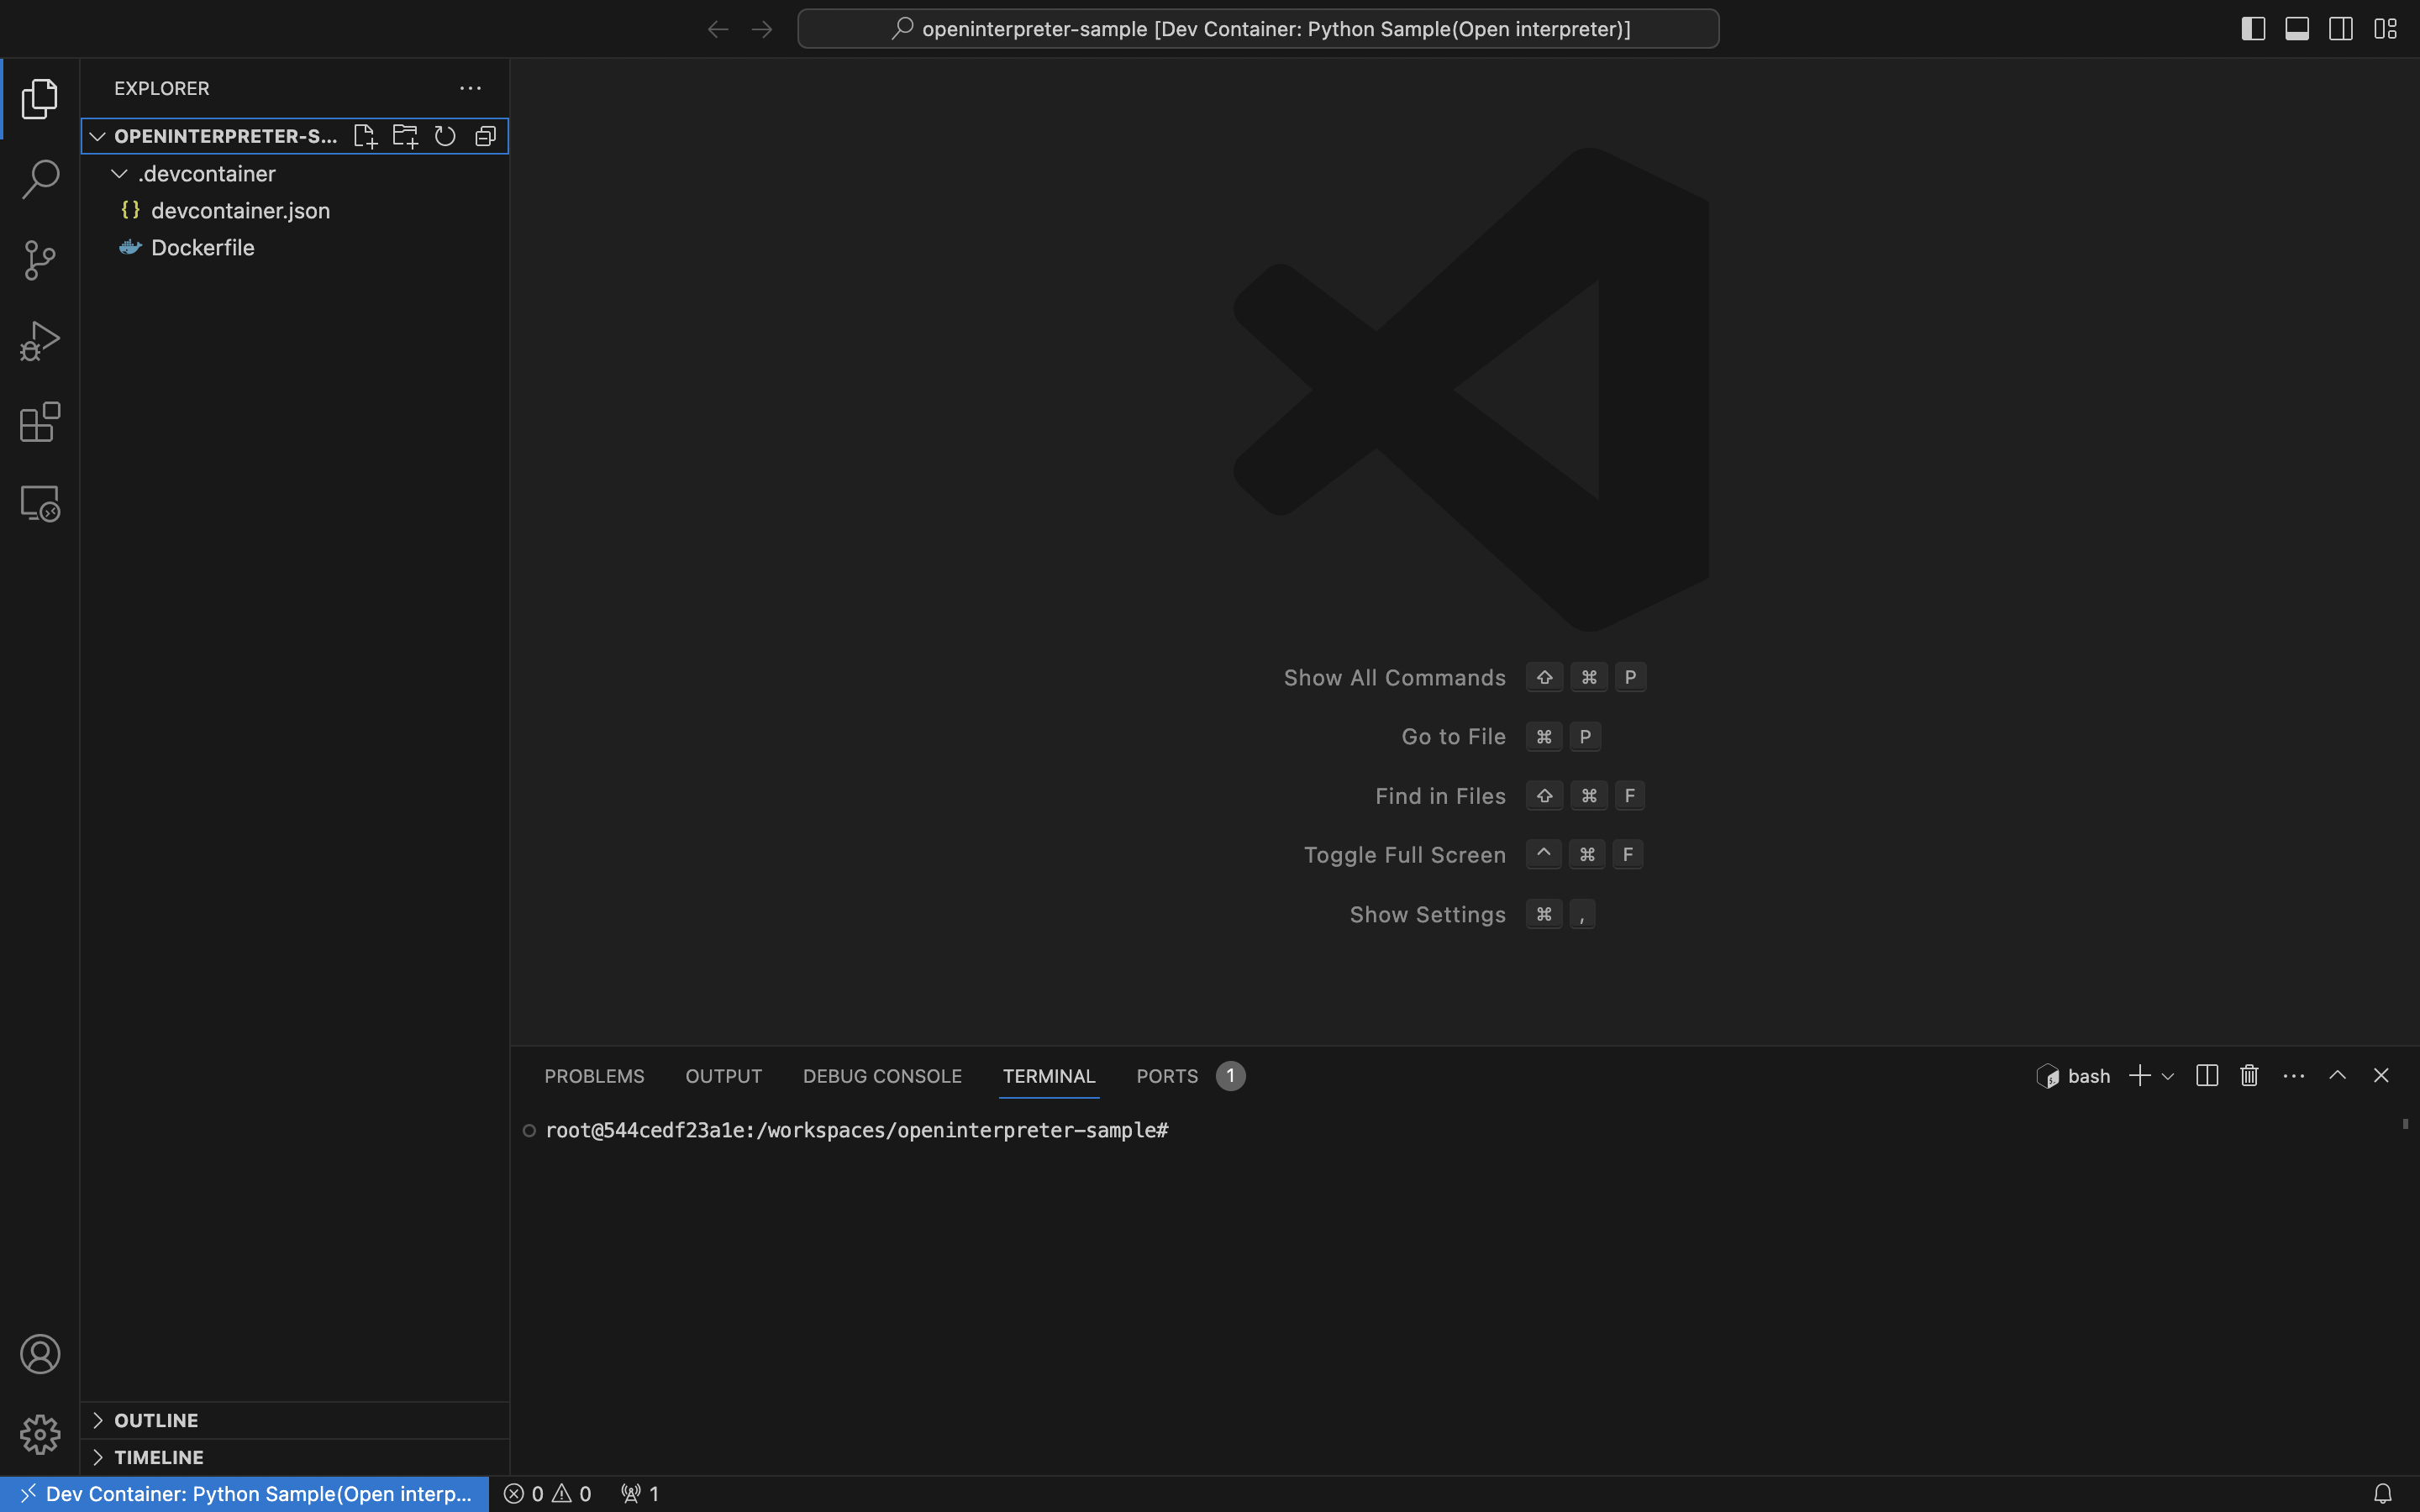
(1) WORKSPACEに作業ディレクトリ内のディレクトリ/ファイルがマウントされています。
スクリーンショット 2023-10-31 20.15.02.png

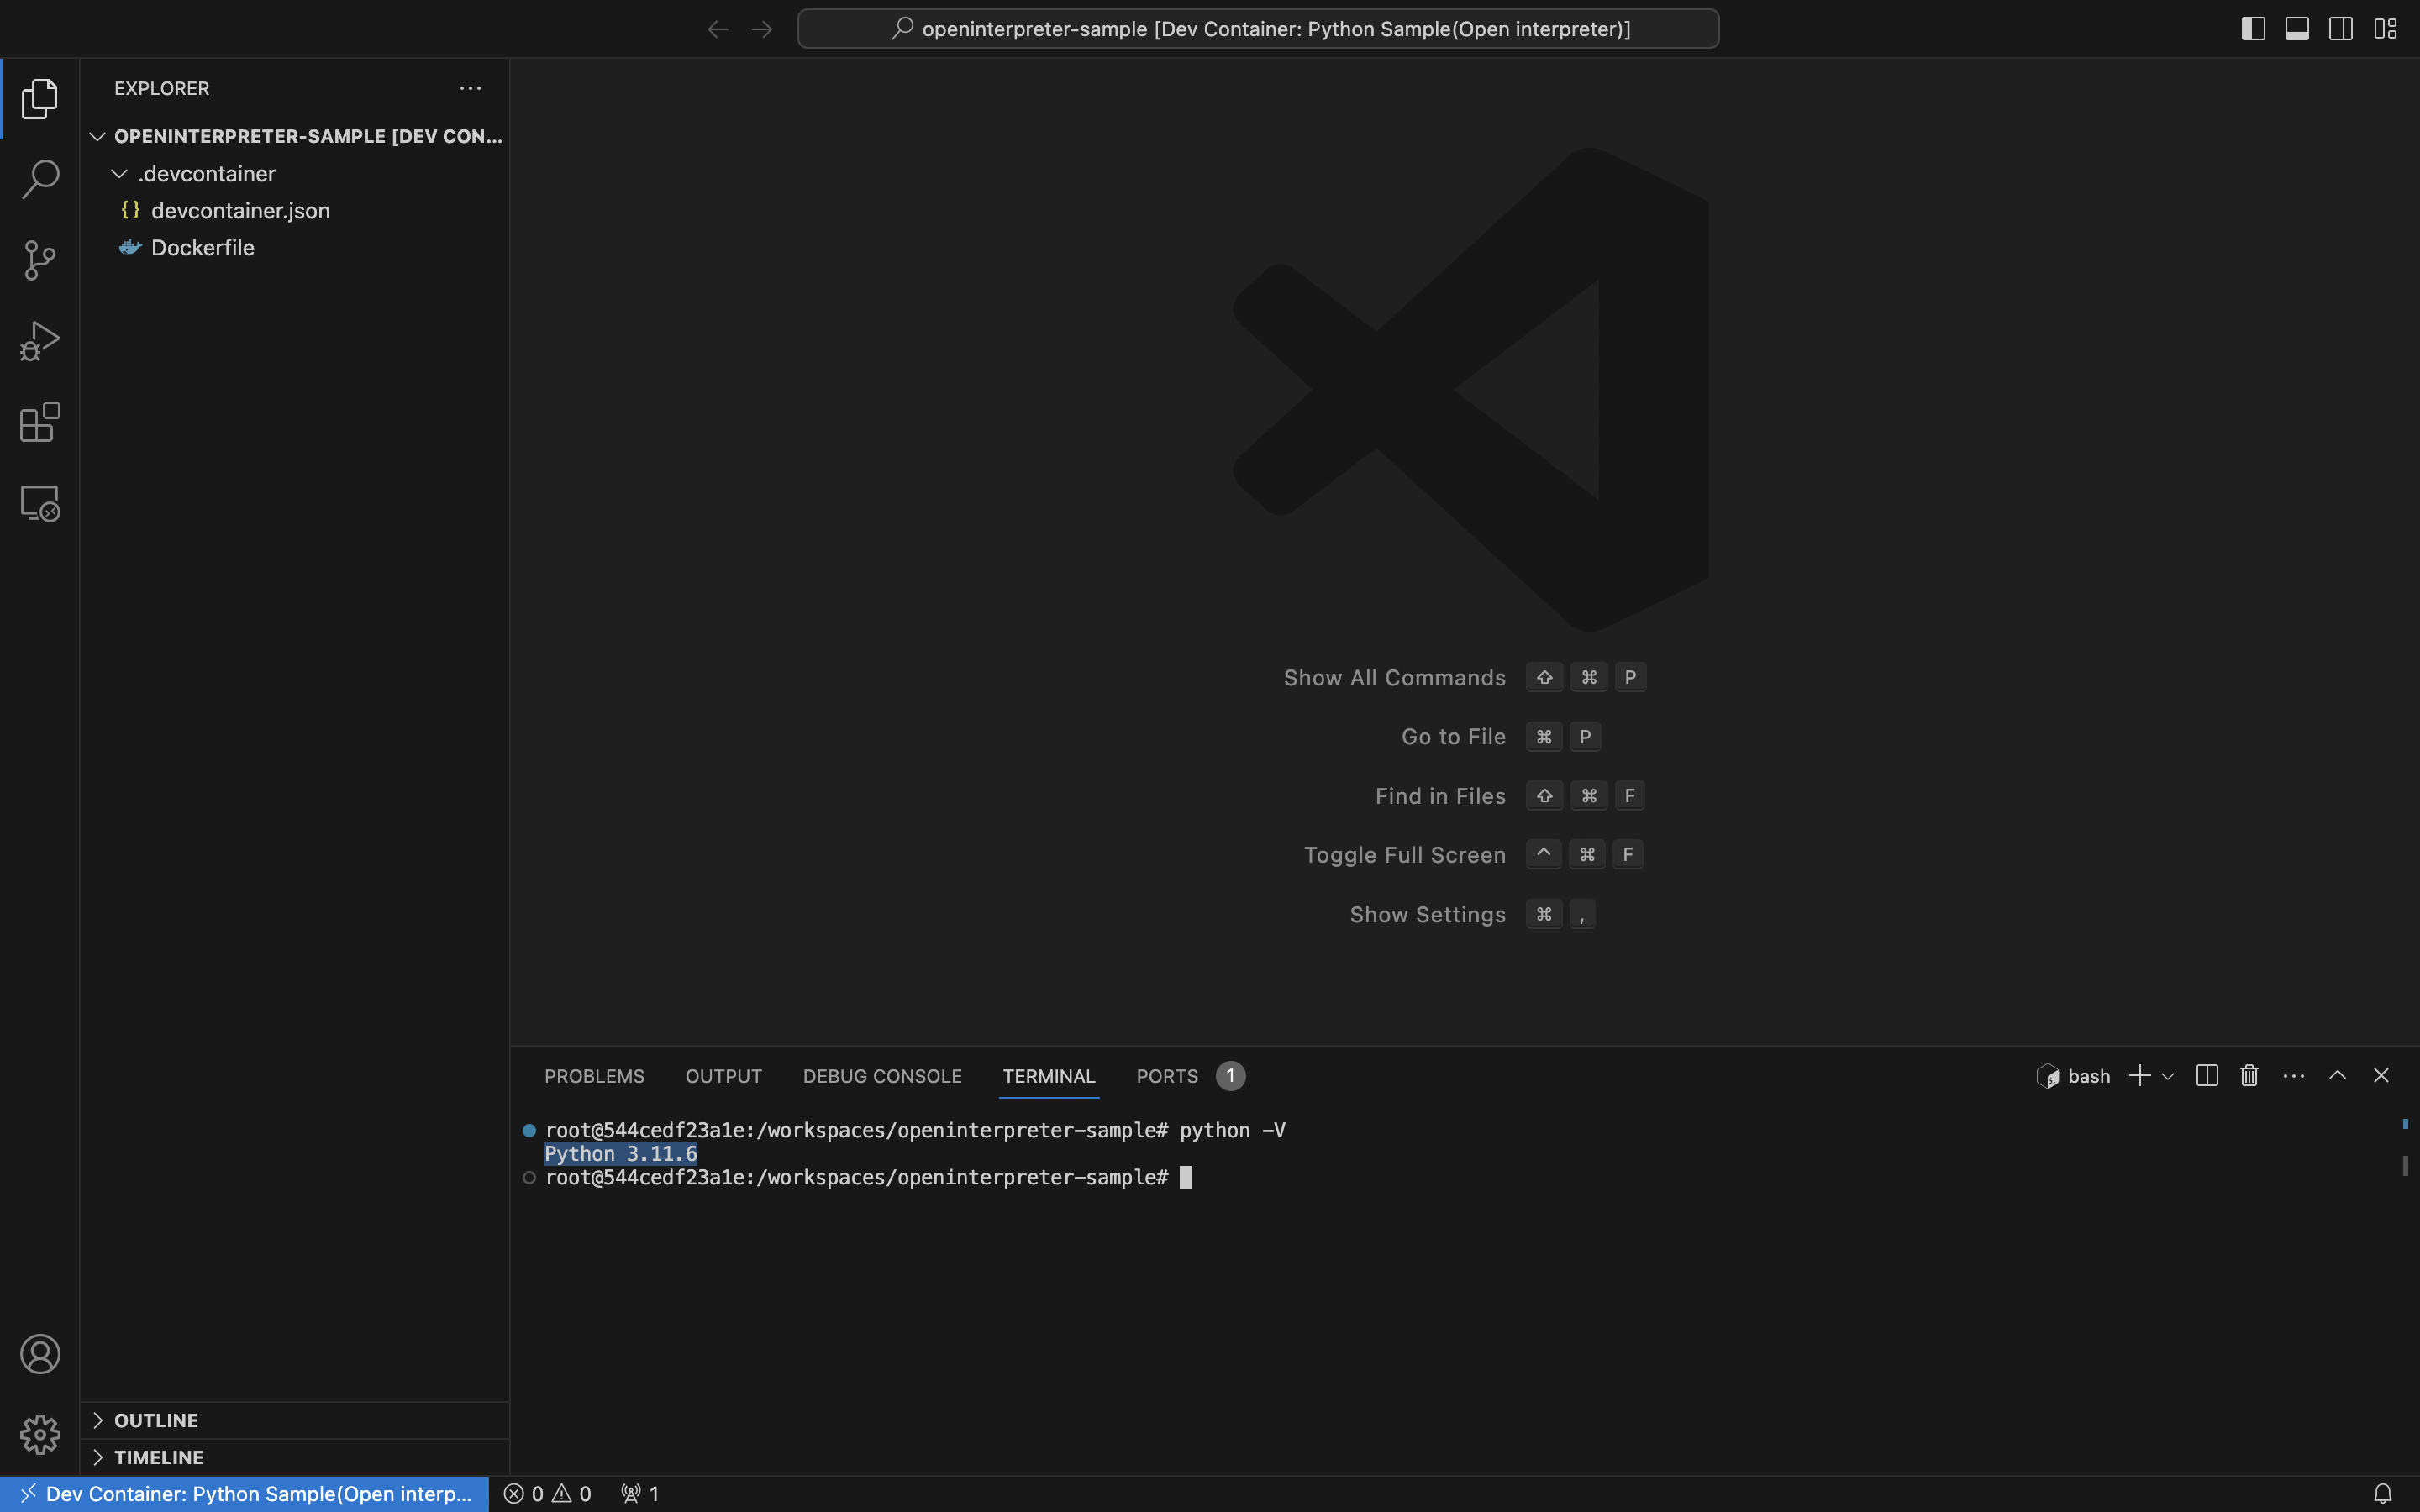
(2) ターミナルで以下のコマンドを実行し、Pythonのバージョンを確認します。

python -V

下記のようにPython 3.11.*が表示されていれば成功です。
スクリーンショット 2023-10-31 20.23.11.png

3. 動作確認

3-1. OpenAI API keyを指定します。

事前に用意したOpenAI API keyを以下のコマンドで指定して下さい。

export OPENAI_API_KEY="[OpenAI API key]"

※ ダブルクォーテーションで囲まないとkeyが認識されず、実行時エラーが発生します。

3-2. プログラムの作成

interpreterを利用するPythonプログラムを作成します。
※ sample.pyという名前で作成しています。

import interpreter

# ユーザー確認を必要としない
interpreter.auto_run = True
# GPT-3.5-turboの指定
interpreter.model = "gpt-3.5-turbo"
# 会話の初期化
interpreter.reset()

while True:
    user_input = input("入力してください> ")
    interpreter.chat(user_input)

3-3. プログラムの実行

python sample.py

(1) 下記のように「入力してください>」が繰り返し表示されます。
 対話形式でメッセージを入力していきます。

入力してください> 

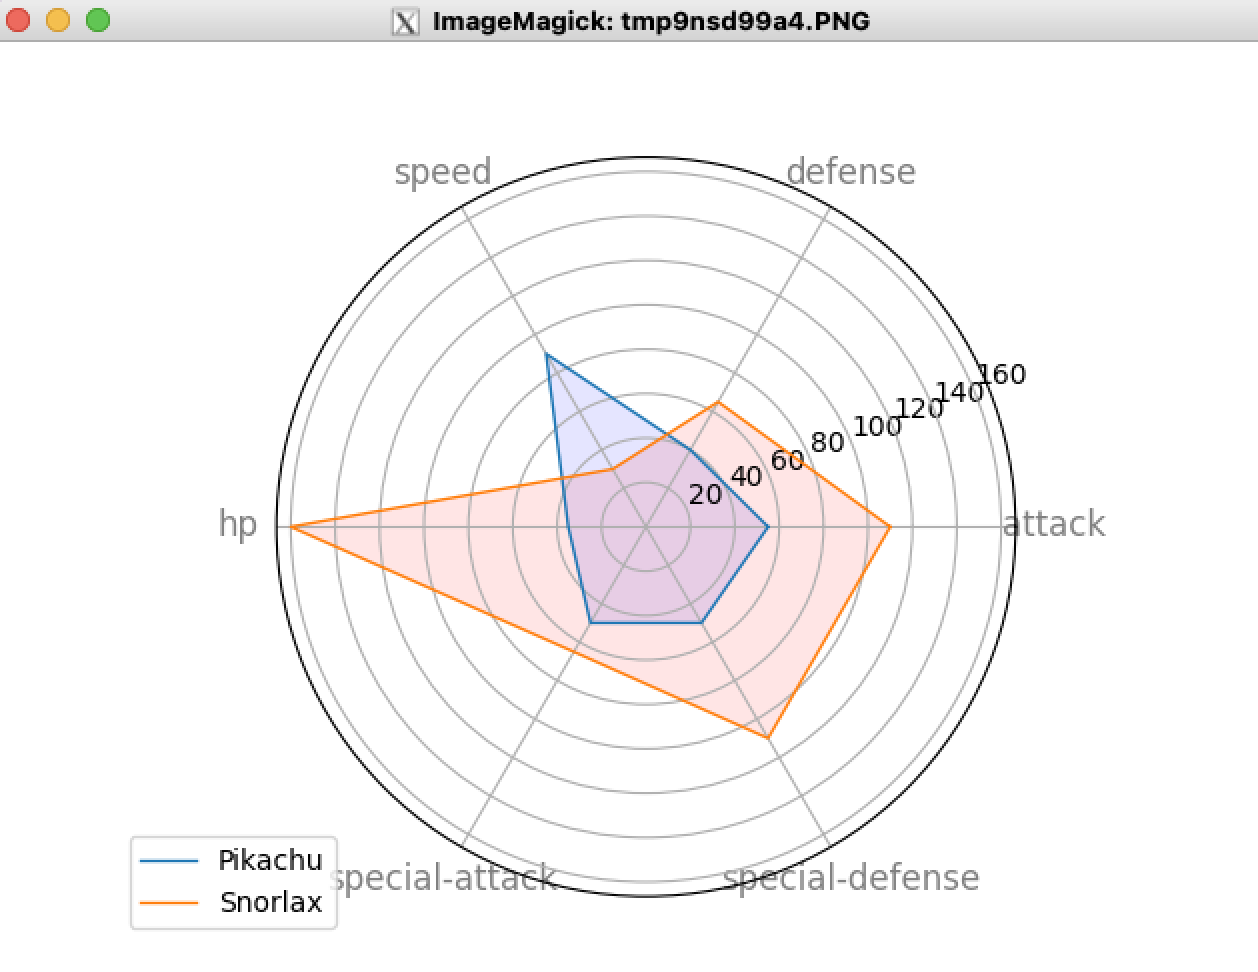
本投稿では、「ピカチュウとカピゴンの強さを比較するレーダーチャートを作成する」を
達成したいと思います。

入力してください> ピカチュウとカピゴンの強さを比較するレーダーチャートを作成してください。

▌ Model set to GPT-4                                                                                                                                      

Open Interpreter will require approval before running code.                                                                                                 

Use interpreter -y to bypass this.                                                                                                                          

Press CTRL-C to exit.                                                                                                                                       

                                                                                                                                                            
  もちろん、わかりました。以下に実行計画を示します。                                                                                                        
                                                                                                                                                            
   1 データ取得:                                                                                                                                            
     ピカチュウとカピゴンの特性データを取得します。このデータはポケモンのAPIから取得します。Pythonのrequestsモジュールを使ってこのAPIからデータを取得しま   
     す。                                                                                                                                                   
   2 データ処理: 取得したデータを整形し、レーダーチャートを作成するための形にします。Pythonのpandasを使ってデータを処理します。                             
   3 レーダーチャート作成: レーダーチャートを作成します。Pythonのmatplotlibを使ってチャートを作成し、それを画像ファイルとして保存します。                   
   4 レーダーチャート表示: 保存したレーダーチャートの画像を表示します。この操作はshellコマンドを使って行います。                                            
                                                                                                                                                            
  それではすぐに作業を開始します。                                                                                                                          
                                                                                                                                                            
  まずは、Pythonのrequestsとpandas、matplotlibライブラリがインストールされていることを確認します。もし、インストールされていない場合はpip install requests  
  pandas matplotlibというコマンドを実行します。こちらの操作は大丈夫でしょうか?                                                                             
                                                                                                                                                            
入力してください> 
入力してください> 大丈夫です

▌ Model set to GPT-4                                                                                                                                      

Open Interpreter will require approval before running code.                                                                                                 

Use interpreter -y to bypass this.                                                                                                                          

Press CTRL-C to exit.                                                                                                                                       


  import requests                                                                                                                                           
  import pandas as pd                                                                                                                                       
  import matplotlib.pyplot as plt                                                                                                                           
                                                                                                                                                            
  {'status': 'Python libraries imported successfully'}                                                                                                      
                                                                                                                                                            

  Would you like to run this code? (y/n)
  y

run_code
run_code
run_code
run_code
run_code
                                                                                                                                                            
  import requests                                                                                                                                           
  import pandas as pd                                                                                                                                       
  import matplotlib.pyplot as plt                                                                                                                           
                                                                                                                                                            
  {'status': 'Python libraries imported successfully'}                                                                                                      
                                                                                                                                                            
                                                                                                                                                            
  {'status': 'Python libraries imported successfully'}                                                                                                      
                                                                                                                                                            
                                                                                                                                                            
  完璧です。requests、pandas、matplotlib ライブラリのインポートが成功しました。                                                                             
                                                                                                                                                            
  それでは計画に従って、次に進みます。                                                                                                                      
                                                                                                                                                            
   2 ピカチュウとカピゴンの特性データを取得します。このデータはポケモンAPIから取得します。ここでは requests                                                 
     モジュールを使用してこのAPIからデータを取得します。                                                                                                    
                                                                                                                                                            
入力してください> はい

▌ Model set to GPT-4                                                                                                                                      

Open Interpreter will require approval before running code.                                                                                                 

Use interpreter -y to bypass this.                                                                                                                          

Press CTRL-C to exit.                                                                                                                                       

run_code
run_code
run_code
run_code
run_code

                                                                                                                                                            
  def get_pokemon_data(name):                                                                                                                               
      response = requests.get(f'https://pokeapi.co/api/v2/pokemon/{name}')                                                                                  
      data = response.json()                                                                                                                                
      stats = data['stats']                                                                                                                                 
      stats_dict = {stat['stat']['name']: stat['base_stat'] for stat in stats}                                                                              
      return stats_dict                                                                                                                                     
                                                                                                                                                            
  pikachu_data = get_pokemon_data('pikachu')                                                                                                                
  pikachu_data                                                                                                                                              
                                                                                                                                                            

  Would you like to run this code? (y/n)

(2) すべての対話を表示すると膨大となるため、途中は割愛します。
対話を繰り返していくと、最終的に以下のPythonのプログラムが作成されました。

import matplotlib.pyplot as plt                                                                                                                           
import pandas as pd                                                                                                                                       
import numpy as np                                                                                                                                        
from math import pi                                                                                                                                       
                                                                                                                                                          
# Define the properties                                                                                                                                   
properties = ['attack', 'defense', 'speed', 'hp', 'special-attack', 'special-defense']                                                                    
                                                                                                                                                          
# Gather the data for Pikachu and Snorlax                                                                                                                 
pikachu = [55, 40, 90, 35, 50, 50]                                                                                                                        
snorlax = [110, 65, 30, 160, 65, 110]                                                                                                                     
                                                                                                                                                          
# Number of variables we're plotting.                                                                                                                     
num_vars = len(properties)                                                                                                                                
                                                                                                                                                          
# Split the circle into even parts and save the angles                                                                                                    
# so we know where to put each axis.                                                                                                                      
angles = np.linspace(0, 2 * np.pi, num_vars, endpoint=False).tolist()                                                                                     
                                                                                                                                                          
# The plot is a circle, so we need to "complete the loop"                                                                                                 
# and append the start to the end.                                                                                                                        
pikachu += pikachu[:1]                                                                                                                                    
snorlax += snorlax[:1]                                                                                                                                    
angles += angles[:1]                                                                                                                                      
                                                                                                                                                          
# ax = plt.figure(figsize=(6, 6), dpi=80).add_subplot(111, polar=True)                                                                                    
ax = plt.subplot(polar=True)                                                                                                                              
                                                                                                                                                          
# Draw one axe per variable + add labels                                                                                                                  
plt.xticks(angles[:-1], properties, color='grey', size=12)                                                                                                
                                                                                                                                                          
# Draw the values                                                                                                                                         
ax.plot(angles, pikachu, linewidth=1, linestyle='solid', label='Pikachu')                                                                                 
ax.plot(angles, snorlax, linewidth=1, linestyle='solid', label='Snorlax')                                                                                 
                                                                                                                                                          
# Fill area                                                                                                                                               
ax.fill(angles, pikachu, 'b', alpha=0.1)                                                                                                                  
ax.fill(angles, snorlax, 'r', alpha=0.1)                                                                                                                  
                                                                                                                                                          
plt.legend(loc='upper right', bbox_to_anchor=(0.1, 0.1))                                                                                                  
                                                                                                                                                          
# Save the figure                                                                                                                                         
plt.savefig('radar_chart.png')   

(3) 作成されたレーダチャートは下記のように出来上がっています。
スクリーンショット 2023-11-01 21.49.47.png


以上で終了となります。
最後まで読んで頂きありがとうございました。
今後は、業務効率がアップしそうな使い道を探していきたいと思います。
良いものが見つかればアップしていきます。

参考

Google ColabでOpen Interpreterを試してみた

3
1
0

Register as a new user and use Qiita more conveniently

  1. You get articles that match your needs
  2. You can efficiently read back useful information
  3. You can use dark theme
What you can do with signing up
3
1

Delete article

Deleted articles cannot be recovered.

Draft of this article would be also deleted.

Are you sure you want to delete this article?