はじめに
Membrane は音声や映像に対する処理をパイプラインで記述できるフレームワークです
例えば
「MP3 ファイルを Web からダウンロードする」
|>「RAW オーディオに変換する」
|>「AAC 形式に変換する」
|>「ブラウザで再生する」
といったようなパイプラインをストリーミングで実行します
KinoMembrane は Livebook 上で Membrane のパイプラインを図として視覚化します
文章では分かりにくいので、実行して結果を確認しましょう
Membrane と KinoMembrane の公式サンプルを参考にしていますが、 Docker 上で音声再生できるように変更しています
元のサンプル
https://github.com/membraneframework/kino_membrane/blob/master/examples/pipeline_in_livebook.livemd
具体的には、ファイル読込は Web からの読込に、 PortAudio による音声再生をブラウザ上での音声再生に変更しています
実装したノートブックはこちら
環境構築
今回実行する処理は OS へのパッケージインストールが必要です
私は普段自分用の Docker コンテナで Livebook を起動しているので、 Dockerfile 上に依存パッケージを追加しました
Ubuntu の場合
sudo apt-get install \
    clang-format \
    ffmpeg \
    libavutil-dev \
    libswresample-dev \
    libmad0-dev \
    libfdk-aac-dev
macOS の場合
brew install \
    clang-format \
    ffmpeg \
    libmad \
    pkg-config \
    fdk-aac
セットアップ
KinoMembrane と Membrane の各種プラグインをインストールします
KinoMembrane と MembraneKinoPlugin が依存する Kino バージョンが食い違っているため、 Kino のバージョンを override: true で指定しています
Mix.install([
  {:kino, "~> 0.13", override: true},
  {:kino_membrane, "~> 0.3"},
  {:membrane_hackney_plugin, "~> 0.11"},
  {:membrane_ffmpeg_swresample_plugin, "~> 0.20"},
  {:membrane_mp3_mad_plugin, "~> 0.18"},
  {:membrane_aac_fdk_plugin, "~> 0.18"},
  {:membrane_audio_mix_plugin, "~> 0.16"},
  {:membrane_tee_plugin, "~> 0.12"},
  {:membrane_kino_plugin,
   github: "membraneframework-labs/membrane_kino_plugin", tag: "v0.3.2"}
])
Membrane や各種プラグインの関数を使うための準備をします
import Membrane.ChildrenSpec

alias Membrane.{
  AAC,
  AudioMixer,
  Hackney,
  MP3,
  RawAudio,
  RCPipeline,
  Tee,
  Time
}

alias Membrane.FFmpeg.SWResample.Converter
MP3 ファイルの再生
ブラウザ上に音声プレイヤーを作成します
MembraneKinoPlugin で定義されています
https://github.com/membraneframework-labs/membrane_kino_plugin
kino = Membrane.Kino.Player.new(audio: true)
コードを実行すると、以下のようなプレイヤーが表示されます
再生する MP3 ファイルのダウンロード元を定義します
base_repo_url = "https://raw.githubusercontent.com/membraneframework/membrane_demo/master"

source_url = "#{base_repo_url}/simple_pipeline/sample.mp3"
音声処理のパイプラインを定義します
pipeline = RCPipeline.start_link!()

spec =
  child(:hackney, %Hackney.Source{
    location: source_url,
    hackney_opts: [follow_redirect: true]
  })
  |> via_in(:input, auto_demand_size: 10)
  |> child(:decoder, MP3.MAD.Decoder)
  |> child(:converter, %Converter{
    output_stream_format: %RawAudio{
      sample_format: :s16le,
      sample_rate: 48000,
      channels: 2
    }
  })
  |> child(:encoder_aac, AAC.FDK.Encoder)
  |> via_in(:audio)
  |> child(:player, %Membrane.Kino.Player.Sink{kino: kino})
パイプラインを実行すると、作っておいたプレイヤーで音声が再生されます
RCPipeline.exec_actions(pipeline, spec: spec)
いよいよ KinoMembrane の登場です
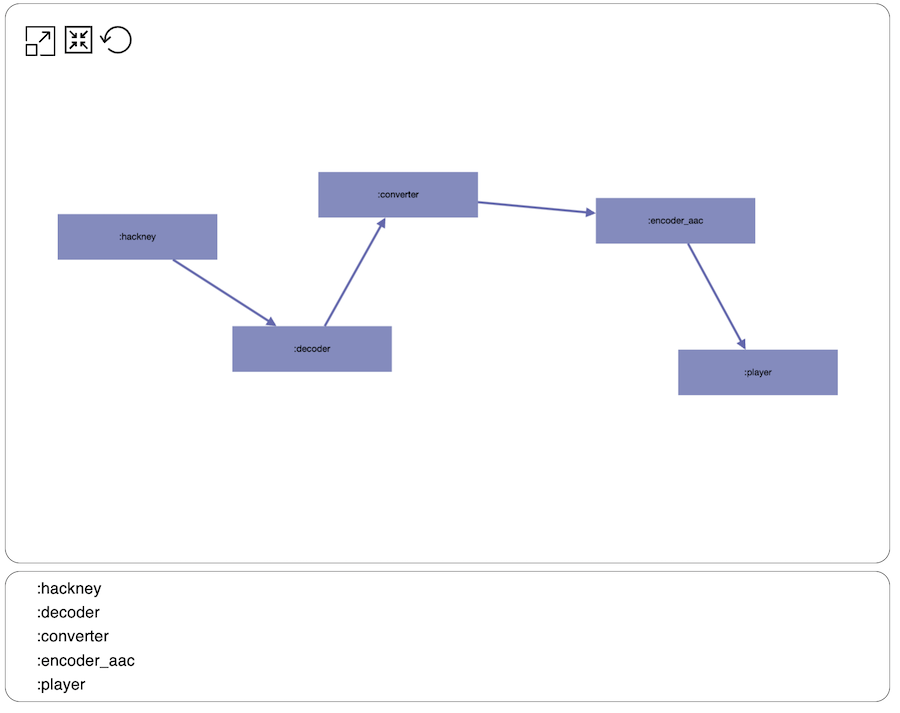
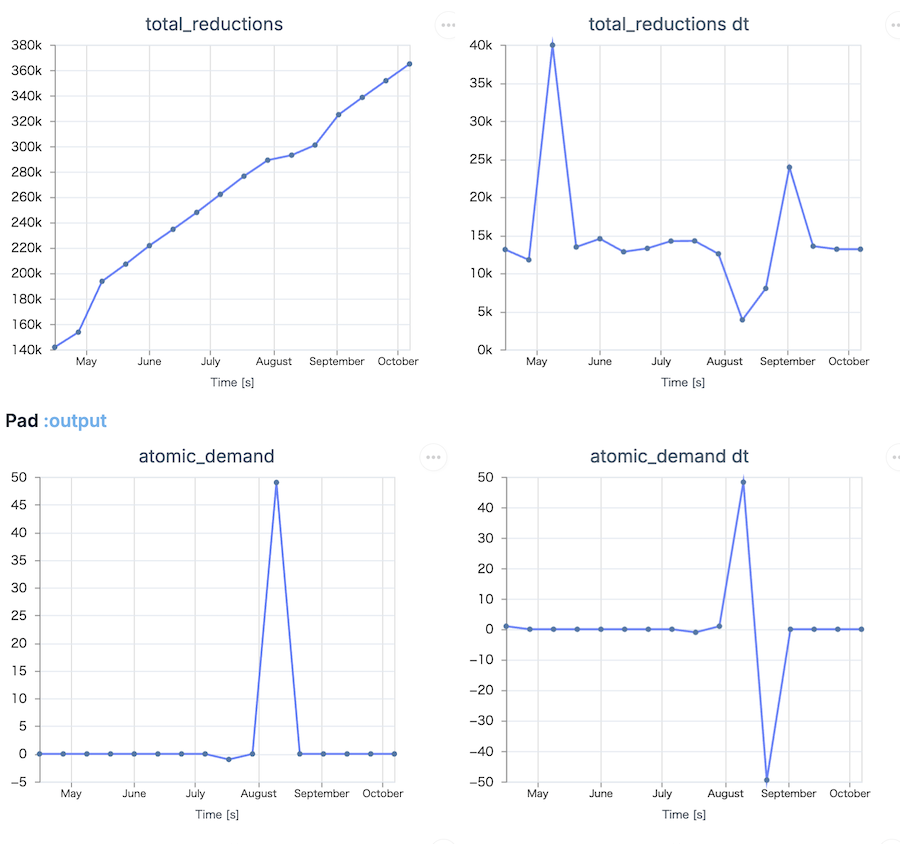
pipeline_dashboard を実行すると、パイプラインが図として表示され、各ブロックをクリックすると処理の状況を確認できます
KinoMembrane.pipeline_dashboard(pipeline)
:hackney や :converter など、パイプラインで定義しておいた各処理が矢印で繋がっています
処理中の状況がグラフで表示され、リアルタイムに更新されます
(グラフの X 軸ラベルはおかしいですが、、、)
最後にパイプラインを終了しておきます
Membrane.Pipeline.terminate(pipeline)
音声を合成する
先ほどの例だと一直線だったので、もっと見た目に面白い例を実装します
まず、ビープ音(「ポーン」という感じの短い音)のダウンロード、デコード(RAW オーディオへの変換)を定義します
beep_url = "#{base_repo_url}/livebooks/audio_mixer/assets/beep.aac"

beep_audio_input =
  child(:beep_hackney, %Hackney.Source{
    location: beep_url,
    hackney_opts: [follow_redirect: true]
  })
  |> child({:beep_decoder_aac, :beep}, AAC.FDK.Decoder)
  |> child(:beeps, Tee.PushOutput)
ビープ音を 1 秒間隔で 30 回繰り返し入力するよう定義します
n_beeps = 30

beeps_split =
  for i <- 1..n_beeps do
    get_child(:beeps)
    |> via_in(:input, options: [offset: Time.seconds(i)])
    |> get_child(:mixer)
  end
BGM (MP3 ファイル)をダウンロードし、ビープ音と同じビット深度、サンプリングレートに合わせる変換を定義します
background_url = "#{base_repo_url}/livebooks/audio_mixer/assets/sample.mp3"

background_audio_input =
  child(:background_hackney, %Hackney.Source{
    location: background_url,
    hackney_opts: [follow_redirect: true]
  })
  |> child(:background_decoder_mp3, MP3.MAD.Decoder)
  |> child(:background_converter, %Converter{
    input_stream_format: %RawAudio{channels: 2, sample_format: :s24le, sample_rate: 48_000},
    output_stream_format: %RawAudio{channels: 1, sample_format: :s16le, sample_rate: 44_100}
  })
  |> get_child(:mixer)
新しいプレイヤーを用意します
mixer_kino = Membrane.Kino.Player.new(audio: true)
音声を合成し、 AAC 形式に変換してからプレイヤーで再生するよう定義します
mixer_output =
  child(:mixer, AudioMixer)
  |> child(:mixer_encoder_aac, AAC.FDK.Encoder)
  |> via_in(:audio)
  |> child(:mixer_player, %Membrane.Kino.Player.Sink{kino: mixer_kino})
ここまで個別に定義したパイプラインを結合します
mixer_spec = beeps_split ++ [beep_audio_input, background_audio_input, mixer_output]
パイプラインを実行すると、 BGM 上にビープ音が重なって再生されます
mixer_pipeline = RCPipeline.start_link!()

RCPipeline.exec_actions(mixer_pipeline, spec: mixer_spec)
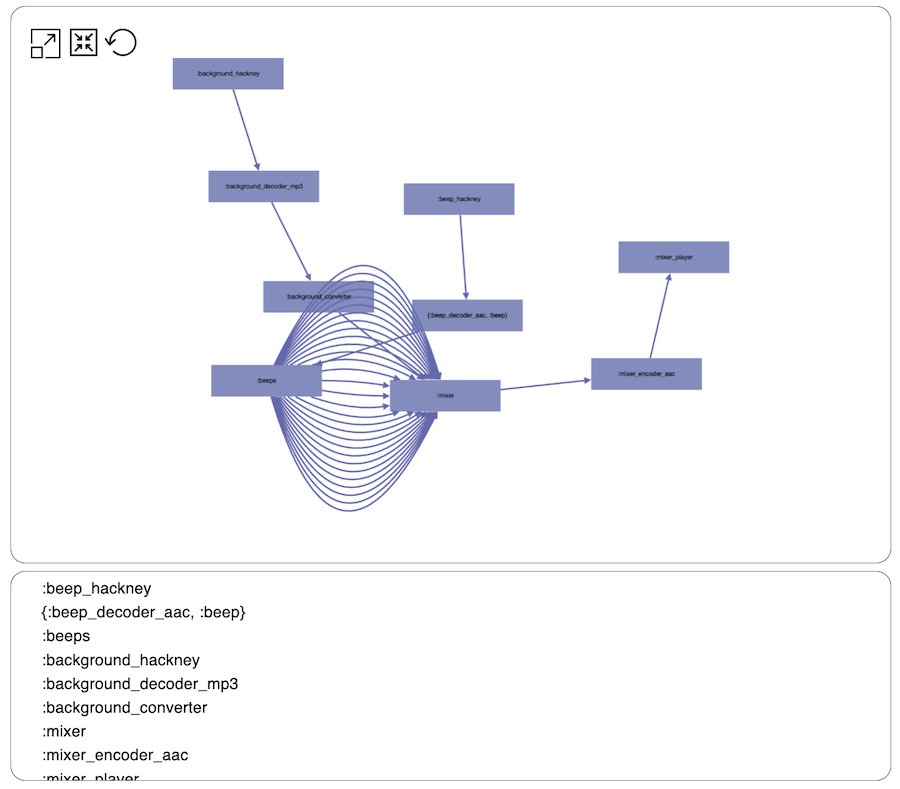
パイプラインを視覚化してみましょう
KinoMembrane.pipeline_dashboard(mixer_pipeline)
ビープ音が大量に増えて、 BGM と合成してから再生される流れが分かりやすく視覚化されました
こちらのパイプラインも終了させます
Membrane.Pipeline.terminate(mixer_pipeline)
まとめ
音声処理をパイプラインで記述し、その流れを図で表すことができました
Livebook による視覚化の好例ですね


