はじめに
Phoenix LiveView 用の UI コンポーネント SaladUI を使ってみます
2024/7/17 のイベントで紹介されるということで、先駆けて楽しみます
SaladUI とは
Phoenix LiveView 用の UI コンポーネント群を提供してくれるモジュールです
ストーリーブックが Web サイトとして公開されているので、どんな UI が提供されているかはそちらを見るのが一番良いです
shadcn/ui にインスパイアされたということで、 shadcn/ui と同じコンポーネントを揃えようとしています
shadcn/ui はライブラリとして公開されているものではなく、コピー&ペーストで使えるコンポーネント集として提供されています
思想としては Pines と同じですね
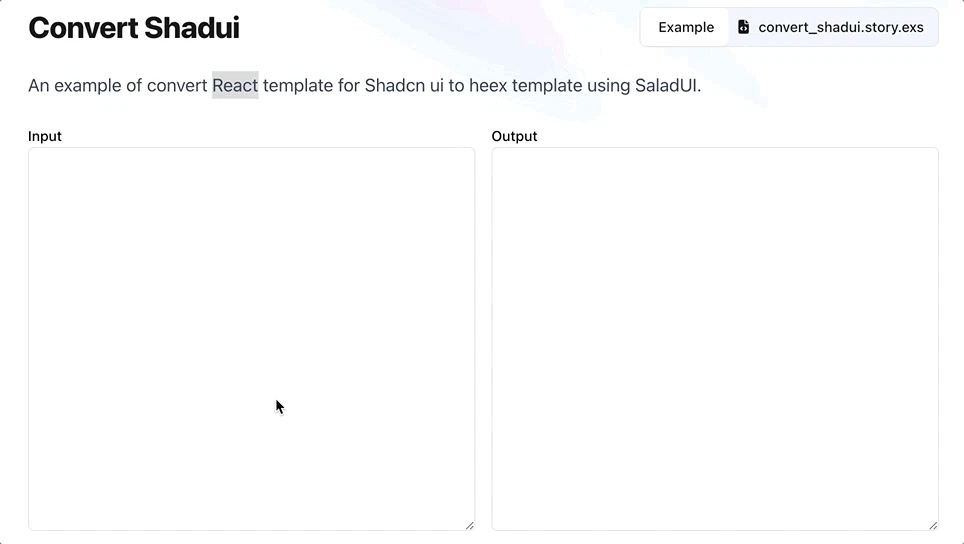
React からの変換
Storybook には React テンプレートからの変換デモが公開されています
React ユーザーはこの機に Phoenix LiveView へ乗り換えてはいかがでしょうか
インストール
Phoenix LiveView プロジェクトに SaladUI を組み込んでみます
Phoenix LiveView プロジェクトの作成
まず組み込み先のプロジェクトを用意します
LiveView の README に従ってプロジェクトを作成しましょう
今回は SaladUISample という名前でプロジェクトを作成します
また、データベースを使わないので --no-ecto を指定します
mix archive.install hex phx_new
mix phx.new salad_ui_sample --no-ecto
依存モジュール等のインストールが終わったらプロジェクトのディレクトリーに移動して Phoenix を起動します
cd salad_ui_sample
mix phx.server
この記事ではこのデフォルトのトップページに SaladUI のコンポーネントを追加してみます
一旦 Phoenix を停止します
SaladUI モジュールの追加
{:salad_ui, "~> 0.5"} を "mix.exs" 内の依存モジュールに追加します
...
  defp deps do
    [
      {:phoenix, "~> 1.7.14"},
      {:phoenix_html, "~> 4.1"},
      {:phoenix_live_reload, "~> 1.2", only: :dev},
      # TODO bump on release to {:phoenix_live_view, "~> 1.0.0"},
      {:phoenix_live_view, "~> 1.0.0-rc.1", override: true},
      ...
-     {:bandit, "~> 1.5"}
+     {:bandit, "~> 1.5"},
+     {:salad_ui, "~> 0.5"}
    ]
  end
...
依存モジュールをインストールします
mix deps.get
カスタムカラーの追加
shadcn/ui のテーマ提供ページを開きます
黒、赤、青、緑、オレンジの円から好きな色を選択し、 "Copy code" をクリックします

カスタムカラー用の CSS コードがモーダルで開くので、右上 "Copy" をクリックしてコードをクリップボードにコピーしておきます
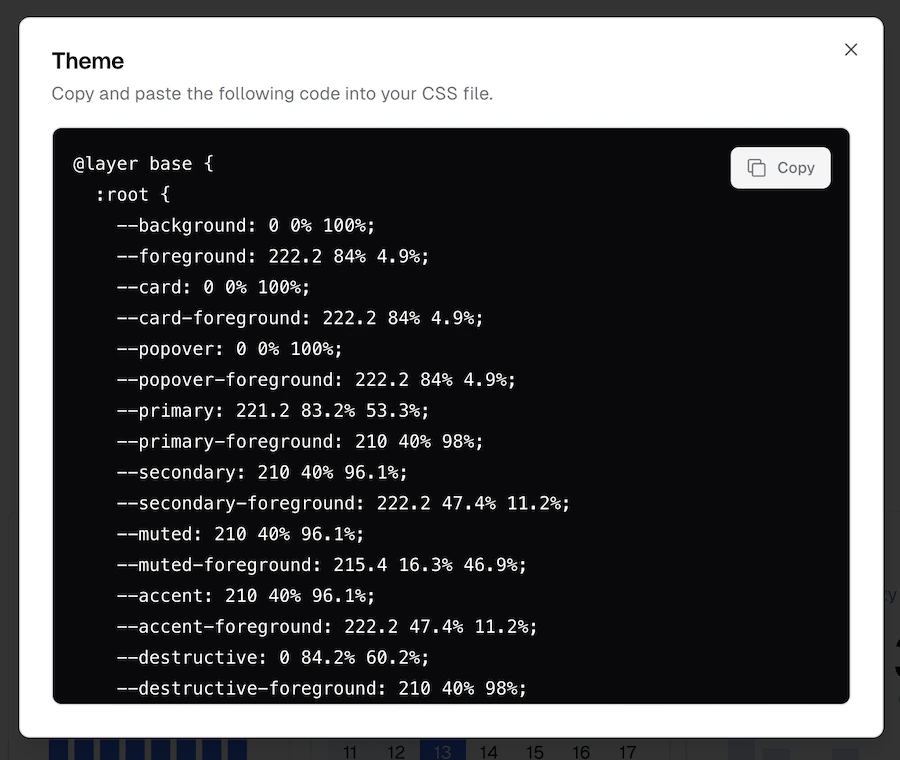
プロジェクト内の "assets/css/app.css" にコピーしたコードを追加します
@import "tailwindcss/base";
@import "tailwindcss/components";
@import "tailwindcss/utilities";

/* This file is for your main application CSS */

+@layer base {
+  :root {
+    --background: 0 0% 100%;
+    --foreground: 222.2 84% 4.9%;
+    --card: 0 0% 100%;
...
+   --border: 217.2 32.6% 17.5%;
+   --input: 217.2 32.6% 17.5%;
+   --ring: 224.3 76.3% 48%;
+ }
+}
"assets/tailwind.colors.json" を新規作成し、以下のコードを貼り付けます
{
  "accent": {
    "DEFAULT": "hsl(var(--accent))",
    "foreground": "hsl(var(--accent-foreground))"
  },
  "background": "hsl(var(--background))",
  "border": "hsl(var(--border))",
  "card": {
    "DEFAULT": "hsl(var(--card))",
    "foreground": "hsl(var(--card-foreground))"
  },
  "destructive": {
    "DEFAULT": "hsl(var(--destructive))",
    "foreground": "hsl(var(--destructive-foreground))"
  },
  "foreground": "hsl(var(--foreground))",
  "input": "hsl(var(--input))",
  "muted": {
    "DEFAULT": "hsl(var(--muted))",
    "foreground": "hsl(var(--muted-foreground))"
  },
  "popover": {
    "DEFAULT": "hsl(var(--popover))",
    "foreground": "hsl(var(--popover-foreground))"
  },
  "primary": {
    "DEFAULT": "hsl(var(--primary))",
    "foreground": "hsl(var(--primary-foreground))"
  },
  "ring": "hsl(var(--ring))",
  "secondary": {
    "DEFAULT": "hsl(var(--secondary))",
    "foreground": "hsl(var(--secondary-foreground))"
  }
}
TailwindCSS の設定
"assets/tailwind.config.js" を開いて編集します
...
module.exports = {
  content: [
    "./js/**/*.js",
+   "../deps/salad_ui/lib/**/*.ex",
    "../lib/salad_ui_sample_web.ex",
    "../lib/salad_ui_sample_web/**/*.*ex"
  ],
  theme: {
    extend: {
-     colors: {
-       brand: "#FD4F00",
-     }
+     colors: require("./tailwind.colors.json")
    },
  },
  plugins: [
    require("@tailwindcss/forms"),
+   require("@tailwindcss/typography"),
+   require("tailwindcss-animate"),
...
tailwindcss-animate の追加
TailwindCSS のアニメーション用プラグイン tailwindcss-animate を追加します
cd assets
yarn add -D tailwindcss-animate
tails の設定
TailwindCSS の Elixir 用ユーティリティーである tails を設定します
"config/config.exs" に以下のコードを追加します
config :tails, colors_file: Path.join(File.cwd!(), "assets/tailwind.colors.json")
コンポーネントの追加
"lib/salad_ui_sample_web/controllers/page_html.ex" を以下のように編集します
defmodule SaladUiSampleWeb.PageHTML do
  @moduledoc """
  This module contains pages rendered by PageController.

  See the `page_html` directory for all templates available.
  """
  use SaladUiSampleWeb, :html
+
+ import SaladUI.Alert
+ import SaladUI.Slider

  embed_templates "page_html/*"
end
インポート対象は実際に使うコンポーネントを指定してください
この記事ではアラートとスライダーを使用します
SaladUI ストーリーブックの各コンポーネントページからコードをコピー&ペーストして使うことができます

今回は "lib/salad_ui_sample_web/controllers/page_html/home.html.heex" を以下のように編集しました
...
<div class="px-4 py-10 sm:px-6 sm:py-28 lg:px-8 xl:px-28 xl:py-32">
  <div class="mx-auto max-w-xl lg:mx-0">
+   <.alert class="mb-2">
+     <.icon name="hero-command-line" class="h-4 w-4" />
+     <.alert_title>Heads up!</.alert_title>
+     <.alert_description>
+       You can add components to your app using the cli
+     </.alert_description>
+   </.alert>
+   <.form class="w-full mb-2" phx-change="validate">
+     <.slider id="slider-single-step-slider" max={50} name="amount" value={20} class="w-[60%]" step={5}/>
+   </.form>
    <svg viewBox="0 0 71 48" class="h-12" aria-hidden="true">
...
</div>
コンポーネントを編集したら改めて Phoenix を起動します
mix phx.server

コピー&ペーストで簡単にコンポーネントが追加できました
スライダーもスムーズに動いています

まとめ
SaladUI を使うことで、簡単にキレイなコンポーネントを組み込むことができました
今後 Web サイトやモバイル開発でも便利に使えそうですね