はじめに
最新版での実装を以下の記事にまとめました
ElixirDesktop を iOS で動かそうと色々検証中
今回はカメラを起動して写真を撮影し、 Elixir 側で画像処理してみました
実行環境
-
開発環境・デスクトップ版実行環境
- macOS Monterey 12.5.1
-
モバイル版実行環境
- iPhone SE 第2世代
- iOS 15.6.1
実装コード
デスクトップ用
iOS用
参考記事
画像データの連携と画像処理部分を参考にしました
カメラ起動について参考にしました
デスクトップ版準備
公式のサンプルコードをベースにしていきます
画像処理に使うライブラリを追加します
desktop ++ [{:wx, "~> 1.0", hex: :bridge, targets: [:android, :ios]}] がないと、
iOS版でビルドしたときに bridge が取得されず、アプリ起動時にErlang error: {:load_driver, 'No driver found'} というエラーが発生します
mix.exs
...
  defp deps do
    desktop = [
        {:ecto_sqlite3, "~> 0.8"},
        {:exqlite, github: "elixir-desktop/exqlite", override: true},
        # {:desktop, path: "../desktop"},
        {:desktop, "~> 1.4"},

        # Phoenix
        {:phoenix, "~> 1.6"},
        {:phoenix_live_view, "~> 0.16"},
        {:phoenix_html, "~> 3.0"},
        {:phoenix_live_reload, "~> 1.3", only: [:dev]},
        {:gettext, "~> 0.18"},
        {:plug_cowboy, "~> 2.5"},
        {:jason, "~> 1.2"},

        # Assets
        {:esbuild, "~> 0.2", runtime: Mix.env() == :dev},
        {:dart_sass, "~> 0.2", runtime: Mix.env() == :dev},

        # Credo
        {:credo, "~> 1.5", only: [:dev, :test], runtime: false},

        # 画像処理
        {:stb_image, "~> 0.5.2"},
        {:nx, "~> 0.3"}
      ]

      # モバイルの場合のみ bridge を使うため
      if Mix.target() in [:android, :ios] do
        desktop ++ [{:wx, "~> 1.0", hex: :bridge, targets: [:android, :ios]}]
      else
        desktop
      end
  end
...
Elixir 側の依存ライブラリを取得します
mix deps.get
JS 側の依存ライブラリを取得します
cd assets
npm install
cd ..
mix assets.deploy
カメラ撮影
テンプレートファイルを todo_live.html.leex から todo_live.html.heex にリネームし、
内容を以下のように変更します
lib/todo_web/live/todo_live.html.heex
<video id="local-video" playsinline autoplay muted width="400"></video>
<button id="shutter" class="button" phx-hook="TakePicture">Take a pickture</button>
<canvas id="canvas" style="display: none"></canvas>
<%= if @gray_image do %>
  <img alt="" src={"data:image/jpeg;base64,#{Base.encode64(@gray_image)}"} />
<% end %>
JS 側の処理を変更します
assets/js/app.js
...
let csrfToken = document.querySelector("meta[name='csrf-token']").getAttribute("content")

// video にカメラ映像を流す
async function initStream() {
  try {
    const stream = await navigator.mediaDevices.getUserMedia({audio: true, video: true, width: "1280"})
    localStream = stream
    document.getElementById("local-video").srcObject = stream
  } catch (e) {
    console.log(e)
  }
}

let Hooks = {}

// 写真撮影用フック
Hooks.TakePicture = {
  mounted() {
    initStream()

    // button クリック時
    this.el.addEventListener("click", event => {
      // canvas に現時点のカメラ映像を描画する
      var canvas = document.getElementById("canvas");
      var video = document.getElementById("local-video");
      canvas.width = 400;
      canvas.height = 300;
      canvas.getContext('2d').drawImage(video, 0, 0, 400, 300);

      // canvas のデータをJPEG形式のBASE64文字列で取り出し、 Elixir へ渡す
      const picture = canvas.toDataURL("image/jpeg", 1.0)
      this.pushEvent("take", {"image": picture})
    })
  }
}

// フックを登録する
let liveSocket = new LiveSocket("/live", Socket, {hooks: Hooks, params: {_csrf_token: csrfToken}})

// Show progress bar on live navigation and form submits
window.addEventListener("phx:page-loading-start", info => NProgress.start())
window.addEventListener("phx:page-loading-stop", info => NProgress.done())
...
Elixir 側の処理を変更します
lib/todo_web/live/todo_live.ex
...
  def mount(_args, _session, socket) do
    todos = TodoApp.Todo.all_todos()
    TodoApp.Todo.subscribe()
    socket =
      socket
      |> assign(:gray_image, nil)            # gray_image を追加
      |> assign(:todos, todos)
    {:ok, socket}
  end

  @impl true
  def handle_info(:changed, socket) do
    todos = TodoApp.Todo.all_todos()
    {:noreply, assign(socket, todos: todos)}
  end

  # 写真撮影時の処理
  # image に画像がBASE64文字列が来る
  # 画像をグレースケールに変換する
  def handle_event("take", %{"image" => base64}, socket) do
    IO.inspect(base64)
    "data:image/jpeg;base64," <> raw = base64
    gray =
      raw
      |> Base.decode64!()                        # BASE64 をバイナリに変換
      |> StbImage.read_binary!()                 # バイナリを画像として読込
      |> StbImage.to_nx()                        # 画像をNXのテンソルに変換
      |> IO.inspect()
      |> Nx.mean(axes: [-1])                     # 各ピクセルでRGBの平均を取る
      |> Nx.round()                              # 四捨五入する
      |> Nx.tile([3, 1, 1])                      # 平均をRGBにコピーする
      |> Nx.transpose(axes: [1, 2, 0])           # 画像の形式になるよう転置する
      |> Nx.as_type({:u, 8})                     # 整数型にする
      |> IO.inspect()
      |> StbImage.from_nx()                      # NXテンソルを画像として読込
      |> StbImage.to_binary(:jpg)                # 画像をJPEG形式のバイナリとして出力
    {:noreply, assign(socket, gray_image: gray)} # JS側に渡す
  end

  @impl true
  def handle_event("add", %{"text" => ""}, socket) do
    {:noreply, socket}
  end
...
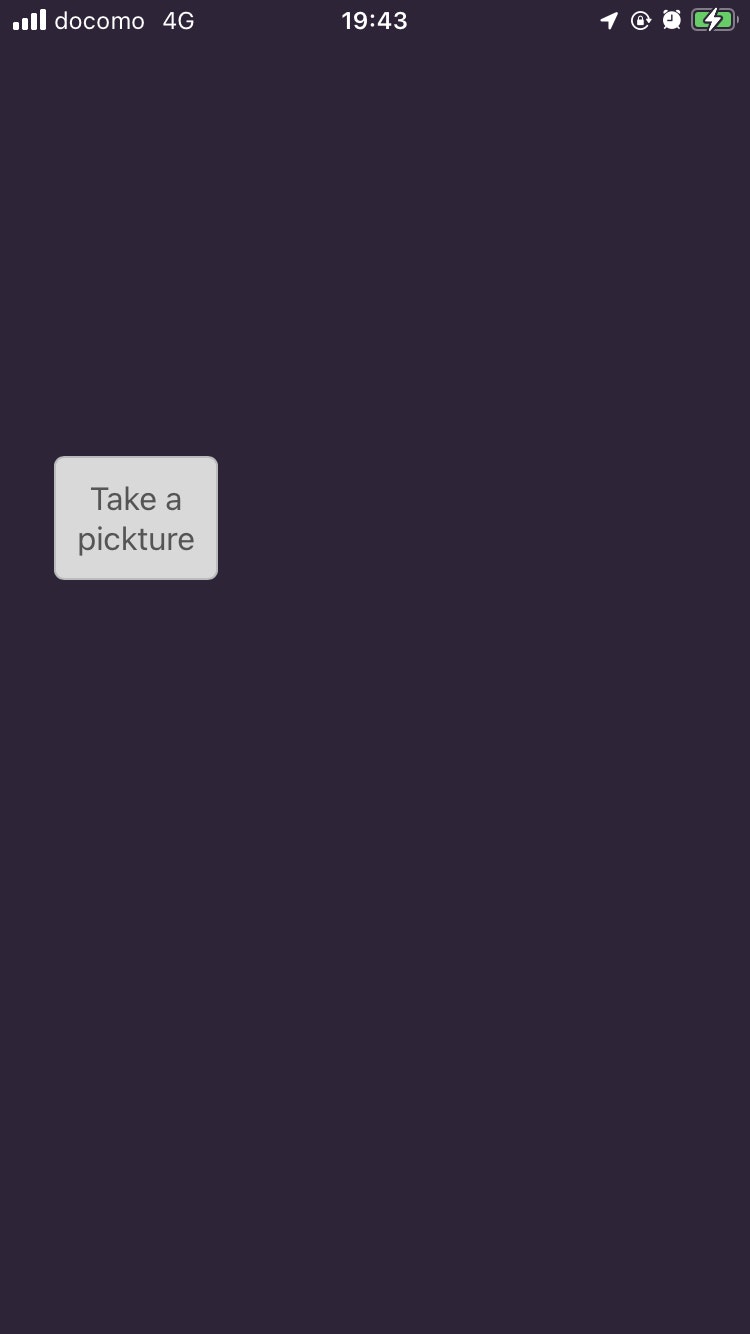
iex -S mix で実行すると、以下のように動作します
- カメラへのアクセス許可を求めるダイアログが表示される
- Allow をクリックすると、カメラ映像が video タグに表示される
-
Take a pictureをクリックすると、グレースケース画像が下に表示される
処理の流れは以下のようになっています
JS 側
new LiveSocket("/live", Socket, {hooks: Hooks, params: {_csrf_token: csrfToken}}) とすることで、 Hooks に定義したフックが動くようになります
Hooks.TakePicture = {... でフックの内容を定義します
mounted() {... で読込時の処理を定義します
mounted 内で以下の initStream を呼び出しています
このカメラ起動の処理は通常のブラウザでの処理と何ら変わりません
async function initStream() {
  try {
    // カメラを起動する
    const stream = await navigator.mediaDevices.getUserMedia({audio: true, video: true, width: "1280"})
    localStream = stream
    // カメラの映像を video 要素に流す
    document.getElementById("local-video").srcObject = stream
  } catch (e) {
    console.log(e)
  }
}
続いて、 mounted 内でボタンクリック時の処理も定義します
canvas.toDataURL で canvas の内容をBASE64文字列として取得します
this.pushEvent で Elixir 側の処理を呼び出します
    this.el.addEventListener("click", event => {
      // canvas に現時点のカメラ映像を描画する
      var canvas = document.getElementById("canvas");
      var video = document.getElementById("local-video");
      canvas.width = 400;
      canvas.height = 300;
      canvas.getContext('2d').drawImage(video, 0, 0, 400, 300);

      // canvas のデータをJPEG形式のBASE64文字列で取り出し、 Elixir へ渡す
      const picture = canvas.toDataURL("image/jpeg", 1.0)
      this.pushEvent("take", {"image": picture})
    })
  }
Elixir 側に移ります
pushEvent で呼ばれた take イベントを定義しています
最後の assign(socket, gray_image: gray) で JS側に処理結果を渡しています
  def handle_event("take", %{"image" => base64}, socket) do
    IO.inspect(base64)
    "data:image/jpeg;base64," <> raw = base64
    gray =
      raw
      |> Base.decode64!()                        # BASE64 をバイナリに変換
      |> StbImage.read_binary!()                 # バイナリを画像として読込
      |> StbImage.to_nx()                        # 画像をNXのテンソルに変換
      |> IO.inspect()
      |> Nx.mean(axes: [-1])                     # 各ピクセルでRGBの平均を取る
      |> Nx.round()                              # 四捨五入する
      |> Nx.tile([3, 1, 1])                      # 平均をRGBにコピーする
      |> Nx.transpose(axes: [1, 2, 0])           # 画像の形式になるよう転置する
      |> Nx.as_type({:u, 8})                     # 整数型にする
      |> IO.inspect()
      |> StbImage.from_nx()                      # NXテンソルを画像として読込
      |> StbImage.to_binary(:jpg)                # 画像をJPEG形式のバイナリとして出力
    {:noreply, assign(socket, gray_image: gray)} # JS側に渡す
  end
テンプレートで結果を表示します
@gray_image に処理結果が渡ってきます
Base.encode64 でBASE64文字列に変換し、 img タグの src に入れます
<%= if @gray_image do %>
  <img alt="" src={"data:image/jpeg;base64,#{Base.encode64(@gray_image)}"} />
<% end %>
iOS版準備
ここまでで出来上がったデスクトップ版を自分用のリポジトリーにプッシュします
GitHub で空のリポジトリーを作成した後、以下のコマンドを実行してください
git remote set-url origin <自分のリポジトリーのURL>
ここまでの変更をコミット、プッシュします
次に、 別の場所に iOS版のサンプルコードをクローンしてきます
カメラ起動とは関係なく、このままだと動かない箇所があるので、変更します
native-lib.cpp
#define ERROR(x) { printf(x); return x; }
- const char* startErlang(std::string root_dir, std::string log_dir, const char *app_version, const char *erts_version)
+ const char* startErlang(std::string root_dir, std::string home_dir, std::string log_dir, const char *app_version, const char *erts_version)
{
    std::string bin_dir = getenv("BINDIR");
    // keeping it static to keep the environment variable alive
    char *path = getenv("PATH");
    // keeping it static to keep the environment variable alive
    static std::string env_path = std::string("PATH=").append(path).append(":").append(bin_dir);

    chdir(root_dir.c_str());
    putenv((char *)env_path.c_str());

    std::string config_path = root_dir + "releases/" + app_version + "/sys";
    std::string boot_path = root_dir + "releases/" + app_version + "/start";
    std::string lib_path = root_dir + "lib";
-   std::string home_dir;
    std::string update_dir = root_dir + "update";
-   if (const char* h = getenv("HOME")) {
-       home_dir = h;
-   } else {
-       home_dir = root_dir + "home";
-   }

    const char *args[] = {
            "test_main",
            "-sbwt",
            "none",
            // Reduced literal super carrier to 10mb because of spurious error message on 9th gen iPads
            // "erts_mmap: Failed to create super carrier of size 1024 MB"
            "-MIscs",
            "10",
            //"-Mea",
            //"min",
            "--",
            // "-init_debug",
            "-root",
            root_dir.c_str(),
            "-progname",
            "erl",
            "--",
            "-home",
            home_dir.c_str(), // Was without slash / at the end
            "--",
            "-kernel",
            "shell_history",
            "enabled",
            "--",
            // "-heart",
            // "-pa",
            // update_dir.c_str(),
            "-start_epmd",
            "false",
            //"-kernel",
            //"inet_dist_use_interface",
            //"{127,0,0,1}",
            "-elixir",
            "ansi_enabled",
            "true",
            "-noshell",
            "-s",
            "elixir",
            "start_cli",
            "-mode",
            "interactive",
            "-config",
            config_path.c_str(),
            "-boot",
            boot_path.c_str(),
            "-bindir",
            bin_dir.c_str(),
            "-boot_var",
            "RELEASE_LIB",
            lib_path.c_str(),
            "--",
            "--",
            "-extra",
            "--no-halt",
    };

    erl_start(sizeof(args) / sizeof(args[0]), (char **)args);
    return "ok";
}

extern "C" {
-const char* start_erlang(const char* root, const char* home) {
-   static std::string root_dir = root;
-   static std::string log_dir = home;
+const char* start_erlang(const char* home, const char* log) {
+   static std::string home_dir = home;
+   static std::string log_dir = log;

    ensure_slash(home_dir);
    static std::string root_dir = home_dir + "app";
    ensure_slash(root_dir);
    ensure_slash(log_dir);
    log_file = log_dir + "elixir.log";

    std::string boot_file = root_dir + "releases/start_erl.data";
    FILE *fp = fopen(boot_file.c_str(), "rb");
    if (!fp) ERROR("Could not locate start_erl.data");

    static char line_buffer[128];
    size_t read = fread(line_buffer, 1, sizeof(line_buffer) - 1, fp);
    fclose(fp);
    line_buffer[read] = 0;

    char* erts_version = strtok(line_buffer, " ");
    if (!erts_version) ERROR("Could not identify erts version in start_erl.data file");

    char* app_version = strtok(0, " ");
    if (!app_version) ERROR("Could not idenfity app version in start_erl.data file");

    std::thread erlang([=]{
-       return startErlang(root_dir, log_dir, app_version, erts_version);
+       return startErlang(root_dir, home_dir, log_dir, app_version, erts_version);
    });
    erlang.detach();
    return "ok";
}
}
todoapp/Bridge.swift
    func stateDidChange(to newState: NWListener.State) {
        switch newState {
        case .ready:
            print("Bridge Server ready. Starting Elixir")
            setEnv(name: "ELIXIR_DESKTOP_OS", value: "ios");
            setEnv(name: "BRIDGE_PORT", value: (listener.port?.rawValue.description)!);
            // not really the home directory, but persistent between app upgrades (yes?)
            setEnv(name: "HOME", value: home.path)
            // BINDIR not used on iOS but needs to be defined
            let bindir = home.appendingPathComponent("bin")
            setEnv(name: "BINDIR", value: bindir.path)

            let urls = FileManager.default.urls(for: .documentDirectory, in: .userDomainMask)
            let logdir = urls[0].path
-           let appdir = home.appendingPathComponent("app")
-           let ret = start_erlang(appdir.path, logdir)
+           let ret = start_erlang(home.path, logdir)
            print("Ret: " + String(cString: ret!))

        case .failed(let error):
            print("Server failure, error: \(error.localizedDescription)")
            exit(EXIT_FAILURE)
        default:
            break
        }
    }
自分のデスクトップ版リポジトリーを参照するように、 run_mix を変更します
run_mix
if [ ! -d "elixir-app" ]; then
- git clone https://github.com/elixir-desktop/desktop-example-app.git elixir-app
+ git clone -b <ブランチ> <自分のリポジトリーのURL> elixir-app
fi
私の環境では asdf を使っているので、不要なプラグイン指定を削除してから asdf install を実行します
.tool-versions
-Erlang 25.0.4
erlang 25.0.4
-Elixir 1.13.4-otp-25
elixir 1.13.4-otp-25
Swift の依存ライブラリを取得します
carthage update --use-xcframeworks
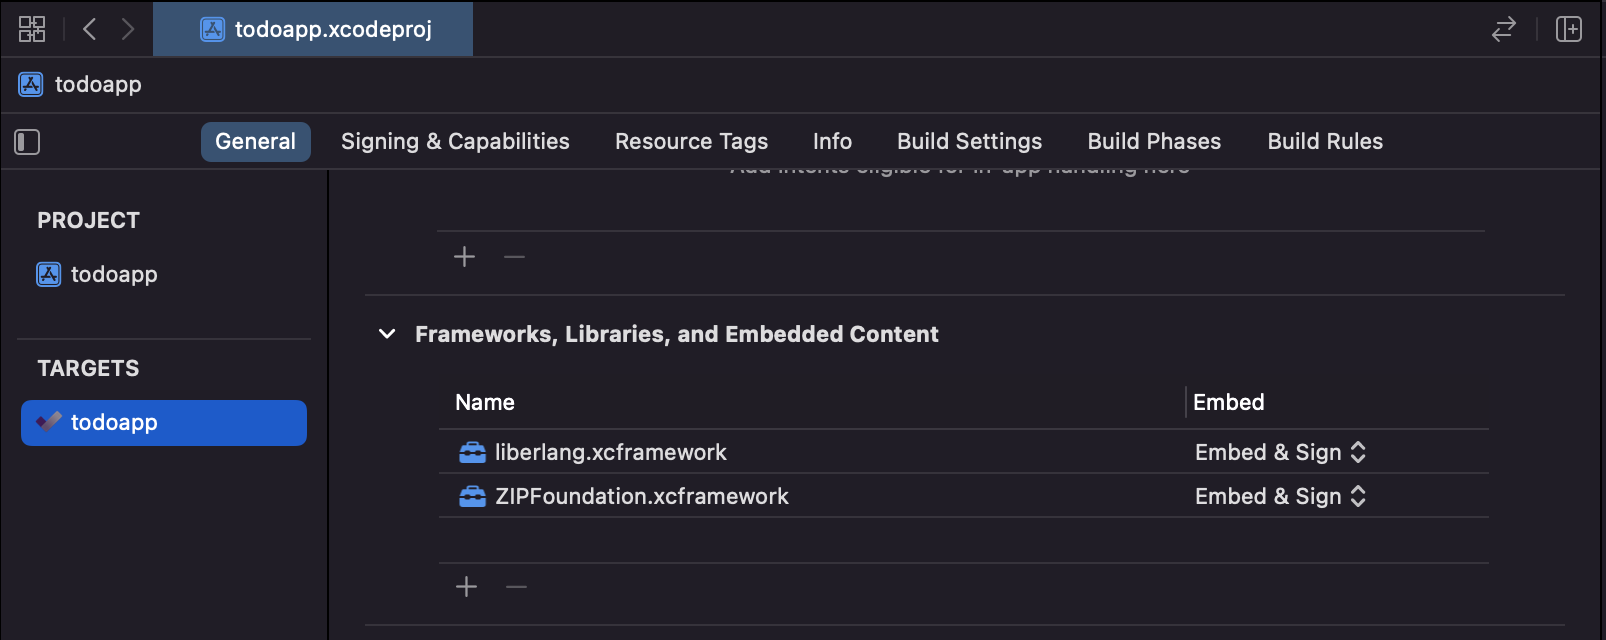
XCode で todoapp.xcodeproj を開きます
General -> Frameworks, ... から、各フレームワークの値を Embed & Sign に変更します
Team と Bundle Identifier を変更します
iPhone を接続して Run します
うまくいけばビルドが成功し、アプリが起動します
しかし、このままではカメラが起動しません
iOS版カメラ起動
カメラを起動するためには、カメラ起動の許可を求めるための設定が必要になります
todoapp/Info.plist
<?xml version="1.0" encoding="UTF-8"?>
<!DOCTYPE plist PUBLIC "-//Apple//DTD PLIST 1.0//EN" "http://www.apple.com/DTDs/PropertyList-1.0.dtd">
<plist version="1.0">
<dict>
+	<key>NSMicrophoneUsageDescription</key>
+	<string>If you want to use the microphone, you have to give permission.</string>
+	<key>NSCameraUsageDescription</key>
+	<string>If you want to use the camera, you have to give permission.</string>
	<key>CFBundleDevelopmentRegion</key>
	<string>$(DEVELOPMENT_LANGUAGE)</string>
todoapp/WebView.swift
        let configuration = WKWebViewConfiguration()
        configuration.limitsNavigationsToAppBoundDomains = true
        configuration.preferences = preferences
        configuration.defaultWebpagePreferences = page
+       configuration.allowsInlineMediaPlayback = true

        webview = WKWebView(frame: CGRect.zero, configuration: configuration)
再度 Run すれば、カメラが起動します
しかし、 Take a picture をクリックしてもグレースケール画像は表示されません
以下のようなエラーが発生しています
(UndefinedFunctionError) function StbImage.Nif.read_binary/2 is undefined (module StbImage.Nif is not available)
Elixir 側で画像読込に使っている StbImage が iOS 上で動作しないのです
StbImage を使わずに画像処理
@the_haigo さんの記事を参考に、デスクトップ版の処理を以下のように修正しました
assets/js/app.js
    const video = document.getElementById("local-video");

+   const canvas = document.getElementById("canvas");
+   canvas.width = 400;
+   const context = canvas.getContext("2d");
+   const canvasGray = document.getElementById("canvas-gray");
+   canvasGray.width = 400;
+   const contextGray = canvasGray.getContext("2d");

    this.el.addEventListener("click", event => {
-     var canvas = document.getElementById("canvas");
-     var video = document.getElementById("local-video");
-     canvas.width = 400;
-     canvas.height = 300;
-     canvas.getContext('2d').drawImage(video, 0, 0, 400, 300);
-     const picture = canvas.toDataURL("image/jpeg", 1.0)
-     this.pushEvent("take", {"image": picture})
+     const height = parseInt(400 * video.videoHeight / video.videoWidth);
+     canvas.height = height;
+     canvasGray.height = height;
+     canvas.getContext('2d').drawImage(video, 0, 0, 400, height);
+     // ピクセルデータを取得
+     const pixel = context.getImageData(0, 0, 400, height)
+     this.pushEvent("take", pixel, (payload) => {
+       let imageData = new ImageData(
+         new Uint8ClampedArray(payload.image),
+         400,
+         height
+       );
+       // ピクセルデータを canvas に貼り付け
+       contextGray.putImageData(imageData, 0, 0);
+     })
    })
  }
}
lib/todo_web/live/todo_live.ex
  def handle_event("take", %{"data" => raw}, socket) do
-   IO.inspect(base64)
-   "data:image/jpeg;base64," <> raw = base64
-   gray =
-     raw
-     |> Base.decode64!()
-     |> StbImage.read_binary!()
-     |> StbImage.to_nx()
-     |> IO.inspect()
-     |> Nx.mean(axes: [-1])
-     |> Nx.round()
-     |> Nx.tile([3, 1, 1])
-     |> Nx.transpose(axes: [1, 2, 0])
-     |> Nx.as_type({:u, 8})
-     |> IO.inspect()
-     |> StbImage.from_nx()
-     |> StbImage.to_binary(:jpg)
-   {:noreply, assign(socket, gray_image: gray)}
+   # ピクセルデータをテンソルに変換
+   pixel =
+     raw
+     |> Map.to_list()
+     |> Enum.map(fn {k, v} -> {String.to_integer(k), v} end)
+     |> Enum.sort()
+     |> Enum.map(fn {_k, v} -> v end)
+     |> Nx.tensor()
+
+   {row} = Nx.shape(pixel)
+   pixel =
+     pixel
+     |> Nx.reshape({div(row, 4), 4})
+
+   # グレースケールに変換
+   gray =
+     pixel
+       |> Nx.mean(axes: [-1])
+       |> Nx.round()
+       |> Nx.as_type({:u, 8})
+       |> Nx.to_flat_list()
+       |> Enum.map(fn avg -> [avg, avg, avg] end)
+       |> Nx.tensor()
+
+     a = Nx.slice_along_axis(pixel, 4, 1, axis: -1)
+
+     # ピクセルデータに変換
+     gray =
+       Nx.concatenate([gray, a], axis: -1)
+       |> Nx.to_flat_list()
+
+   {:reply, %{image: gray}, socket}
  end
lib/todo_web/live/todo_live.html.heex
<video id="local-video" playsinline autoplay muted width="400"></video>
<button id="shutter" class="button" phx-hook="TakePicture">Take a pickture</button>
<canvas id="canvas" style="display: none"></canvas>
-<%= if @gray_image do %>
-  <img alt="" src={"data:image/jpeg;base64,#{Base.encode64(@gray_image)}"} />
-<% end %>
+<canvas id="canvas-gray"></canvas>
今までBASE64文字列でデータを受け渡していたのを、 getImageData で取得したピクセルデータに変えています
StbImage を使わなくなったことで、 iOS で動かせるようになりました
ただし、BASE64文字列を使っていた時と比べて、行列演算ではないループが多く存在しているため、
画像処理は非常に重くなっています
StbImage を使わない方法として画像をBMP形式にする方法も試みましたが、
WebViewがBMP形式に対応しておらず断念しました
まとめ
カメラの起動自体は比較的簡単に実装できました
ただし、 StbImage や Nx の各種バックエンドが iOS 対応するまでは、
画像処理の実行はやはり速度的に厳しいようです