目標
electronを用いてフレームレス(タイトルバーのない)なウインドウアプリケーションを作成し、その際独自に最小化、最大化、閉じるボタンを作り、機能させる。
下準備
Node.jsのインストール
割愛します、詳しくはこちら
アプリケーションのディレクトリを作成
ディレクトリ名は仮にTestWindowAppとした。
$ mkdir TestWindowApp
$ cd TestWindowApp
package.jsonの作成
Node.jsのパッケージを管理するnpm(Node Package Manager)を使い、packege.jsonを生成する。
$ npm init -y
生成されたpackage.json
{
  "name": "testwindowapp",
  "version": "1.0.0",
  "description": "",
  "main": "index.js",
  "scripts": {
    "test": "echo \"Error: no test specified\" && exit 1"
  },
  "keywords": [],
  "author": "",
  "license": "ISC"
}
Electronのインストール
$ npm i -D electron
カレントディレクトリにElectronがインストールされる。
これにより、node_modulesフォルダと、package-lock.jsonが生成されます。
TestWindowApp
 ├ node_modules/
 ├ package-lock.json
 └ package.json
各種ディレクトリ、ファイルの作成
カレントディレクトリにsrcフォルダを作成。
更にその中に、index.html、main.js、package.json を作成します。
<!DOCTYPE html>
<html>
    <head>
        <meta charset="UTF-8">
        <meta name="viewport" content="width=device-width, initial-scale=1.0">
        <title>Test Window App</title>
    </head>
    <body>
        <!-- header area -->
        <div class="header-area"></div>
        <!-- main area -->
        <div class="main-area">Hello World!</div>
        <!-- footer area -->
        <div class="footer-area"></div>
    </body>
</html>
const { app, Menu, BrowserWindow, ipcMain } = require('electron');
const path = require('path');
const url = require('url');

let mainWindow;

function createWindow() {
    mainWindow = new BrowserWindow({
        width: 800,
        height: 600,
    });

    mainWindow.loadURL(url.format({
        pathname: path.join(__dirname, '/index.html'),
        protocol: 'file:',
        slashes: true
    }));

    // コメントアウトで開発者ツール起動
    // mainWindow.webContents.openDevTools();

    mainWindow.on('closed', () => {
        mainWindow = null;
    });
}

app.on('ready', createWindow);

app.on('window-all-closed', () => {
    if (process.platform !== 'darwin') {
        app.quit();
    }
});

app.on('activate', () => {
    if (mainWindow === null) {
        createWindow();
    }
});
{
  "main": "main.js"
}
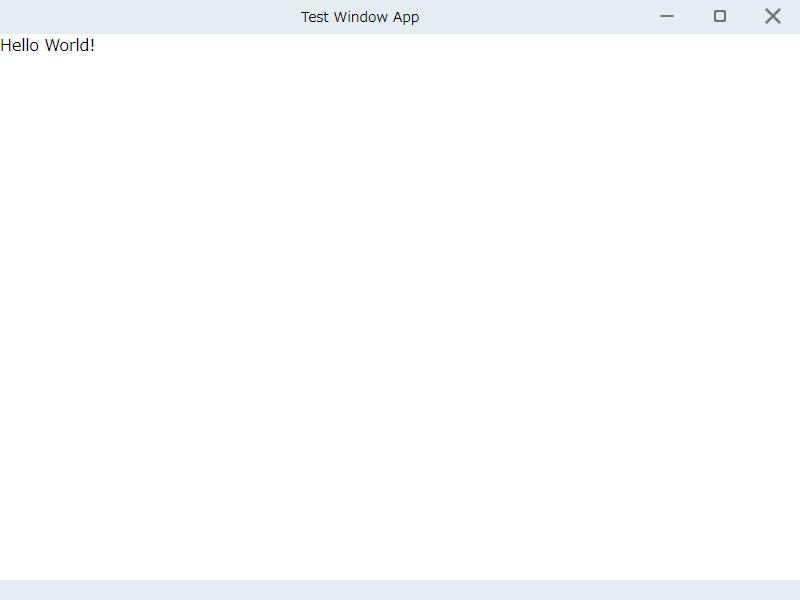
これらを作成したら、下記コマンドで実行するとブラウザが立ち上がります。
実行
$ npx electron src
このようなウインドウが表示された。
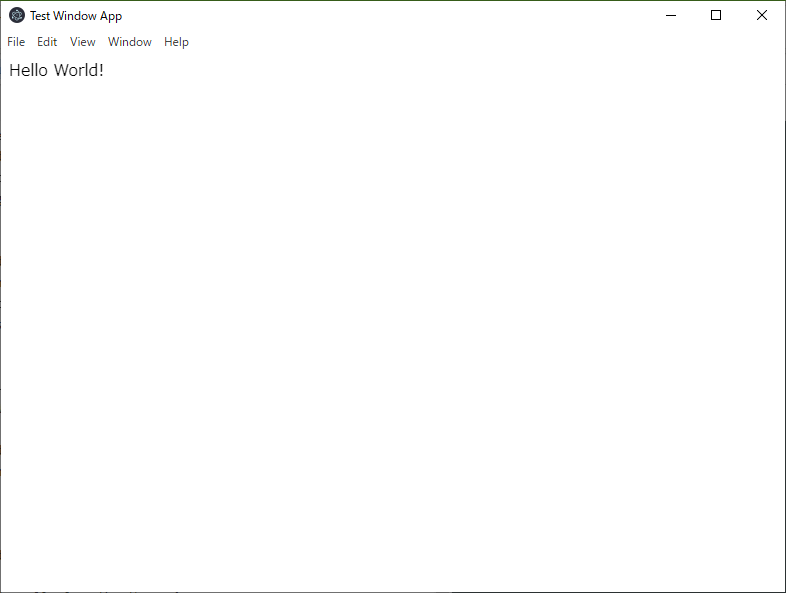
が、タイトルバーやツールバーがちょっと邪魔だなと思った。
そういう時は
mainWindow = new BrowserWindow({
    width: 800,
    height: 600,
    frame: false
});
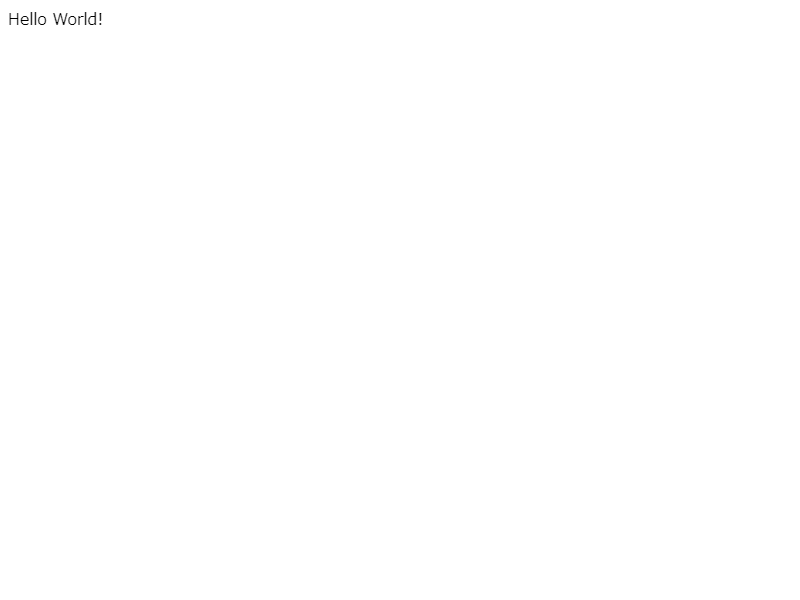
とすると、これらが非表示となりフレームレスなウインドウが表示される。
 |
|---|
Visual Studio Codeで実行する
Electronでアプリを作っている時に、いちいち npx electron src をするのはめんどくさい。
ということで、起動構成を追加する。
main.jsを選択した状態で、VSCode上の構成の追加を行う際、Node.jsを選択できます。
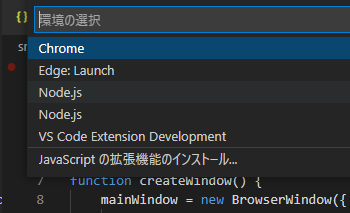
Node.jsを選択して起動構成を追加すると、
ルートディレクトリの直下に.vscodeファイルが、更にその中にlaunch.jsonが生成されます。
{
    // IntelliSense を使用して利用可能な属性を学べます。
    // 既存の属性の説明をホバーして表示します。
    // 詳細情報は次を確認してください: https://go.microsoft.com/fwlink/?linkid=830387
    "version": "0.2.0",
    "configurations": [
        {
            "type": "pwa-node",
            "request": "launch",
            "name": "Launch Program",
            "skipFiles": [
                "<node_internals>/**"
            ],
            "program": "${workspaceFolder}\\src\\main.js"
        }
    ]
}
このままでは動かないので、launch.jsonを以下のように変更した。
{
    "version": "0.2.0",
    "configurations": [
        {
            "type": "node",
            "request": "launch",
            "name": "Electron Main",
            "program": "${workspaceFolder}/src/main.js",
            "runtimeExecutable": "${workspaceFolder}/node_modules/.bin/electron",
            "runtimeArgs": [
                "--enable-logging"
            ],
            "console":"integratedTerminal"
        }
    ]
}
これでVisual Studio Code上で実行して、Electronブラウザを立ち上げることが出来るようになりました。
簡易的なレイアウトの作成
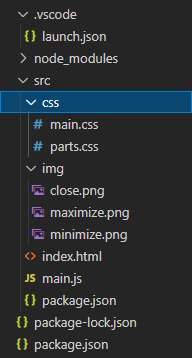
srcフォルダ直下にcss, imgフォルダを追加しました。
cssフォルダ内に、2つのcssファイルを作成
imgフォルダ内に、最小化、最大化、閉じるボタンの画像を用意
<!DOCTYPE html>
<html>
    <head>
        <meta charset="UTF-8">
        <meta name="viewport" content="width=device-width, initial-scale=1.0">
        <title>Test Window App</title>
        <link rel="stylesheet" href="css/main.css">
        <link rel="stylesheet" href="css/parts.css">
    </head>
    <body>
        <!-- header area -->
        <div class="header-area">
            <div class="header-container">
                <div class="button-tools"></div>
                <div class="title-bar">Test Window App</div>
                <div class="button-control">
                    <!--最小化、最大化、閉じるボタンが格納されるエリア-->
                    <div class="button" id="button-minimize">
                        <button><img src="img/minimize.png"></button>
                    </div>
                    <div class="button" id="button-maximize">
                        <button><img src="img/maximize.png"></button>
                    </div>
                    <div class="button" id="button-close">
                        <button><img src="img/close.png"></button>
                    </div>
                </div>
            </div>
        </div>
        <!-- main area -->
        <div class="main-area">
            <div class="main-container">
                <p>Hello World!</p>
            </div>
        </div>
        <!-- footer area -->
        <div class="footer-area">
            <div class="footer-container"></div>
        </div>
    </body>
</html>
メインウインドウのレイアウト担当
* {
    margin: 0px;
    padding: 0px;
}

html,
body {
    width: 100%;
    height: 100%;
    overflow: hidden;
    background-color: #e4edf1;
}

/* ヘッダーエリア */
.header-area {
    position: fixed;
    -webkit-app-region: drag; /* draggable */
    height: 34px;
    width: 100%;
}

.header-container{
    display: flex;
    height: 100%;
}

.button-tools{
    width: 10%;
}

.title-bar{
    display: inline-flex;
    justify-content: center;
    align-items: center;
    flex: 1;

    font-size: 14px;
}

.button-control{
    display: flex;
    width: 160px;
}

/* メインエリア */
.main-area {
    /* ヘッダーが34px、フッターが20pxのため余白に */
    padding: 34px 0px 20px 0px;
    height: 546px;
}

.main-container {
    width: 100%;
    height: 100%;
    background-color: #ffffff;
}

/* フッターエリア */
.footer-area {
    position: fixed;
    height: 20px;
    width: 100%;
    bottom: 0px;
}
ボタン等の細かなパーツの装飾担当
/* ボタン装飾 */
button{
    width: 100%;
    height: 100%;
    border: none;
    outline: none !important;
    background: transparent;
}

.button{
    display: inline-flex;
    justify-content: center;
    align-items: center;
    text-align: center;

    height: 100%;
    width: 100%;

    -webkit-app-region: no-drag;
}

# button-minimize{
    flex: 1;
}

# button-maximize{
    flex: 1;
}

# button-close{
    flex: 1;
}

# button-minimize:hover{
    background-color: #aed5fa;
}

# button-maximize:hover{
    background-color: #aed5fa;
}

# button-close:hover{
    background-color: #ff4747;
}
この状態で実行すると、画像のようになります。
 |
|---|
次回
今回追加したボタンにクリックイベントを割り当てます。
(未完成)