はじめに
これは、前回書いた記事[Swift] GoogleMapAPI 〜Map表示&現在値にピン立て編〜
と関連した部分があります。
なので、GoogleMapAPIの導入などは省きますので、導入部分を読みたい方は前回記事をご参考ください。
対象者
- GoogleMapをアプリに組み込もうとしている方
- PlacesAPIを検討している方
バージョン
- Xcode....Version 11.1
- Swift....5.0
完成物
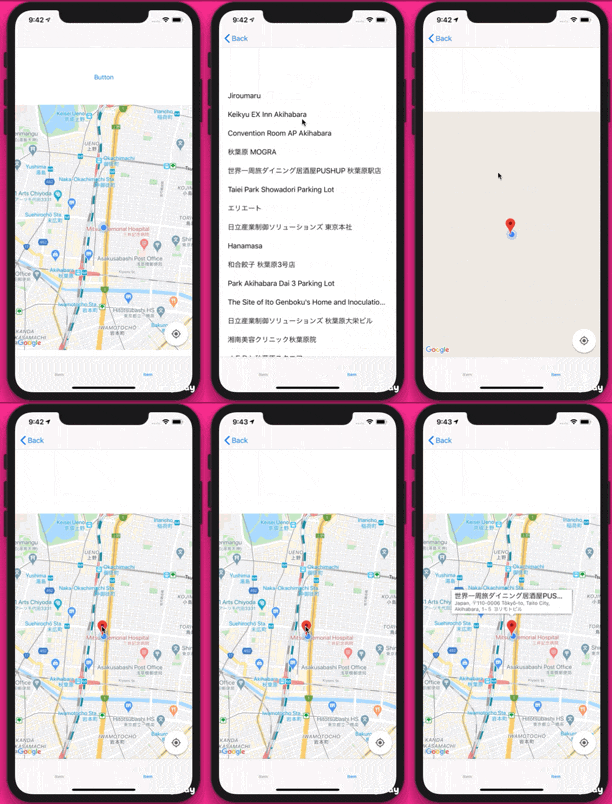
GoogleMapで現在地を表示したあと、現在地付近の情報をtableViewに表示し、cellをタップするとその地名にピンを立てる仕様になっております。
概要
前回記事では、現在位置をGoogleMapに表示する際に、Corelocationというデフォルトで存在するフレームワークとMaps SDK for iosの両方を用いて行っていましたが、今回はPlaces SDK for iosを用いて行いました。
実装
それでは実装に移ります。
基本的に、公式ドキュメントから読み取ったものなので、これを見た後に公式ドキュメントを見ると、理解が深まってよいかもしれません。
MapViewControllerに書くコード
まず、変数宣言していきます。今回宣言したのは以下の通り。
  @IBOutlet var showMapView: UIView!

  var locationManager = CLLocationManager()
  var mapView: GMSMapView!
  var placesClient: GMSPlacesClient!
  var zoomLevel: Float = 15.0
ここでは、表示するViewの名前と、その他初期設定をしました。また、以下も宣言しました。
  // 近くにある建造物の情報を格納
  var likelyPlaces: [GMSPlace] = []

  // PlacesViewControllerのtableViewで選択されたときの建造物についての情報
  var selectedPlace: GMSPlace?
意味合いとしてはコメントアウトした通りです。
次に、CLLocationManagerDelegateのDelegateメソッドをMapViewControllerに追記します。
// Delegates to handle events for the location manager.
extension MapViewController: CLLocationManagerDelegate {

  // Handle incoming location events.
  func locationManager(_ manager: CLLocationManager, didUpdateLocations locations: [CLLocation]) {
    let location: CLLocation = locations.last!
    print("Location: \(location)")

    let camera = GMSCameraPosition.camera(withLatitude: location.coordinate.latitude,
                                          longitude: location.coordinate.longitude,
                                          zoom: zoomLevel)

    if mapView.isHidden {
      mapView.isHidden = false
      mapView.camera = camera
    } else {
      mapView.animate(to: camera)
    }

  }

  // Handle authorization for the location manager.
  func locationManager(_ manager: CLLocationManager, didChangeAuthorization status: CLAuthorizationStatus) {
    switch status {
    case .restricted:
      print("Location access was restricted")
    case .denied:
      print("User denied access to location.")
      // Display the map using the default location.
      mapView.isHidden = false
    case .notDetermined:
      print("Location status not determined.")
    case .authorizedAlways: fallthrough
    case .authorizedWhenInUse:
      print("Location status is OK.")
    @unknown default:
      fatalError()
    }
  }

  // Handle location manager errors.
  func locationManager(_ manager: CLLocationManager, didFailWithError error: Error) {
    locationManager.stopUpdatingLocation()
    print("Error: \(error)")
  }
}
上記のlocationManager(: didUpdateLocations:)デリゲートメソッドは、位置情報を取得・更新するたびに呼ばれます。また、locationManager(: didChangeAuthorization)デリゲートメソッドは、ユーザーのプリバシー情報が変わるたびに呼ばれます。
次に、Viewdidloadに以下のコードを書きます。
override func viewDidLoad() {
  super.viewDidLoad()

  //  location managerの初期化
  locationManager = CLLocationManager()
  locationManager.desiredAccuracy = kCLLocationAccuracyBest
  locationManager.requestAlwaysAuthorization()
  locationManager.distanceFilter = 50
  locationManager.startUpdatingLocation()
  locationManager.delegate = self

   placesClient = GMSPlacesClient.shared()

   // Create a map.
   let camera = GMSCameraPosition.camera(withLatitude: defaultLocation.coordinate.latitude,
                                               longitude: defaultLocation.coordinate.longitude,
                                               zoom: zoomLevel)
  mapView = GMSMapView.map(withFrame: showMapView.bounds, camera: camera)
//
  mapView.settings.myLocationButton = true
  mapView.autoresizingMask = [.flexibleWidth, .flexibleHeight]
  mapView.isMyLocationEnabled = true

  // Add the map to the view, hide it until we've got a location update.
  showMapView.addSubview(mapView)
  mapView.isHidden = true
}
上記は、ViewDidloadにて、location managerの初期化とMapの表示を行います。
次に、以下のメソッドを追加します。これは、近くにある施設の情報を、likelyPlacesの配列に追加するためのものです。
//可能性のある場所を配列に入力.
    func listLikelyPlaces() {

      placesClient.currentPlace(callback: { (placeLikelihoods, error) -> Void in
        if let error = error {
          // TODO: Handle the error.
          print("Current Place error: \(error.localizedDescription)")
          return
        }

        // likelyPlacesに値を挿入
        if let likelihoodList = placeLikelihoods {
          for likelihood in likelihoodList.likelihoods {
            let place = likelihood.place
            print("Current Place name \(String(describing: place.name)) at likelihood \(likelihood.likelihood)")
            print("Current PlaceID \(String(describing: place.placeID))")
            self.likelyPlaces.append(place)

          }
        }
      })
    }
次に、ボタンを押したときに、次の画面にlikelyPlaces配列の値を受け渡すために、prepare(for segue:)を追加で書きます。
// Prepare the segue.
    override func prepare(for segue: UIStoryboardSegue, sender: Any?) {
      if segue.identifier == "segueToSelect" {
        if let nextViewController = segue.destination as? PlacesViewController {
          nextViewController.likelyPlaces = likelyPlaces
        }
      }
    }
ボタンを押したときのアクションは以下の通り。
    @IBAction func unwindToMain(segue: UIStoryboardSegue) {
        // Clear the map.
        mapView.clear()

        listLikelyPlaces()

        self.performSegue(withIdentifier: "segueToSelect", sender: nil)

      }
これで、ひとまずMapViewControllerのコードは落ち着きました。ビルドして、Mapが表示されること・likelyPlacesを出力してみて値が入っているかなどを確認してください。
PlacesViewControllerに書くコード
次に、周辺施設の情報をtableViewにてまとめている、についてふれます。
これは、tableViewの知識でいけるので、コードのみ記載します。
//可能性のある場所を配列に入力.
import UIKit
import GoogleMaps
import GooglePlaces

class PlacesViewController: UIViewController,UITableViewDataSource, UITableViewDelegate {

    @IBOutlet weak var tableView: UITableView!

    var likelyPlaces: [GMSPlace] = []
    var selectedPlace: GMSPlace?

    override func viewDidLoad() {
        super.viewDidLoad()

        tableView.dataSource = self
        tableView.delegate = self
    }

    func tableView(_ tableView: UITableView, numberOfRowsInSection section: Int) -> Int {
        likelyPlaces.count
    }

    func tableView(_ tableView: UITableView, cellForRowAt indexPath: IndexPath) -> UITableViewCell {
        let cell = tableView.dequeueReusableCell(withIdentifier: "cell")
        cell?.textLabel?.text = likelyPlaces[indexPath.row].name
        return cell!
    }

    // Pass the selected place to the new view controller.
    override func prepare(for segue: UIStoryboardSegue, sender: Any?) {
      if segue.identifier == "unwindToMain" {
        if let nextViewController = segue.destination as? MapViewController {
          nextViewController.selectedPlace = selectedPlace
        }
      }
    }


    func tableView(_ tableView: UITableView, didSelectRowAt indexPath: IndexPath) {
        selectedPlace = likelyPlaces[indexPath.row]
        performSegue(withIdentifier: "unwindToMain", sender: self)
    }

}
最後のtableViewのdelegateメソッドとprepare(forsegue:)で、タップされたcellの情報を次のviewControllerに受け渡しています。
MapViewControllerに付け足し
値が受け渡された先のViewControllerも、最初に作ったMapViewControllerとします。ただ、cellの値の部分にピン立てをするコードを付け足します。
viewDidLoad()にて、以下のコードを付け足してください。
  override func viewDidLoad() {
        super.viewDidLoad()


        // mapにmarkerを加える
        if selectedPlace != nil {
          let marker = GMSMarker(position: (self.selectedPlace?.coordinate)!)
          marker.title = selectedPlace?.name
          marker.snippet = selectedPlace?.formattedAddress
          marker.map = mapView
        }

    }
これで、完成版のように表示することができたかと思います!
おわりに
Google Maps Platformが提供しているAPIは多岐に渡ります。
知る分アイディアの幅も拡がると思うので、精進していきます。
