10
2

Delete article

Deleted articles cannot be recovered.

Draft of this article would be also deleted.

Are you sure you want to delete this article?

Microsoft Power AutomateAdvent Calendar 2024

Day 22

Backlog の課題に Power Automate の承認を組み込もう

Posted at

みなさんこんにちわ、りなたむです。
Backlog は、様々なタスクを効率的に管理できるクラウドサービスです。
使いやすいインターフェースで、しかもタスクの対応を称賛する「スター機能」があったりします。

image.png

また、Microsoft には ローコード開発が可能なソリューション、Power Platform があり、その中に、様々なサービスを連携して自動運用する iPaaS、Power Automate があります。

Power Automate には、Microsoft 365 での業務を支援するために様々な機能がありますが、その中に承認機能があります。
この承認機能を使うことで、様々なアクションに対して、上長の承認プロセスを組み込むことができます。

Backlog には、タスクの状態を管理する機能があり、現状のタスクがどのステータスであるかを判断できるようになっていますが、タスクの完了も含めて手動で操作することができます。

image.png

この状態ステータスが処理済みとなった場合に、特定の人に対して承認を要求し、承認されれば「完了」、そうでなければ「差し戻し」といった機能を実装してみたいと思います。

1. Power Automate トリガー の準備

  1. Requestコネクタの HTTP要求の受信時トリガーを使用します
    image.png
    image.png

  2. トリガーできるユーザーを「誰でも」にします
    image.png

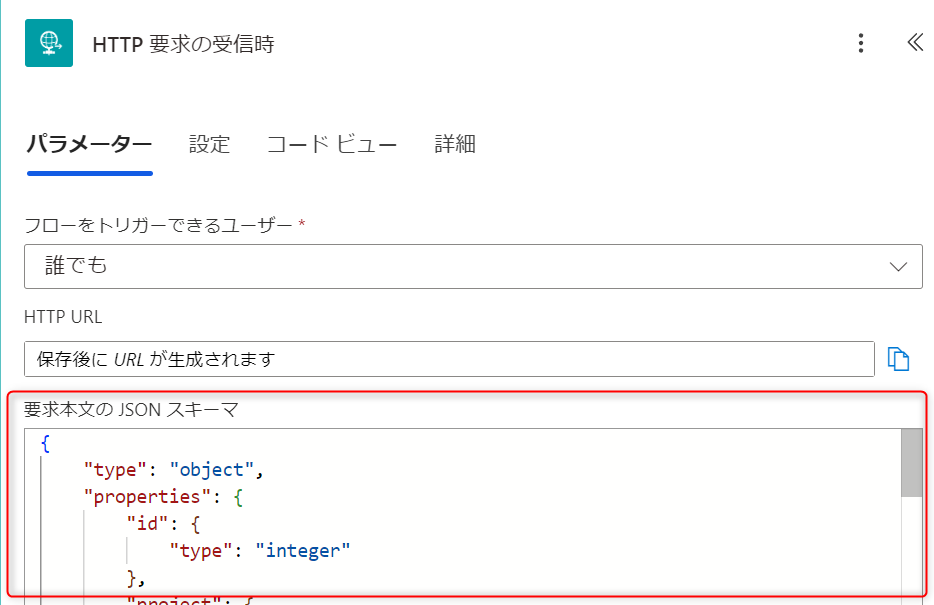
  3. JSONスキーマを以下にします
    image.png

Schema
{
    "type": "object",
    "properties": {
        "id": {
            "type": "integer"
        },
        "project": {
            "type": "object",
            "properties": {
                "id": {
                    "type": "integer"
                },
                "projectKey": {
                    "type": "string"
                },
                "name": {
                    "type": "string"
                },
                "chartEnabled": {
                    "type": "boolean"
                },
                "subtaskingEnabled": {
                    "type": "boolean"
                },
                "projectLeaderCanEditProjectLeader": {
                    "type": "boolean"
                },
                "useWikiTreeView": {
                    "type": "boolean"
                },
                "textFormattingRule": {
                    "type": "string"
                },
                "archived": {
                    "type": "boolean"
                }
            }
        },
        "type": {
            "type": "integer"
        },
        "content": {
            "type": "object",
            "properties": {
                "id": {
                    "type": "integer"
                },
                "key_id": {
                    "type": "integer"
                },
                "summary": {
                    "type": "string"
                },
                "description": {
                    "type": "string"
                },
                "issueType": {
                    "type": "object",
                    "properties": {
                        "id": {
                            "type": "integer"
                        },
                        "projectId": {
                            "type": "integer"
                        },
                        "name": {
                            "type": "string"
                        },
                        "color": {
                            "type": "string"
                        },
                        "displayOrder": {
                            "type": "integer"
                        }
                    }
                },
                "resolution": {},
                "priority": {
                    "type": "object",
                    "properties": {
                        "id": {
                            "type": "integer"
                        },
                        "name": {
                            "type": "string"
                        }
                    }
                },
                "status": {
                    "type": "object",
                    "properties": {
                        "id": {
                            "type": "integer"
                        },
                        "name": {
                            "type": "string"
                        }
                    }
                },
                "assignee": {},
                "category": {
                    "type": "array"
                },
                "versions": {
                    "type": "array"
                },
                "milestone": {
                    "type": "array"
                },
                "startDate": {},
                "dueDate": {},
                "estimatedHours": {},
                "actualHours": {},
                "parentIssueId": {},
                "customFields": {
                    "type": "array"
                },
                "attachments": {
                    "type": "array"
                },
                "shared_files": {
                    "type": "array"
                },
                "externalFileLinks": {
                    "type": "array"
                },
                "diff": {},
                "comment": {},
                "changes": {
                    "type": "array"
                }
            }
        },
        "notifications": {
            "type": "array"
        },
        "createdUser": {
            "type": "object",
            "properties": {
                "id": {
                    "type": "integer"
                },
                "userId": {},
                "name": {
                    "type": "string"
                },
                "roleType": {
                    "type": "integer"
                },
                "lang": {
                    "type": "string"
                },
                "mailAddress": {},
                "nulabAccount": {
                    "type": "object",
                    "properties": {
                        "nulabId": {
                            "type": "string"
                        },
                        "name": {
                            "type": "string"
                        },
                        "uniqueId": {
                            "type": "string"
                        }
                    }
                }
            }
        },
        "created": {
            "type": "string"
        }
    }
}

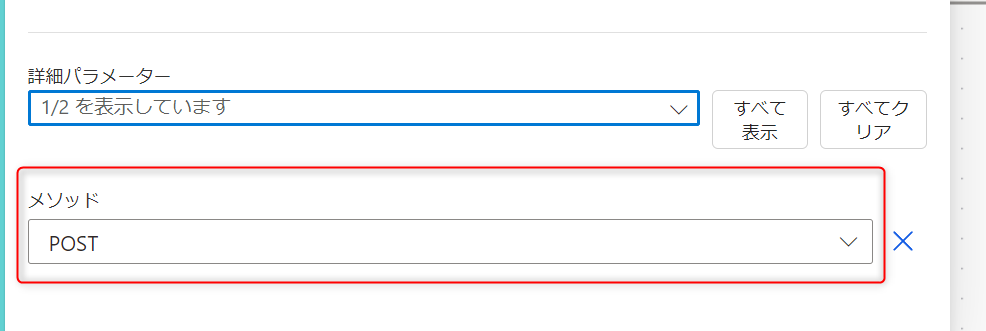
4.メソッドを POST にします
image.png

5.設定のトリガー条件を以下のようにします
image.png
@equals(triggerBody()?['content']?['status']?['name'],'処理済み')

6.後続のアクションを適当に設定し、いったん保存します
image.png

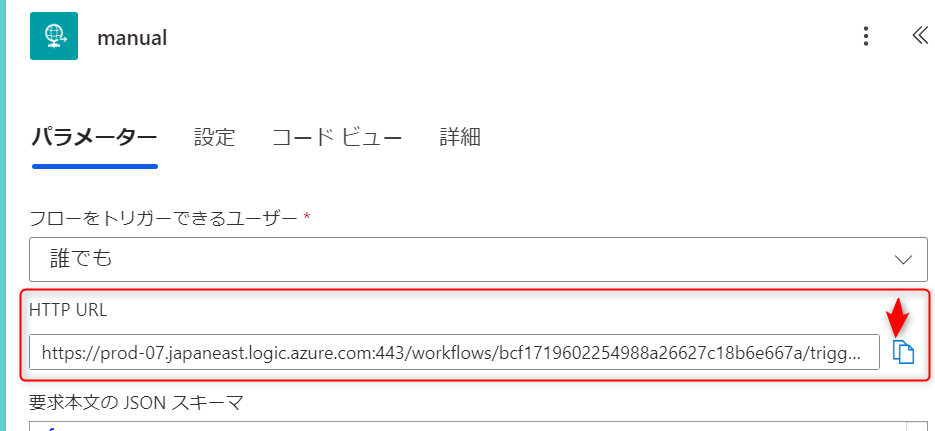
7.HTTP URL が生成されるので、メモ帳に張り付けておきます。
image.png

2. Backlog プロジェクトの設定

承認を組み込みたい Backlog プロジェクトの設定を開きます。

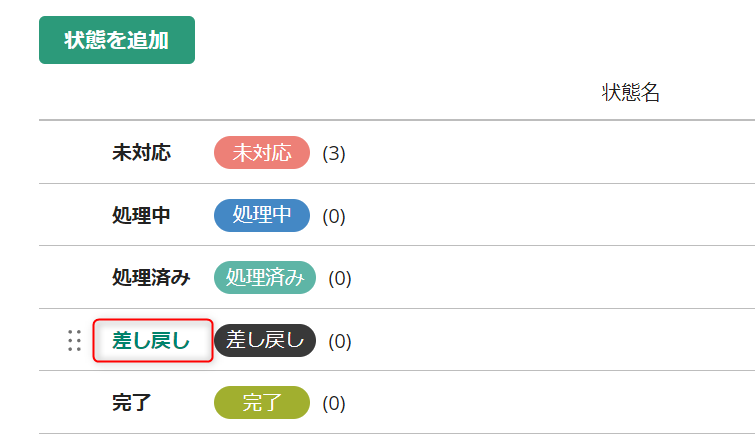
2.1. 却下時の状態追加

  1. 状態から、状態の追加をクリックします
    image.png

  2. 新しく状態を登録します
    image.png

  3. 作成された状態をクリックします
    image.png

  4. 状態IDをメモしておきます
    image.png

2.2. Webhook の設定

課題の更新通知を Power Automate に送る設定を行います

  1. インテグレーションから Webhook の設定をクリックします
    image.png

  2. Webhook を追加する をクリックします
    image.png

  3. WebHook URL に Power Automate フローで生成されたURLを張り付けます
    image.png

  4. 課題の更新 にチェックを入れます
    image.png

  5. Webhook を追加するをクリックします
    image.png

  6. Webhook が追加されます
    image.png

3. Backlog APIの取得

Power Automate でタスク状態を変更するユーザーの API キーを取得します。

  1. ユーザーアイコンから、個人設定をクリックします
    image.png

  2. API から メモを入力し、登録をクリックします
    image.png

  3. API キーが取得できますので、キーをメモ帳にコピーしておきます
    image.png

4. Power Automate の続き

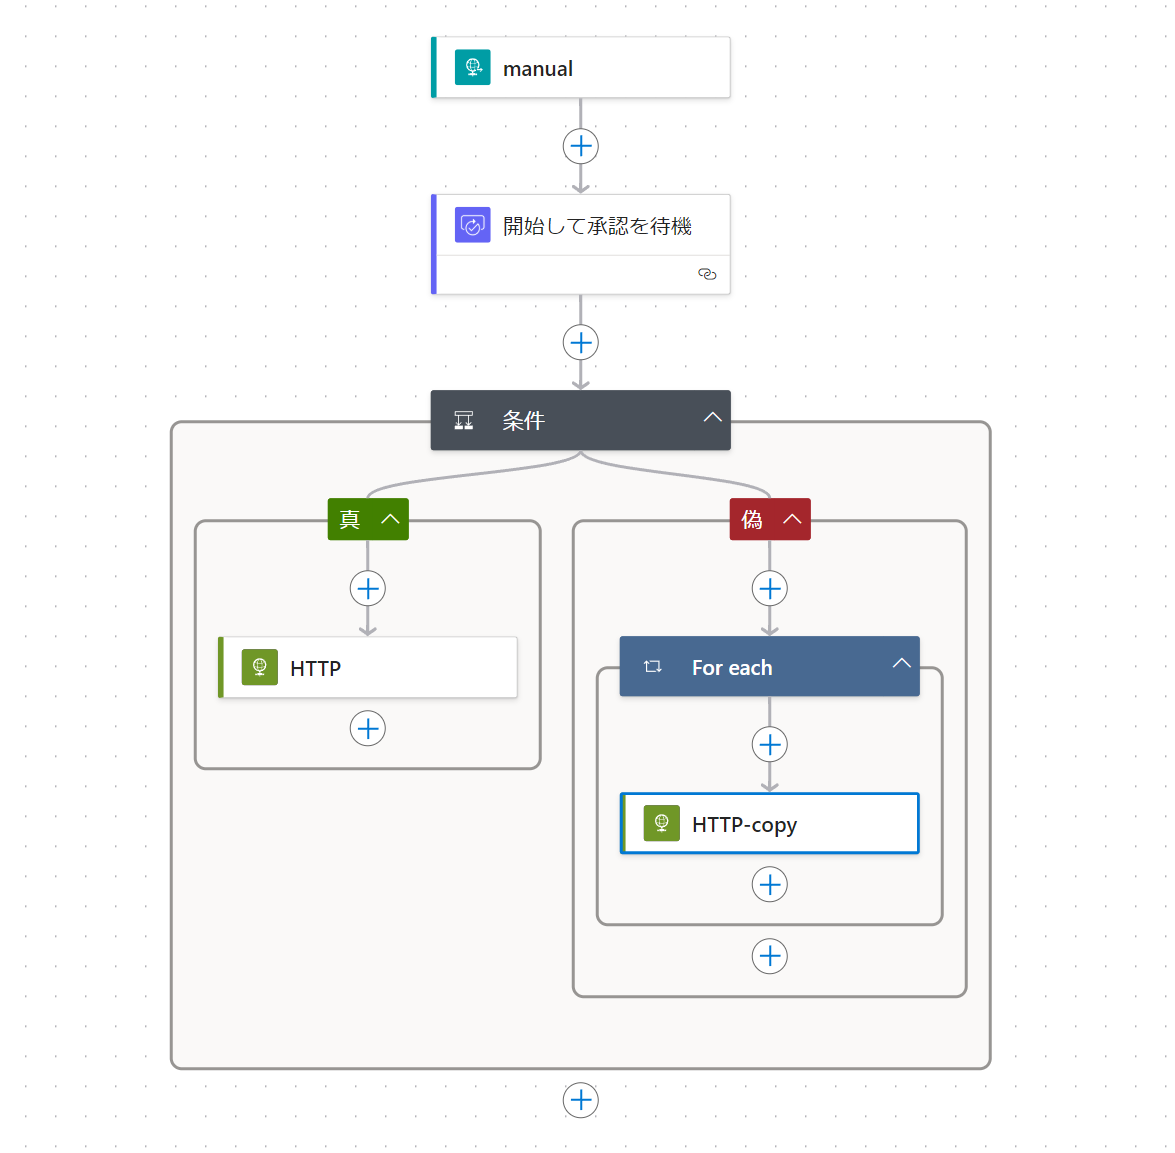
承認処理を実施し、承認されたときとそうじゃないときとの処理を以下のように作成します。

image.png

4.1. 承認部分

このような設定にします。

image.png

タイトル

@{triggerBody()?['project']?['name']} プロジェクト課題終了通知

詳細

@{triggerBody()?['project']?['name']} プロジェクトの課題 
@{triggerBody()?['content']?['summary']} の状態が 処理済みになりました。    
内容を確認してください。

アイテムリンク

https://<テナントID>.backlog.com/view/@{triggerBody()?['project']?['projectKey']}-@{triggerBody()?['content']?['key_id']}

アイテムリンクの説明

@{triggerBody()?['content']?['summary']}

4.2. True部分

承認された時の動作(状態を完了にする)を設定します
image.png

URL

https://<テナントID>.backlog.com/api/v2/issues/@{triggerBody()?['project']?['projectKey']}-@{triggerBody()?['content']?['key_id']}

Body

{
  "statusId": 4
}

4.3. False部分

却下された時の動作(状態を差し戻しにし、コメントを付記)を設定します
image.png

URL

https://<テナントID>.backlog.com/api/v2/issues/@{triggerBody()?['project']?['projectKey']}-@{triggerBody()?['content']?['key_id']}

Body

{
  "statusId": <追加した状態ID>,
  "comment": @{items('For_each')?['comments']}
}

5. 動作確認

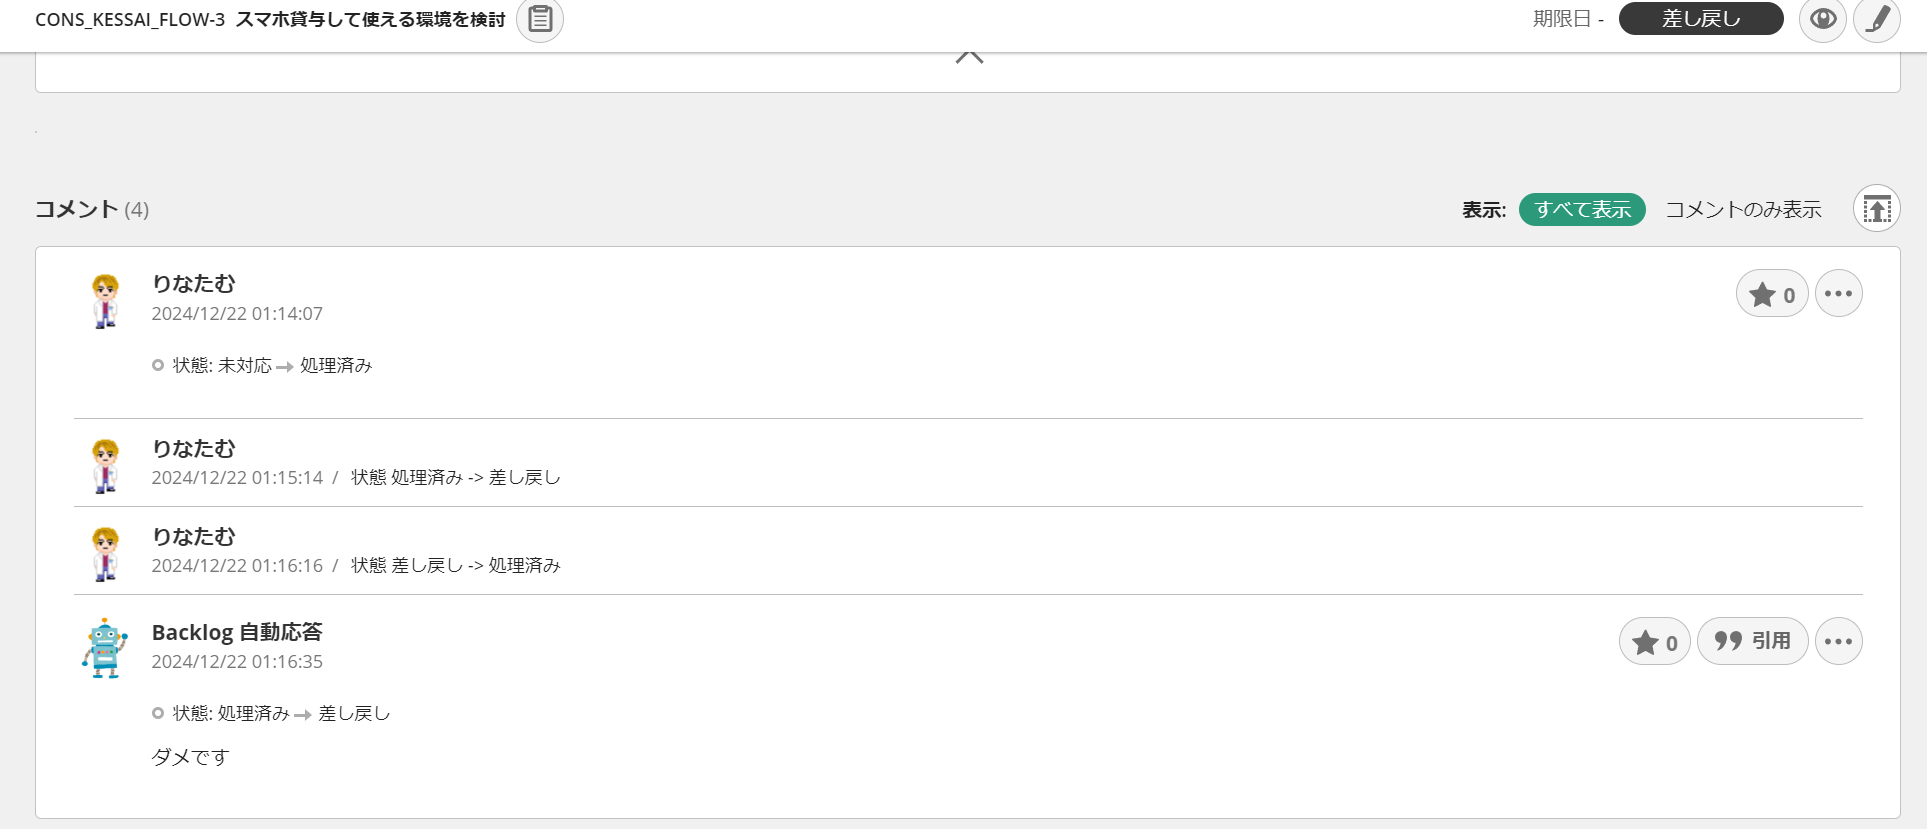
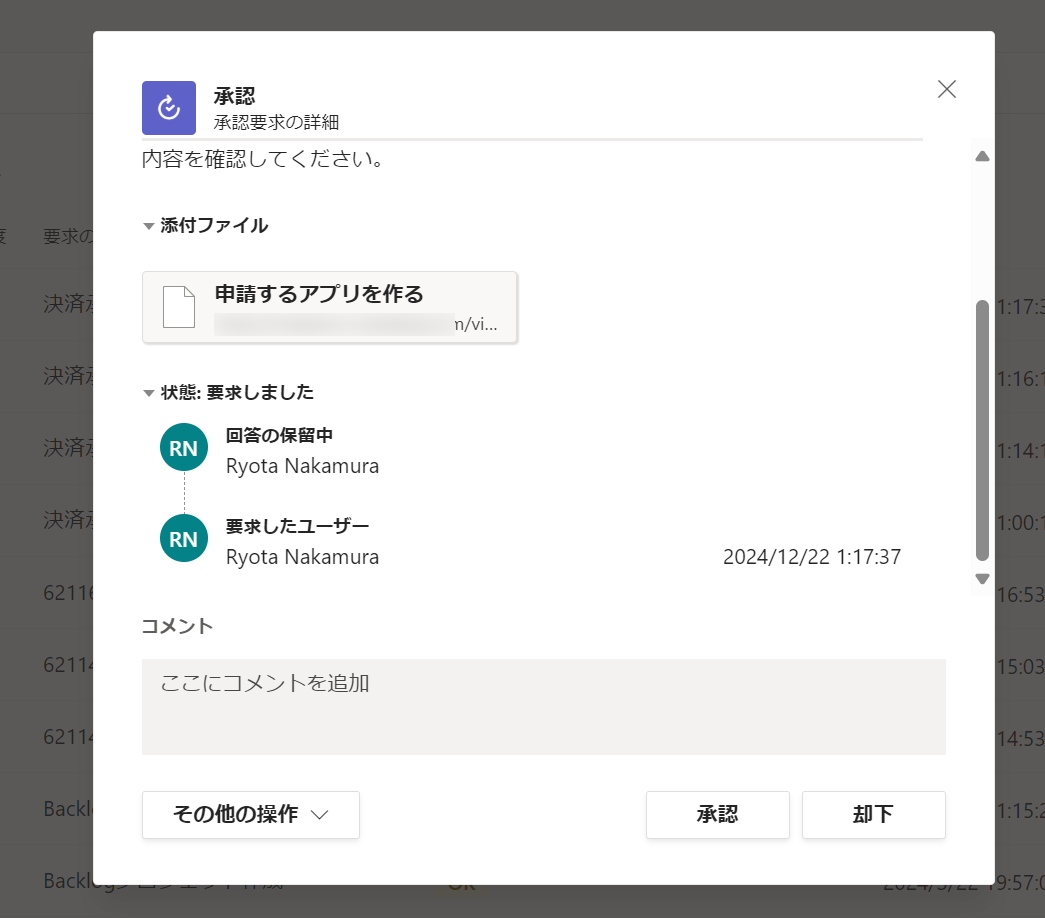
実際にタスクを処理済みにすると以下のようになります

image.png

image.png

image.png

image.png

まとめ

Power Automate と Backlog API を組み合わせることで、より実業務運用に近いカスタマイズを自分たちで行うことができるようになります!
Backlog API 自体も様々な機能があるので、ぜひいろいろ試してみてはいかがでしょうか?

10
2
0

Register as a new user and use Qiita more conveniently

  1. You get articles that match your needs
  2. You can efficiently read back useful information
  3. You can use dark theme
What you can do with signing up
10
2

Delete article

Deleted articles cannot be recovered.

Draft of this article would be also deleted.

Are you sure you want to delete this article?