Background
Around one month ago, REST Services get available for Oracle Autonomous Databases (ATP/ADW), that means you can develop and deploy REST Services for your Autonomous Database with native Oracle REST Data Services (ORDS) support.
We already know that Oracle Autonomous Database is super easy to use, you just need to click several buttons and you will get a fully-featured, robust and performant database for your business.
Is it still the same for the ORDS in ADB? Let's build a typical blog application (REST APIs) to check it out.
Get ready to start (Environment preparation)
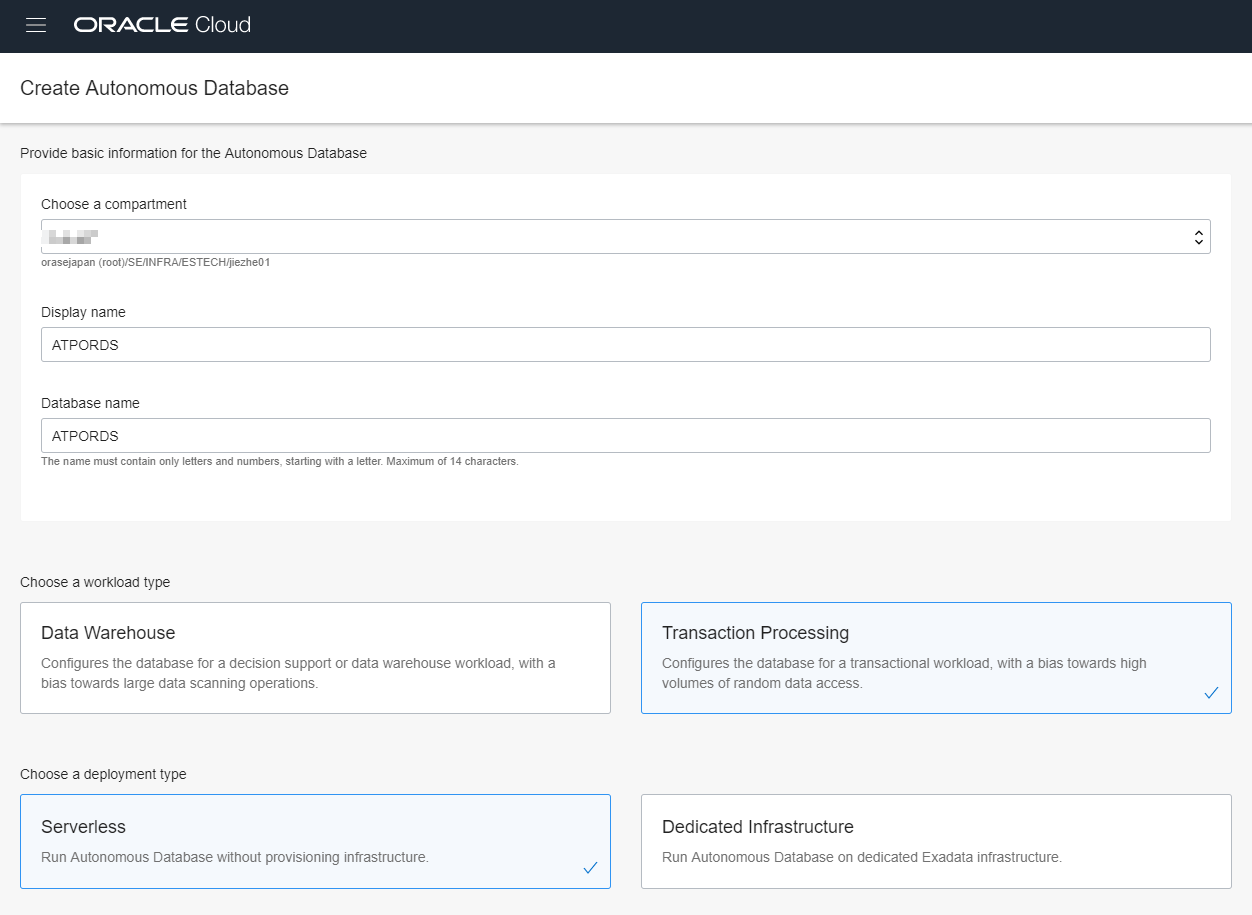
Create an ATP Instance
As I mentioned above, it's super easy, just several clicks and minutes. You will get an ATP Instance and ready to go. Don't forget that if your business increases very fast, you can scale up the OCPU and storage at any time without downtime.
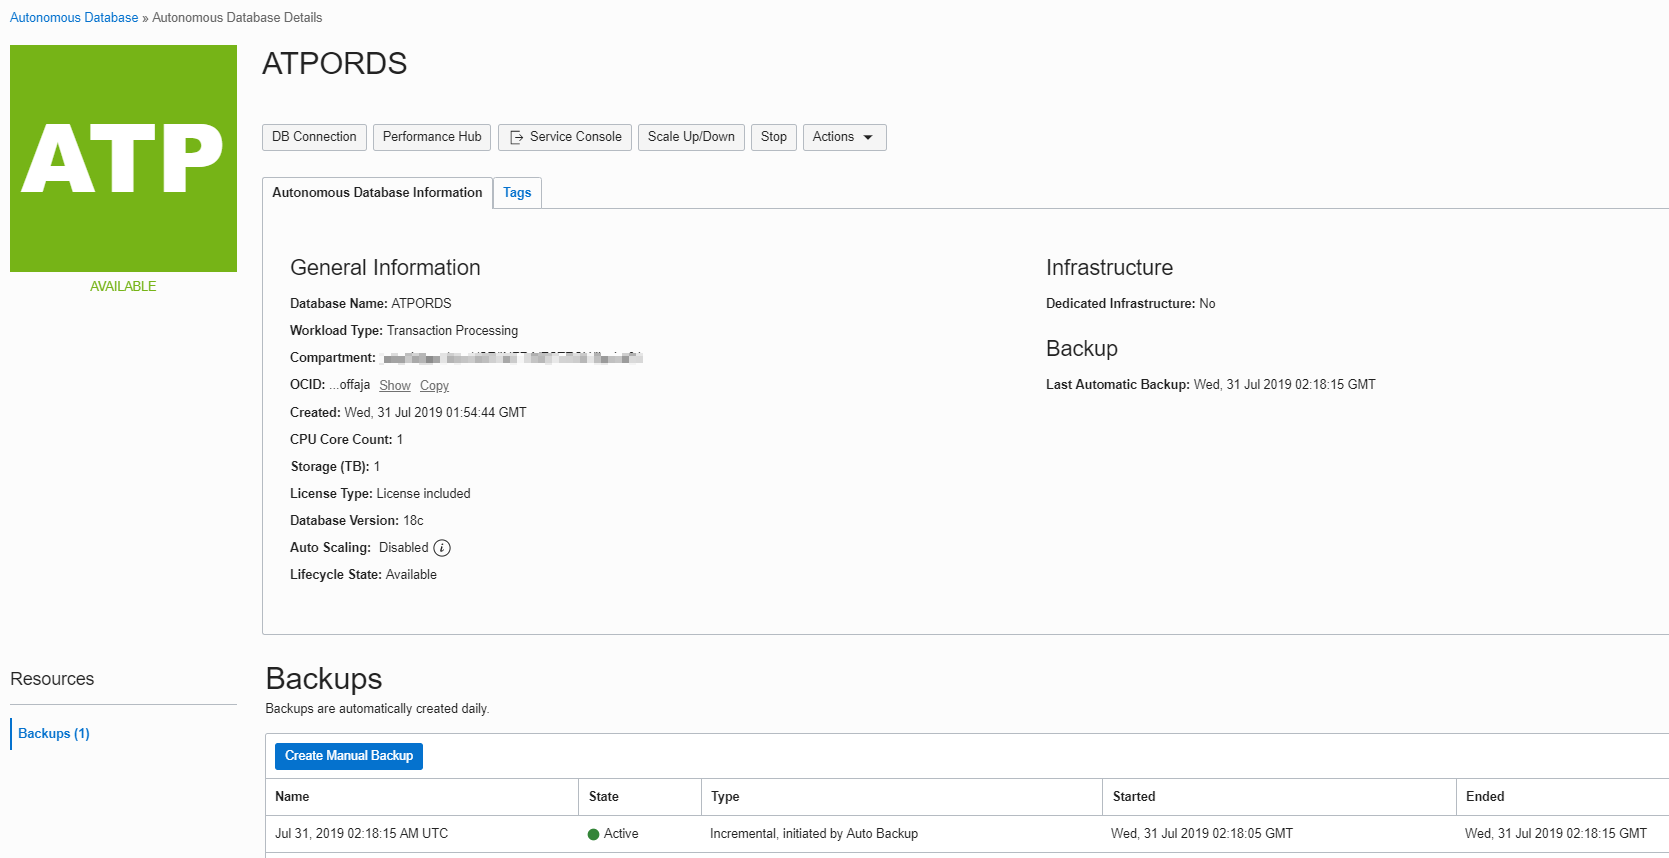
Now we get an ATP Instance.
Create application schema and enable REST Services
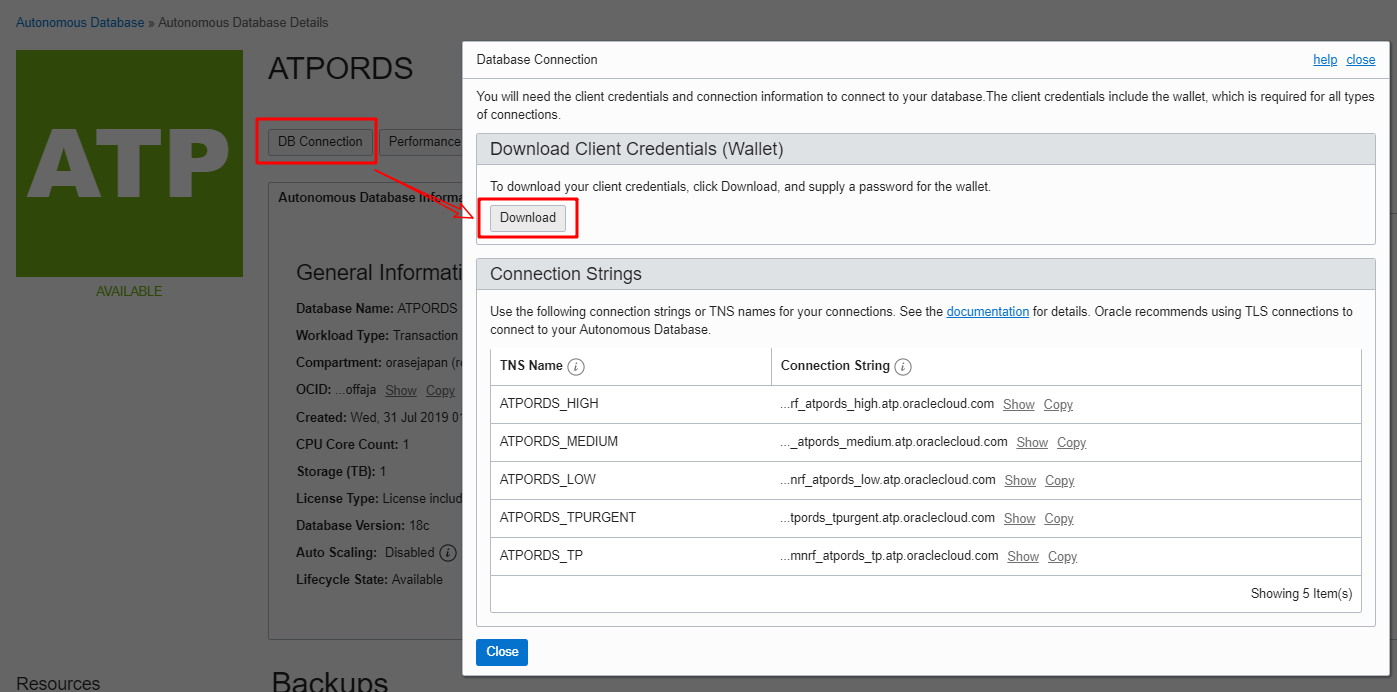
On the ATP instance web console, click the DB Connection button and download the credentials(Wallet) file.
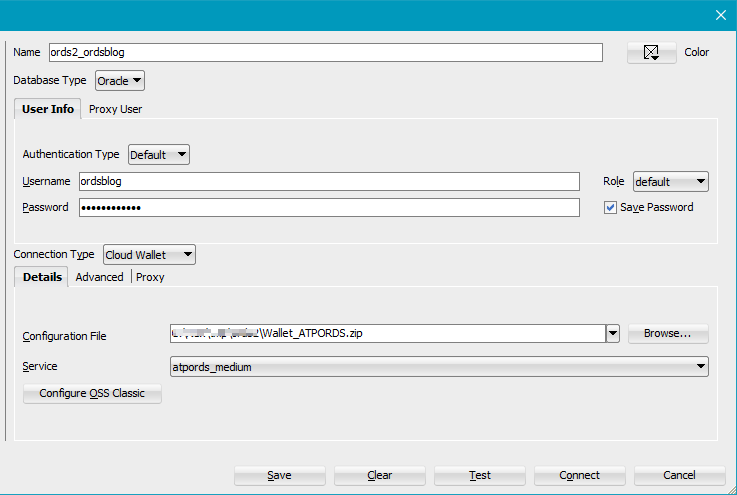
After download the wallet file, create a new connection with the default user(admin) in SQL Developer

In the worksheet, create a database user and grant necessary privileges. This user(schema) will be used for our blog application.
-- Create DB user
CREATE USER ORDSBLOG IDENTIFIED BY <PASSWORD>;

-- Grant privileges
GRANT CREATE SESSION TO ORDSBLOG;
GRANT DWROLE TO ORDSBLOG;
GRANT UNLIMITED TABLESPACE TO ORDSBLOG;
After the user is created, create a new connection for this user in SQL Developer.
After you connect to the new connection, right-click on the connection name and click the "Enable REST Services..." to enable REST service for this schema.
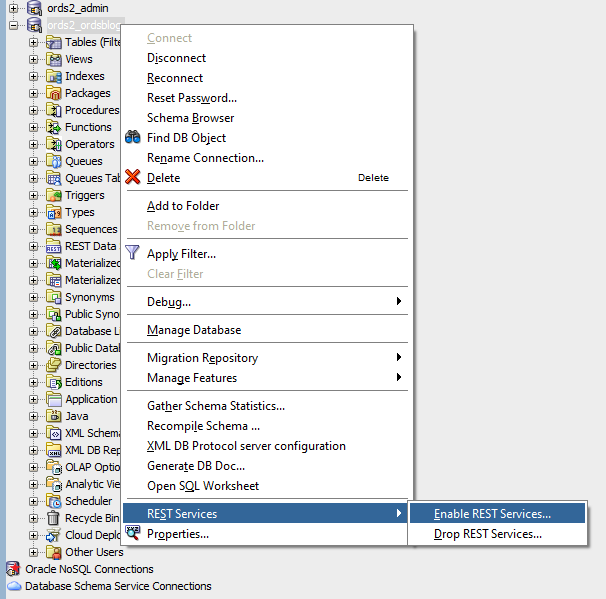
Select the checkbox "Enable schema".
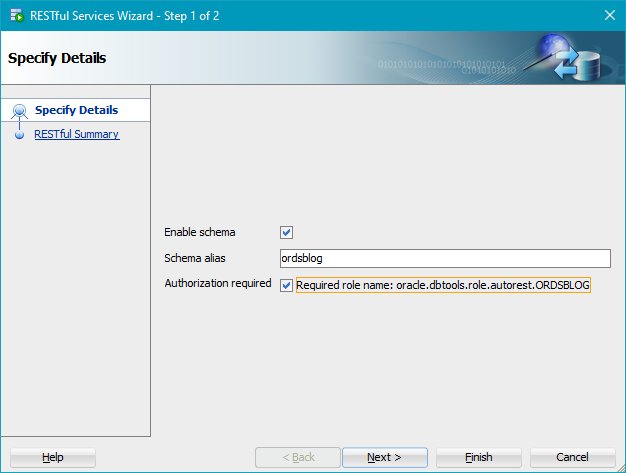
Click Next and Finish to make it done.
In the worksheet of the DB user connection we just created, execute the following SQL commands to create two tables, they will be used for the blog application.
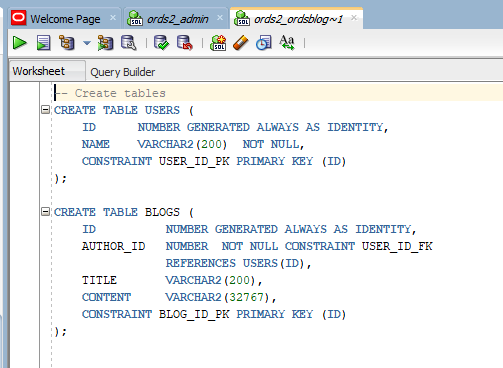
-- Create tables
CREATE TABLE USERS (
    ID      NUMBER GENERATED ALWAYS AS IDENTITY,
    NAME    VARCHAR2(200)  NOT NULL,
    CONSTRAINT USER_ID_PK PRIMARY KEY (ID)
);

CREATE TABLE BLOGS (
    ID          NUMBER GENERATED ALWAYS AS IDENTITY,
    AUTHOR_ID   NUMBER  NOT NULL CONSTRAINT USER_ID_FK
                REFERENCES USERS(ID),
    TITLE       VARCHAR2(200),
    CONTENT     VARCHAR2(32767),
    CONSTRAINT BLOG_ID_PK PRIMARY KEY (ID)
);
Until now, we have completed all the preparation work. Next, we will start to build REST API for some specific resources(tables).
The easiest way to start using ORDS in ADB (not recommended)
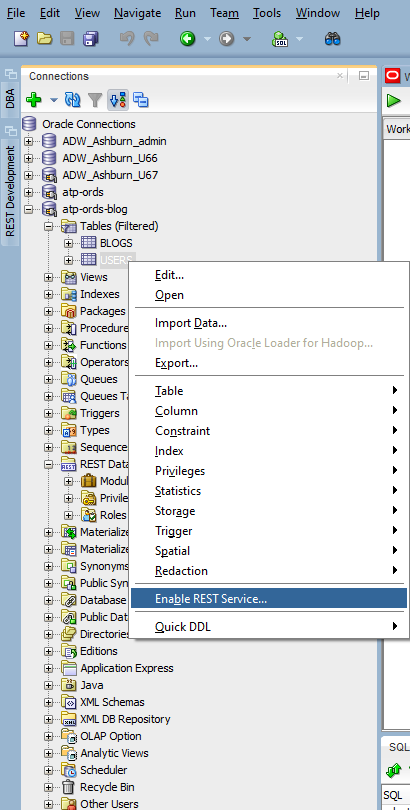
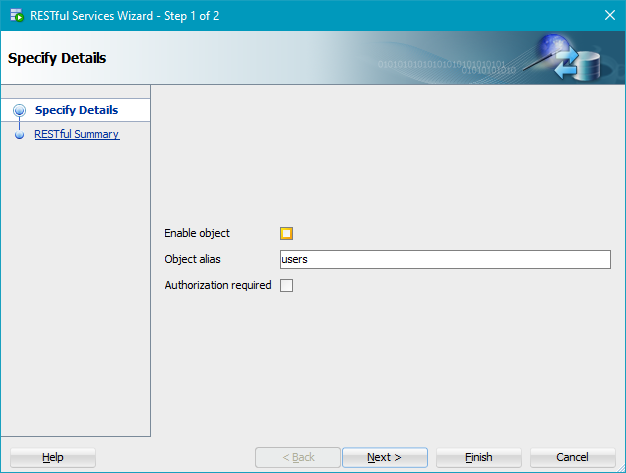
We can just enable REST Service on a table, then you will get REST APIs for this table. But I highly recommend you to use the "REST Data Services" to create Modules/Templates/Handlers to get better fine graded control of the REST Services. We will talk more about how to use the "REST Data Services" later. Here let's have a quick look of the table content through REST API.
For simplicity, we don't require authorization here. Un-select the "Authorization required" checkbox.
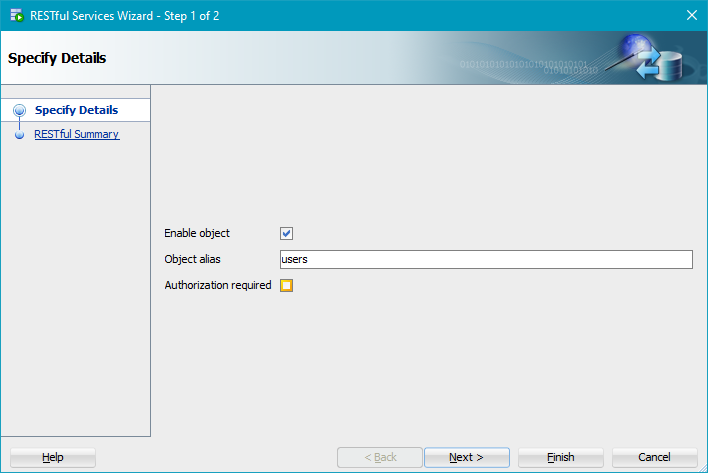
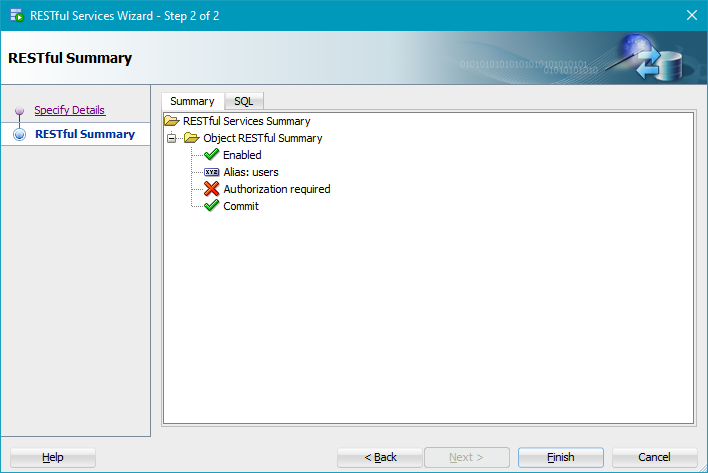
Review what we are going to create and click Finish.
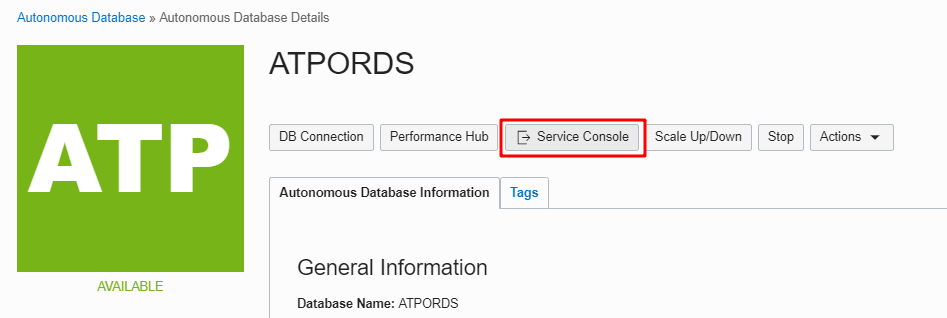
Now, the REST API for the table users is ready to use. But what URI endpoint we should use to access the API? We could get this information from the Service Console of the ATP Instance we just created.
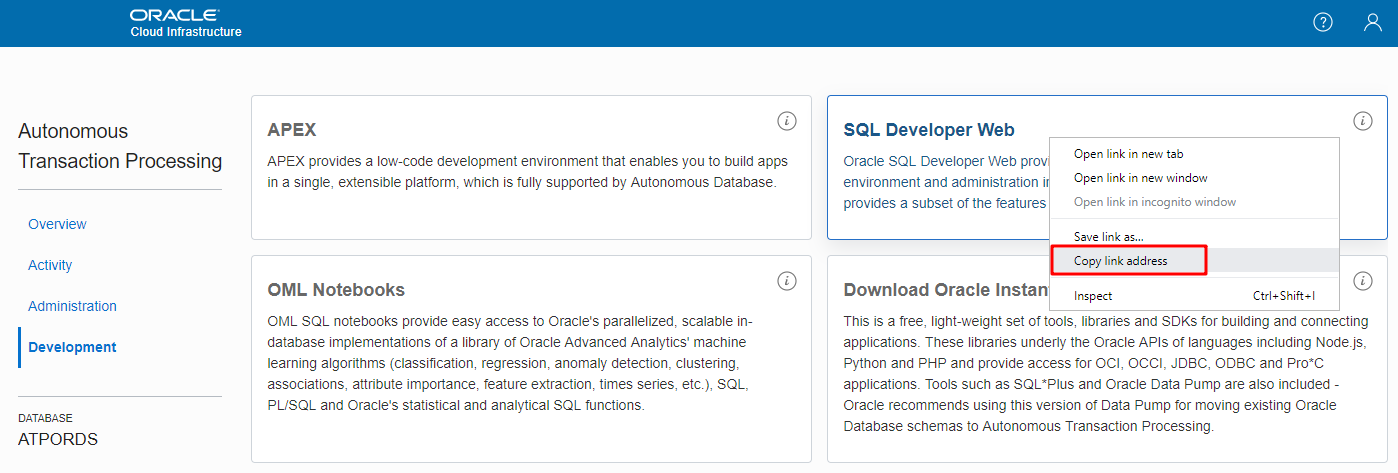
Visit the OCI we console and go the page of your ATP Instance, click Service Console
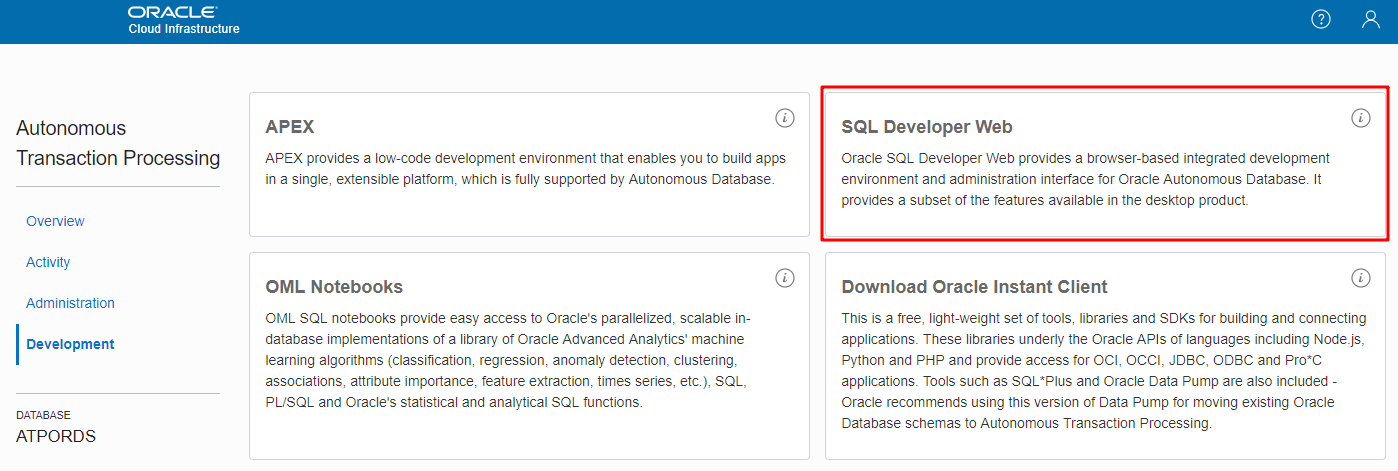
then click Developer and right click the SQL Developer Web tile and copy the link of it.
We should get a link as below. Replace the admin/_sdw/?nav=worksheet part with the schema name you created and the table name you just enabled REST service on.
Old: https://<DB_NAME>.adb.<REGION>.oraclecloudapps.com/ords/admin/_sdw/?nav=worksheet
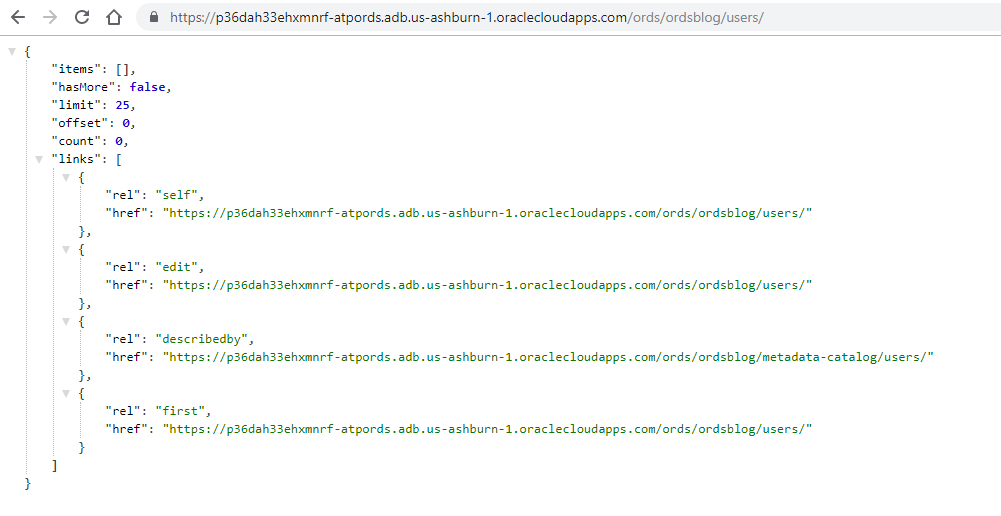
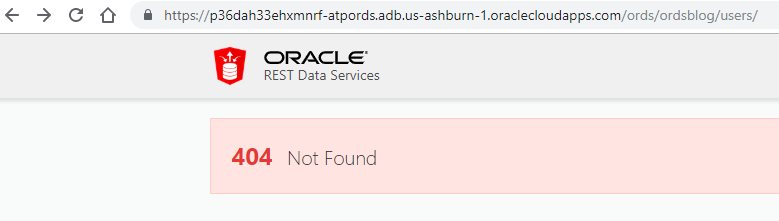
New: https://<DB_NAME>.adb.<REGION>.oraclecloudapps.com/ords/ordsblog/users/
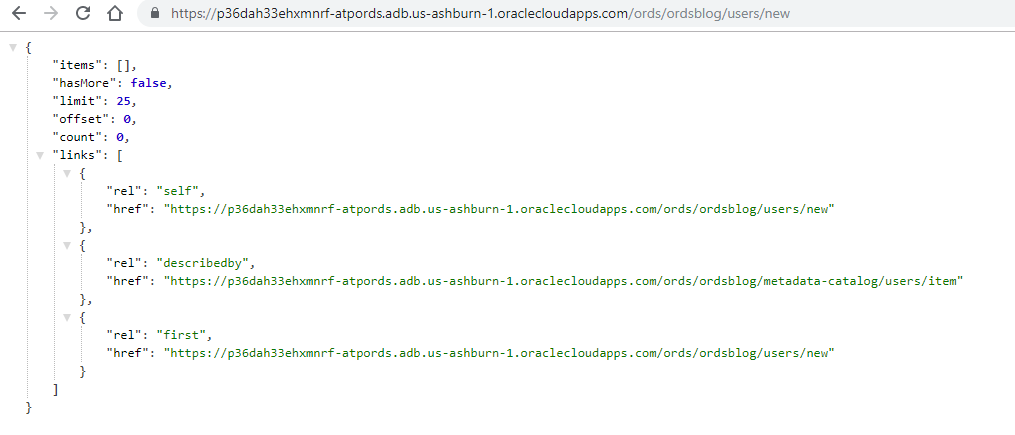
Since we did not enable authorization check when we enable the REST service, we should be able to access the new link (REST API endpoint) and get a JSON format response directly, as shown in below screenshot.
We use the convenient tool postman to test our REST APIs here. You could also use CURL or any other tools to do so.
No record in the table users, so items is [].
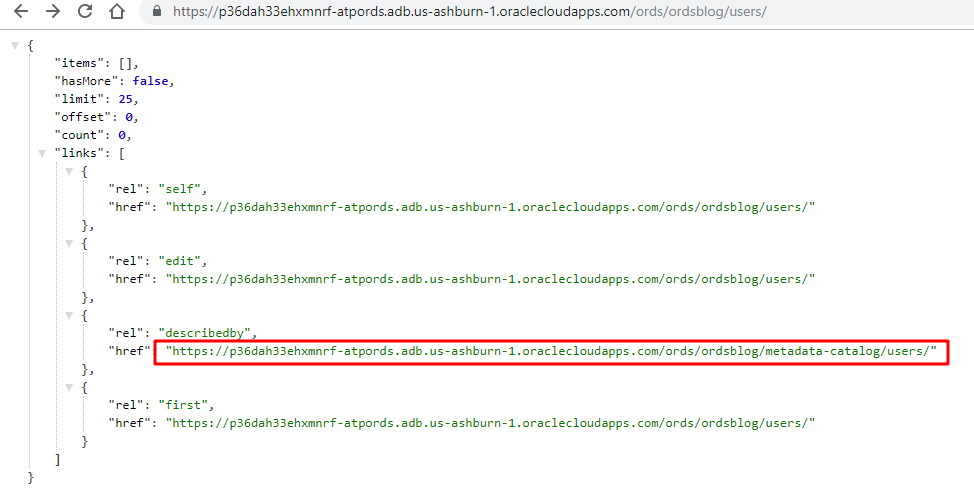
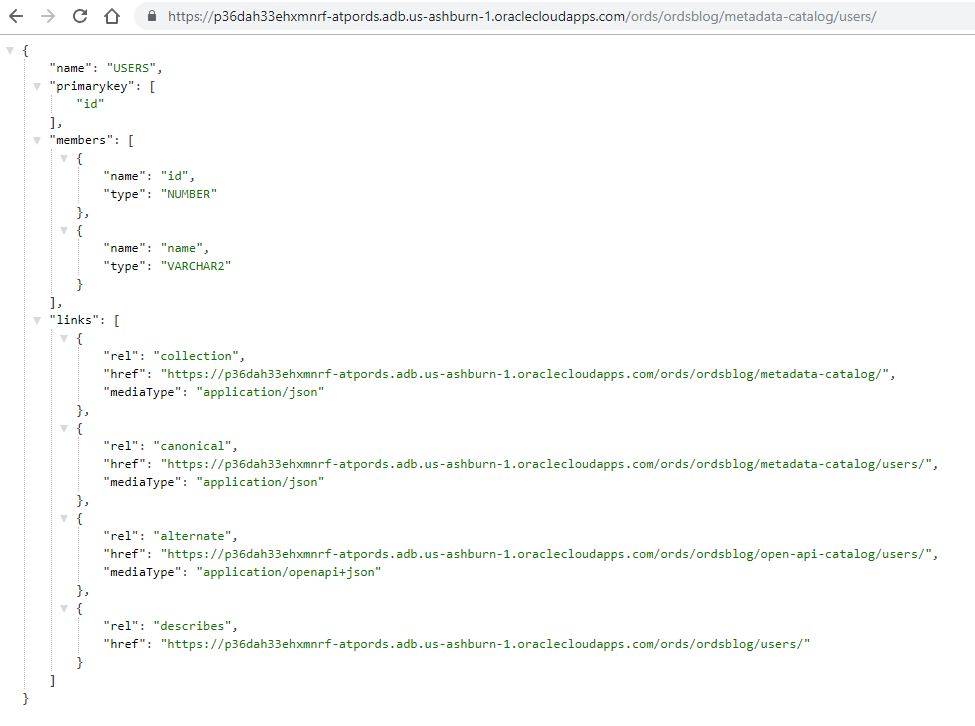
We could even click the describedby link to check the metadata of the table users.
As you can see, as long as we have an ADB Instance, we just need to enable REST service, then we can have REST API access to our tables. So easy, isn't it?
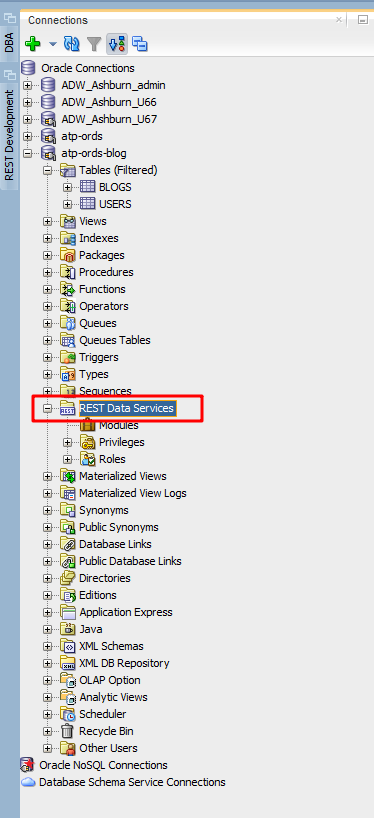
A better way to use ORDS in ADB (fine graded control)
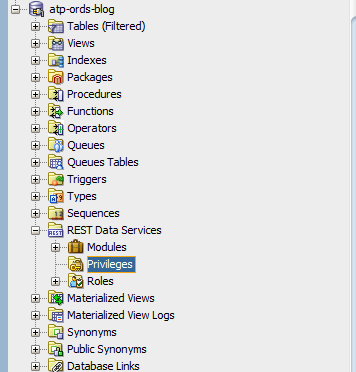
The way introduced above is easy and simple, but we lose control of access to our resources. To have a fine graded control to your resources(tables), I suggest using the "Modules" and "Services" under REST Data Services which is listed in the connection navigator bar.
Before we move forward, let's disable the REST service we just enabled on the table users. No one wants their data to get exposed without control.
Un-check the "Enable object" checkbox would be fine.
Once the REST service of the table users is disabled, we would get "404 Not Found" error when we access the same link. That's what we expected.
First module/template/handler to retrieve the users
Right click the Modules under REST Data Services and click New Module to create a new module.

Input the Module Name and URI Prefix, select the checkbox "Publish – Make this RESTful Service available for use". That's what we want.
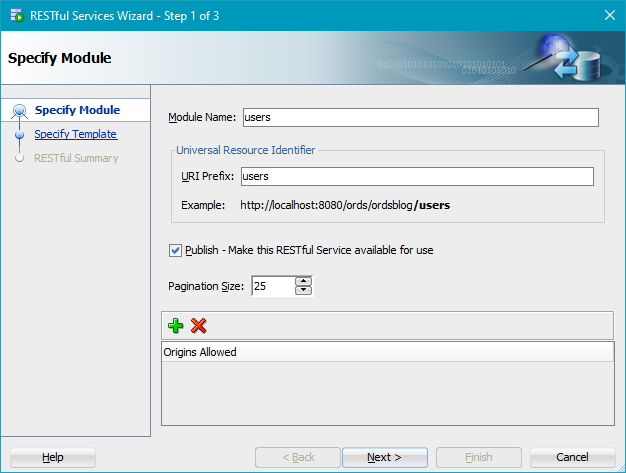
Click Next and specify a template. We are going to use this URI to provide the registration function of new user.
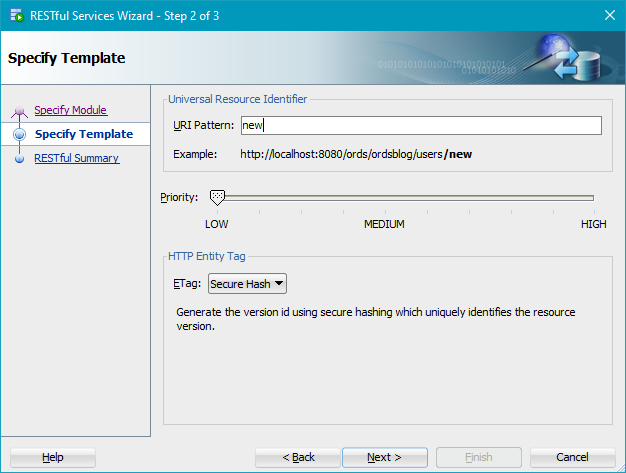
Review the summary and click Finish.
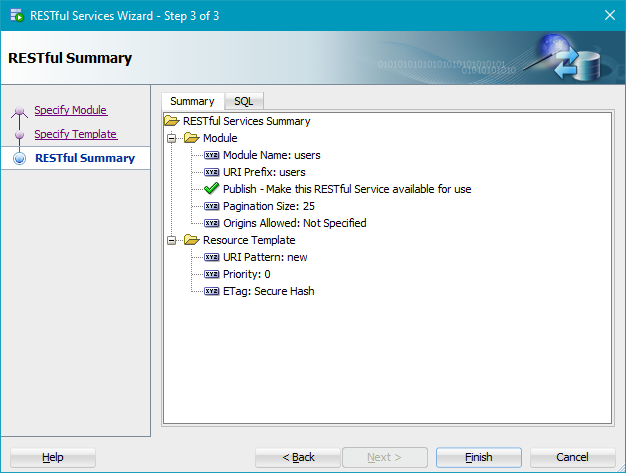
Now, we should see a Module called users and a template called new is created.
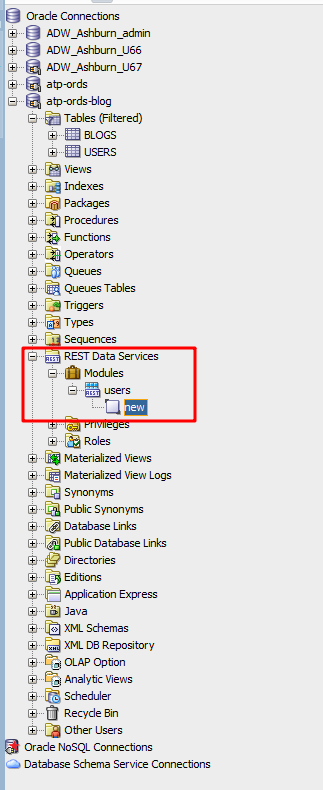
This means we just created a REST API endpoint as below.
https://<DB_NAME>.adb.<REGION>.oraclecloudapps.com/ords/ordsblog/users/new
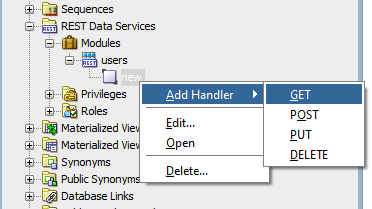
If you try to access this link you will still get "404 Not Found" error because we have not added any handler for this endpoint.
Although we planned to use this endpoint to provide registration function, for test purpose, we add a GET handler for this endpoint for now.
Input a simple query "select * from users" to the table users in the handler worksheet and save it.
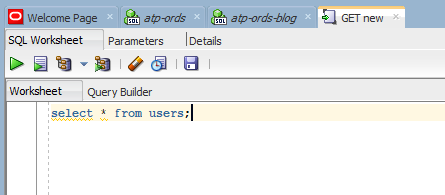
Then try to access the endpoint again.
https://<DB_NAME>.adb.<REGION>.oraclecloudapps.com/ords/ordsblog/users/new
Yeah! The API works!
Register a new user (POST)
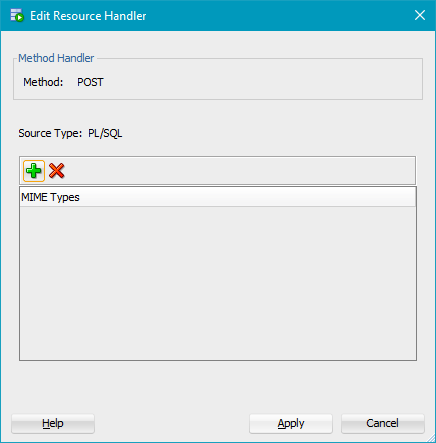
Our target is to use this endpoint to register new user, so let's add a POST handler to it.
Right click the template new and add a new POST handler.

Just click Apply
To handle the POST request is a little bit complex, we need to take care of the input parameters and the output response contents. We use a procedure to handle the creating of a new user as below.

create or replace PROCEDURE ADD_USER (
    P_USER_NAME    IN  USERS.name%TYPE,
    P_OUT_ID      OUT USERS.id%TYPE,
    P_OUT_TOTAL   OUT INTEGER
)
AS
BEGIN
    INSERT INTO USERS (name)
    VALUES (P_USER_NAME)
    RETURN id INTO P_OUT_ID;

    SELECT COUNT(id) INTO P_OUT_TOTAL FROM USERS;

EXCEPTION
    WHEN OTHERS
    THEN HTP.print(SQLERRM);
END;
In the POST handler, we call the procedure we just created and pass in the parameters we get from the request.
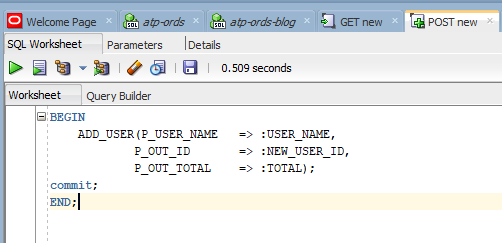
BEGIN
    ADD_USER(P_USER_NAME   => :USER_NAME,
            P_OUT_ID       => :NEW_USER_ID,
            P_OUT_TOTAL    => :TOTAL);
commit;
END;
For the response, we want to return the newly created user id so that the client could decide what is the next move, and we also return the total number of all users. Set the Parameters as shown below.

Now, our POST handler is ready to go. We will post an user information in JSON format to create a new user. Please note that the keys in JSON must be the same as the definition in your handler procedure.
In postman client, select the request method as POST, input the endpoint URI, and input the user info in JSON format in the Body/Raw section. (You can also use an json file and select binary instead of raw)
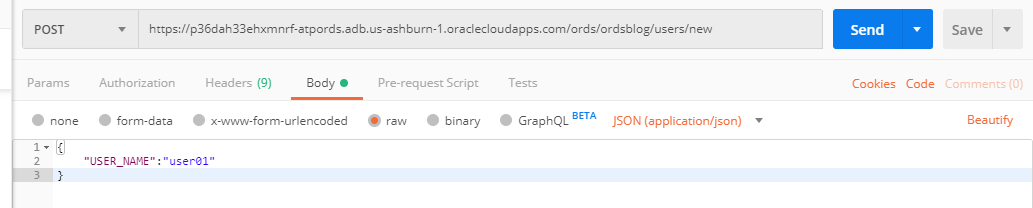
{
    "USER_NAME":"user01"
}
We also need to set the "Content-Type" as "application/json" in Headers.

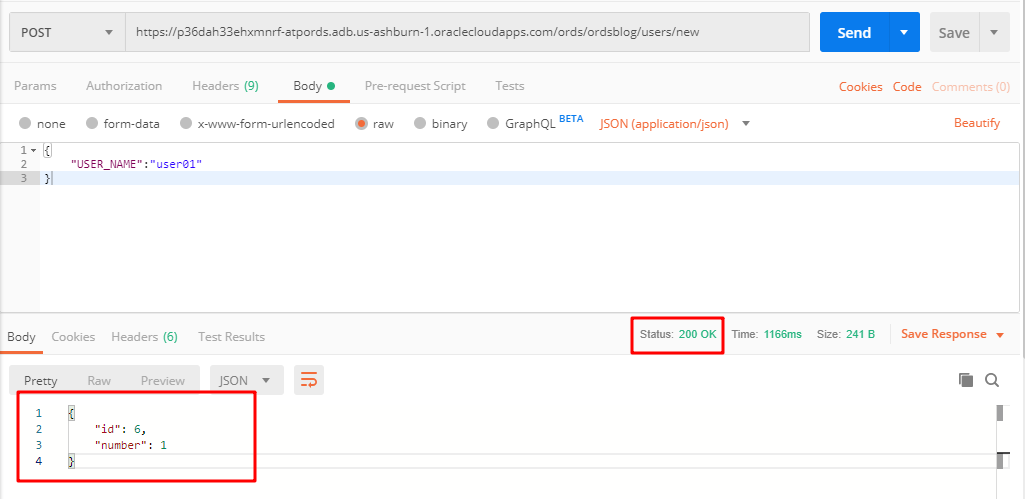
After we click the Send button we will see the response status is 200 OK and the new user id and the total number of users in the response.
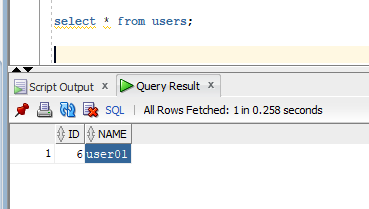
In SQL Developer we could also verify the newly created user record.
Do you remember that we have a GET handler to retrieve all users? Let's try with it.
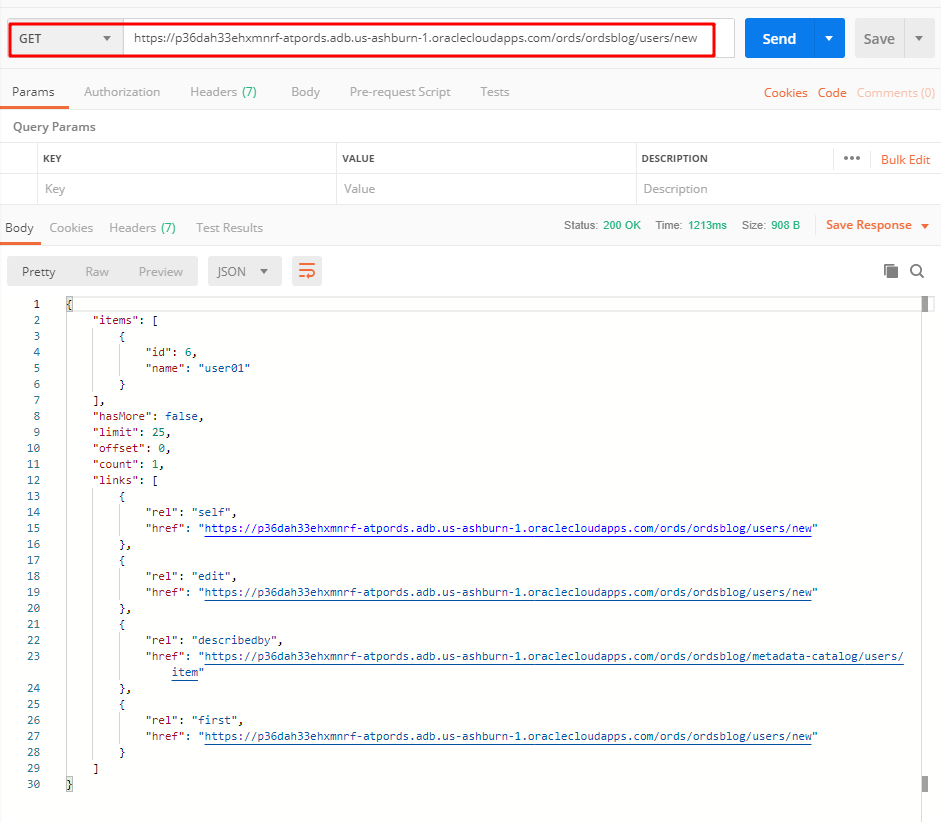
Cool, we can see the users, although there is only one yet.
Check the user profile (GET)
Once the user is registered, it is an obvious thing that we should provide the user info to show the user's profile.
Let's create a show endpoint to do this.
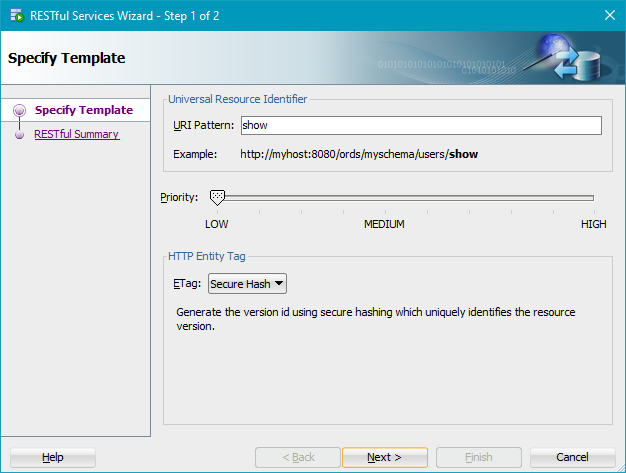
Add a GET handler to provide the user info.
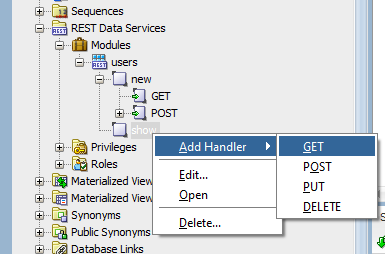
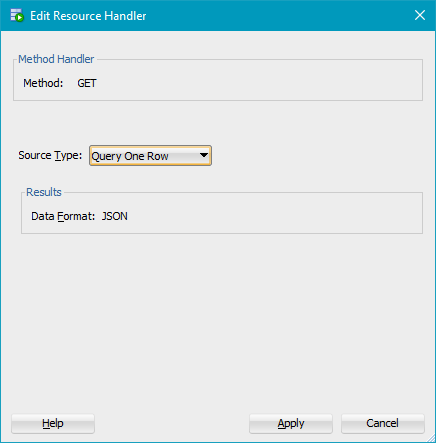
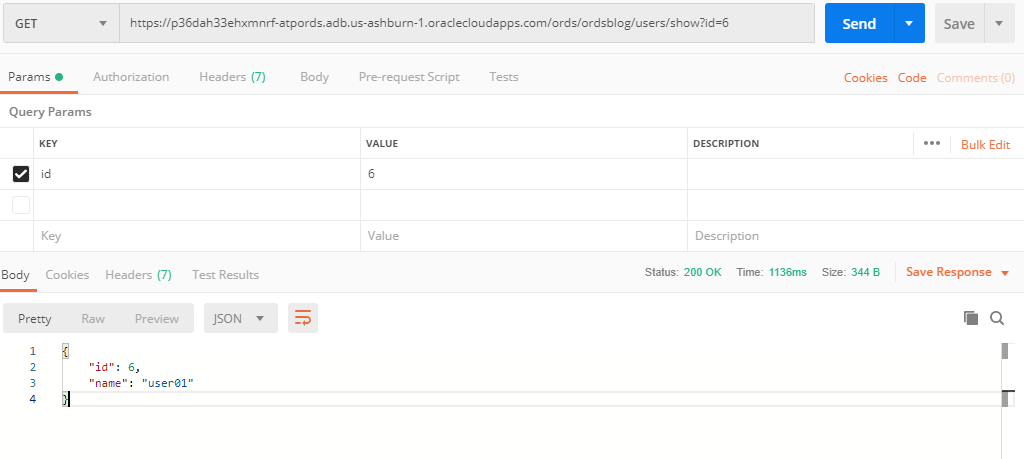
Query in the handler is quite simple, we just need to provide the user id as a query parameter to complete the query.
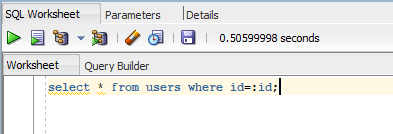
Initiate a query as below, we will get the user info as expected.
https://<DB_NAME>.adb.<REGION>.oraclecloudapps.com/ords/ordsblog/users/show?id=6
Handle the blogs
You already see how easy it is to enable the REST Data Services for the users table. Let’s move forward to enable all the CRUD behaviors through REST API to the table blogs.
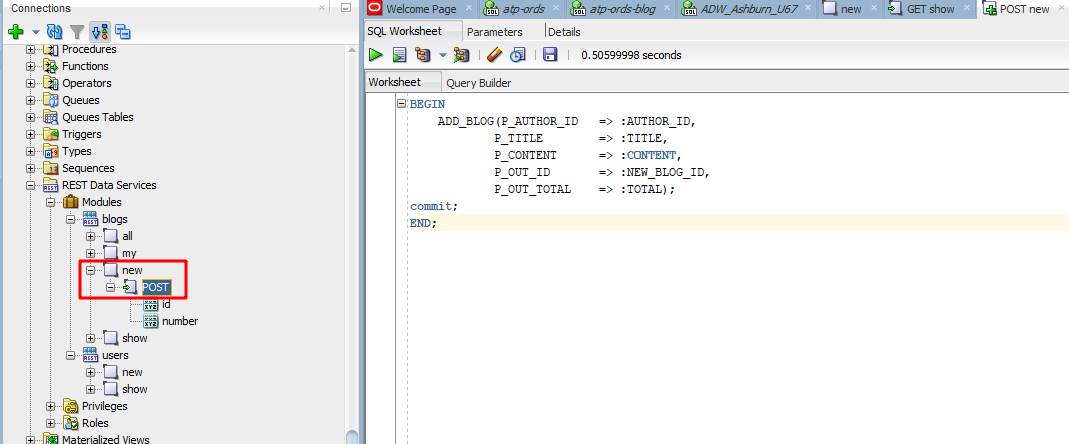
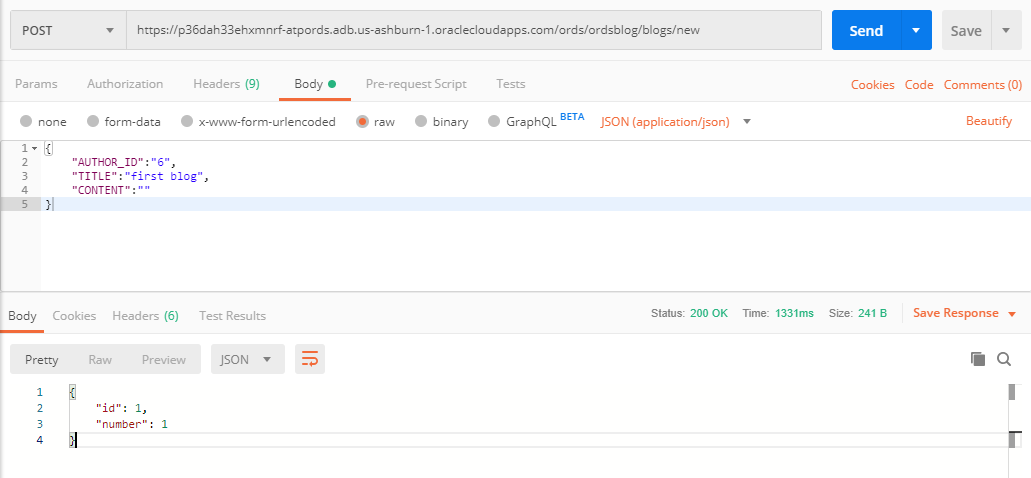
Post the first blog (POST)
I believe you already get familiar with this, similar to the new user handler. Create a procedure to handle the data insert and call the procedure in the POST handler.
You should not encounter any problem to see expected response.
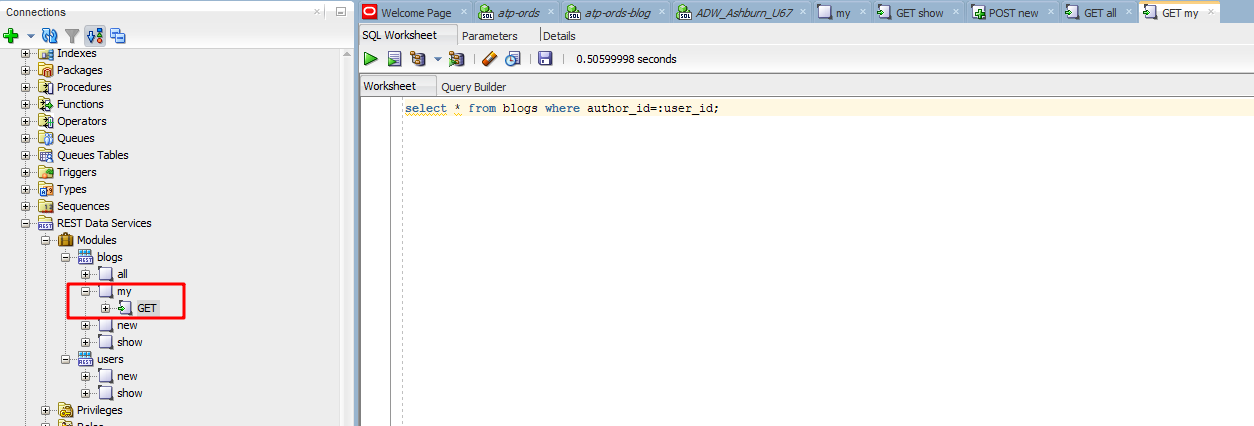
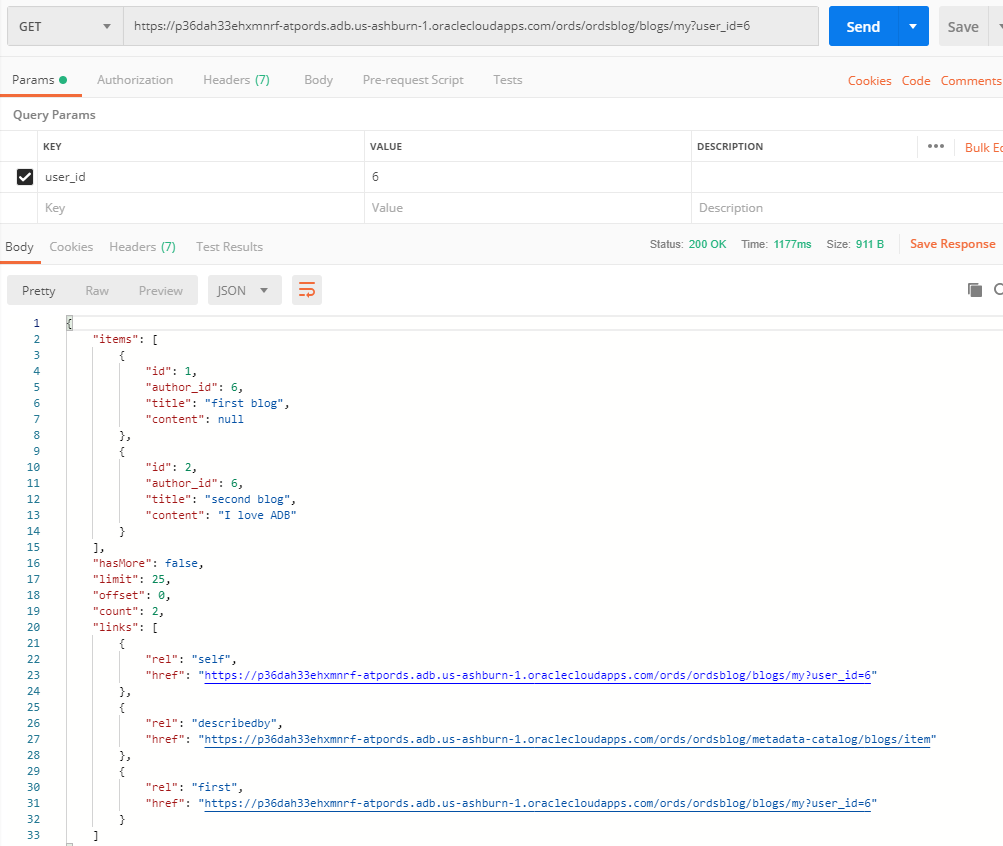
List all my own blogs (GET)
It's still a GET request, the only difference is that pass in the user id so that the SQL query can retrieve the blogs belong to this guy.
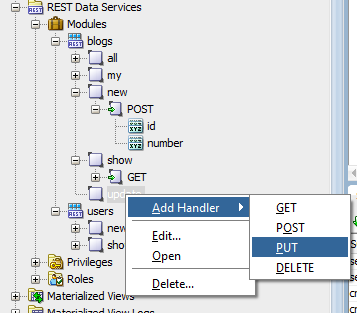
Update my blog (PUT)
What if we want to update a blog we posted previously? Use the PUT method to do so.
Create a update template
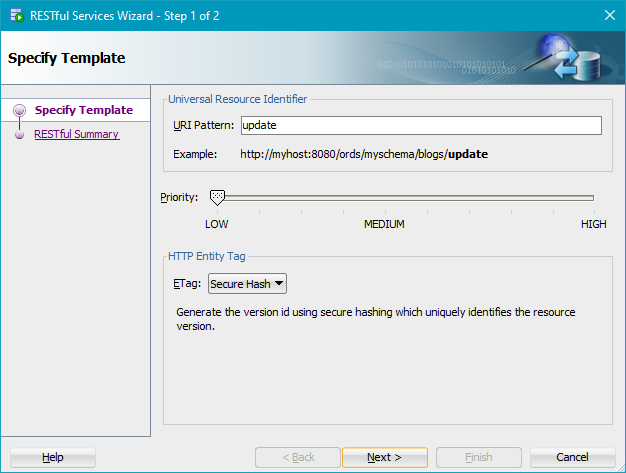
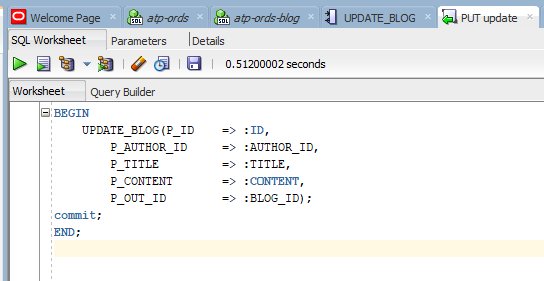
Add a PUT handler to do the update work, although POST also works, but according to the REST API best practices, we should use PUT to indicate our intention, that's update here.
Procedure to handle the update of a blog is similar to the creating.
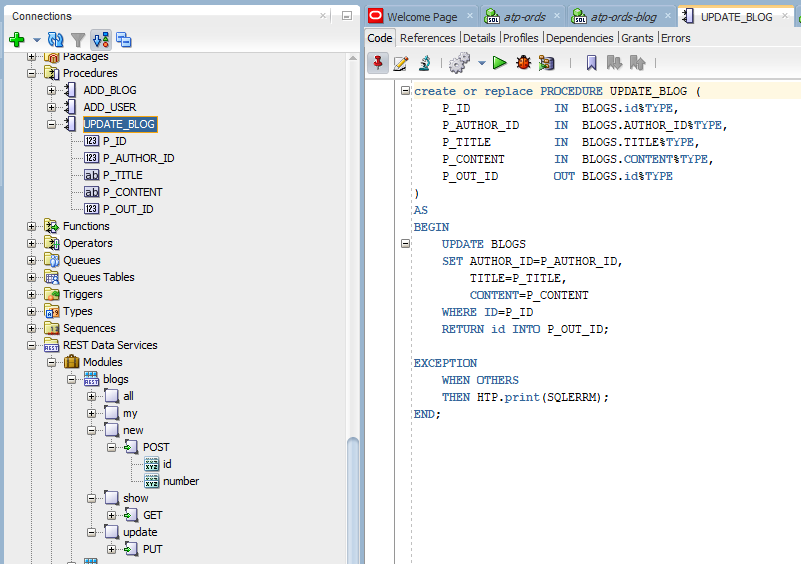
Call the update blog procedure in PUT handler.
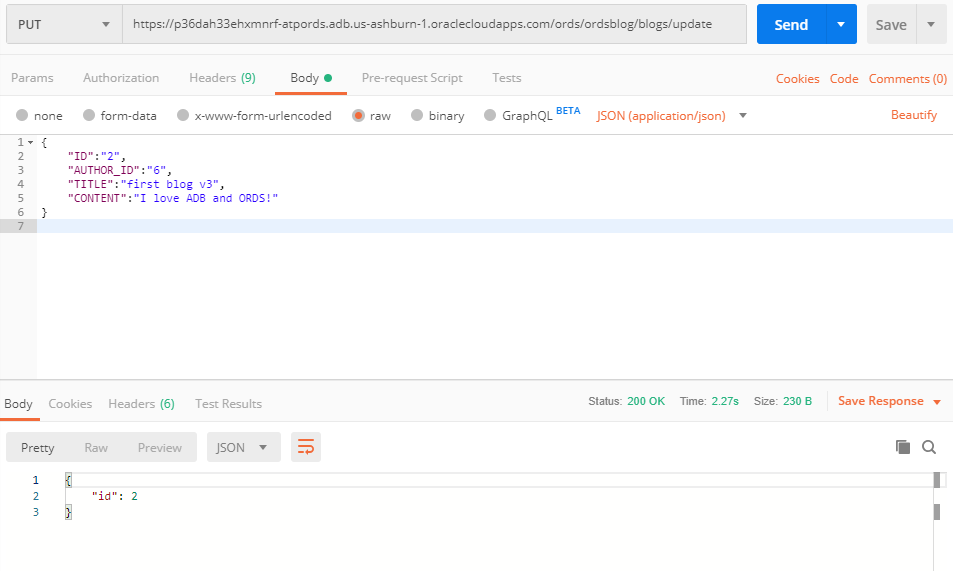
In postman client, set the request method as PUT, input the new blog info in the Body section.
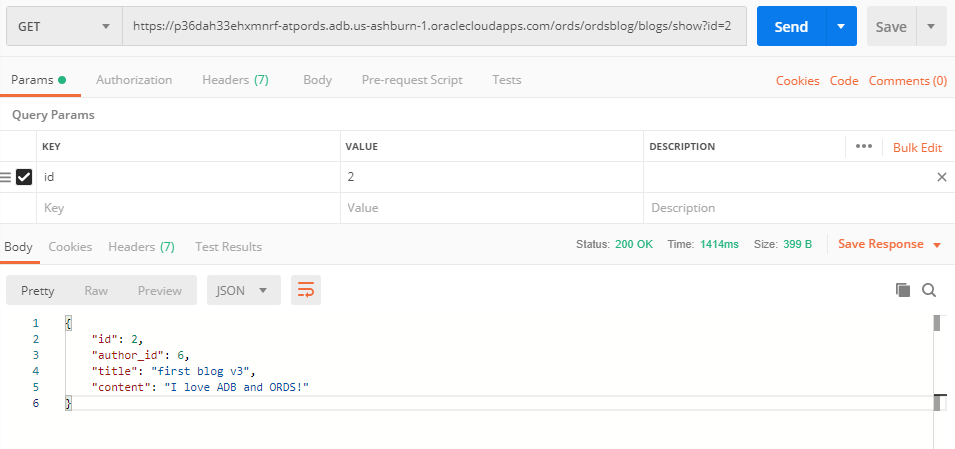
Verify the updated blog.
What? You don't have the show blog endpoint? Implement of such a GET handler is quite easy for you now I believe.
Remove a blog (DELETE)
If something in your blog is out of date and you don't want to remain it anymore, you can implement a DELETE handler to remove the blog any time.
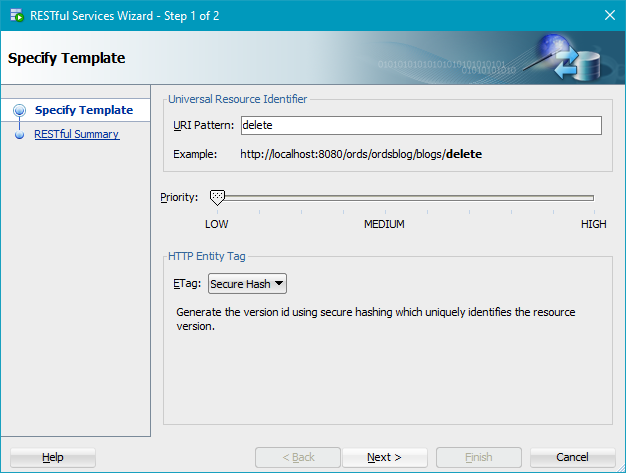
Add a delete template
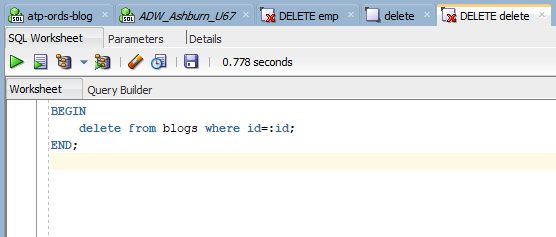
Create DELETE handler
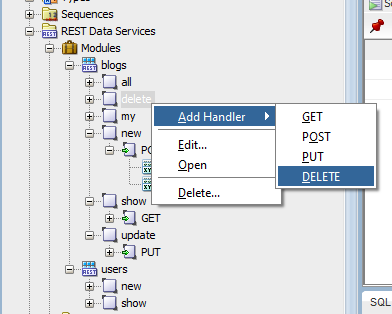
Don't forget to pass in the blog id you want to remove.
In postman client, select request method as DELETE and send request the endpoint you just implemented.
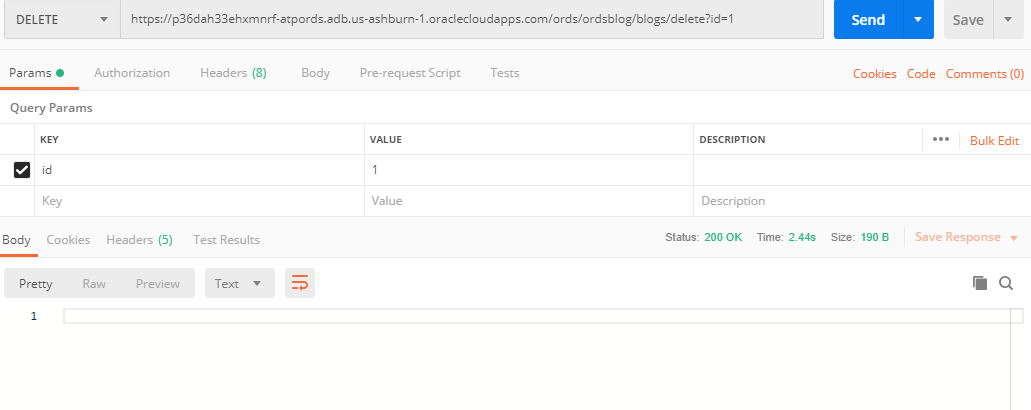
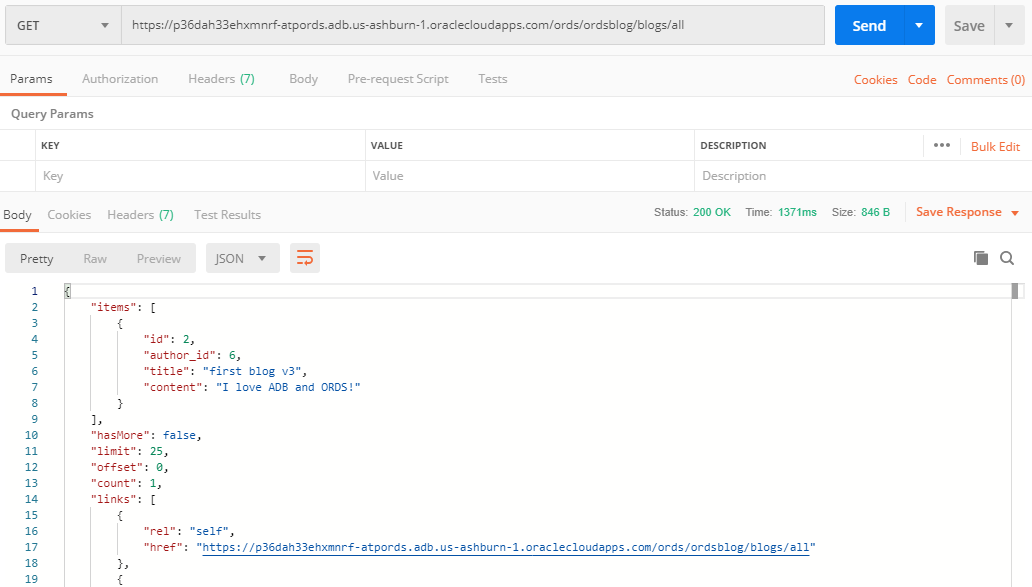
You can only see the #2 blog now.
Secure the resources
Basic Auth
Until now, anyone can do anything to our resources (users, blogs). Obviously, we got to protect the resources and we can do so by leveraging the privileges in ORDS.
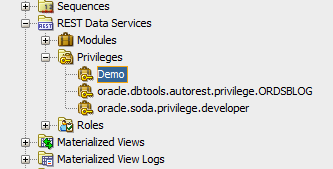
right click the Privileges under REST Data Services and create a new privilege. Input the Name, Title and Description. For simplicity, we protect all the modules by one privilege. Add all the modules(users, blogs) to the Protected Modules section.

We can see the newly created privilege Demo.
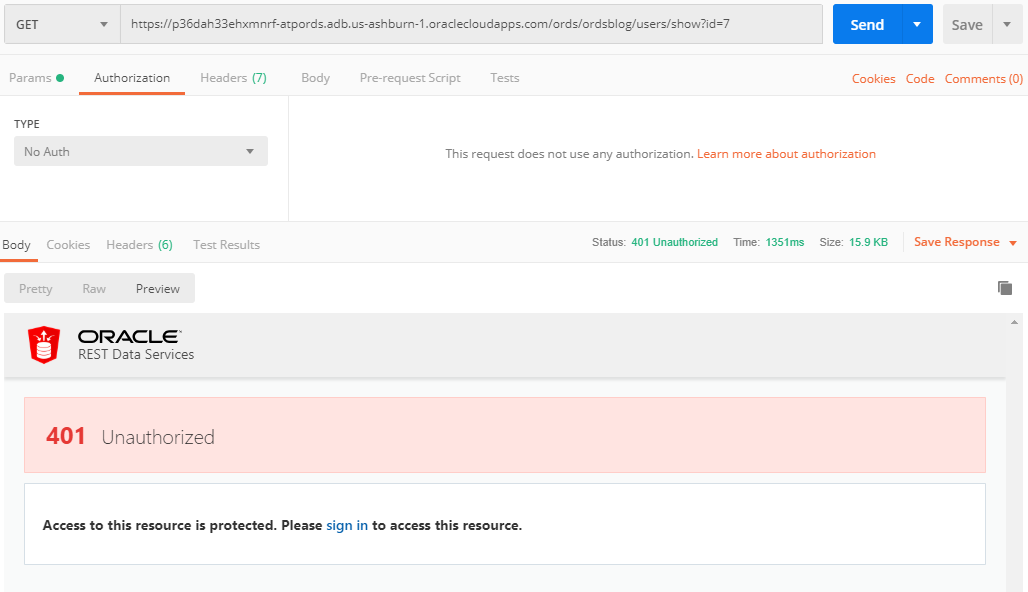
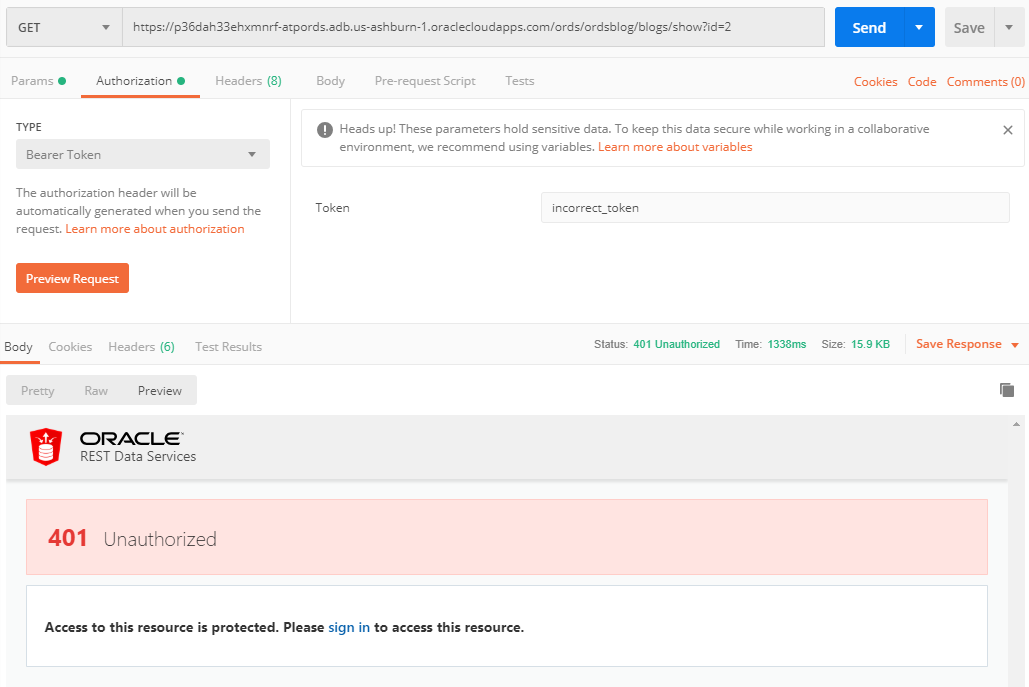
If we try to request for a user's info again, we would get 401 Unauthorized error as below.
If you are using a web browser to test the API, you could click the sign in and get pass by inputting the DB user credential.
In postman client, under Authorization tab, select TYPE as Basic Auth and input the DB user credential. Send the request you will get the user info.

Register an OAuth Client Application
Our target of building this REST API is to provide data access capability to the frontend or any other authorized third-party applications, Basic Auth is not the proper way to do so obviously.
OAuth 2.0 is a standard Internet protocol that provides a means for HTTP servers providing REST APIs to give limited access to third party applications on behalf of an end user.
- The author of the third-party application must register the application to gain client credentials.
- Using the client credentials the third party application starts a web flow that prompts the end-user to approve access.
As mentioned above, by using OAuth the client application can get access to the REST API by registering and getting approval. And the lucky thing is that this flow is embedded in ORDS by default.
To register a client application, we need to access the following URL:
https://<DB_NAME>.adb.<REGION>.oraclecloudapps.com/ords/ordsblog/oauth/clients/
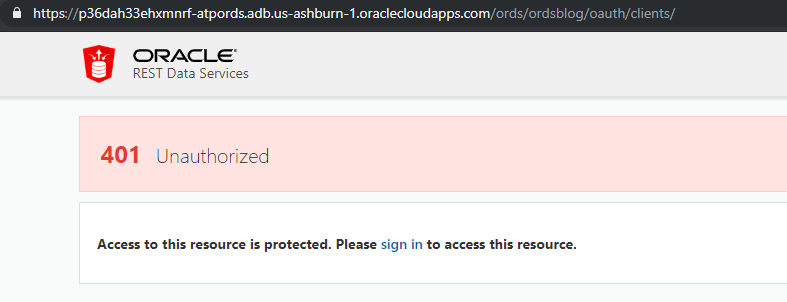
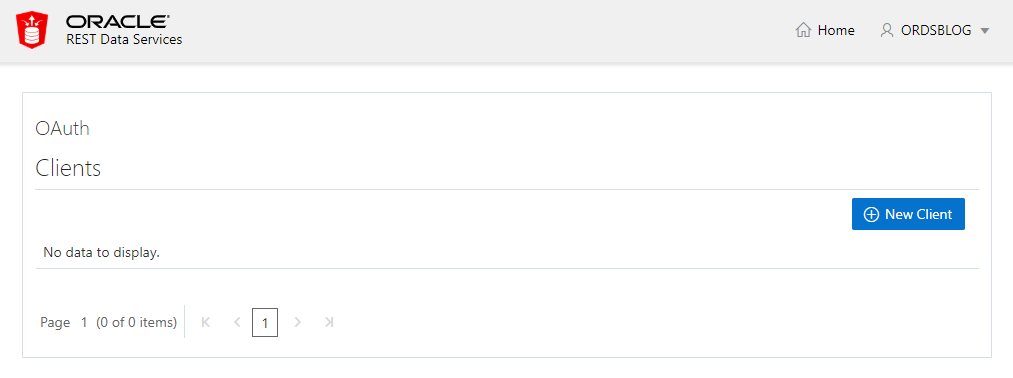
Sign in with the DB user credential and we can see that there is no client registered yet.
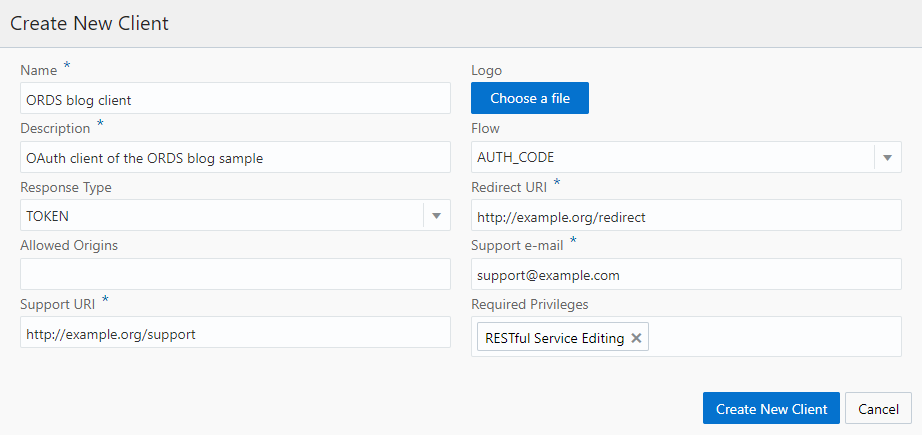
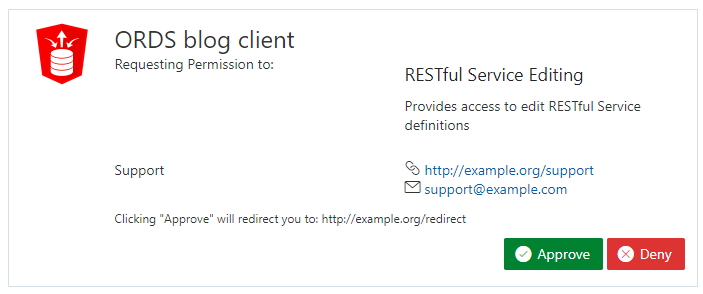
Click the New Client, input the necessary information and click the Create New Client.
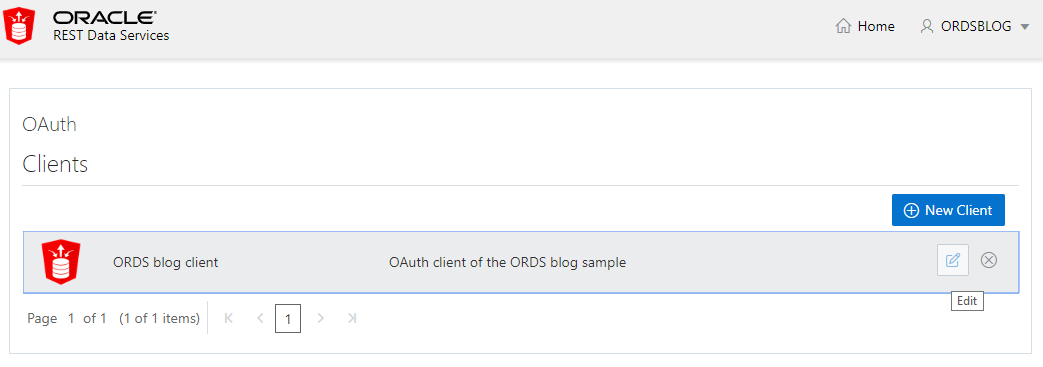
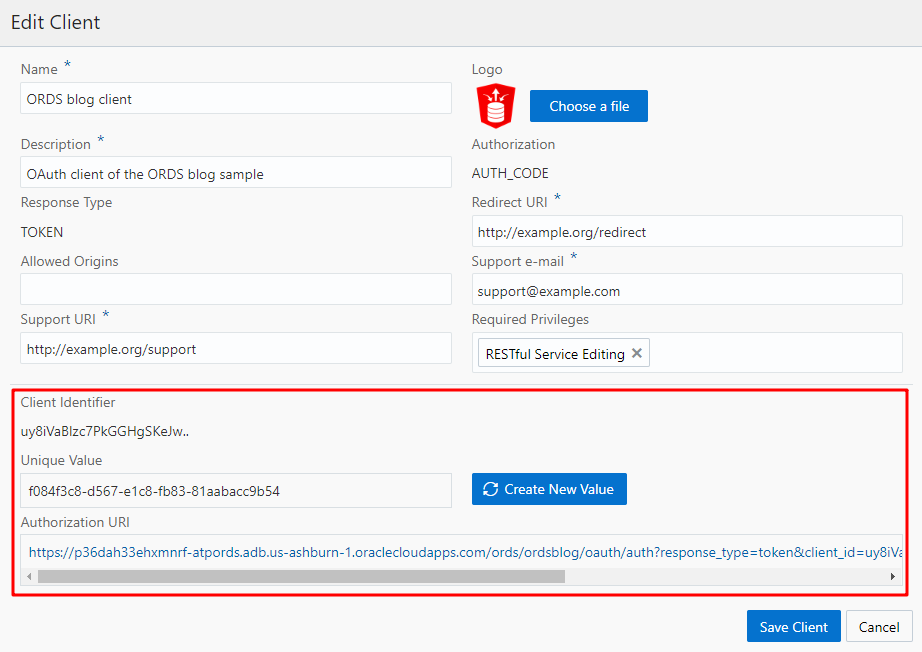
The client is registered but not approved yet. Click the Edit icon to show the details of this registered client.
We can see the generated Client identifier, Unique Value, and Authorization URI.
Click the Authorization URI and sign in with the DB user credential. You will see the client approval page. Click the Approve button to approve this request. Deny is also available for you.
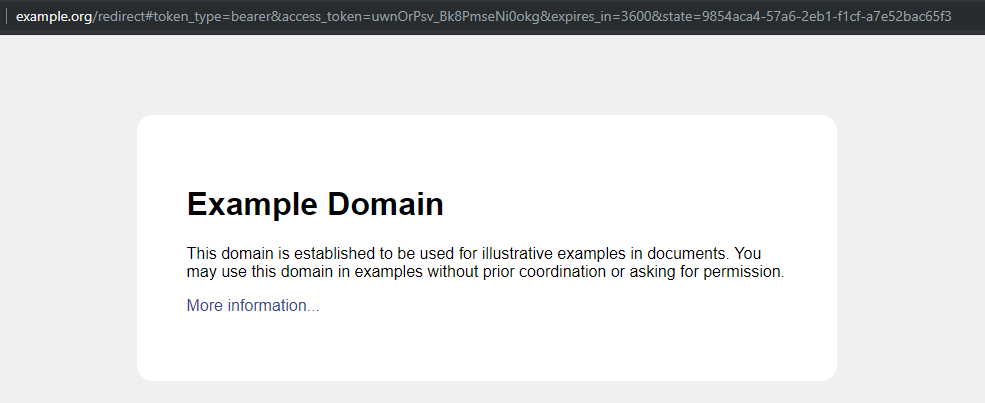
Once you approved the request, the web page will be redirected to the URL you specified when you register the client. The key points are the following items in the redirected URL.
http://example.org/redirect#token_type=bearer&access_token=XErqh-jlHNSoXGe9JX5m7Q&expires_in=3600&state=f084f3c8-d567-e1c8-fb83-81aabacc9b54
- Token_type: bearer
- Access_token: XErqh-jlHNSoXGe9JX5m7Q
- Expires_in: 3600
- State:f084f3c8-d567-e1c8-fb83-81aabacc9b54
Token_type and access_token is the key information when your client application tries to access the REST API. You need to include them in every request to the REST API.
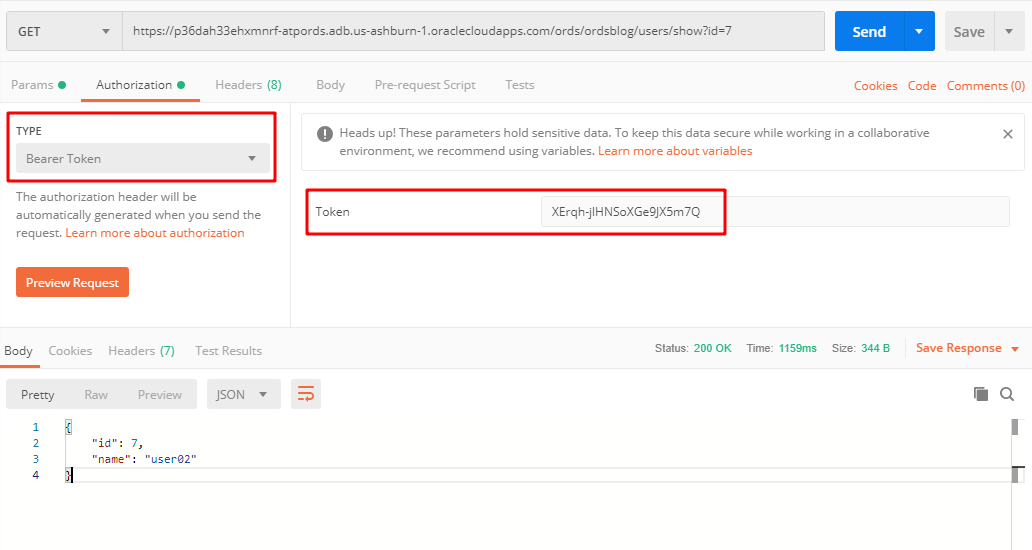
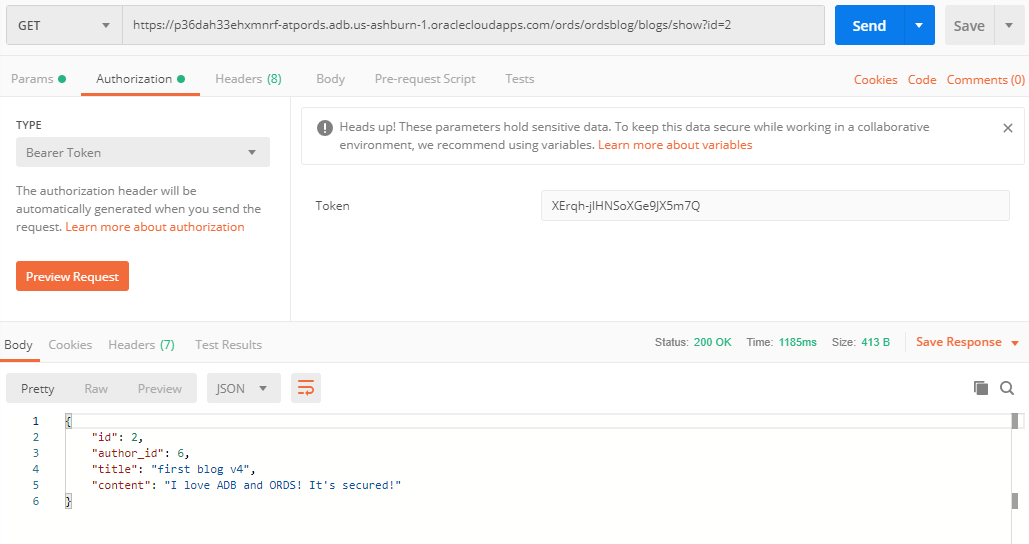
Now we have everything we need to access a protected REST API, let's try to get a user's profile with the access token.
In postman client, select Authorization Type as Bearer Token and input the access token. Then send your request, you should not see the 401 Unauthorized error anymore.
Not only the GET handler, as long as you provide the correct access token, you can access all the handlers, such as update blog.
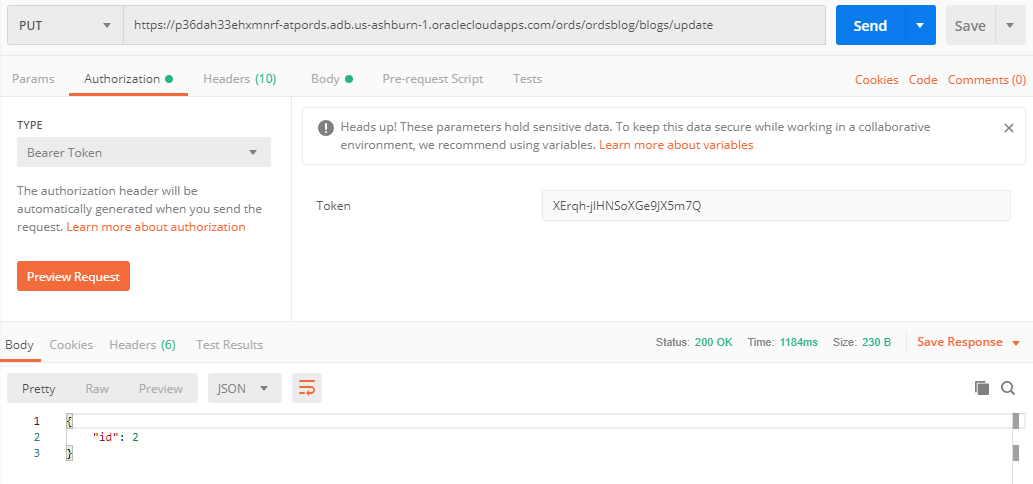
In contrast, if the client application cannot provide the correct access token, it will be blocked out of our resources.
Now we have a secured and fully featured (sample) REST API for our blog application. And I believe you already get familiar with the basic usage of ORDS in Autonomous Database. If you want to know more about ORDS and Oracle Autonomous Database, please refer to the references below.
References
- Developing RESTful Services in Autonomous Database
- Oracle REST Data Services
- Getting Started with Oracle REST Data Services