背景
ファーウェイのスポーツウォッチのアプリを開発する際、ネット上では意外と参考資料が少ないです。そのため、自力で開発する難易度が高いのではないかと思います。
最近、生成AIによるコーディングが流行っています。生成AIを利用してファーウェイのスポーツウォッチのアプリを開発しようと思う開発者がいるかもしれません。そこで、実際に可能なのか、可能な場合、どこまで開発できるか検証したくて、Geminiの無料版を使って、検証してみました。
検証に使用するもの
- Gemini 3 Flash(無料プラン)
- DevEco Studio 6.0.1 Release
- HUAWEI WATCH GT 5 Pro
検証の流れ
プロジェクトのテーマを決める
ファーウェイスポーツウォッチのアプリ開発が未経験のエンジニアを対象に、デモアプリを作りたくて、アイデアが欲しいという質問をGeminiに聞きました。そうしたら、次の3つのアイデアが返ってきました。
- 現場応援!「作業ステップ・チェッカー」
- センサー連動!「リアルタイム・姿勢/体調モニター」
- 2B向けカスタマイズ!「社員証・QRコード表示器」
2番が一番しっくり来るので、2番にしました。

レイアウト構成
次はアプリのレイアウト構成を決めます。Geminiが提案したのはメイン画面と詳細画面による2画面構成です。


メイン画面のコーディング
ページのコード
ファーウェイスポーツウォッチのページはhmlとcssとjsによって構成されます。Geminiにこの3つのファイルのコーディングを書かせたら、コードがちゃんと返ってきました。
<div class="container">
    <text class="title">Vital Monitor</text>

    <div class="heart-rate-box">
        <image src="/common/heart_icon.png" class="heart-icon"></image>
        <text class="bpm-value" style="color: {{bpmColor}};">{{heartRate}}</text>
        <text class="unit">BPM</text>
    </div>

    <div class="sensor-box">
        <text class="sensor-label">Wrist Angle (Z):</text>
        <text class="sensor-data">{{accelZ}}</text>
    </div>

    <button class="btn-detail" type="capsule" value="Detail View" onclick="goToDetail"></button>
</div>
.container {
    flex-direction: column;
    justify-content: center;
    align-items: center;
    width: 100%;
    height: 100%;
    background-color: #000000;
}

.title {
    font-size: 18px;
    color: #aaaaaa;
    margin-bottom: 10px;
}

.heart-rate-box {
    flex-direction: row;
    align-items: center;
    margin-bottom: 20px;
}

.bpm-value {
    font-size: 48px;
    font-weight: bold;
}

.unit {
    font-size: 20px;
    color: #ffffff;
    margin-left: 5px;
}

.sensor-box {
    flex-direction: column;
    align-items: center;
    margin-bottom: 30px;
}

.sensor-data {
    font-size: 24px;
    color: #00ff00;
}

.btn-detail {
    width: 150px;
    height: 40px;
}
import sensor from '@system.sensor'; // センサーAPIのインポート
import router from '@system.router'; // ルーターAPI

export default {
    data: {
        heartRate: 75,
        accelZ: 0,
        bpmColor: '#ffffff'
    },
    onInit() {
        // 心拍センサーの購読開始
        sensor.subscribeHeartRate({
            success: (ret) => {
                this.heartRate = ret.heartRate;
                // 心拍数が高い時に色を変えるデモ用ロジック
                this.bpmColor = this.heartRate > 100 ? '#ff0000' : '#ffffff';
            },
            fail: (data, code) => {
                console.log('subscribe heart rate fail, code: ' + code);
            }
        });

        // 加速度センサーの購読開始
        sensor.subscribeAccelerometer({
            interval: 'normal',
            success: (ret) => {
                // Z軸(腕の上げ下げ)の値を更新
                this.accelZ = ret.z.toFixed(2);
            }
        });
    },
    goToDetail() {
        router.replace({
            uri: 'pages/detail/index'
        });
    },
    onDestroy() {
        // 画面を閉じるときにセンサーを解除(バッテリー消費を抑える基本作法)
        sensor.unsubscribeHeartRate();
        sensor.unsubscribeAccelerometer();
    }
}
hmlの制限の追加
しかし、hmlはhtmlではないので、button要素など使えない要素があります。そこで、参照(https://developer.huawei.com/consumer/cn/doc/harmonyos-references/js-lite-container-comp)を渡し、使える要素を絞り、直させました。そうすると、次の修正が返ってきました。
<div class="container">
    <text class="title">Vital Monitor</text>

    <div class="heart-rate-box">
        <image src="/common/heart.png" class="heart-icon"></image>
        <text class="bpm-value" style="color: {{bpmColor}};">{{heartRate}}</text>
        <text class="unit">BPM</text>
    </div>

    <div class="sensor-box">
        <text class="sensor-label">Wrist Angle (Z):</text>
        <text class="sensor-data">{{accelZ}}</text>
    </div>

    <div class="custom-btn" onclick="goToDetail">
        <text class="btn-text">Detail View</text>
    </div>
</div>
.container {
    flex-direction: column;
    justify-content: center;
    align-items: center;
    width: 454px; /* ウォッチの解像度に合わせて調整 */
    height: 454px;
    background-color: #000000;
}

.title {
    font-size: 24px;
    color: #aaaaaa;
}

.heart-rate-box {
    flex-direction: row;
    align-items: center;
    margin-top: 10px;
}

.bpm-value {
    font-size: 60px;
}

.unit {
    font-size: 20px;
    color: #ffffff;
    margin-left: 8px;
}

.sensor-box {
    flex-direction: column;
    align-items: center;
    margin-top: 20px;
}

.sensor-data {
    font-size: 30px;
    color: #00ff00;
}

/* カスタムボタンのスタイル */
.custom-btn {
    width: 200px;
    height: 50px;
    background-color: #404040;
    border-radius: 25px; /* カプセル型 */
    justify-content: center;
    align-items: center;
    margin-top: 30px;
}

.btn-text {
    font-size: 24px;
    color: #ffffff;
}
import sensor from '@system.sensor';
import router from '@system.router';

export default {
    data: {
        heartRate: 0,
        accelZ: 0,
        bpmColor: '#ffffff'
    },
    onInit() {
        // 心拍数モニターの購読
        sensor.subscribeHeartRate({
            success: (ret) => {
                this.heartRate = ret.heartRate;
                // 100を超えたら赤くする
                this.bpmColor = (this.heartRate > 100) ? '#ff0000' : '#ffffff';
            },
            fail: (data, code) => {
                console.log('Heart rate fail, code: ' + code);
            }
        });

        // 加速度センサーの購読
        sensor.subscribeAccelerometer({
            interval: 'normal',
            success: (ret) => {
                this.accelZ = ret.z.toFixed(2);
            }
        });
    },
    // ボタン押下時の処理
    goToDetail() {
        router.replace({
            uri: 'pages/detail/index'
        });
    },
    onDestroy() {
        // リソース解放
        sensor.unsubscribeHeartRate();
        sensor.unsubscribeAccelerometer();
    }
}
この修正では、button要素がtext要素に置き換わりました。
権限の宣言
index.hmlは直りましたが、index.jsでは「To use this API, you need to apply for the
permissions: ohos. permission. READ_HEALTH_DATA 」というエラーが表示されるので、これもGeminiに解決させます。Geminiはconfig.jsonにreqPermissionsを追加することで、この問題を解決しました。
{
    "app": {
        "bundleName": "com.example.vitalsensor",
        "vendor": "example",
        "version": {
            "code": 1,
            "name": "1.0"
        }
    },
    "deviceConfig": {},
    "module": {
        "deviceType": [
            "liteWearable"
        ],
        "distro": {
            "deliveryWithInstall": true,
            "moduleName": "entry",
            "moduleType": "entry"
        },
        "reqPermissions": [
            {
                "name": "ohos.permission.READ_HEALTH_DATA",
                "reason": "To display real-time heart rate data on the dashboard.",
                "usedScene": {
                    "ability": [
                        "default"
                    ],
                    "when": "always"
                }
            }
        ],
        "js": [
            {
                "mode": "lite",
                "name": "default",
                "pages": [
                    "pages/index/index"
                ],
                "window": {
                    "designWidth": 454,
                    "autoDesignWidth": false
                }
            }
        ]
    }
}
メイン画面のプレビュー
これでメイン画面のコードは問題ないと思って、プレビューしてみたら、ハートの画像が表示されないことに気付きました。

そこで、Geminiは次のようにcssの追加コードを書きました。
/* 画像のサイズを明示的に指定する */
.heart-icon {
    width: 40px;
    height: 40px;
    object-fit: contain; /* アスペクト比を維持 */
}

/* 各ボックスに十分なサイズを与える */
.heart-rate-box {
    width: 300px;
    height: 80px;
    flex-direction: row;
    justify-content: center;
    align-items: center;
    margin-top: 10px;
}
これで、メイン画面の表示が直りました。

詳細画面のコーディング
ページのコード
Geminiに詳細画面のhmlとcssとjsを書かせます。
<div class="container">
    <text class="title">Posture Advisor</text>

    <div class="status-box" show="{{isGoodPosture}}">
        <image src="/common/ok_mark.png" class="status-icon"></image>
        <text class="message-good">Good Posture</text>
    </div>

    <div class="status-box" show="{{!isGoodPosture}}">
        <image src="/common/warning_mark.png" class="status-icon"></image>
        <text class="message-bad">Check Your Arm!</text>
    </div>

    <text class="hint">Keep your wrist level.</text>

    <div class="back-btn" onclick="goBack">
        <text class="btn-text">Back</text>
    </div>
</div>
.container {
    flex-direction: column;
    justify-content: center;
    align-items: center;
    width: 454px;
    height: 454px;
    background-color: #000000;
}

.title {
    font-size: 24px;
    color: #aaaaaa;
    margin-bottom: 20px;
}

.status-box {
    flex-direction: column;
    align-items: center;
    width: 100%;
}

.status-icon {
    width: 80px;
    height: 80px;
    margin-bottom: 10px;
}

.message-good {
    font-size: 32px;
    color: #00ff00; /* 緑 */
}

.message-bad {
    font-size: 32px;
    color: #ff0000; /* 赤 */
}

.hint {
    font-size: 18px;
    color: #ffffff;
    margin-top: 20px;
    text-align: center;
}

.back-btn {
    width: 160px;
    height: 45px;
    background-color: #333333;
    border-radius: 22px;
    justify-content: center;
    align-items: center;
    margin-top: 30px;
}

.btn-text {
    font-size: 20px;
    color: #ffffff;
}
import sensor from '@system.sensor';
import router from '@system.router';

export default {
    data: {
        isGoodPosture: true,
        accelZ: 0
    },
    onInit() {
        // 姿勢判定のための加速度センサー購読
        sensor.subscribeAccelerometer({
            interval: 'normal',
            success: (ret) => {
                this.accelZ = ret.z;

                // ロジック例:腕が水平(Z軸が重力加速度付近)かどうかを判定
                // 実際にはデモ用に少しの傾きで反応するように調整します
                if (this.accelZ > 8.0 && this.accelZ < 11.0) {
                    this.isGoodPosture = true;
                } else {
                    this.isGoodPosture = false;
                }
            }
        });
    },
    goBack() {
        // メイン画面に戻る
        router.replace({
            uri: 'pages/index/index'
        });
    },
    onDestroy() {
        // 画面を離れる際は必ず購読解除
        sensor.unsubscribeAccelerometer();
    }
}
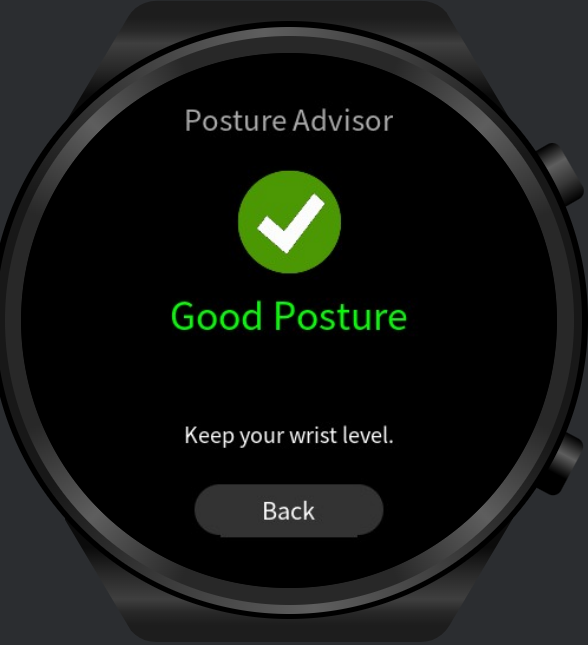
プレビューの結果は次の通りです。

しかし、ここで2つのバグが見つかりました
メイン画面の画面遷移バグ
メイン画面では「Detail View」ボタンをクリックしても詳細画面に遷移しないというバグが見つかりました。
ここで、Geminiが自分のindex.jsのバグに気付きました。uriの指定が間違っていることを指摘しました。
    goToDetail() {
        router.replace({
            uri: 'pages/detail/index'
        });
    },
ここは手動で次のように直しました。
    goToDetail() {
        router.replace({
            uri: 'pages/detail/detail'
        });
    },
これで、画面遷移ができるようになりました。
詳細画面の表示バグ
詳細画面にOKマークまたは警告マークが表示されるはずなのに、まったく表示されません。これをGeminiに直させると、次の修正コードが返ってきました。
.status-box {
    flex-direction: column;
    align-items: center;
    /* 修正ポイント:幅と高さを明示的に指定する */
    width: 300px;
    height: 200px;
}

.status-icon {
    width: 100px;
    height: 100px;
    /* 念のため背景色がなくても表示されるはずですが、サイズ指定が必須です */
}
プレビューで確認し、たしかに直りました。
権限問題
いざ実機でテストしたら、なぜか心拍数がずっと0のままでした。
基本的にこういう問題は「設定」アプリの中で権限を有効にすれば直るので、自分で「設定」→「権限マネージャー」→自分のアプリに入り、「ボディセンサー」権限を許可し、デモアプリを再起動しました。そうしたら、心拍数が正しく表示されるようになりました。
README.mdの作成
最後はREADME.mdの作成をGeminiに書かせ、今回のGeminiによるファーウェイスポーツウォッチのアプリ開発の検証が終了しました。
検証結果
今回の検証で、生成AI(少なくともGemini)を利用すれば、ファーウェイスポーツウォッチのアプリ開発経験がなくても、アプリが作れることは証明されました。ちなみに、このプロジェクトの作成と検証を合わせて半日もかかりませんでした。
GitHub