1.DRBDとは?
・ストレージのレプリケーションのためのソフトウェア
・ブロックレベルでのレプリケーションを実現
・レプリケーションは用途によって、同期/非同期モードを選択することが可能
本記事では、DRBDのはじめの一歩ということで、検証機2台を使用したレプリケーション環境を構築します。
2.検証環境構築
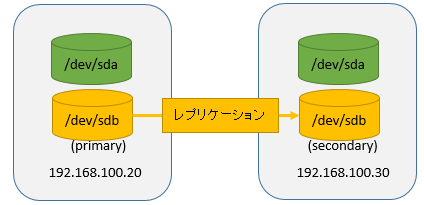
2-1.全体像
CentOS6.7 2台
target1:192.168.100.20
target2:192.168.100.30
全体のイメージ像は、以下の図の通りです。
2-2.インストール
今回はdrbd8.4系を使用します。
wget http://ftp.kddilabs.jp/Linux/RPMS/elrepo/elrepo/el6/x86_64/RPMS/kmod-drbd84-8.4.9-1.el6.elrepo.x86_64.rpm
wget http://ftp.kddilabs.jp/Linux/RPMS/elrepo/elrepo/el6/x86_64/RPMS/drbd84-utils-8.9.8-1.el6.elrepo.x86_64.rpm
rpm -ivh *drbd*.rpm
2-3.DRDBの初期設定
primaryになるサーバとsecondaryになるサーバで同じ設定が必要です。
起動時に/etc/drbd.confが読み込まれますが、デフォルトでは以下のファイルをincludeしています。
[root@target1 ~]# cat ../drbd.conf
# You can find an example in  /usr/share/doc/drbd.../drbd.conf.example

include "drbd.d/global_common.conf";
include "drbd.d/*.res";
リソースを定義します。今回はr0.resというファイル名にしました。
global_common.confは共通の設定ファイルになります。
[root@target1 ~]# cat r0.res
resource r0 {
        meta-disk internal;
        device /dev/drbd0;
        disk /dev/sdb1;

		# クラスタノードとして、target1とtarget2を使用
        on target1 {
                address 192.168.100.20:7788;
        }
        on target2 {
                address 192.168.100.30:7788;
        }
}
global {
		# 統計情報をサーバに送信するかどうか。
        usage-count no;
}
common {
        handlers {
        }
        startup {
        }
        options {
        }
        disk {
        }
        net {
        		# 同期レプリケーションを使用
                protocol C;
        }
}
※レプリケーションするディスクは事前にfdiskでパーティショニングしておきます。
[root@target1 ~]# fdisk /dev/sdb
Device contains neither a valid DOS partition table, nor Sun, SGI or OSF disklabel
Building a new DOS disklabel with disk identifier 0x10601e04.
Changes will remain in memory only, until you decide to write them.
After that, of course, the previous content won't be recoverable.

Warning: invalid flag 0x0000 of partition table 4 will be corrected by w(rite)

WARNING: DOS-compatible mode is deprecated. It's strongly recommended to
         switch off the mode (command 'c') and change display units to
         sectors (command 'u').

Command (m for help): m
Command action
   a   toggle a bootable flag
   b   edit bsd disklabel
   c   toggle the dos compatibility flag
   d   delete a partition
   l   list known partition types
   m   print this menu
   n   add a new partition
   o   create a new empty DOS partition table
   p   print the partition table
   q   quit without saving changes
   s   create a new empty Sun disklabel
   t   change a partition's system id
   u   change display/entry units
   v   verify the partition table
   w   write table to disk and exit
   x   extra functionality (experts only)

Command (m for help): n
Command action
   e   extended
   p   primary partition (1-4)
p
Partition number (1-4): 1
First cylinder (1-1044, default 1):
Using default value 1
Last cylinder, +cylinders or +size{K,M,G} (1-1044, default 1044):
Using default value 1044

Command (m for help): p

Disk /dev/sdb: 8589 MB, 8589934592 bytes
255 heads, 63 sectors/track, 1044 cylinders
Units = cylinders of 16065 * 512 = 8225280 bytes
Sector size (logical/physical): 512 bytes / 512 bytes
I/O size (minimum/optimal): 512 bytes / 512 bytes
Disk identifier: 0x10601e04

   Device Boot      Start         End      Blocks   Id  System
/dev/sdb1               1        1044     8385898+  83  Linux

Command (m for help): w
The partition table has been altered!

Calling ioctl() to re-read partition table.
Syncing disks.
2-4.起動
初回のみDRDBのメタデータを初期化する必要があります。
[root@target1 ~]# drbdadm create-md r0
initializing activity log
NOT initializing bitmap
Writing meta data...
New drbd meta data block successfully created.
success
primaryになるサーバのプロセススタート時にsecondaryになるサーバも起動します。
[root@target1 ~]# service drbd start
Starting DRBD resources: [
     create res: r0
   prepare disk: r0
    adjust disk: r0
     adjust net: r0
]
..........
***************************************************************
 DRBD's startup script waits for the peer node(s) to appear.
 - If this node was already a degraded cluster before the
   reboot, the timeout is 0 seconds. [degr-wfc-timeout]
 - If the peer was available before the reboot, the timeout
   is 0 seconds. [wfc-timeout]
   (These values are for resource 'r0'; 0 sec -> wait forever)
 To abort waiting enter 'yes' [  19]:
.
起動時はともにSecondary/Secondaryとなっています。
192.168.100.20をprimaryに昇格させます。
--overwrite-data-of-peerオプションを指定すると、初期同期もあわせて実行されます。
[root@target1 ~]# service drbd status
drbd driver loaded OK; device status:
version: 8.4.9-1 (api:1/proto:86-101)
GIT-hash: 9976da086367a2476503ef7f6b13d4567327a280 build by mockbuild@Build64R6, 2016-12-13 18:38:15
m:res  cs         ro                   ds                         p  mounted  fstype
0:r0   Connected  Secondary/Secondary  Inconsistent/Inconsistent  C
[root@target1 ~]# drbdadm -- --overwrite-data-of-peer primary r0
[root@target1 ~]# service drbd status
drbd driver loaded OK; device status:
version: 8.4.9-1 (api:1/proto:86-101)
GIT-hash: 9976da086367a2476503ef7f6b13d4567327a280 build by mockbuild@Build64R6, 2016-12-13 18:38:15
m:res  cs          ro                 ds                     p  mounted  fstype
0:r0   SyncSource  Primary/Secondary  UpToDate/Inconsistent  C
...    sync'ed:    7.4%               (7592/8188)M
primaryに昇格できました。DRBDで同期レプリケーションしている状態になりました。
2-5.同期されていることの確認
実際にデバイスにファイルシステムを作成して、同期されていることを確認します。
ext4ファイルシステムを作成し、/mnt-drbdにmountします。
[root@target1 ~]#  mkfs.ext4 /dev/drbd0
mke2fs 1.41.12 (17-May-2010)
Filesystem label=
OS type: Linux
Block size=4096 (log=2)
Fragment size=4096 (log=2)
Stride=0 blocks, Stripe width=0 blocks
524288 inodes, 2096401 blocks
104820 blocks (5.00%) reserved for the super user
First data block=0
Maximum filesystem blocks=2147483648
64 block groups
32768 blocks per group, 32768 fragments per group
8192 inodes per group
Superblock backups stored on blocks:
        32768, 98304, 163840, 229376, 294912, 819200, 884736, 1605632

Writing inode tables: done
Creating journal (32768 blocks): done
Writing superblocks and filesystem accounting information: done

This filesystem will be automatically checked every 20 mounts or
180 days, whichever comes first.  Use tune2fs -c or -i to override.
[root@target1 ~]# mkdir /mnt-drbd
[root@target1 ~]# mount /dev/drbd0 /mnt-drbd/
mountできました。
primaryサーバで書き込みしたファイルがsecondaryサーバに同期されていることを確認します。
ここでは192.168.100.20がsecondaryになり、192.168.100.30がprimaryになった想定で確認します。
[root@target1 ~]# echo "This is test text." > /mnt-drbd/test.txt
[root@target1 ~]# ll /mnt-drbd/
total 20
drwx------ 2 root root 16384 Dec 30 03:01 lost+found
-rw-r--r-- 1 root root    19 Dec 30 03:18 test.txt
[root@target1 ~]# umount /mnt-drbd/
[root@target1 ~]# drbdadm secondary r0
192.168.100.30側にでsecondaryからprimaryに昇格させ、/mnt-drbdにmountします。
[root@target2 ~]# drbdamdm primary r0
[root@target2 ~]# mkdir /mnt-drbd
[root@target2 ~]# mount /dev/drbd0 /mnt-drbd/
[root@target2 ~]# ll /mnt-drbd/
total 20
drwx------ 2 root root 16384 Dec 30 03:01 lost+found
-rw-r--r-- 1 root root    19 Dec 30 03:18 test.txt
もともとsecondaryだった192.168.100.30にprimaryで書き込みしたtest.txtが同期されていることが分かりました。
3.まとめ
ブロックレベルでレプリケーションするDRBDを使用して、レプリケーション環境を構築しました。
LANでのActive-Stanby構成・リアルタイムバックアップ、あるいはWANでのBCPなど様々な用途に利用できます。
今回はLANでのActive-Stanby構成を想定したレプリケーション環境を構築しました。
参考
- [1]DRBDユーザーズガイド バージョン8.4版:https://blog.3ware.co.jp/drbd-users-guide-8.4/drbd-users-guide.html
- [2]使用事例と効果:https://drbd.jp/jirei_information/