Android ゼロからJavamailを使ってメールを送る方法を参考にAndroid Studioでアプリから直接メールを送信するプログラムを書いてみましたが、エラー続出でビルドできませんでした。
検索しても大体の記事が2017年以前に書かれたもので(私のやり方が悪かったのか、もう時代遅れなのか)どれもうまくいかないので、最新の導入方法を探ってみました。
結論:jarファイルをダウンロードしてライブラリにインポートするやり方はもう古い!
調べて見つかった記事によく書かれている方法は、javamail-androidから3つのjarファイルをダウンロードしてきて、手動でAndroid Studioのlibsフォルダーにコピーして導入するものでした。
しかし、そんな面倒なことをしなくてもbuild.gradleに記述するだけで導入できることが分かったので、やり方を書いておきます。
 AndroidManifest.xmlに記述(インターネットアクセス許可)
パーミッションを追加します。
インターネットアクセスなので、ユーザーが手動で権限をオンにする必要はありません。
次の一文を追加します:<uses-permission android:name="android.permission.INTERNET" />
<?xml version="1.0" encoding="utf-8"?>
<manifest xmlns:android="http://schemas.android.com/apk/res/android"
    package="com.example.mailsend">

    <uses-permission android:name="android.permission.INTERNET" />

    <application
        android:allowBackup="true"
        android:icon="@mipmap/ic_launcher"
        android:label="@string/app_name"
        android:roundIcon="@mipmap/ic_launcher_round"
        android:supportsRtl="true"
        android:theme="@style/AppTheme">
        <activity android:name=".MainActivity">
            <intent-filter>
                <action android:name="android.intent.action.MAIN" />
                <category android:name="android.intent.category.LAUNCHER" />
            </intent-filter>
        </activity>
    </application>

</manifest>
 build.gradle(アプリレベル)のdependenciesに記述
ここがポイントです。
以下の二文を追加してください。
dependencies {
    ・・・省略・・・

    implementation 'com.sun.mail:android-mail:1.6.5'
    implementation 'com.sun.mail:android-activation:1.6.5'
}
 レイアウトを記述
今回はボタンをタップしたときにメールが送信されるプログラムを書きます。
<?xml version="1.0" encoding="utf-8"?>
<LinearLayout xmlns:android="http://schemas.android.com/apk/res/android"
    xmlns:app="http://schemas.android.com/apk/res-auto"
    xmlns:tools="http://schemas.android.com/tools"
    android:layout_width="match_parent"
    android:layout_height="match_parent"
    android:orientation="vertical"
    tools:context=".MainActivity">

    <TextView
        android:layout_width="wrap_content"
        android:layout_height="wrap_content"
        android:text="メール送信テスト"
        app:layout_constraintBottom_toBottomOf="parent"
        app:layout_constraintLeft_toLeftOf="parent"
        app:layout_constraintRight_toRightOf="parent"
        app:layout_constraintTop_toTopOf="parent" />

    <Button
        android:id="@+id/button"
        android:layout_width="match_parent"
        android:layout_height="wrap_content"
        android:text="送信する" />

</LinearLayout>
 プログラム記述
Googleアカウントのメールアドレス・パスワード・タイトル・本文を適宜変更してください。
また、このプログラムは自分宛てにメールするようになっています。
送信先アドレスを変更する場合は、msg.setRecipients(javax.mail.Message.RecipientType.TO, javax.mail.internet.InternetAddress.parse(account + "@gmail.com"));の部分の「account + "@gmail.com"」を送信先アドレスに変更してください。
(入力したGoogleアカウントからhoge@huge.comに送信する例:msg.setRecipients(javax.mail.Message.RecipientType.TO, javax.mail.internet.InternetAddress.parse("hoge@huge.com"));)
また、「javax.mail.Message.RecipientType.TO」の部分を変更すると、メールタイプをCCやBCCに変えたり、複数のアドレスに送信することもできます。
(詳しくはこちら:http://javadrive.s25.xrea.com/javamail/smtp/index3.html)
package com.example.mailsend;

import androidx.appcompat.app.AppCompatActivity;

import android.os.Bundle;
import android.view.View;
import android.widget.Button;
import android.widget.Toast;

public class MainActivity extends AppCompatActivity {

    @Override
    protected void onCreate(Bundle savedInstanceState) {
        super.onCreate(savedInstanceState);
        setContentView(R.layout.activity_main);

        Button button=findViewById(R.id.button);
        button.setOnClickListener(new View.OnClickListener() {
            @Override
            public void onClick(View v) {
                asyncTask a=new asyncTask();
                a.execute("Gmailのアカウント名(@gmail.comの前まで)",
                        "Gmailのパスワード","テストタイトル","送信完了\n本文をここに記述する") ;
            }
        });
    }

    private class asyncTask extends android.os.AsyncTask{
        protected String account;
        protected String password;
        protected String title;
        protected String text;

        @Override
        protected Object doInBackground(Object... obj){
            account=(String)obj[0];
            password=(String)obj[1];
            title=(String)obj[2];
            text=(String)obj[3];

            java.util.Properties properties = new java.util.Properties();
            properties.put("mail.smtp.host", "smtp.gmail.com");
            properties.put("mail.smtp.auth", "true");
            properties.put("mail.smtp.port", "465");
            properties.put("mail.smtp.socketFactory.post", "465");
            properties.put("mail.smtp.socketFactory.class", "javax.net.ssl.SSLSocketFactory");

            final javax.mail.Message msg = new javax.mail.internet.MimeMessage(javax.mail.Session.getDefaultInstance(properties, new javax.mail.Authenticator(){
                @Override
                protected javax.mail.PasswordAuthentication getPasswordAuthentication() {
                    return new javax.mail.PasswordAuthentication(account,password);
                }
            }));

            try {
                msg.setFrom(new javax.mail.internet.InternetAddress(account + "@gmail.com"));
                //自分自身にメールを送信
                msg.setRecipients(javax.mail.Message.RecipientType.TO, javax.mail.internet.InternetAddress.parse(account + "@gmail.com"));
                msg.setSubject(title);
                msg.setText(text);

                javax.mail.Transport.send(msg);

            } catch (Exception e) {
                return (Object)e.toString();
            }

            return (Object)"送信が完了しました";

        }
        @Override
        protected void onPostExecute(Object obj) {
            //画面にメッセージを表示する
            Toast.makeText(MainActivity.this,(String)obj,Toast.LENGTH_LONG).show();
        }
    }
}
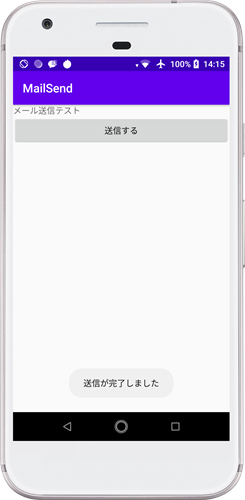
 実行した様子
「送信する」ボタンをタップすると、メールが送信されます。
送信が完了すると、トーストが表示されます。
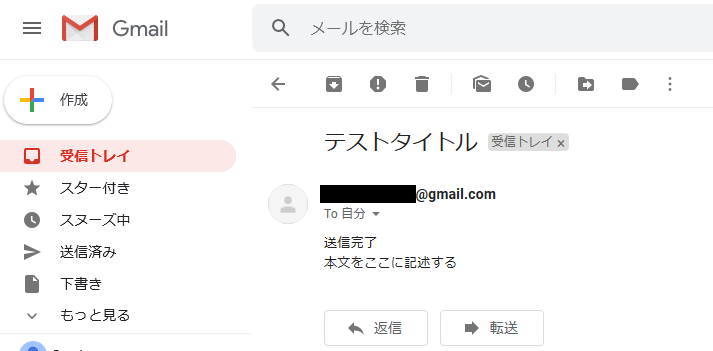
受信を確認した様子
 参考サイト
参考サイト
https://it-engineer-info.com/language/android-app/2142/
http://7ujm.net/android/javamail.html
https://stackoverflow.com/questions/32103337/android-studio-noclassdeffounderror