はじめに
Part5 まででコンテナアプリケーションの自動スケーリングまで実現しましたが、今回は GitHub Actions による CI/CD パイプラインとVPC Endpoints の無効化によるコスト削減を実装します。
これまでの記事
- Part1: VPC 基盤インフラ構築
- Part2: HTTPS 対応
- Part3: ECS Fargate でアプリケーション稼働
- Part4: FARGATE_SPOT でコスト最適化
- Part5: 時間ベース Auto Scaling でさらなるコスト削減
- Part6(本記事): GitHub Actions OIDC 認証 + VPC Endpoints 削減 ← 今ここ
対象読者
- GitHub Actions で AWS へデプロイしたい方
- OIDC 認証によるシークレットキー不要のデプロイに興味がある方
- VPC Endpoints のコストを削減したい方
- セキュリティとコストのトレードオフを理解したい方
概要
今回は大きく分けて 2 つの改善を実施しました。
1. GitHub Actions OIDC 認証によるセキュアな CI/CD
従来の課題:
- AWS アクセスキーを GitHub Secrets に保存
- シークレットキーの漏洩リスク
- 定期的なローテーションが必要
OIDC 認証の利点:
- シークレットキー不要(GitHub が発行する一時トークン使用)
- 短期間トークン(デフォルト 1 時間で自動失効)
- リポジトリ/ブランチ制限(特定のリポジトリのみ許可)
- 最小権限の原則(必要な権限のみ付与)
2. VPC Endpoints 削減による $21.90/月 コスト削減
変更前:
- Private Subnet + VPC Endpoints 構成
- 月額 $21.90 の固定費
変更後:
- Public Subnet + Public IP 構成
- VPC Endpoints 不要
トレードオフ:
- コスト削減: $21.90/月
- セキュリティ: インターネット経由でのアクセス
開発環境
ローカル環境
| 項目 | バージョン/内容 |
|---|---|
| OS | Windows 11 |
| Terraform | v1.6.0 以上 |
| AWS CLI | v2.13.0 以上 |
AWS 環境
| 項目 | 内容 |
|---|---|
| リージョン | ap-northeast-1(東京) |
| ECS クラスター | app-cluster |
| GitHub リポジトリ | RYA234/typescript-container |
構成図
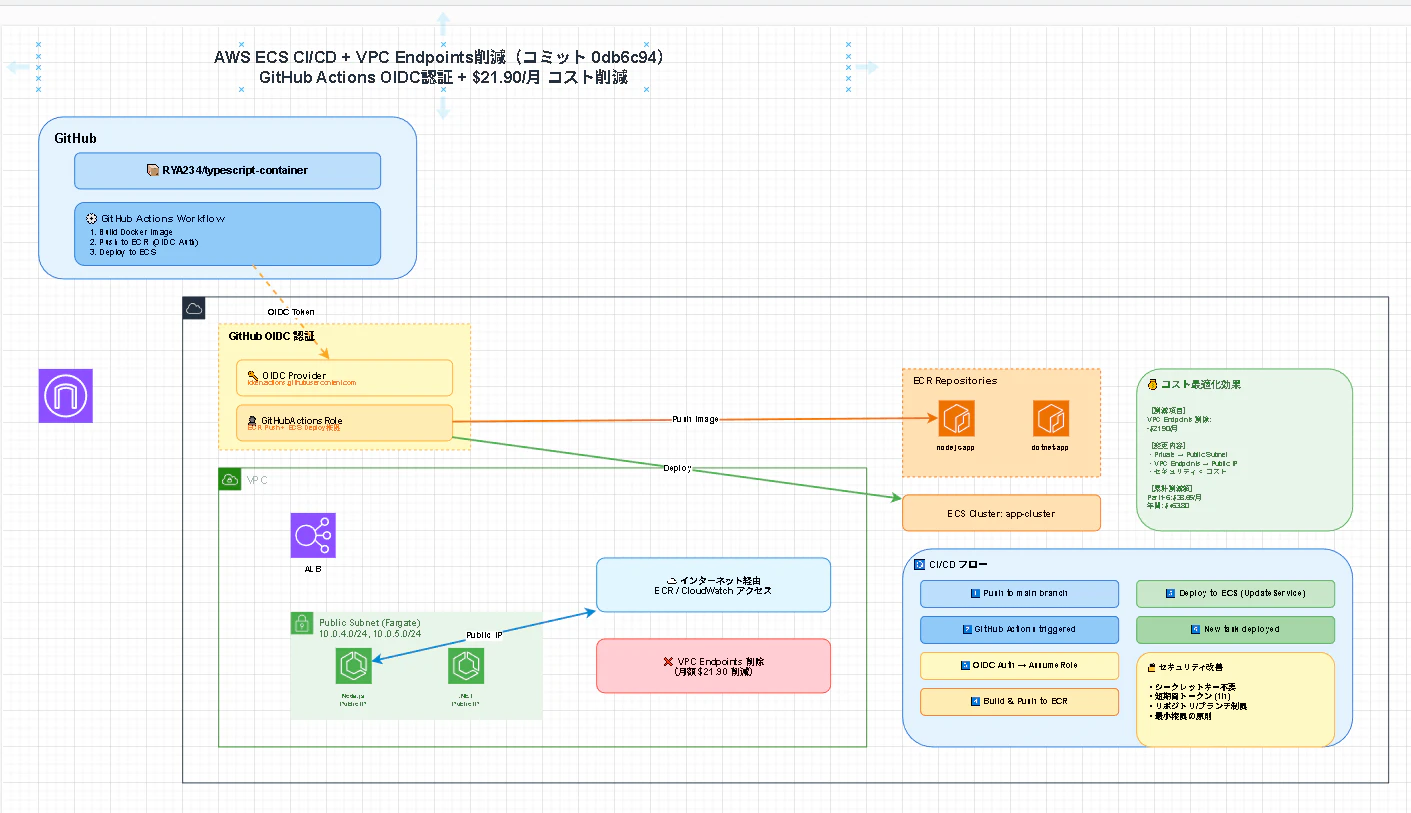
変更点
変更前(Part5):
Private Subnet (10.0.2.0/24)
  ↓
VPC Endpoints (ECR API, ECR DKR, S3, CloudWatch Logs)
  ↓
AWS Services

コスト: $21.90/月
変更後(Part6):
Public Subnet (10.0.4.0/24, 10.0.5.0/24)
  ↓
Public IP
  ↓
Internet Gateway
  ↓
AWS Services

コスト: $0/月
今回実現したこと
1. GitHub Actions OIDC 認証の実装
OIDC Provider の作成
# GitHub Actions OIDC プロバイダー
# GitHub が発行する OIDC トークンを AWS が検証するためのプロバイダー
resource "aws_iam_openid_connect_provider" "github_actions" {
  url = "https://token.actions.githubusercontent.com"

  # GitHub Actions の OIDC エンドポイント
  client_id_list = [
    "sts.amazonaws.com"
  ]

  # GitHub の証明書フィンガープリント(公式値)
  thumbprint_list = [
    "6938fd4d98bab03faadb97b34396831e3780aea1",
    "1c58a3a8518e8759bf075b76b750d4f2df264fcd"
  ]

  tags = {
    Name = "github-actions-oidc-provider"
  }
}
ポイント:
-
url: GitHub Actions の OIDC エンドポイント -
client_id_list:sts.amazonaws.com固定 -
thumbprint_list: GitHub の公式証明書フィンガープリント
IAM Role の作成(Trust Policy)
resource "aws_iam_role" "github_actions" {
  name        = "GitHubActionsRole"
  description = "Role for GitHub Actions to deploy to ECS via OIDC"

  # 信頼ポリシー: どの GitHub リポジトリからこのロールを Assume できるか
  assume_role_policy = jsonencode({
    Version = "2012-10-17"
    Statement = [
      {
        Effect = "Allow"
        Principal = {
          Federated = aws_iam_openid_connect_provider.github_actions.arn
        }
        Action = "sts:AssumeRoleWithWebIdentity"
        Condition = {
          StringEquals = {
            # OIDC トークンの audience 検証
            "token.actions.githubusercontent.com:aud" = "sts.amazonaws.com"
          }
          StringLike = {
            # リポジトリとブランチを制限
            "token.actions.githubusercontent.com:sub" = [
              "repo:RYA234/typescript-container:ref:refs/heads/main"
            ]
          }
        }
      }
    ]
  })

  # セッション継続時間(1時間)
  max_session_duration = 3600
}
Trust Policy の重要ポイント:
- Principal.Federated: OIDC Provider の ARN を指定
-
Action:
sts:AssumeRoleWithWebIdentityで一時トークン発行 -
Condition.StringEquals: audience 検証(
sts.amazonaws.com) -
Condition.StringLike: リポジトリ・ブランチ制限
- フォーマット:
repo:OWNER/REPO:ref:refs/heads/BRANCH - 例:
repo:RYA234/typescript-container:ref:refs/heads/main
- フォーマット:
ECR プッシュ権限
resource "aws_iam_policy" "github_actions_ecr" {
  name = "GitHubActionsECRPolicy"

  policy = jsonencode({
    Version = "2012-10-17"
    Statement = [
      {
        Effect = "Allow"
        Action = [
          "ecr:GetAuthorizationToken",           # ECR ログイン
          "ecr:BatchCheckLayerAvailability",     # レイヤー確認
          "ecr:GetDownloadUrlForLayer",          # レイヤーダウンロード
          "ecr:BatchGetImage",                   # イメージ取得
          "ecr:PutImage",                        # イメージプッシュ
          "ecr:InitiateLayerUpload",             # アップロード開始
          "ecr:UploadLayerPart",                 # アップロード
          "ecr:CompleteLayerUpload"              # アップロード完了
        ]
        Resource = "*"
      }
    ]
  })
}
注意: ecr:GetAuthorizationToken はリソース指定不可のため "*" を使用
GitHub Actions Workflow 例
name: Deploy to ECS

on:
  push:
    branches: [main]

permissions:
  id-token: write  # OIDC トークン取得に必須
  contents: read

jobs:
  deploy:
    runs-on: ubuntu-latest

    steps:
      - name: Checkout
        uses: actions/checkout@v3

      - name: Configure AWS Credentials
        uses: aws-actions/configure-aws-credentials@v2
        with:
          role-to-assume: arn:aws:iam::123456789012:role/GitHubActionsRole
          aws-region: ap-northeast-1

      - name: Login to Amazon ECR
        id: login-ecr
        uses: aws-actions/amazon-ecr-login@v1

      - name: Build and Push Docker Image
        env:
          ECR_REGISTRY: ${{ steps.login-ecr.outputs.registry }}
          ECR_REPOSITORY: nodejs-app
          IMAGE_TAG: ${{ github.sha }}
        run: |
          docker build -t $ECR_REGISTRY/$ECR_REPOSITORY:$IMAGE_TAG .
          docker push $ECR_REGISTRY/$ECR_REPOSITORY:$IMAGE_TAG

      - name: Deploy to ECS
        run: |
          aws ecs update-service \
            --cluster app-cluster \
            --service nodejs-service \
            --force-new-deployment
重要ポイント:
-
permissions.id-token: writeが必須 -
role-to-assumeに GitHubActionsRole の ARN を指定 - シークレットキー不要
2. VPC Endpoints の無効化
変更後の構成
# Public Subnet(新規作成)
resource "aws_subnet" "public_fargate_1a" {
  vpc_id                  = aws_vpc.main.id
  cidr_block              = "10.0.4.0/24"
  availability_zone       = "ap-northeast-1a"
  map_public_ip_on_launch = true
}

resource "aws_subnet" "public_fargate_1c" {
  vpc_id                  = aws_vpc.main.id
  cidr_block              = "10.0.5.0/24"
  availability_zone       = "ap-northeast-1c"
  map_public_ip_on_launch = true
}

# VPC Endpoints 削除(vpc_endpoints.tf → vpc_endpoints.tf.disabled)

# ECS Service(Public Subnet)
resource "aws_ecs_service" "nodejs" {
  network_configuration {
    subnets          = [aws_subnet.public_fargate_1a.id]
    assign_public_ip = true  # Public IP 経由でアクセス
  }
}
変更のポイント:
- Private Subnet → Public Subnet に変更
- assign_public_ip = false → true に変更
- VPC Endpoints 削除 (vpc_endpoints.tf.disabled に移動)
- インターネット経由 で ECR / CloudWatch にアクセス
技術的なポイント
ポイント1: OIDC トークンの仕組み
1. GitHub Actions がワークフロー実行
   ↓
2. GitHub が OIDC トークンを発行
   (トークンにリポジトリ情報が含まれる)
   ↓
3. AWS に AssumeRoleWithWebIdentity リクエスト
   ↓
4. AWS が OIDC Provider で GitHub のトークンを検証
   ↓
5. Trust Policy の Condition をチェック
   (リポジトリ・ブランチが一致するか)
   ↓
6. 一時認証情報を発行(有効期間 1 時間)
   ↓
7. GitHub Actions が AWS リソースにアクセス
セキュリティ上の利点:
- シークレットキーが GitHub Secrets に保存されない
- トークンは 1 時間で自動失効
- リポジトリ・ブランチ制限で不正アクセス防止
ポイント2: VPC Endpoints vs Public IP のコスト比較
VPC Endpoints(Interface Endpoint)のコスト:
$0.01/時間 × 3 エンドポイント × 24h × 30日 = $21.60/月
  + データ処理料金: 約 $0.30/月
合計: 約 $21.90/月
Public IP のコスト:
固定費: $0/月
データ転送料: 約 $0.10/月(ECR pull, CloudWatch Logs)
合計: 約 $0.10/月
削減額: $21.90 - $0.10 = $21.80/月
ポイント3: セキュリティのトレードオフ
VPC Endpoints 使用時(エンタープライズ構成):
- ✅ インターネット経由しない(セキュア)
- ✅ AWS サービスへのアクセスが VPC 内完結
- ✅ コンプライアンス要件を満たしやすい
- ❌ 月額 $21.90 の固定費
Public IP 使用時(コスト重視構成):
- ✅ 月額 $21.90 削減
- ✅ シンプルな構成
- ❌ インターネット経由でアクセス
- ❌ セキュリティグループで厳重な制御が必要
判断基準:
- 商用環境: VPC Endpoints 推奨(セキュリティ優先)
- 学習・ポートフォリオ: Public IP 推奨(コスト優先)
コスト試算
Part5 からの変更
| 項目 | Part5 | Part6 | 削減額 |
|---|---|---|---|
| VPC Endpoints | $21.90 | $0 | $21.90 |
| データ転送料 | $0 | $0.10 | -$0.10 |
| 合計削減 | $21.80 |
全体コスト(月額)
| サービス | 詳細 | Part5 | Part6 | 削減額 |
|---|---|---|---|---|
| ALB | 時間料金 + LCU | $20.00 | $20.00 | $0 |
| VPC Endpoint | Interface × 3 | $21.90 | $0 | $21.90 |
| ECS Fargate | 3 サービス(17h) | $8.92 | $8.92 | $0 |
| ECR | イメージ保存 | $0.50 | $0.50 | $0 |
| CloudWatch Logs | 7 日保持 | $3.26 | $3.26 | $0 |
| データ転送料 | Public IP | $0 | $0.10 | -$0.10 |
| 合計 | $54.58 | $32.78 | $21.80 |
削減率: 約 40%
Part1 からの累計削減効果
| 項目 | Part1(想定) | Part6(現在) | 削減額 |
|---|---|---|---|
| NAT Gateway → VPC Endpoints | $32 → $21.90 | → $0 | $32.00 |
| ECS(SPOT) | - | -$3.63 | $3.63 |
| ECS(時間制御) | - | -$3.02 | $3.02 |
| 合計削減額 | $38.65/月 | ||
| 年間削減額 | $463.80/年 |
CI/CD フロー
デプロイの流れ
1️⃣ main ブランチに Push
   ↓
2️⃣ GitHub Actions Workflow triggered
   ↓
3️⃣ OIDC Auth → AssumeRole
   (GitHub が OIDC トークン発行 → AWS が検証)
   ↓
4️⃣ Build & Push to ECR
   (Docker イメージをビルドして ECR にプッシュ)
   ↓
5️⃣ Deploy to ECS (UpdateService)
   (ECS サービスを更新して新しいタスクをデプロイ)
   ↓
6️⃣ New task deployed
   (ALB のヘルスチェック完了後にトラフィック切り替え)
デプロイ時間
合計: 約 5-7 分
  - Docker Build: 2-3 分
  - ECR Push: 1-2 分
  - ECS Deploy: 2-3 分
感想
学んだこと
1. OIDC 認証の仕組みが理解できた
Trust Policy の重要性:
Condition = {
  StringLike = {
    "token.actions.githubusercontent.com:sub" = [
      "repo:RYA234/typescript-container:ref:refs/heads/main"
    ]
  }
}
この1行で、特定のリポジトリの特定のブランチのみ が AWS リソースにアクセスできるように制限できます。
2. コストとセキュリティのトレードオフ
結論: 環境に応じて使い分けることが重要
3. Terraform の柔軟性
vpc_endpoints.tf を .disabled にリネームするだけで、簡単に有効/無効を切り替えられます。
# 無効化
mv vpc_endpoints.tf vpc_endpoints.tf.disabled

# 有効化
mv vpc_endpoints.tf.disabled vpc_endpoints.tf
苦労した点
-
OIDC Trust Policy の記述
- リポジトリ名の形式が分かりにくかった
-
repo:OWNER/REPO:ref:refs/heads/BRANCHの形式を理解するのに時間がかかった
-
Public Subnet への移行
- subnet_ids と assign_public_ip を同時に変更する必要がある
- 変更順序を間違えると ECS タスクが起動しない
参考資料
AWS 公式ドキュメント
GitHub ドキュメント
読んだ本
- AWS コンテナ設計・構築本格入門
まとめ
この記事で実現したこと
- ✅ GitHub Actions OIDC 認証によるセキュアな CI/CD
- ✅ シークレットキー不要のデプロイ
- ✅ VPC Endpoints 削減で $21.90/月 コスト削減
- ✅ Public Subnet 構成への移行
- ✅ Terraform による完全な IaC 化
コスト削減効果
- 月額 $21.80 削減(約 40% 削減)
- 年間 $261.60 削減
Part1 からの累計削減
- 月額 $38.65 削減
- 年間 $463.80 削減
次のステップ
- 🔧 CloudWatch Alarms + SNS 通知の構築
- 🔧 Dashboard による可視化
- 🔧 本番環境への移行検討(VPC Endpoints 再導入)