Automation Anywhere Enterprise v11.xを知っている人であれば、「v11.xはローカルPCから.atmxファイルをダブルクリックすればロボットが起動したよな、A2019はどうなんだろう」と思うでしょう。特に、WinActorやUiPathも含めてデスクトップ型RPAに慣れている人は、ローカルPCでロボットを起動することに慣れているのではないでしょうか。Automation Anywhereはv11.xではEnterprise Clientで一部デスクトップ型RPAっぽい動きが残っていた (ローカルPCからのロボット起動、スケジュール、トリガーなど) のが、バージョンがA2019になって本格的にサーバー型RPAの動作になった部分があるようで、すべてがControl Room側の操作に切り替わりました。ただ、今までの動作を継続したい人は困ってしまいますね。
これは、ローカルPCからControl Room APIと呼ばれるサーバー側のREST APIをコールする仕組みを作ることにより解消されます。今回も、Control Room APIを呼ぶスクリプトをローカルPC側で実装することにより解決を試みます。スクリプトを.exe化すれば、より手軽にローカルPC側から操作が可能になります。
やりたいこと
v11.xではBot Creator権限を持っている人であれば自分が開発したBotをそのままクライアントから実行、というデスクトップ型RPAっぽい実行方法が可能でした。A2019でもUnattended Bot Runner権限を持っている人向けに、ローカルPCのコマンドからControl Room APIを呼び出してBotを実行できるようにします。

- 実行するBot: "Messagebox"
- 実行するユーザー: "runuser"
実行するための要件
API経由でBot Agentに指令を出すためのUnattended Bot Runner権限のアカウントを作っておきます。(Bot CreatorやAttended Bot Runnerは不可)
※Community Editionやフリートライアル版では実行ができません。クラウド版またはオンプレミス版の有償版が必要となります。
また、実行したいBotは非公開リポジトリから公開リポジトリにチェックインしておく必要があります。(Unattended Bot Runnerユーザーからは公開リポジトリしか見えない)
Unattended Bot Runner権限を設定するユーザーには、ロールで必要なBotフォルダーへのアクセス権を付与しておいてください。このユーザーにはデフォルトデバイスを設定し、そのデバイスはBot Creator権限のユーザーと同じものでないものを指定してください。実行するデバイスにはパスワードが設定されており、Unattended Bot Runner権限を設定するユーザーにデバイスのユーザー名とパスワードが正しく設定されている必要があります。

APIを呼ぶときに使用するアカウントは、Botを実行の権限を持っている必要があります。
curlコマンドは元々Linuxのコマンドですが、Windows 10でもApril 2018 Updateから標準コマンドとなっており、特に追加インストールなく実行できます。もしこの要件を満たしていないOSでcurlコマンドを使いたい場合は、必要なモジュールをダウンロードしてインストールしてください。
また、curlコマンドで返されるJSONをコマンドラインで加工するjqコマンドはWindowsでは標準では実装されていないため、ここからWindows版 (jq-win64)をダウンロードして、パスが通る場所にコピーしておきます。
Control Room APIをSwagger UIでテストしてみる
http(s)://(A2019ControlRoomURL)/Swagger/を見てみると、以下の画面が表示され、利用可能なControl Room API一覧を見ることができます。(A2019.13相当)

この中で、以下の順番にAPIを呼び出します。(v11から変更になっています。Botファイルとユーザーについて、名前からIDを検索する必要があるのが、2ステップ増えています)
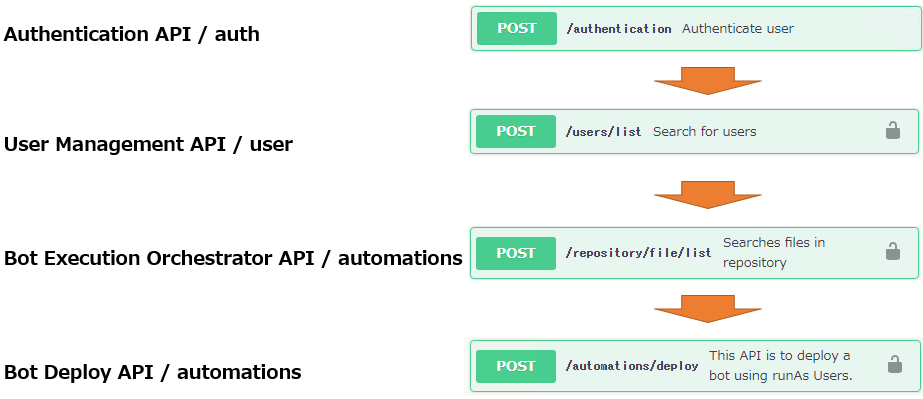
Swagger UIによる操作方法
- まず、Authentication APIのページを開きます。(上記①のリンク)
http(s)://(A2019ControlRoomURL)/swagger/ui/?url=/swagger/api/v1/auth-api-supported.yaml
開いた後のページ内でSchemesでHTTP/HTTPSの適切なほうを選択した後、/authentication(ユーザーに権限を与える)メソッドのセクションを開いて、「Try it out」ボタンを押します。
- body部分が編集できるようになるので、apiKeyを消して、username、passwordに適切なユーザー名とパスワードを指定して、「Execute」ボタンを押します。
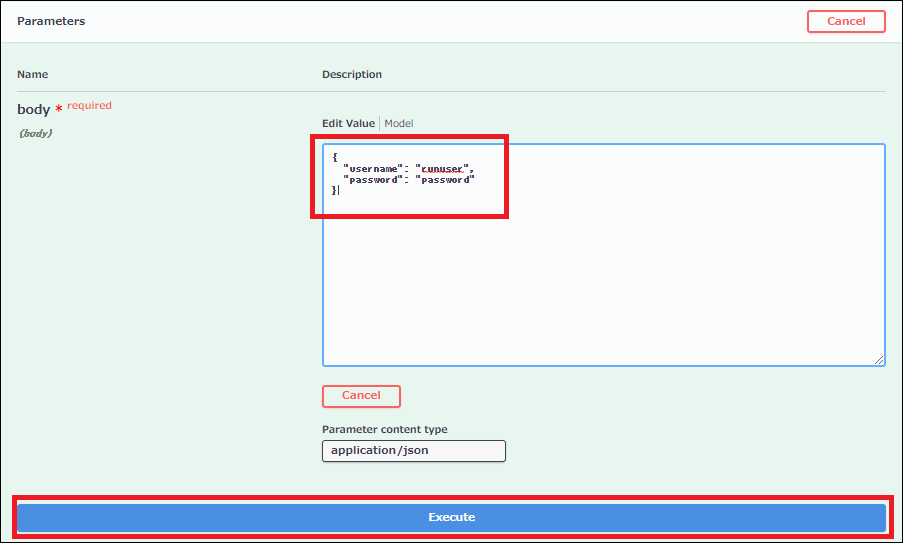
- 正常に実行されると、Response部分にapiKeyが返ります。下記の図のtokenの内容 ("
eyJ...zHg"の部分です。) をクリップボードにコピーしておきます。このtoken (apiKey)は同じユーザーでControl Roomにサインインすると期限が切れてしまうので注意してください。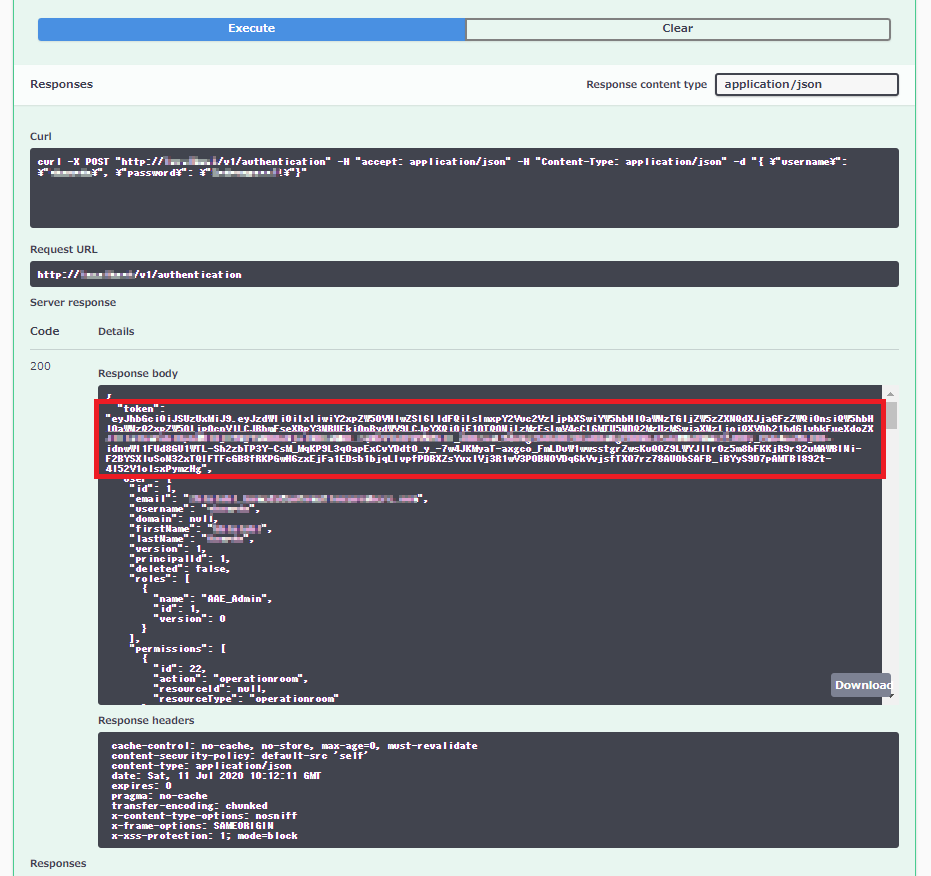
- 次に、User Management APIのページを開きます。(上記②のリンク)
http(s)://(A2019ControlRoomURL)/swagger/ui/?url=/swagger/api/v1/um-api-supported.yaml
開いた後のページ内でSchemesでHTTP/HTTPSの適切なほうを選択した後、「Authorize」ボタンを押します。
- 開いたダイアログボックスで、先ほどクリップボードにコピーしておいたtoken (apiKey) をValueにペーストして「Authorize」ボタンを押します。
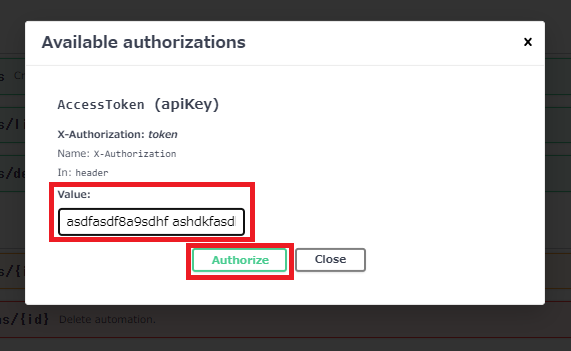
- 「Close」ボタンを押してダイアログボックスを終了します。
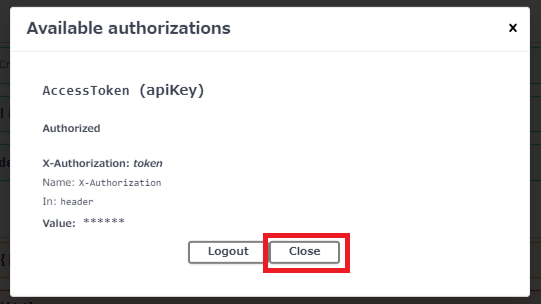
これにより、「Authorize」ボタンの中の鍵のアイコンが、はずれた状態からかかった状態になります。
-
/users/list(ユーザーの検索)メソッドのセクションを開いて「Try it out」ボタンを押します。
- body部分が編集できるようになるので、以下の値を入れて「Execute」ボタンを押します。
{
 "filter": {
   "operator": "eq",
   "value": "runuser",
   "field": "username"
 }
}
すると、戻り値として以下の値が返ります。ここではrunuserのuserId=4であることがわかります。
{
 "page": {
   "offset": 0,
   "total": 3,
   "totalFilter": 1
 },
 "list": [
   {
     "id": 4,
     "username": "runuser",
     "domain": "",
     "firstName": "",
     "lastName": "",
     "version": 16,
     "principalId": 4,
     "email": "runuser@admin.com",
     "emailVerified": true,
     "passwordSet": true,
     "questionsSet": true,
     "enableAutoLogin": false,
     "disabled": false,
     "clientRegistered": false,
     "description": "",
     "createdBy": 2,
     "createdOn": "2020-07-11T14:42:27.700Z",
     "updatedBy": 1,
     "updatedOn": "2020-07-11T17:34:56.230Z",
     "licenseFeatures": [
       "RUNTIME"
     ],
     "roles": [
       {
         "id": 2,
         "name": "AAE_Basic"
       },
       {
         "id": 20,
         "name": "SuperUser"
       }
     ],
     "deleted": false
   }
 ]
}
- 次に、Bot Execution Orchestrator APIのページを開きます。(上記③のリンク)
http(s)://(A2019ControlRoomURL)/swagger/ui/?url=/swagger/api/v2/bot-execution-orchestrator-api-supported.yaml
開いた後のページ内でSchemesでHTTP/HTTPSの適切なほうを選択した後、「Authorize」ボタンを押して同様にapiKeyで認証します。
-
/repository/file/list(リポジトリ内のファイル検索)メソッドのセクションを開いて「Try it out」ボタンを押します。
- body部分が編集できるようになるので、以下の値を入れて「Execute」ボタンを押します。
{
 "filter": {
   "operator": "eq",
   "value": "MessageBox",
   "field": "name"
 }
}
すると、戻り値として以下の値が返ります。ここではMessageBoxのfileId=31であることがわかります。
{
 "page": {
   "offset": 0,
   "total": 11,
   "totalFilter": 1
 },
 "list": [
   {
     "id": "31",
     "parentId": "9",
     "name": "MessageBox",
     "permission": {
       "delete": true,
       "download": true,
       "execute": false,
       "upload": true,
       "run": true,
       "publishBotstore": false
     },
     "lastModified": "2020-07-11T15:15:05.009218600Z",
     "lastModifiedBy": "2",
     "path": "Automation Anywhere\\Bots\\MessageBox",
     "directory": false,
     "size": "0",
     "locked": false
   }
 ]
}
- 次に、Bot Deploy APIのページを開きます。(上記④のリンク)
http(s)://(A2019ControlRoomURL)/swagger/ui/?url=/swagger/api/v3/deploy-api-supported.yaml
開いた後のページ内でSchemesでHTTP/HTTPSの適切なほうを選択した後、「Authorize」ボタンを押して同様にapiKeyで認証します。
-
/automations/deploy(別ユーザーでオートメーションを展開する)メソッドのセクションを開いて「Try it out」ボタンを押します。
- body部分が編集できるようになるので、以下の値を入れて「Execute」ボタンを押します。後の引数は消します。(ここでbotInput配下を指定すると、Botに入力変数を引数として渡すことも可能です)
{
 "fileId": "31",
 "status": "ACTIVE",
 "rdpEnabled": false,
 "setAsDefaultDevice": false,
 "poolIds": [],
 "workspaceName": "public",
 "runAsUserIds": ["4"],
 "scheduleType": "INSTANT"
}
正常に実行されると、しばらくして指定されたデバイスのBot Agent上でBotが実行されます。(デバイスのロック、ログインから始まる) 戻り値としては以下のような値が返ります。
{
 "deploymentId": "dff7910e-020f-4617-9bc9-b6324ced0bdd"
}
エラーコード/エラーメッセージ
実行するにあたって遭遇したエラーと回避策を書いておきます。これ、この粒度ではどこにも記載がなく、苦労しました。。。
| エラーコード | メッセージ | 状況と回避策 |
|---|---|---|
| 400 |
Error: Bad Request "code": "json.deserialization.exception", "details": null, "message": "Invalid request parameters" |
文法が間違っている。 |
| 401 |
Error: Unauthorized "code": "UM1110", "details": "This may be due to a misspelling or because your Caps Lock is on. To continue, please retype your username and password.", "message": "Either your username or your password is incorrect" |
指定したユーザー名かパスワードが間違っている、またはデバイスにパスワードが設定されていない |
| 401 |
Error: Unauthorized "code": "code": "UM1111", "details": "To be safe, we logged you out. Please login again.", "message": "Your session expired" |
セッションが期限切れ、再ログインが必要 |
| 401 |
Error: Unauthorized "code": "UM1117", "details": null, "message": "Access token expected in the 'X-Authorization' header" |
APIを呼ぶ際にサインインがされていない |
| 401 |
Error: Unauthorized "code": "UM9999", "details": null, "message": "An unexpected problem occurred." |
指定したapiKeyが正しくないか、期限が切れている |
| 500 |
Error:Internal Server Error "message": "PERMISSION_DENIED: User (user name) does not have permission to run as user(s): [GUID]" |
指定されたユーザーで実行する権限を持っていない、権限を付与するか別のユーザーを使う |
| 500 |
Error:Internal Server Error "message": "UNKNOWN" |
指定されたfileIdのファイルが存在しない |
| 500 |
Error:Internal Server Error "message": "UNKNOWN: devicemanagement.exception.user.not.found" |
指定されたuserIdのユーザーが存在しない |
正常に終了すると以下が返ります。
| コード | メッセージ |
|---|---|
| 200 | "deploymentId": "GUID" |
curlとバッチファイルを使ってローカルPCからの実行を実装
Swagger UIの操作中に、同等の操作をコマンドラインからcurlを使って行う文法が表示されています。これをコピペしてバッチファイルに仕込むと、ローカルPCから一発のダブルクリックでBotを実行することができます。
今回の操作をまとめると以下のファイルとなります。
@SET crurl=%~1
@SET username=%~2
@SET password=%~3
@SET filename=%~4
@SET user=%~5
@curl -s -X POST "%crurl%/v1/authentication" -H "accept: application/json" -H "Content-Type: application/json" -d "{ \"username\": \"%username%\", \"password\": \"%password%\"}" | jq-win64 -r .token > %TMP%\tmp.txt
@SET /p token=<%TMP%\tmp.txt
@DEL %TMP%\tmp.txt
@curl -s -X POST "%crurl%/v1/usermanagement/users/list" -H "accept: application/json" -H "X-Authorization: %token%" -H "Content-Type: application/json" -d "{ \"filter\": { \"operator\": \"eq\", \"value\": \"%user%\", \"field\": \"username\" }}" | jq-win64 -r .list[].id > %TMP%\tmp.txt
@SET /p userid=<%TMP%\tmp.txt
@DEL %TMP%\tmp.txt
@curl -s -X POST "%crurl%/v2/repository/file/list" -H "accept: application/json" -H "X-Authorization: %token%" -H "Content-Type: application/json" -d "{ \"filter\": { \"operator\": \"eq\", \"value\": \"%filename%\", \"field\": \"name\" }}" | jq-win64 -r .list[].id > %TMP%\tmp.txt
@SET /p fileid=<%TMP%\tmp.txt
@DEL %TMP%\tmp.txt
@curl -X POST "%crurl%/v3/automations/deploy" -H "accept: application/json" -H "X-Authorization: %token%" -H "Content-Type: application/json" -d "{ \"fileId\": \"%fileid%\", \"status\": \"ACTIVE\", \"rdpEnabled\": false, \"setAsDefaultDevice\": false, \"poolIds\": [], \"workspaceName\": \"public\", \"runAsUserIds\": [\"%userid%\"], \"scheduleType\": \"INSTANT\"}"
@pause
コマンドラインから以下のように引数を付けて呼び出します。
Automate.cmd (Control Room URL) (username) (password) (filename) (user)
メモ
- コマンドライン引数に
%~1などの「チルダ」を付けると、引数全体が引用符で囲われている場合は引用符が削除されたものを参照します。 - Swagger UIで生成されるcurlコマンドにサイレントオプション
-sを付けています。 - jq-win64にはcurlコマンドからパイプでJSONを渡します。
-rオプションを付けると外側で囲っている引用符が削除されたものを返します。 - コマンドプロンプトでは、標準出力 (stdout)の内容を変数に直接代入できないため、一旦一時ファイル ("
%TMP%\tmp.txt")に結果を出力して、そのファイルの内容を次の行のSET /pコマンドで変数に代入します。
Automate.cmdを実行すると、正常に実行されると指定したBotが起動します。
まとめ
Botのローカル実行に相当することをA2019のUnattended Bot RunnerでもAPI経由で実行できることが確認できました!サーバー型RPAとしてのBot実行の様式を、API経由で試してみてください。
参考情報
- A2019でAPI<基本の4選> by @stig さん
