前書き
私が勉強中のOracle DatabaseについてVirtualBox環境でセットアップ・各種操作等を行った際のメモです。
- 記事一覧 Oracle実験室 / Oracle Restart環境構築 (19.3)
- 前の記事 Oracle実験室 / CentOS7.x 初期設定
- 次の記事 Oracle実験室 / Oracle Database 19c (19.3) インストール
Oracle Database 19c Grid Infrastructure (19.3) インストール
MinimalインストールしたCentOS 7.xにインストールしたGrid Infrastructure 19cをインストールします。
準備
作業用ディレクトリ作成
- ダウンロードファイル用の一時用作業ディレクトリを作成します。
# mkdir -p /tmp/work
# chmod -R 777 /tmp/work
# cd /tmp/work
ダウンロード
- ダウンロードしたファイルは"/tmp/work"に配置します。
Oracle Database 19c Grid Infrastructure (19.3) for Linux x86-64
https://www.oracle.com/database/technologies/oracle19c-linux-downloads.html
OS設定変更
oracle-database-preinstallパッケージインストール
- 設定変更を容易にするため今回は「oracle-database-preinstall」を使用します。
必要に応じてプロキシサーバーを設定してください。
# cd /tmp/work
# curl -OL https://yum.oracle.com/repo/OracleLinux/OL7/latest/x86_64/getPackage/oracle-database-preinstall-19c-1.0-1.el7.x86_64.rpm
# yum -y localinstall oracle-database-preinstall-19c-1.0-1.el7.x86_64.rpm
パッケージインストール
# yum -y install gcc
# yum -y install gcc-c++
グループ作成
oracle-database-preinstallのインストールで作成されないASMのグループを追加します。
# groupadd -g 54327 asmdba
# groupadd -g 54328 asmoper
# groupadd -g 54329 asmadmin
ユーザー作成
gridユーザー作成
# /usr/sbin/useradd -u 54331 -g oinstall -G dba,asmdba,asmoper,asmadmin,racdba grid
# passwd grid
gridユーザーの.bash_profileへの追加環境設定
/home/grid/.bash_profileに追加します。
umask 022

export LANG=ja_JP.utf8
export NLS_LANG=Japanese_Japan.AL32UTF8
export ORACLE_BASE=/u01/app/grid
export ORACLE_HOME=${ORACLE_BASE}/product/19.3.0/grid
export ORACLE_SID=+ASM
export PATH=$ORACLE_HOME/bin:$ORACLE_HOME/OPatch:$PATH
export LD_LIBRARY_PATH=$ORACLE_HOME/lib:$LD_LIBRARY_PATH
oracleユーザー変更
# /usr/sbin/usermod          -g oinstall -G dba,oper,backupdba,dgdba,kmdba,asmdba,racdba oracle
# passwd oracle
oracleユーザーの.bash_profileへの追加環境設定
/home/oracle/.bash_profileに追加します。
umask 022

export LANG=ja_JP.utf8
export NLS_LANG=Japanese_Japan.AL32UTF8
export ORACLE_BASE=/u01/app/oracle
export ORACLE_HOME=$ORACLE_BASE/product/19.3.0/dbhome_1
export ORACLE_SID=ORCLCDB
export PATH=$ORACLE_HOME/bin:$ORACLE_HOME/OPatch:$PATH
export LD_LIBRARY_PATH=$ORACLE_HOME/lib:$LD_LIBRARY_PATH
ulimit設定
バックアップ
# cd /etc/security/limits.d; cp -p oracle-database-preinstall-19c.conf oracle-database-preinstall-19c.conf.BAK
# vi oracle-database-preinstall-19c.conf
編集
# oracle-database-preinstall-19c setting for nofile soft limit is 1024
oracle   soft   nofile    1024

# oracle-database-preinstall-19c setting for nofile hard limit is 65536
oracle   hard   nofile    65536

# oracle-database-preinstall-19c setting for nproc soft limit is 16384
# refer orabug15971421 for more info.
oracle   soft   nproc    16384

# oracle-database-preinstall-19c setting for nproc hard limit is 16384
oracle   hard   nproc    16384

# oracle-database-preinstall-19c setting for stack soft limit is 10240KB
oracle   soft   stack    10240

# oracle-database-preinstall-19c setting for stack hard limit is 32768KB
oracle   hard   stack    32768

# oracle-database-preinstall-19c setting for memlock hard limit is maximum of 128GB on x86_64 or 3GB on x86 OR 90 % of RAM
oracle   hard   memlock    134217728

# oracle-database-preinstall-19c setting for memlock soft limit is maximum of 128GB on x86_64 or 3GB on x86 OR 90% of RAM
oracle   soft   memlock    134217728

grid             soft    nproc           2047
grid             hard    nproc           16384
grid             soft    nofile          1024
grid             hard    nofile          65536
grid             soft    stack           12040
grid             hard    stack           32768
grid             soft    memlock         3145728
grid             hard    memlock         3145728

# End of file
hosts設定
バックアップ
# cd /etc/; cp -p hosts hosts.BAK
# vi hosts
編集
下記設定を追加する。
192.168.56.101 unryu
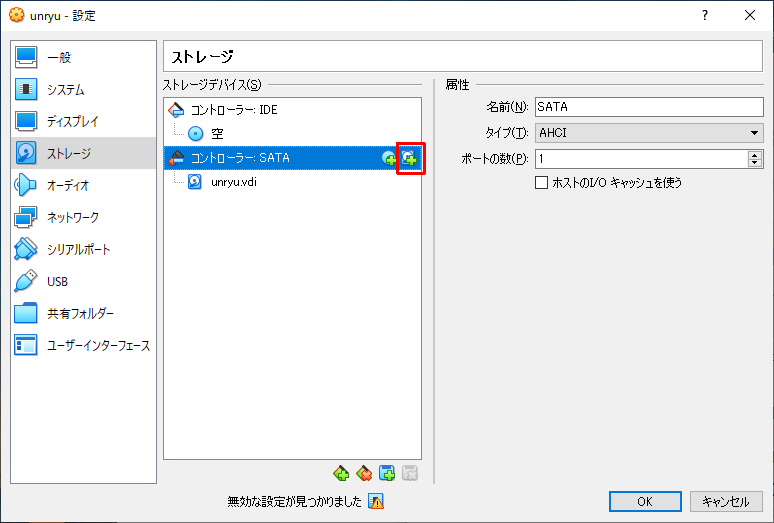
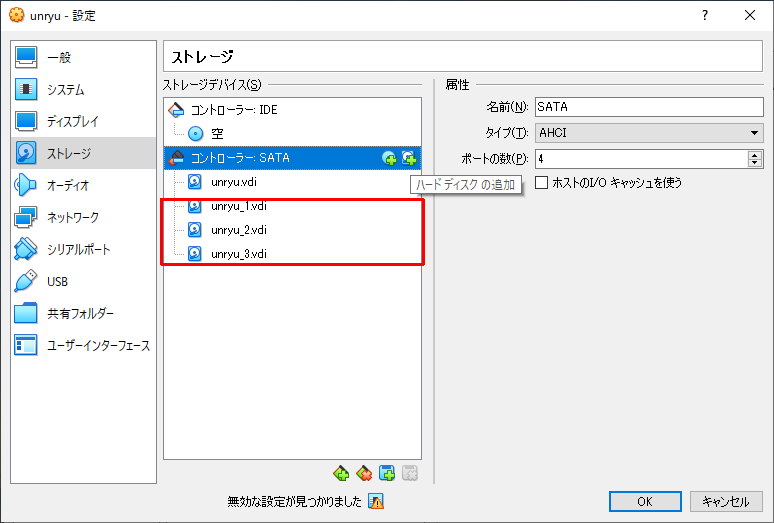
ASM用仮想HDDの追加・設定
仮想マシンをシャットダウンした状態で仮想HDDを作成します。
作成した仮想HDDを仮想マシンに割り当てた後に、仮想マシンを起動します。
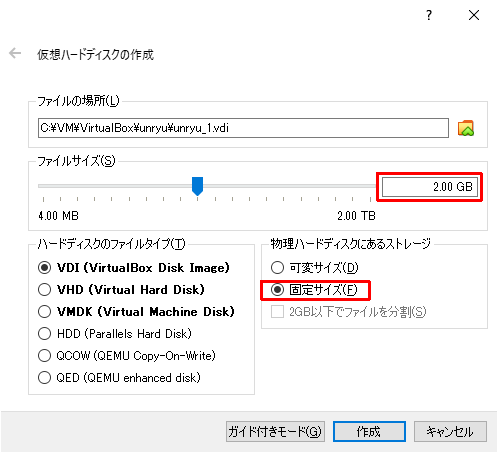
仮想HDD作成
- VirtualBoxでディスクを追加する。
| Devise File | ASM Disk | 概要 | サイズ |
|---|---|---|---|
| /dev/sdb | CRS | CRS記憶域 | 2GB |
| /dev/sdc | DATA | データ記憶域 | 100GB |
| /dev/sdd | FRA | 高速フラッシュバック領域 | 60GB |
- VirtualBoxでのディスク追加
以下の手順で、3つの仮想HDDを作成します。

ASMデバイス設定
追加した仮想HDDの状態確認
# export LANG=C; fdisk -l

WARNING: fdisk GPT support is currently new, and therefore in an experimental phase. Use at your own discretion.

Disk /dev/sda: 214.7 GB, 214748364800 bytes, 419430400 sectors
Units = sectors of 1 * 512 = 512 bytes
Sector size (logical/physical): 512 bytes / 4096 bytes
I/O size (minimum/optimal): 4096 bytes / 4096 bytes
Disk label type: gpt
Disk identifier: 70328DFB-945E-478D-BEB3-4843FC97CE7D


#         Start          End    Size  Type            Name
 1         2048       411647    200M  EFI System      EFI System Partition
 2       411648      2508799      1G  Microsoft basic
 3      2508800    354580479  167.9G  Linux LVM

Disk /dev/mapper/centos_taiho-root: 171.8 GB, 171798691840 bytes, 335544320 sectors
Units = sectors of 1 * 512 = 512 bytes
Sector size (logical/physical): 512 bytes / 4096 bytes
I/O size (minimum/optimal): 4096 bytes / 4096 bytes


Disk /dev/mapper/centos_taiho-swap: 8455 MB, 8455716864 bytes, 16515072 sectors
Units = sectors of 1 * 512 = 512 bytes
Sector size (logical/physical): 512 bytes / 4096 bytes
I/O size (minimum/optimal): 4096 bytes / 4096 bytes


Disk /dev/sdb: 2147 MB, 2147483648 bytes, 4194304 sectors
Units = sectors of 1 * 512 = 512 bytes
Sector size (logical/physical): 512 bytes / 4096 bytes
I/O size (minimum/optimal): 4096 bytes / 4096 bytes


Disk /dev/sdc: 107.4 GB, 107374182400 bytes, 209715200 sectors
Units = sectors of 1 * 512 = 512 bytes
Sector size (logical/physical): 512 bytes / 4096 bytes
I/O size (minimum/optimal): 4096 bytes / 4096 bytes


Disk /dev/sdd: 85.9 GB, 85899345920 bytes, 167772160 sectors
Units = sectors of 1 * 512 = 512 bytes
Sector size (logical/physical): 512 bytes / 4096 bytes
I/O size (minimum/optimal): 4096 bytes / 4096 bytes
パーティション作成
/dev/sdb, /dev/sdc, /dev/sddについて同じ操作を行います。
# export LANG=C; fdisk /dev/sdb
Welcome to fdisk (util-linux 2.23.2).

Changes will remain in memory only, until you decide to write them.
Be careful before using the write command.

Device does not contain a recognized partition table
Building a new DOS disklabel with disk identifier 0x7bface37.

Command (m for help): n  <-- 'n'を入力
Partition type:
   p   primary (0 primary, 0 extended, 4 free)
   e   extended
Select (default p): p  <-- 'p'を入力
Partition number (1-4, default 1): 1 <- '1'を入力
First sector (2048-4194303, default 2048):  <-- '<ENTER>'を入力
Using default value 2048
Last sector, +sectors or +size{K,M,G} (2048-4194303, default 4194303):  <-- '<ENTER>'を入力
Using default value 4194303
Partition 1 of type Linux and of size 2 GiB is set

Command (m for help): p  <-- 'p'を入力

Disk /dev/sdb: 2147 MB, 2147483648 bytes, 4194304 sectors
Units = sectors of 1 * 512 = 512 bytes
Sector size (logical/physical): 512 bytes / 512 bytes
I/O size (minimum/optimal): 512 bytes / 512 bytes
Disk label type: dos
Disk identifier: 0x7bface37

   Device Boot      Start         End      Blocks   Id  System
/dev/sdb1            2048     4194303     2096128   83  Linux

Command (m for help): w  <-- 'w'を入力
The partition table has been altered!

Calling ioctl() to re-read partition table.
Syncing disks.
追加した仮想HDDの状態確認
# export LANG=C; fdisk -l

WARNING: fdisk GPT support is currently new, and therefore in an experimental phase. Use at your own discretion.

Disk /dev/sda: 214.7 GB, 214748364800 bytes, 419430400 sectors
Units = sectors of 1 * 512 = 512 bytes
Sector size (logical/physical): 512 bytes / 4096 bytes
I/O size (minimum/optimal): 4096 bytes / 4096 bytes
Disk label type: gpt
Disk identifier: 70328DFB-945E-478D-BEB3-4843FC97CE7D


#         Start          End    Size  Type            Name
 1         2048       411647    200M  EFI System      EFI System Partition
 2       411648      2508799      1G  Microsoft basic
 3      2508800    354580479  167.9G  Linux LVM

Disk /dev/mapper/centos_taiho-root: 171.8 GB, 171798691840 bytes, 335544320 sectors
Units = sectors of 1 * 512 = 512 bytes
Sector size (logical/physical): 512 bytes / 4096 bytes
I/O size (minimum/optimal): 4096 bytes / 4096 bytes


Disk /dev/mapper/centos_taiho-swap: 8455 MB, 8455716864 bytes, 16515072 sectors
Units = sectors of 1 * 512 = 512 bytes
Sector size (logical/physical): 512 bytes / 4096 bytes
I/O size (minimum/optimal): 4096 bytes / 4096 bytes


Disk /dev/sdb: 2147 MB, 2147483648 bytes, 4194304 sectors
Units = sectors of 1 * 512 = 512 bytes
Sector size (logical/physical): 512 bytes / 4096 bytes
I/O size (minimum/optimal): 4096 bytes / 4096 bytes
Disk label type: dos
Disk identifier: 0x18ec6d87

   Device Boot      Start         End      Blocks   Id  System
/dev/sdb1            2048     4194303     2096128   83  Linux

Disk /dev/sdc: 107.4 GB, 107374182400 bytes, 209715200 sectors
Units = sectors of 1 * 512 = 512 bytes
Sector size (logical/physical): 512 bytes / 4096 bytes
I/O size (minimum/optimal): 4096 bytes / 4096 bytes
Disk label type: dos
Disk identifier: 0x14d8b95f

   Device Boot      Start         End      Blocks   Id  System
/dev/sdc1            2048   209715199   104856576   83  Linux

Disk /dev/sdd: 85.9 GB, 85899345920 bytes, 167772160 sectors
Units = sectors of 1 * 512 = 512 bytes
Sector size (logical/physical): 512 bytes / 4096 bytes
I/O size (minimum/optimal): 4096 bytes / 4096 bytes
Disk label type: dos
Disk identifier: 0x19b2c464

   Device Boot      Start         End      Blocks   Id  System
/dev/sdd1            2048   167772159    83885056   83  Linux
ASM設定
ASMデバイス設定
udevルールの作成
新規ファイル作成
# cd /etc/udev/rules.d; touch 99-oracle.rules
# vi 99-oracle.rules
ファイル編集
KERNEL=="sdb1", ACTION=="add|change",OWNER="grid", GROUP="asmadmin", MODE="0660"
KERNEL=="sdc1", ACTION=="add|change",OWNER="grid", GROUP="asmadmin", MODE="0660"
KERNEL=="sdd1", ACTION=="add|change",OWNER="grid", GROUP="asmadmin", MODE="0660"
設定テスト
udevadm info -q path /dev/sdb1
udevadm test /block/sdb/sdb1

udevadm info -q path /dev/sdc1
udevadm test /block/sdc/sdc1

udevadm info -q path /dev/sdd1
udevadm test /block/sdd/sdd1
udevルール適用
# udevadm control --reload-rules
パーミッション確認
# ls -la /dev | grep asm
brw-rw----.  1 grid asmadmin   8,  17 mm DD HH:MM sdb1
brw-rw----.  1 grid asmadmin   8,  33 mm DD HH:MM sdc1
brw-rw----.  1 grid asmadmin   8,  49 mm DD HH:MM sdd1
ASMデバイス設定
パッケージインストール
oracleasm
# yum install -y oracleasm
oracleasmlib
# cd /tmp/work
# curl -OL https://download.oracle.com/otn_software/asmlib/oracleasmlib-2.0.12-1.el7.x86_64.rpm
# yum -y localinstall oracleasmlib-2.0.12-1.el7.x86_64.rpm
oracleasm-support
# cd /tmp/work
# curl -OL https://yum.oracle.com/repo/OracleLinux/OL7/latest/x86_64/getPackage/oracleasm-support-2.1.11-2.el7.x86_64.rpm
# yum -y localinstall oracleasm-support-2.1.11-2.el7.x86_64.rpm
ASMlib構成
# /usr/sbin/oracleasm configure -i
Configuring the Oracle ASM library driver.

This will configure the on-boot properties of the Oracle ASM library
driver.  The following questions will determine whether the driver is
loaded on boot and what permissions it will have.  The current values
will be shown in brackets ('[]').  Hitting <ENTER> without typing an
answer will keep that current value.  Ctrl-C will abort.

Default user to own the driver interface []: grid <-- 'grid'を入力
Default group to own the driver interface []: asmadmin <-- 'asmadmin'を入力
Start Oracle ASM library driver on boot (y/n) [n]: y <-- 'y'を入力
Scan for Oracle ASM disks on boot (y/n) [y]: y <-- 'y'を入力
Writing Oracle ASM library driver configuration: done
Oracleasmカーネルモジュールの読み込み
# /usr/sbin/oracleasm init
Creating /dev/oracleasm mount point: /dev/oracleasm
Loading module "oracleasm": oracleasm
Configuring "oracleasm" to use device physical block size
Mounting ASMlib driver filesystem: /dev/oracleasm
確認
# oracleasm status
Checking if ASM is loaded: yes
Checking if /dev/oracleasm is mounted: yes
ASM Disk 設定
sdb
# oracleasm createdisk CRS /dev/sdb1
Writing disk header: done
Instantiating disk: done
sdc
# oracleasm createdisk DATA /dev/sdc1
Writing disk header: done
Instantiating disk: done
sdd
# oracleasm createdisk FRA /dev/sdd1
Writing disk header: done
Instantiating disk: done
ASM設定反映
# oracleasm scandisks
Reloading disk partitions: done
Cleaning any stale ASM disks...
Scanning system for ASM disks...
ASM設定確認 (1)
# oracleasm listdisks
CRS
DATA
FRA
ASM設定確認 (2)
# ls -l /dev/oracleasm/disks
total 0
brw-rw----. 1 grid asmadmin 8, 17 mm DD HH:MM CRS
brw-rw----. 1 grid asmadmin 8, 33 mm DD HH:MM DATA
brw-rw----. 1 grid asmadmin 8, 49 mm DD HH:MM FRA
Grid Infrastructureインストールディレクトリ作成
# mkdir -p /u01/app/grid/product/19.3.0/grid
# mkdir -p /u01/app/oracle
# chown -R grid:oinstall /u01
# chown oracle:oinstall /u01/app/oracle
# chmod -R 775 /u01/
Grid Infrastructureインストールメディアの展開
# su - grid
$ cd $ORACLE_HOME
$ pwd
/u01/app/grid/product/19.3.0/grid
$ unzip -q /tmp/work/LINUX.X64_193000_grid_home.zip
cvuqdiskインストール
$ cd $ORACLE_HOME/cv/rpm
$ su
# rpm -ivh cvuqdisk-1.0.10-1.rpm
Oracle Grid Infrastructure インストール
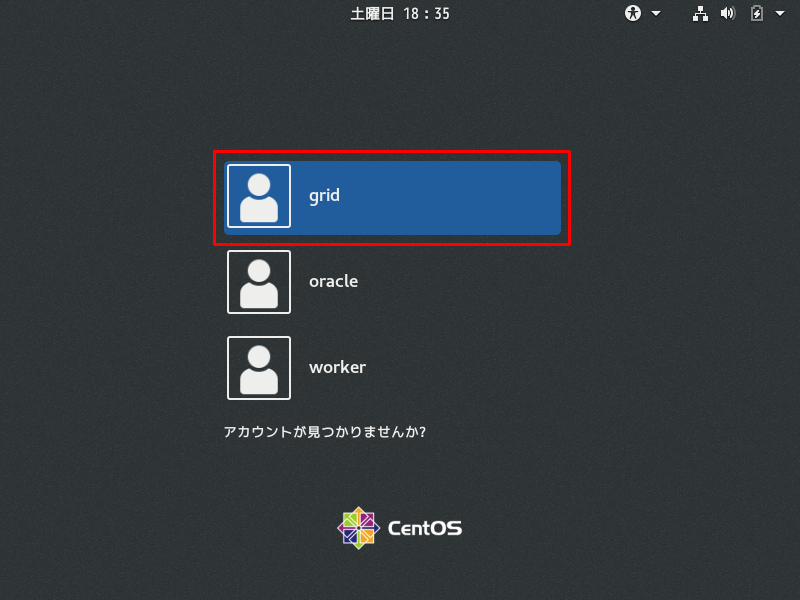
gridユーザーでGUIでログインします。
OUI起動
$ cd $ORACLE_HOME
$ ./gridSetup.sh
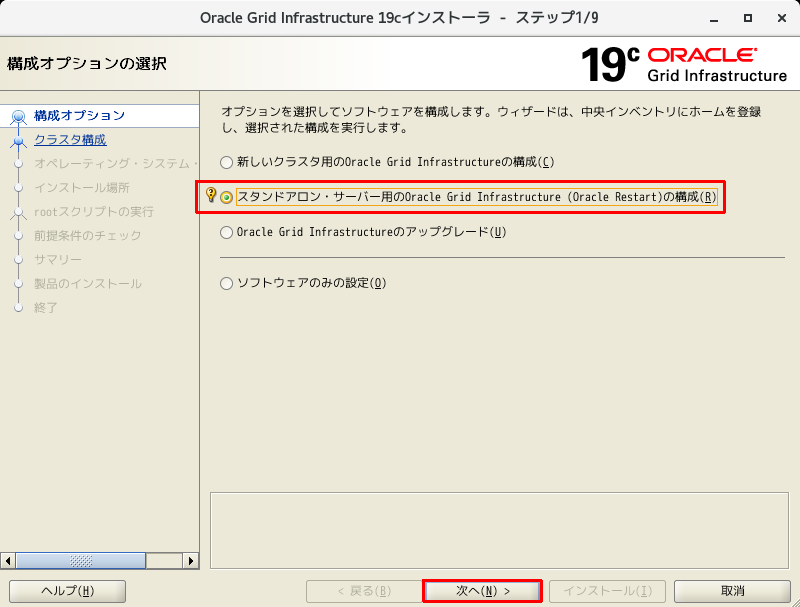
構成オプションの選択
- 今回はOracle Restart環境構築を行いますので"スタンドアロンサーバー用の..."を選択します。
- [次へ]をクリックします。
ASMディスク・グループの作成
- ”外部"を選択します。
- ディスクグループをすべて選択します。
- [次へ]をクリックします。

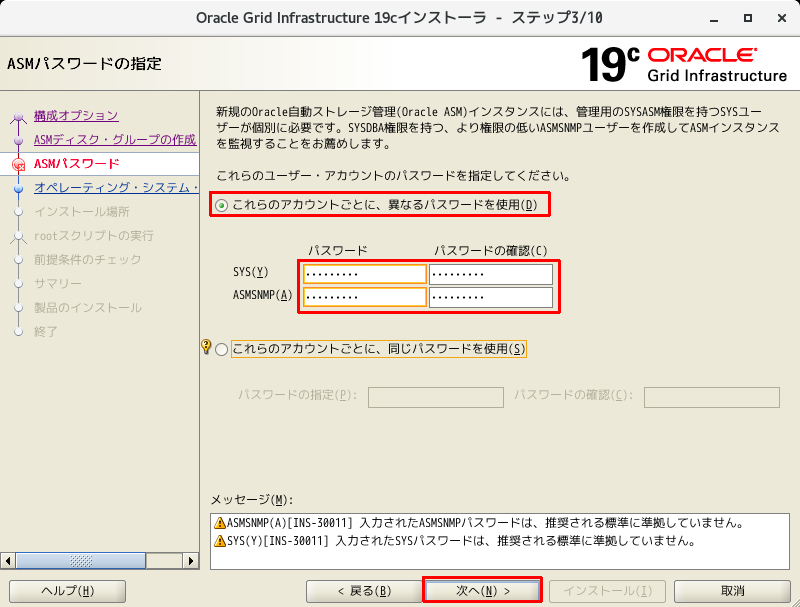
ASMパスワードの指定
- 画面に表示されているユーザーのパスワードを設定します。
- [次へ]をクリックします。
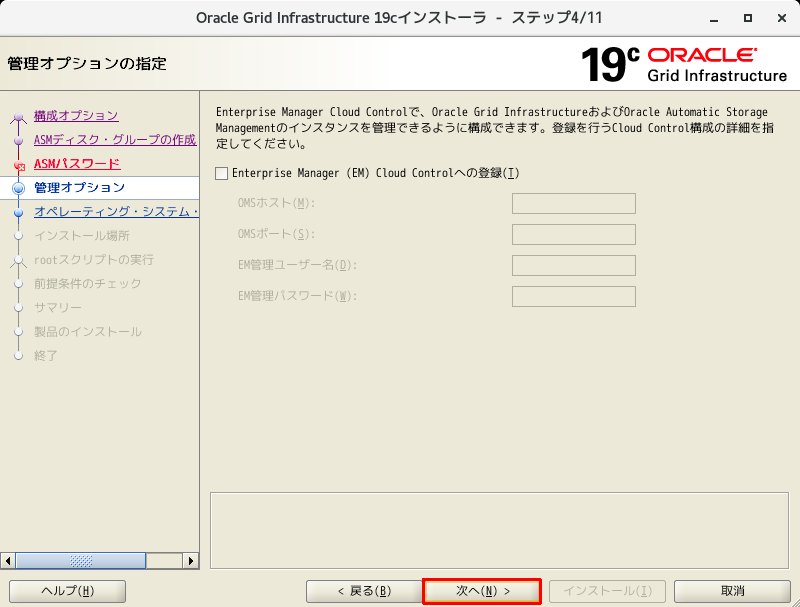
管理オプションの指定
- 今回はEMCCへの登録は行いませんのでデフォルトのままにしておきます。
- [次へ]をクリックします。
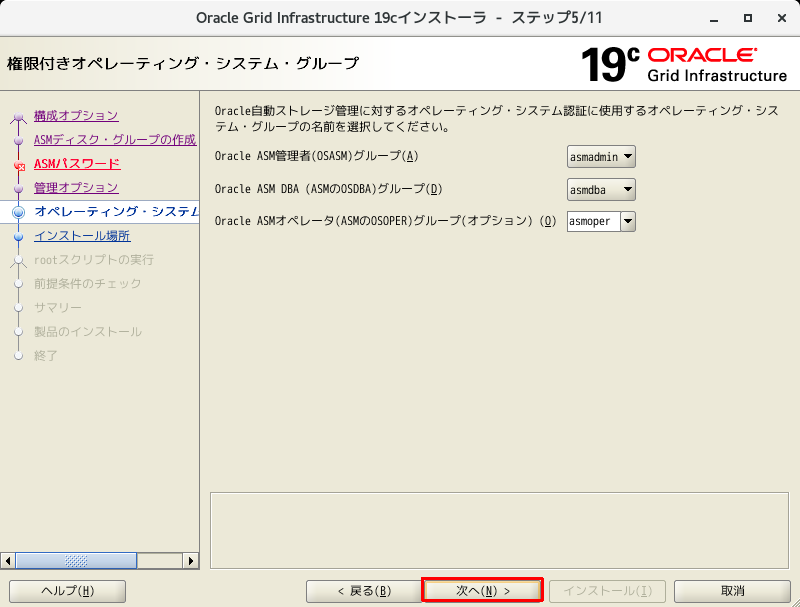
権限付きオペレーディング・システム・グループ
- 特に変更する必要はないのでデフォルトのままにしておきます。
- [次へ]をクリックします。
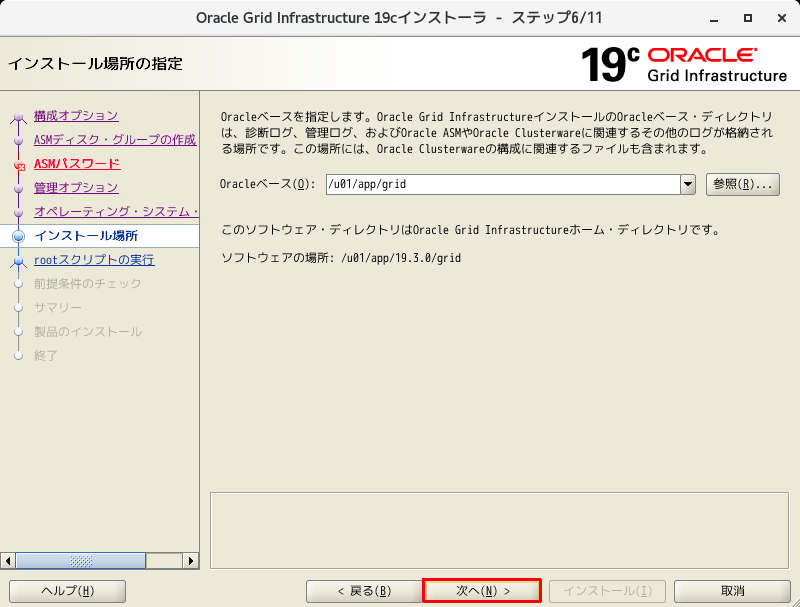
インストール場所の指定
- 特に変更する必要はないのでデフォルトのままにしておきます。(環境変数で設定済)
- [次へ]をクリックします。
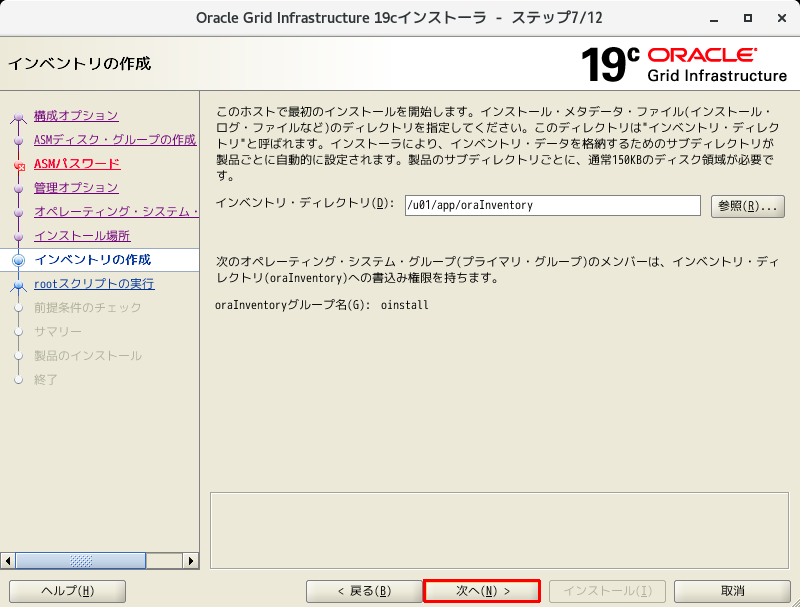
インベントリの作成
- 特に変更する必要はないのでデフォルトのままにしておきます。
- [次へ]をクリックします。
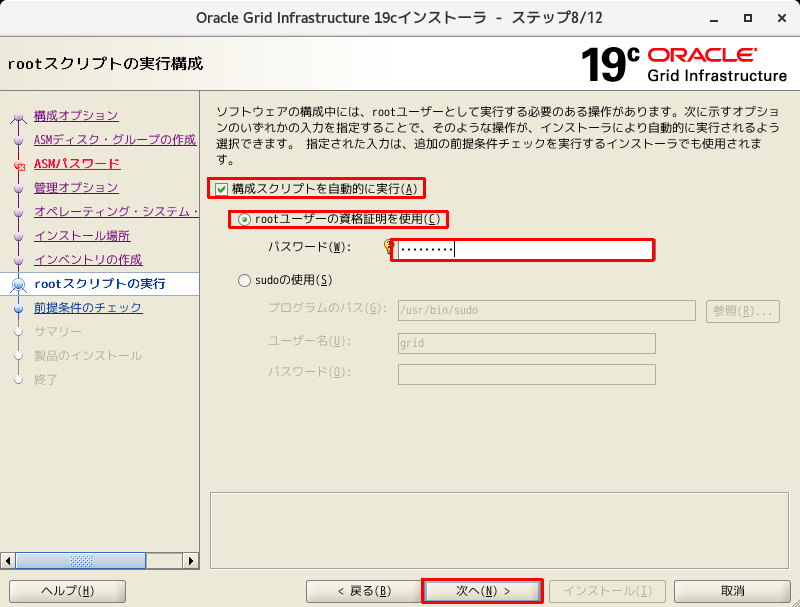
rootスクリプトの実行構成
- インストール中に必要なrootパスワードを設定します。
- [次へ]をクリックします。
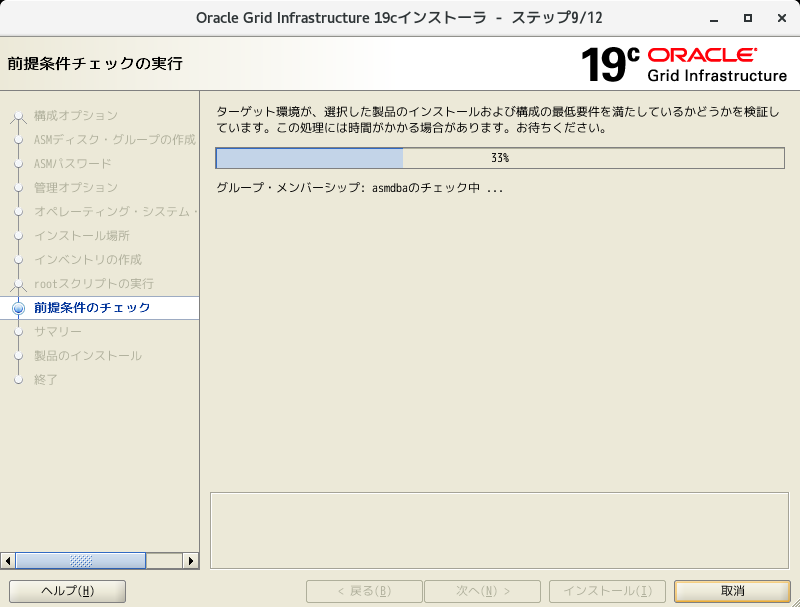
前提条件チェックの実行
- インストールに必要なリソース、パッケージのチェックが実行されます。
問題があれば都度対象する必要があります。
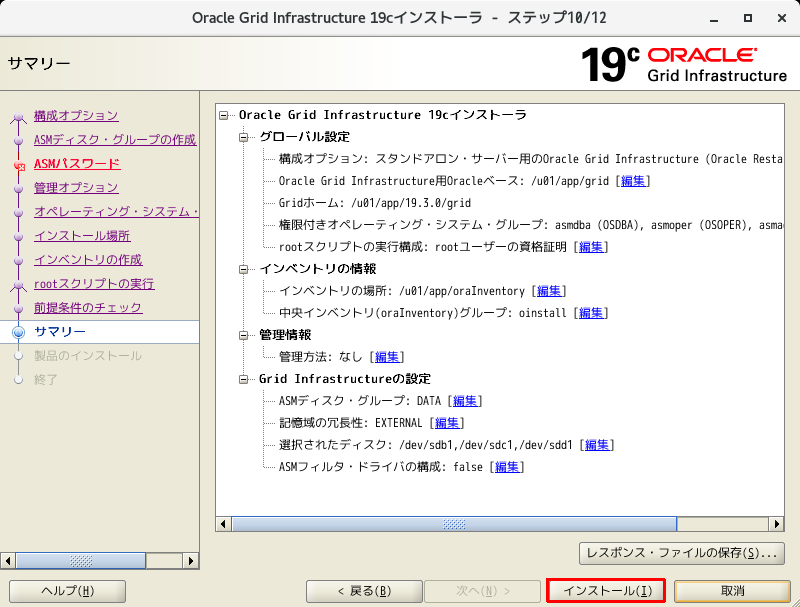
サマリー
- 問題がなければインストールの準備画面が表示されます。
- [インストール]をクリックします。
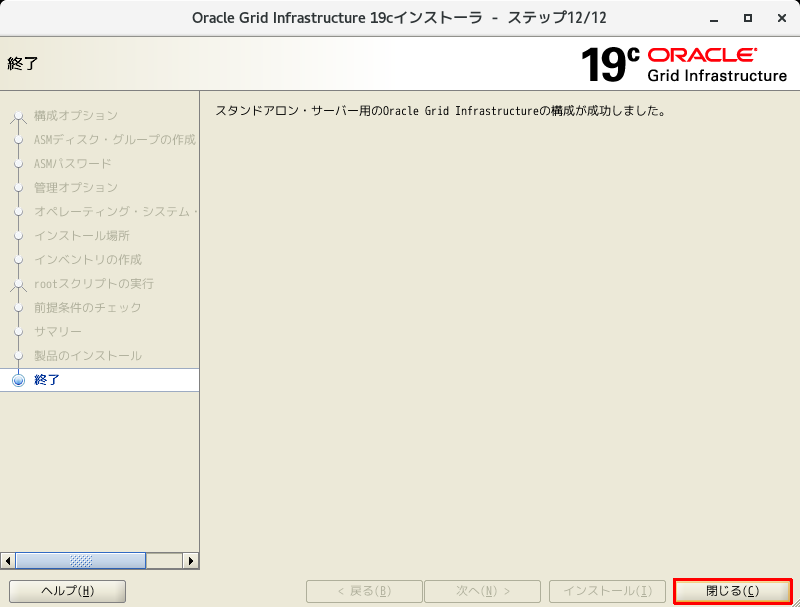
終了
- インストールが完了したら[閉じる]をクリックします。
確認
ASMインスタンスが認識されていれば成功です。
$ lsnrctl status

LSNRCTL for Linux: Version 19.0.0.0.0 - Production on 12-6月 -2021 20:38:58

Copyright (c) 1991, 2019, Oracle.  All rights reserved.

(DESCRIPTION=(ADDRESS=(PROTOCOL=TCP)(HOST=unryu)(PORT=1521)))に接続中
リスナーのステータス
------------------------
別名                      LISTENER
バージョン                TNSLSNR for Linux: Version 19.0.0.0.0 - Production
開始日                    DD-mm月 -yyyy HH:MM:SS
稼働時間                  0 日 0 時間 0 分 01 秒
トレース・レベル          off
セキュリティ              ON: Local OS Authentication
SNMP                      OFF
パラメータ・ファイル      /u01/app/19.3.0/grid/network/admin/listener.ora
ログ・ファイル            /u01/app/grid/diag/tnslsnr/unryu/listener/alert/log.xml
リスニング・エンドポイントのサマリー...
  (DESCRIPTION=(ADDRESS=(PROTOCOL=tcp)(HOST=unryu)(PORT=1521)))
  (DESCRIPTION=(ADDRESS=(PROTOCOL=ipc)(KEY=EXTPROC1521)))
サービスのサマリー...
サービス"+ASM"には、1件のインスタンスがあります。
  インスタンス"+ASM"、状態READYには、このサービスに対する1件のハンドラがあります...
サービス"+ASM_DATA"には、1件のインスタンスがあります。
  インスタンス"+ASM"、状態READYには、このサービスに対する1件のハンドラがあります...
コマンドは正常に終了しました。