1. 概要
単層カーボンナノチューブ(Single Walled Carbon Nanotube, SWCNT)の3DCGモデルを作りたくなったので、blenderを使ってレンダリングしてみようと思い立ちました。
ググっても出てこないので、記事に残しておこうと思います。
もっと簡単な方法を見つけたので新しく記事にしました!!
環境
MacOS 12.4
Blender 3.0.1
C++, コンパイラはc++14
Python 3.9
2. SWCNTとは
完成品を見た方がイメージが湧くと思います。
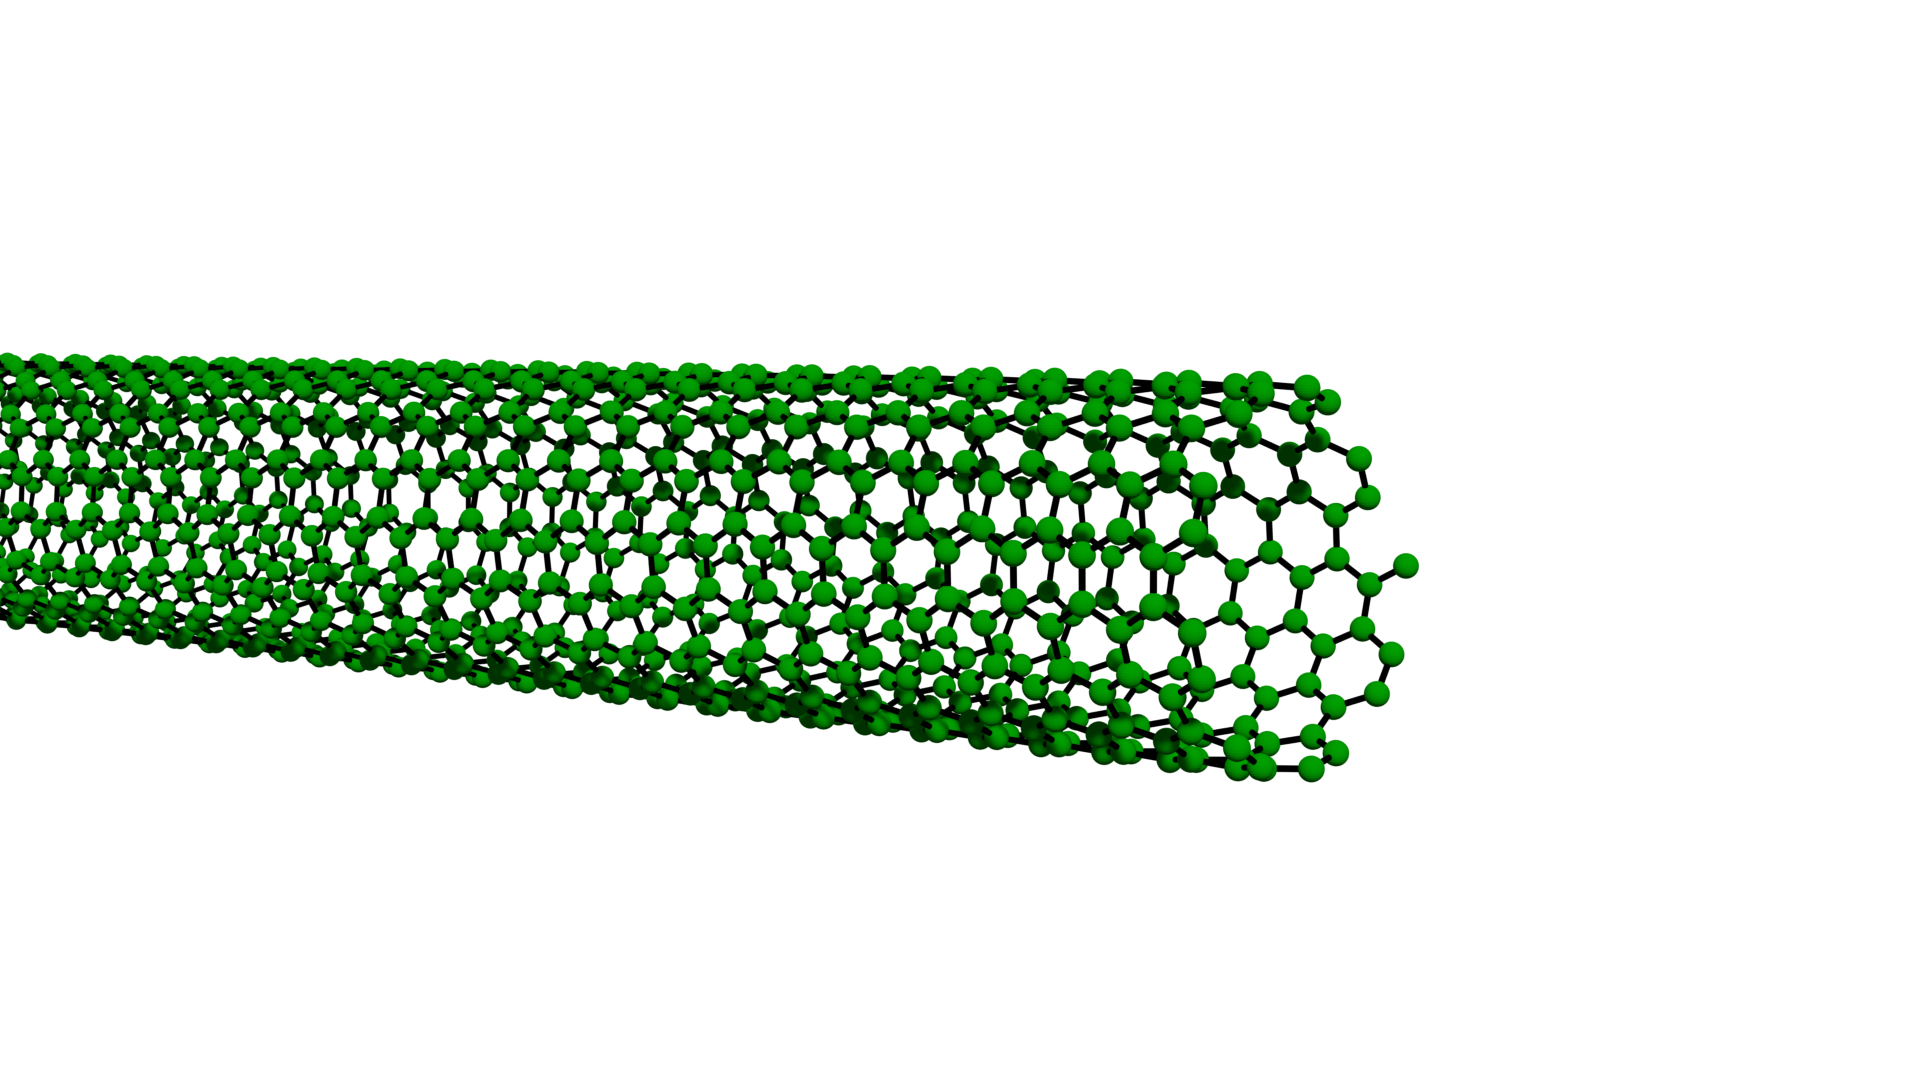
緑色の球体が炭素原子、黒色の棒がC-C結合にあたります。
炭素の六員環構造からなるチューブ状の物質がカーボンナノチューブです。
これを今から作っていきましょう。
3. 全体の流れ
まず、各原子の位置を計算する必要があります。
そして原子間の結合も描画したいので、それらの位置・傾きを計算します。
そしてCGソフト(Blender)でデータを読み込み、色の設定などをしてレンダリングします。
原子や結合の位置の計算は計算量が大きくなってしまうので、C++で実装します。
最初はPythonで実装していたのですが、如何せん時間がかかるもので・・・
そして、有難いことにBlenderはPythonで操作することができるので、データの読み込みや球体・円柱の配置はPython様に任せます。
最後に、色の設定などを手動でかましてレンダリングすれば完成になります。
4. SWCNTの原子構造
SWCNTの原子の位置はどうやって計算すれば良いのでしょうか?
その答えを求め我々はアマゾンの奥地へと向かいました。
そもそもSWCNTとは、2次元物質のグラフェンを円筒状に巻いた構造をしています。
グラフェンの原子の位置を計算し、それを巻いて円筒状にすればいいじゃないかという結論に至りました。
下にSWCNTの展開図の一例を示します。
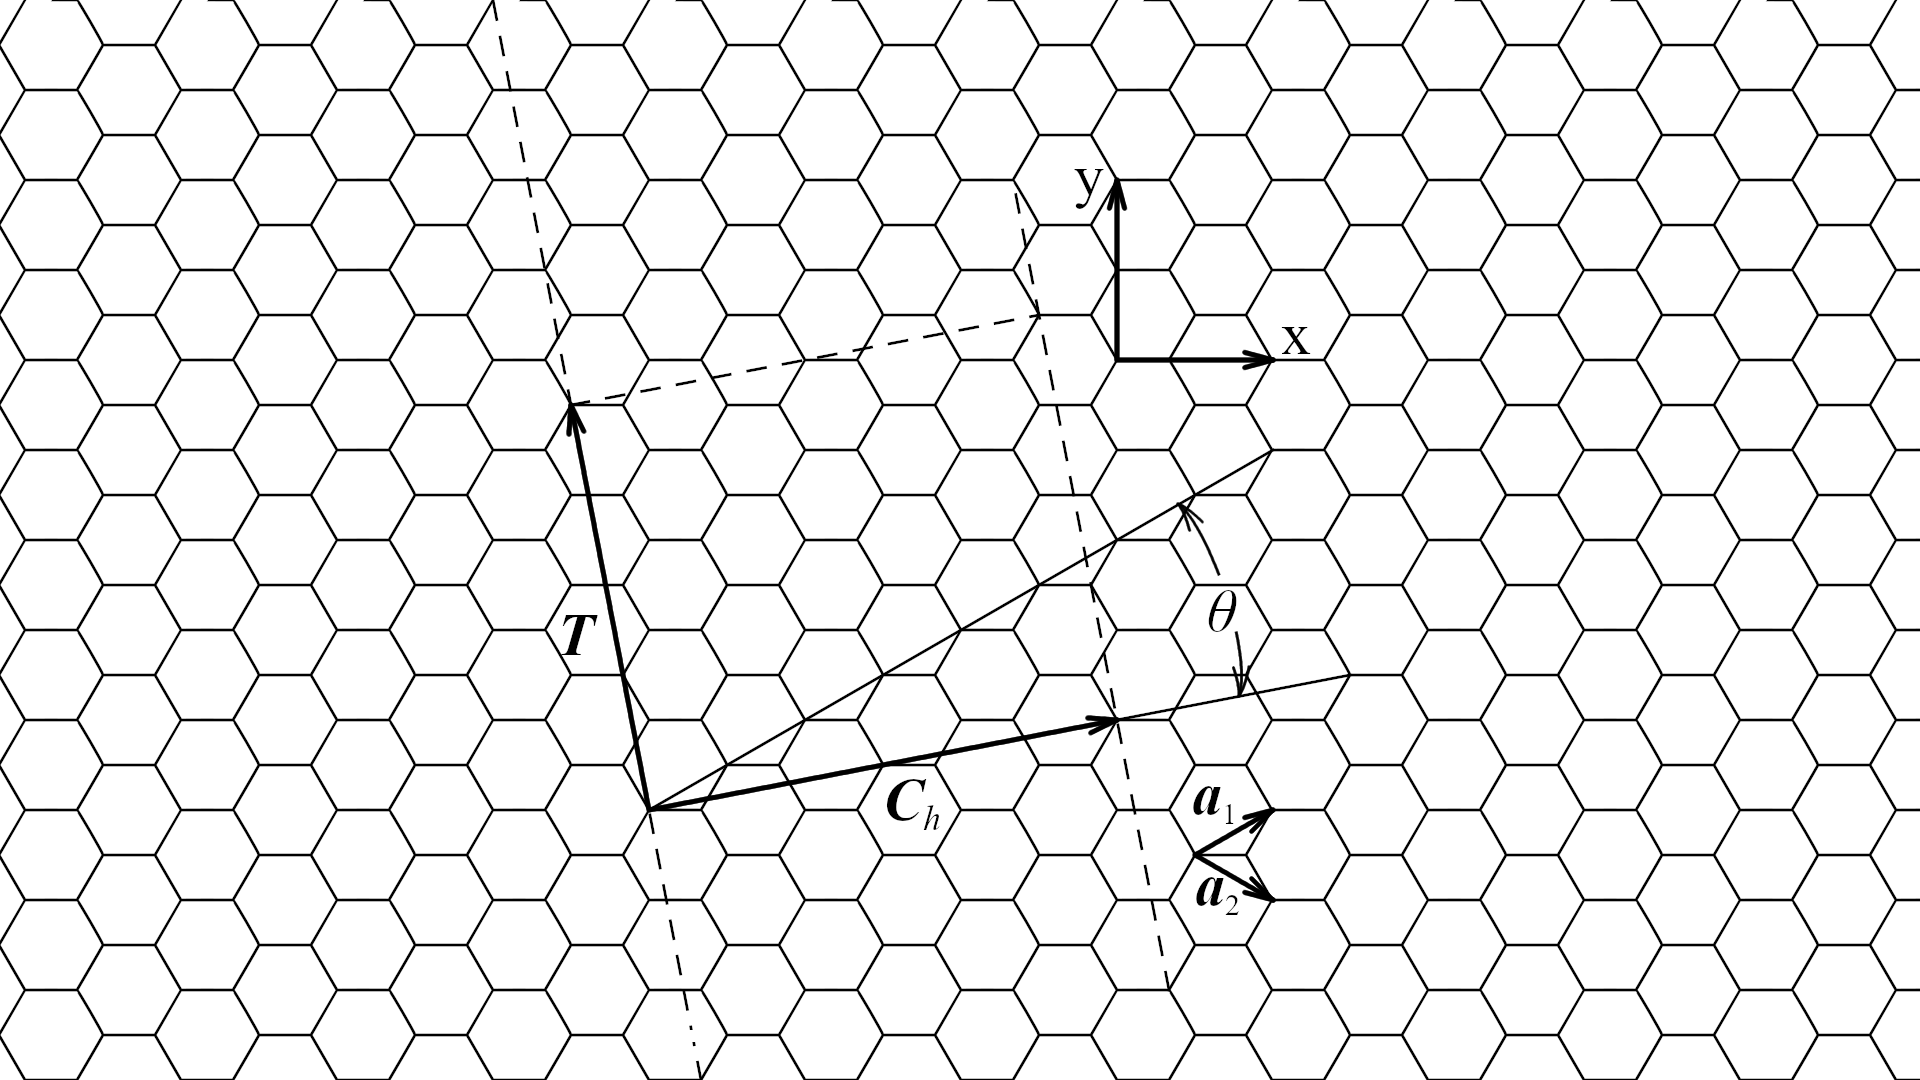
SWCNTは巻き方が(理論上)無限に存在します。
その巻き方を示すパラメータがカイラリティ(n, m)です。
グラフェンの基本格子の単位ベクトルを
\boldsymbol{a_1}=\Biggl(\frac{\sqrt{3}}{2}a, \frac{1}{2}a\Biggr)\\
\boldsymbol{a_2}=\Biggl(\frac{\sqrt{3}}{2}a, -\frac{1}{2}a\Biggr)
として、任意の基本格子の位置ベクトルは、整数n, mを用いて
n\boldsymbol{a_1}+m\boldsymbol{a_2}
と表せます。
そして、SWCNTの円周方向に相当するベクトルがカイラルベクトル$C_h$であり、
C_h=n\boldsymbol{a_1}+m\boldsymbol{a_2}
となる整数n, mの組がカイラリティ(n, m)になります。上図だと(4, 2)になります。
n, mが決まると並進ベクトル$T$も決まります。
T=t_1\boldsymbol{a_1}+t_2\boldsymbol{a_2}\:\:\:\:(t_1=\frac{2m+n}{d_R}, t_2=\frac{-2n+m}{d_R})
$d_R$はn, mの最大公約数です。
ここまでくれば理論的な話は十分です。
コーディングしていきましょう。
5. Atomクラス
C++でコーディングします。
まずはAtomクラスを定義します。
class Atom
{
private:
	vector<double> coord;
    string name;
public:
	double get_x() const;
	double get_y() const;
	double get_z() const;
    vector<double> get_coord() const;
    string get_name() const;
    void preprocess(const vector<double>);
	void tubize(const vector<double>);
	void print() const;
	Atom(vector<double>);
	Atom(vector<double>, string);
};
セッターゲッターは置いておいて、preprocessとtubizeの説明をします。
preprocess(Ch)はカイラルベクトル$C_h$を受け取って、SWCNTの単位胞がxy軸に沿うように回転させる関数です。
tubize(Ch)は造語なのですが、平面の単位胞を巻いてチューブ状に整形する関数です。
6. Bondクラス
class Bond
{
private:
	vector<double> coord;
	vector<double> angle;
public:
	Bond(const vector<double>, const vector<double>);
	vector<double> get_coord() const;
	vector<double> get_angle() const;
};

vector<double> calc_rotation(vector<double>, vector<double>);
private変数としてcoord(座標)、angle(角度)を持ちます。3次元の剛体なので当たり前ですね。
ここで大事なのはcalc_rotationという関数です。
bondがつなぐ二つの原子の座標を受け取って、bondの傾きを算出します。
ざっくり中身を説明すると、真っ直ぐz方向に伸びる棒を仮定して、y軸周りに何ラジアン、z軸周りに何ラジアン傾ければ目的のbondに一致するかを計算する流れです。
vector<double> calc_rotation(vector<double> coord_1, vector<double> coord_2)
{
	vector<double> theta_y_z(2);

	if (coord_1[2] < coord_2[2])
	{
		vector<double> coord_tmp = coord_1;
		coord_1 = coord_2;
		coord_2 = coord_tmp;
	}

	vector<double> center = (coord_1 + coord_2) / 2;
	double length = norm(coord_1 - coord_2);
	double theta_y = acos((coord_1[2] - center[2]) / (length / 2));

	vector<double> half = {0, 0, length / 2};
	vector<double> before_1 = center + half;
	vector<double> before_2 = center - half;

	vector<double> angle = {0, theta_y, 0};
	vector<double> mid_1 = rotate_3d((before_1 - center), angle) + center;
	vector<double> mid_2 = rotate_3d((before_2 - center), angle) + center;

	double theta_loc = atan2(coord_1[1] - center[1], coord_1[0] - center[0]);
	double theta_mid = atan2(mid_1[1] - center[1], mid_1[0] - center[0]);
	double theta_z = theta_loc - theta_mid;

	theta_y_z[0] = -theta_y;
	theta_y_z[1] = theta_z;

	return theta_y_z;
}
7. Nanotubeクラス
AtomとBondのvectorを保持します。
まずplace_atomで六方格子構造にたくさん原子を配置し、CNTの単位胞に含まれるものをピックアップします。
このとき、単位胞境界付近の原子はなるべく排除しないようにします。
次に、tubize_allで3次元のチューブ状にします。
そして、delete_dplで非常に近い位置になった原子を重複として削除します。
最後に、find_bondで妥当な結合距離にいる原子同士をbondで結びます。
このfind_bondが一番時間のかかる処理です。
class NanoTube
{
private:
	int n, m;
	vector<string> atom_types;
	vector<double> Ch;
	int dR;
	int t1;
	int t2;
	vector<double> T;
	int l;
	int N;

	vector<Atom> Atom_list;
	vector<Bond> Bond_list;
public:
	NanoTube(const int, const int, const string);
	void place_atom();
	void tubize_all();
	void delete_dpl();
	void find_bond();
	void to_csv() const;
};
ちなみにCarbon NanotubeとBoron Nitride Nanotubeの2種類に対応しています。
8. main.cpp
int main()
{
	for (int i = 1; i < 30; i++)
	{
		for (int j = 0; j <= i; j++)
		{
			NanoTube nt(i, j, "C");
			nt.place_atom();
			nt.tubize_all();
			nt.find_bond();
			nt.to_csv();
			std::cout << "(" << i << "," << j << ") nanotube has been created." << std::endl;
		}
	}
	return EXIT_SUCCESS;
}
9. Blenderでデータ読み込み(Python)
get_dataでpathからcsvデータを読み込みます。
もしフィールドに余計なオブジェクトがあるときにはdelete_objsを呼びます。
データに沿ってatom(sphere)とbond(cylinder)を作成していくだけです。
(原子数が多いと結構時間がかかります)
import bpy
import numpy as np
import pandas as pd

def delete_objs():
    for item in bpy.data.objects:
        bpy.data.objects.remove(item)
    for item in bpy.data.meshes:
        bpy.data.meshes.remove(item)
    for item in bpy.data.materials:
        bpy.data.materials.remove(item)


def get_data(n, m):
    df_atoms = pd.read_csv(path + f'atoms_{n}_{m}.csv', index_col=0)
    df_bonds = pd.read_csv(path + f'bonds_{n}_{m}.csv', index_col=0)
    return df_atoms, df_bonds


def create_atom(tag, loc, radius):
    bpy.ops.mesh.primitive_uv_sphere_add(segments=32, ring_count=16, radius=radius, calc_uvs=True, enter_editmode=False, align='WORLD', location=loc, rotation=(0.0, 0.0, 0.0), scale=(1.0, 1.0, 1.0))
    obj = list(filter(lambda x: x.name[:6] == 'Sphere', bpy.data.objects))[0]
    obj.name = tag


def create_bond(tag, loc, theta, radius):
    bpy.ops.mesh.primitive_cylinder_add(vertices=32, radius=radius, depth=1.46, end_fill_type='NGON', calc_uvs=True, enter_editmode=False, align='WORLD', location=loc, rotation=theta, scale=(1.0, 1.0, 1.0))
    obj = list(filter(lambda x: x.name[:8] == 'Cylinder', bpy.data.objects))[0]
    obj.name = tag


def main():
#    delete_objs()

    df_atoms, df_bonds = get_data(10, 10)

    for tag, loc in df_atoms.iterrows():
        create_atom(tag, loc.values, 0.3)

    for tag, item in df_bonds.iterrows():
        loc = item['x':'z'].values
        theta = item['theta_x':'theta_z'].values
        create_bond(tag, loc, theta, 0.1)

if __name__ == '__main__':
    main()
10. マテリアルの設定と描画
Pythonのコード内でtagを設定しています。
CNTなら'Carbon'が、BNNTなら'Boron'と'Nitorgen'が名前となっています。
bondは'Bond'という名前がついているはずです。
この名前でソートをかけて一括でマテリアルを設定すれば好きな色を付けることができます。
こんな感じでCNT@BNNTも作れちゃいます。

-1. 最後に
githubのリンクはこちら。