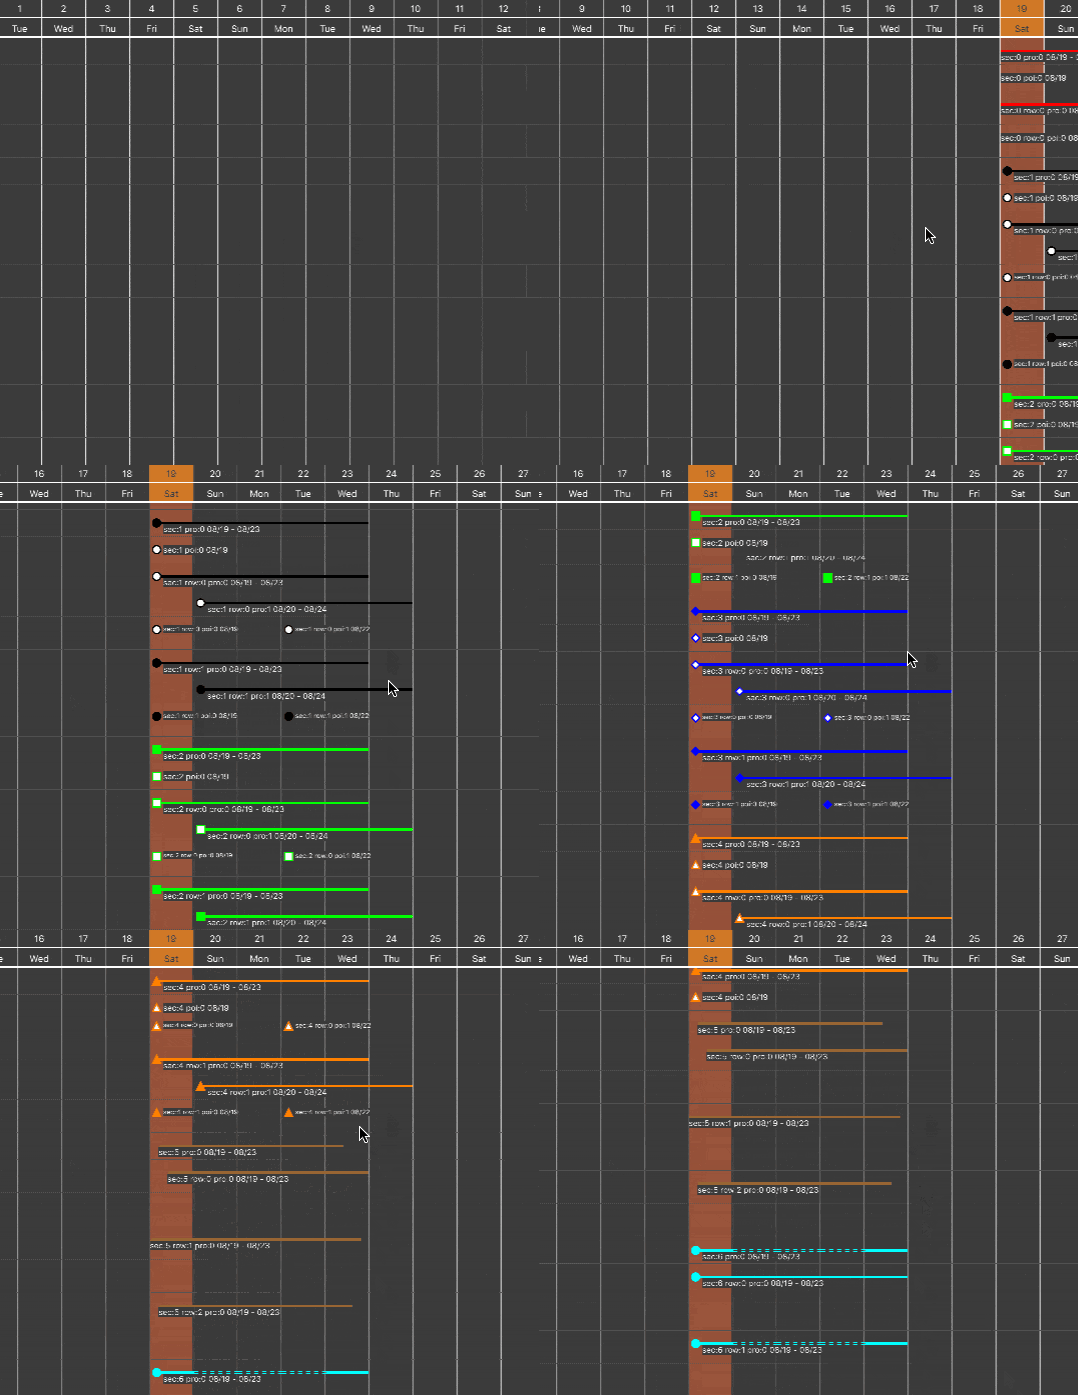
プログラマー歴1年ちょっとのペーペーがiOSでガントチャートのライブラリを作ってgithubに公開したので、紹介も兼ねて初投稿します。
github
サンプルのアプリも用意してるので、よかったら触ってみてください🍣
こんな感じ
機能
・UITableView風にデータソースを実装するだけで作成可能
・あらゆるパーツ・表示エリアのサイズ変更が可能
・あらゆるパーツ・表示エリアのカラー変更が可能
・複数日にまたがるデータ、一日のみのデータを分けて表示可能
・自動で各データの表示範囲の調整、複数データが同じ日付に表示される場合の自動の高さ計算
使い方
1.画面に追加
コードでもxibでも画面に追加できます。
コードで使いたい場合
#import <OTGanttChartKit/OTGanttChartKit.h>

OTGanttChartView *ganttChartView = [[OTGanttChartView alloc]initWithFrame:self.yourView.bounds];

ganttChartView.dataSource = self;
ganttChartView.delegate = self;

[self.yourView addSubView:ganttChartView];
xibで使いたい場合
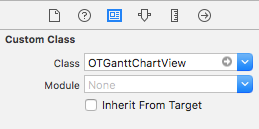
xibにカスタムクラスを設定後、Outlet接続する。
#import <OTGanttChartKit/OTGanttChartKit.h>

@property (weak,nonatomic) IBOutlet OTGanttChartView *ganttChartView;

self.ganttChartView.dataSource = self;
self.ganttChartView.delegate = self;
2.OTGanttChartViewDataSource
データソースには以下のメソッドがあります。
ガントチャートの表示に必要なメソッドです。
@protocol OTGanttChartViewDataSource<NSObject>

@required

- (NSDate *)startDateInGanttChartView:(OTGanttChartView *)ganttChartView;

- (NSDate *)lastDateInGanttChartView:(OTGanttChartView *)ganttChartView;

- (NSInteger)ganttChartView:(OTGanttChartView *)ganttChartView numberOfRowsInSection:(NSInteger)section;

- (NSInteger)ganttChartView:(OTGanttChartView *)ganttChartView numberOfProcessViewsForIndexPath:(NSIndexPath *)indexPath;

- (OTGChartProcessView *)ganttChartView:(OTGanttChartView *)ganttChartView chartProcessViewAtIndexPath:(NSIndexPath *)indexPath processNo:(NSInteger)processNo;

@optional

- (NSInteger)ganttChartView:(OTGanttChartView *)ganttChartView numberOfPointViewsForIndexPath:(NSIndexPath *)indexPath;

- (OTGChartPointView *)ganttChartView:(OTGanttChartView *)ganttChartView chartPointViewAtIndexPath:(NSIndexPath *)indexPath pointNo:(NSInteger)pointNo;

- (NSInteger)numberOfSectionsInGanttChartView:(OTGanttChartView *)ganttChartView;

- (NSInteger)ganttChartView:(OTGanttChartView *)ganttChartView numberOfProcessViewsForSection:(NSInteger)section;

- (OTGChartProcessView *)ganttChartView:(OTGanttChartView *)ganttChartView chartProcessViewAtSection:(NSInteger)section processNo:(NSInteger)processNo;

- (NSInteger)ganttChartView:(OTGanttChartView *)ganttChartView numberOfPointViewsForSection:(NSInteger)section;

- (OTGChartPointView *)ganttChartView:(OTGanttChartView *)ganttChartView chartPointViewAtSection:(NSInteger)section pointNo:(NSInteger)pointNo;

@end
requiredのメソッドを実装する方法
1.ガントチャート全体の開始日と終了日を指定します。
- (NSDate *)startDateInGanttChartView:(OTGanttChartView *)ganttChartView
{
    return yourGanttChartFirstDate;
}


- (NSDate *)lastDateInGanttChartView:(OTGanttChartView *)ganttChartView
{
    return yourGanttChartLastDate;
}
終了日が開始日より前の日付だった場合にExceptionを出す仕様になっているので使用する際は気をつけてください。
2.ガントチャートの列の数を指定します。
- (NSInteger)ganttChartView:(OTGanttChartView *)ganttChartView numberOfRowsInSection:(NSInteger)section
{
    return yourGanttChartRow;
}
3.実際のデータを入れる
線でデータを出したい場合
- (NSInteger)ganttChartView:(OTGanttChartView *)ganttChartView numberOfProcessViewsForIndexPath:(NSIndexPath *)indexPath
{
    return yourProcessDataCount;
}


- (OTGChartProcessView *)ganttChartView:(OTGanttChartView *)ganttChartView chartProcessViewAtIndexPath:(NSIndexPath *)indexPath processNo:(NSInteger)processNo
{
    OTGChartProcessView *processView = [[OTGChartProcessView alloc]init];
    processView.dateArray = yourProcessDateArray;

    return processView;
}
点でデータを出したい場合(ver1.3でoptionalになりました)
- (NSInteger)ganttChartView:(OTGanttChartView *)ganttChartView numberOfPointViewsForIndexPath:(NSIndexPath *)indexPath
{
    return yourProcessDataCount;
}


- (OTGChartPointView *)ganttChartView:(OTGanttChartView *)ganttChartView chartPointViewAtIndexPath:(NSIndexPath *)indexPath pointNo:(NSInteger)pointNo
{
    OTGChartPointView *pointView = [[OTGChartPointView alloc]init];
    pointView.date = yourPointDate;

    return pointView;
}
応用
例えば、点のデータを出したくないのに点のデータを表示するエリアを確保されるのが嫌だな(その反対も)という場合は、以下の二つのプロパティを必要に応じて0を指定してあげるといいです。
@property(nonatomic) CGFloat minimumRowProcessAreaHeight;
@property(nonatomic) CGFloat minimumRowPointAreaHeight;
self.ganttChartView.minimumRowProcessAreaHeight = 0;
self.ganttChartView.minimumRowPointAreaHeight = 0;
しかしこれはあくまで 最低の高さ なので、実際のデータを返すとガントチャート内に表示されるデータだった場合に高さを計算してしまうので気をつけましょう。
追記(2017/08/23)
ver1.3からは点データのDataSourceメソッドのoptionalになりました。
それに伴って、minimumRowPointAreaHeightは0を初期状態で設定するように変更しました。
よって、点のデータがいらない場合は、DataSouceの実装も、上記の対応も不要です。
optionalのメソッドを実装する方法
requiredのメソッドのセクション版なので割愛。
3.OTGanttChartViewDelegate
Delegateには以下のメソッドがあります。
@protocol OTGanttChartViewDelegate<NSObject>

@optional

- (void)ganttChartView:(OTGanttChartView *)ganttChartView didVerticalScroll:(UIScrollView *)scrollView;

- (void)ganttChartView:(OTGanttChartView *)ganttChartView didHorizontalScroll:(UIScrollView *)scrollView;

- (UIColor *)ganttChartView:(OTGanttChartView *)ganttChartView chartColorForSection:(NSInteger)section;

- (UIColor *)ganttChartView:(OTGanttChartView *)ganttChartView chartColorForIndexPath:(NSIndexPath *)indexPath;

- (UIColor *)ganttChartView:(OTGanttChartView *)ganttChartView chartBackgroundColorForDate:(NSDate *)date;

- (void)ganttChartView:(OTGanttChartView *)ganttChartView scrolledPrevieous:(UIScrollView *)scrollView;

- (void)ganttChartView:(OTGanttChartView *)ganttChartView scrolledNext:(UIScrollView *)scrollView;

- (void)ganttChartView:(OTGanttChartView *)ganttChartView tappedSection:(NSInteger)section;

@end
1.ガントチャートのスクロールを取得する
以下の二つのメソッドはガントチャートの縦横それぞれのスクロールを検知できます。
- (void)ganttChartView:(OTGanttChartView *)ganttChartView didVerticalScroll:(UIScrollView *)scrollView;

- (void)ganttChartView:(OTGanttChartView *)ganttChartView didHorizontalScroll:(UIScrollView *)scrollView;
縦スクロールはガントチャートの左側に独自で見出し用のUITableViewを用意したい場合などにUITableViewとOTGanttChartViewのスクロールの位置を連動する場合などに使えるかと思います。
横スクロールはガントチャートのパブリックメソッドに、現在のスクロール位置から日付を取得できるメソッドがあるので、横スクロールの位置に合わせて現在表示中の月を表示したい場合に使えると思います。
- (NSDate *)getCurrentLeftDate;
- (NSDate *)getCurrentCenterDate;
- (NSDate *)getCurrentRightDate;
2.ガントチャートの列ごとのを色を設定する
以下の二つのメソッドは、セクションと列それぞれのOTGChartProcessViewとOTGChartPointViewの色を一括指定することができるメソッドです。
- (UIColor *)ganttChartView:(OTGanttChartView *)ganttChartView chartColorForSection:(NSInteger)section;
- (UIColor *)ganttChartView:(OTGanttChartView *)ganttChartView chartColorForIndexPath:(NSIndexPath *)indexPath;
OTGChartProcessViewにもOTGChartPointViewにも色を指定できるプロパティがあるので、データを入れる際に、色を指定してあげるのであれば、特にこのデリゲートのメソッドを実装する必要はありません。
@property(nonatomic) UIColor *strokeColor;

@property(nonatomic) UIColor *fillColor;
3.背景色を日付ごとに設定する
このメソッドは、最初のgifでもありましたが、指定した日の背景色を変更したい場合に使用します。
今日の日付や、土日の色を変えるとガントチャートが見易くなるのでそういった用途に使うのがオススメです。
- (UIColor *)ganttChartView:(OTGanttChartView *)ganttChartView chartBackgroundColorForDate:(NSDate *)date;
4.リフレッシュコントロールを使用する
リフレッシュコントロールを実装するには以下の二つのプロパティにYESを設定して、デリゲートメソッドを実装する必要があります。
@property(nonatomic) BOOL leftRefreshControlEnabled;

@property(nonatomic) BOOL rightRefreshControlEnabled;
- (void)ganttChartView:(OTGanttChartView *)ganttChartView scrolledPrevieous:(UIScrollView *)scrollView;

- (void)ganttChartView:(OTGanttChartView *)ganttChartView scrolledNext:(UIScrollView *)scrollView;
5.セクションのタップ判定を取得する
以下のメソッドを実装することで、セクションのタップを判定できるので、タップで開閉などをしたい時に実装するといいと思います。
- (void)ganttChartView:(OTGanttChartView *)ganttChartView tappedSection:(NSInteger)section;
Q&A
Q1.なんで今更Objective-C?
A.勉強不足故に、Swiftをまだちゃんと書けないので、仕方なく。
今少しずつSwift版を開発しているので、10月までに完成させたいです。
Q2.ライセンスは?
A.MITです。
Q3.今後修正・追加する機能は?
A.現時点で修正しているのは動作の軽量化です。
特にセクションや行単位でリロードした際に、データを全行分取得してしまう問題があるので、その修正を現在進めています。
Q4.Cocoapods・Carthageに対応してる?
A.対応しています。
それぞれのファイルに以下の文言を記述してください。
CocoaPods
pod 'OTGanttChartKit'
Carthage
github "PKPK-Carnage/OTGanttChartKit"
Q5.ここ壊れてるよ!
A.すいません・・・
githubのissueに上げてもらえれば直すように努力します・・・

