Tensorflow-bin 
TensorflowLite-bin 
1.Introduction
Tensorflow公式のクロスコンパイル用スクリプトはチュートリアルどおりの手順ではまともに動作しませんでしたので、独自に手順を見直しました。 非公式手順です。 なお、この手順は 2019年09月13日時点 で正常動作を確認済みの手順ですが、日々Tensorflowのリポジトリはエンハンスされていますので、作業時期によっては正しく動作しない可能性があります。ご注意ください。 しばらくはバージョン表記の部分を最新に追随して変更していけば同様にビルドが可能だと思います。 公式の Tensorflow Liteバイナリよりも 2.5倍 速いパフォーマンスが出ます。 記事の最後に海外のエンジニアの協力に基づく RaspberryPi4 によるパフォーマンス検証結果を記載しています。
今回も、Tensorflow Lite の PythonAPI を改造して内部処理を MultiThread化 して高速チューニングします。 なお、MultiThread化により効果が出るオペレーションは、 Convolution と Mul ですので、全てのモデルが高速化するわけではない点にご注意ください。 また、Floatのオペレーションが含まれる場合も効果が無いようです。
あれ...TF-Lite
— nb.o (@Nextremer_nb_o) September 11, 2019
set_num_threadsを指定しても効果がないぞ...
MobileNet v1はうまく行くのに?
あれ?もしかして量子化の種類によっては効果ないんだっけ?(ソースどうだったけ...覚えてないぞ...うーん)
明日見てみよぉ
ということで...
— nb.o (@Nextremer_nb_o) September 12, 2019
あらためて「Artistic Style Transfer with TensorFlow Lite」のStyle transform modelをみると、FloatのOpeも含まれている。なのでmulti-threadの効果がないのか?
これはおそらく、Weight quantizationのモデルか。https://t.co/HJwZArv3kA pic.twitter.com/8QjRusdFlE
ビルド済みのインストーラは、上記ニコチャンマークのリンク先のリポジトリからダウンロード可能です。 ちなみに、v2.0.0-rc1版 もビルド済みです。 また、aarch64アーキテクチャ用のWheelファイルも生成済みです。
https://github.com/PINTO0309/TensorflowLite-bin.git
2.Environment
- Ubuntu16.04 x86_64
- Docker
- Tensorflow v1.14.0 or v1.15.0-rc0
3.Procedure
3−1.Preparation before building Tensorflow Lite
Tensorflow のリポジトリを手元に Clone します。
$ cd ~

$ git clone -b v1.14.0 http://github.com/tensorflow/tensorflow.git
or
$ git clone -b v1.15.0-rc0 http://github.com/tensorflow/tensorflow.git

$ cd tensorflow
arm_compiler.BUILD を編集します。
$ nano arm_compiler.BUILD
package(default_visibility = ["//visibility:public"])

filegroup(
    name = "gcc",
    srcs = [
        "bin/arm-linux-gnueabihf-gcc",
    ],
)

filegroup(
    name = "ar",
    srcs = [
        "bin/arm-linux-gnueabihf-ar",
    ],
)

filegroup(
    name = "ld",
    srcs = [
        "bin/arm-linux-gnueabihf-ld",
    ],
)

filegroup(
    name = "nm",
    srcs = [
        "bin/arm-linux-gnueabihf-nm",
    ],
)

filegroup(
    name = "objcopy",
    srcs = [
        "bin/arm-linux-gnueabihf-objcopy",
    ],
)

filegroup(
    name = "objdump",
    srcs = [
        "bin/arm-linux-gnueabihf-objdump",
    ],
)

filegroup(
    name = "strip",
    srcs = [
        "bin/arm-linux-gnueabihf-strip",
    ],
)

filegroup(
    name = "as",
    srcs = [
        "bin/arm-linux-gnueabihf-as",
    ],
)

filegroup(
    name = "compiler_pieces",
    srcs = glob([
        "arm-linux-gnueabihf/**",
        "libexec/**",
        "lib/gcc/arm-linux-gnueabihf/**",
        "include/**",
    ]),
)

filegroup(
    name = "compiler_components",
    srcs = [
        ":ar",
        ":as",
        ":gcc",
        ":ld",
        ":nm",
        ":objcopy",
        ":objdump",
        ":strip",
    ],
)
Ctrl + O
Ctrl + X
私の Google Drive から必要なリソースをダウンロードします。 公式のバグりポイント解消のための作業のひとつです。
$ cd tensorflow/lite/tools/pip_package
$ rm *
$ curl -sc /tmp/cookie "https://drive.google.com/uc?export=download&id=11azfXvOKQWqfg5JwdWIJ4fWWafy13_wg" > /dev/null
$ CODE="$(awk '/_warning_/ {print $NF}' /tmp/cookie)"
$ curl -Lb /tmp/cookie "https://drive.google.com/uc?export=download&confirm=${CODE}&id=11azfXvOKQWqfg5JwdWIJ4fWWafy13_wg" -o debian.zip
$ unzip debian.zip
$ rm debian.zip
changelog ファイルを編集します。
$ nano debian/changelog
下記のとおり、編集が必要な箇所はバージョン番号の表記の部分のみです。 rc版やalpha/beta版をビルドする場合は、バージョン番号とrcxxの間のハイフンを除外することがポイントです。
tflite-runtime (1.14.0-1) unstable; urgency=low

or

tflite-runtime (1.15.0rc0) unstable; urgency=low
Ctrl + O
Ctrl + X
setup.py を編集します。
$ nano setup.py
PACKAGE_VERSION = os.environ['TENSORFLOW_VERSION']
PACKAGE_VERSION = '1.14.0'

or

PACKAGE_VERSION = '1.15.0-rc0'
Ctrl + O
Ctrl + X
$ nano tensorflow/tools/pip_package/setup.py
_VERSION = '1.14.0'

or

_VERSION = '1.15.0-rc0'
Dockerファイルを編集します。 公式のスクリプトは unzip のインストールが漏れていることがあります。
$ nano Dockerfile.debian
ARG VERSION
FROM debian:${VERSION}

RUN dpkg --add-architecture armhf
RUN dpkg --add-architecture arm64
RUN apt-get update && apt-get install -y \
  python \
  python-setuptools \
  python-wheel \
  python-numpy \
  libpython-dev \
  libpython-dev:armhf \
  libpython-dev:arm64 \
  python3 \
  python3-setuptools \
  python3-wheel \
  python3-numpy \
  libpython3-dev \
  libpython3-dev:armhf \
  libpython3-dev:arm64 \
  crossbuild-essential-armhf \
  crossbuild-essential-arm64 \
  zlib1g-dev  \
  zlib1g-dev:armhf \
  zlib1g-dev:arm64 \
  swig \
  curl \
  unzip \
  git
Ctrl + O
Ctrl + X
3−2.Multithread speed-up tuning of Tensorflow Lite
Tensorflow Lite の PythonAPI の内部処理を MultiThread化 します。 3枚のプログラムファイルに対して数行追記します。
$ nano tensorflow/lite/python/interpreter.py
# Add the following two lines to the last line
  def set_num_threads(self, i):
    return self._interpreter.SetNumThreads(i)
Ctrl + O
Ctrl + X
$ nano tensorflow/lite/python/interpreter_wrapper/interpreter_wrapper.cc
// Corrected the vicinity of the last line as follows
PyObject* InterpreterWrapper::ResetVariableTensors() {
  TFLITE_PY_ENSURE_VALID_INTERPRETER();
  TFLITE_PY_CHECK(interpreter_->ResetVariableTensors());
  Py_RETURN_NONE;
}

PyObject* InterpreterWrapper::SetNumThreads(int i) {
  interpreter_->SetNumThreads(i);
  Py_RETURN_NONE;
}

}  // namespace interpreter_wrapper
}  // namespace tflite
Ctrl + O
Ctrl + X
$ nano tensorflow/lite/python/interpreter_wrapper/interpreter_wrapper.h
  // should be the interpreter object providing the memory.
  PyObject* tensor(PyObject* base_object, int i);

  PyObject* SetNumThreads(int i);

 private:
  // Helper function to construct an `InterpreterWrapper` object.
  // It only returns InterpreterWrapper if it can construct an `Interpreter`.
Ctrl + O
Ctrl + X
3−3.Tensorflow Lite cross compilation
Docker上で RaspberryPi用の Tensorflow Wheelインストーラ をビルドします。
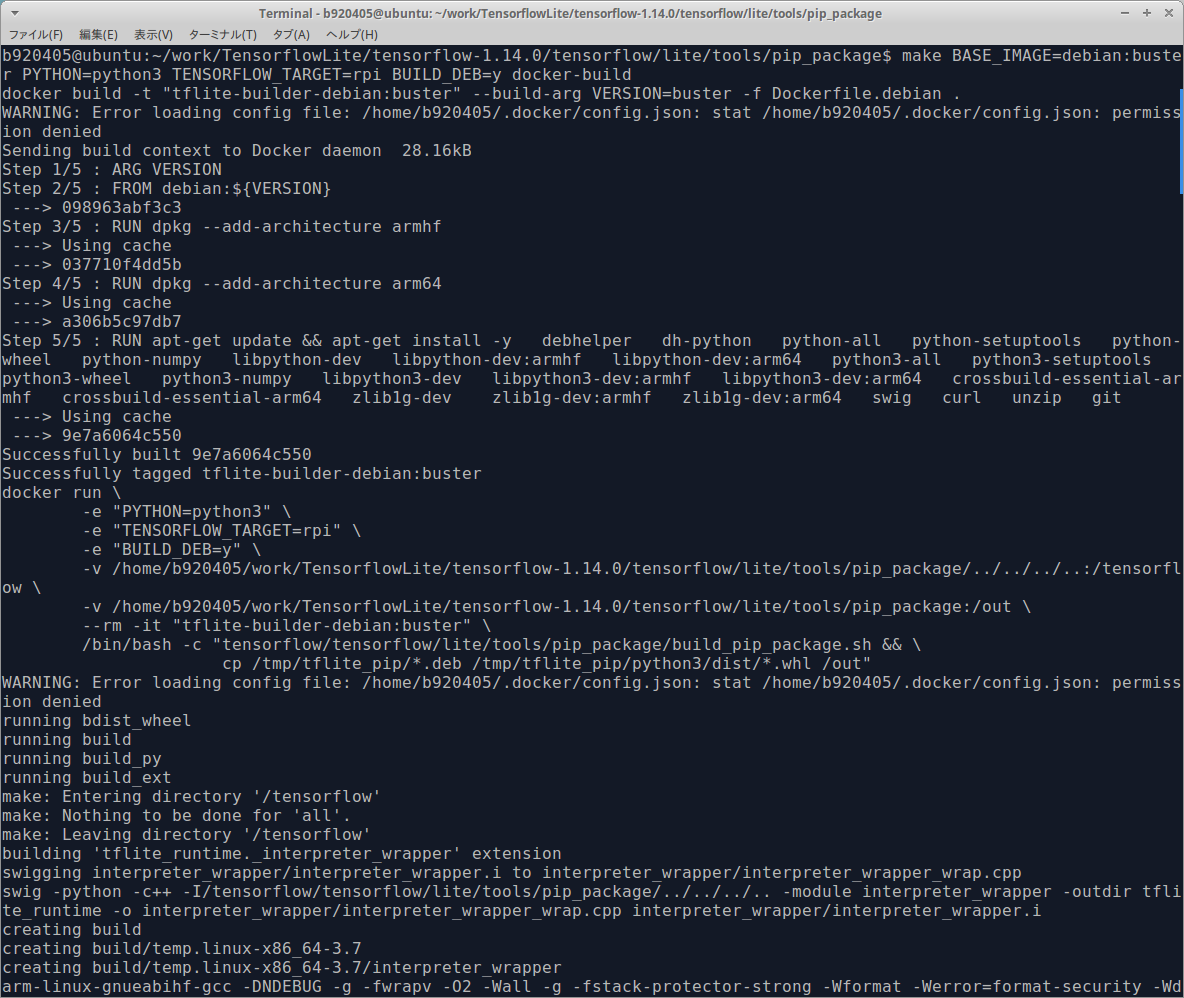
$ cd tensorflow/lite/tools/pip_package
$ make BASE_IMAGE=debian:buster PYTHON=python3 TENSORFLOW_TARGET=rpi BUILD_DEB=y docker-build
ビルドが開始されると下図のようにビルドの経過表示が延々と続きます。10分ほどで終わりますのでしばらく待ちます。
下図のように表示されるとビルド完了です。
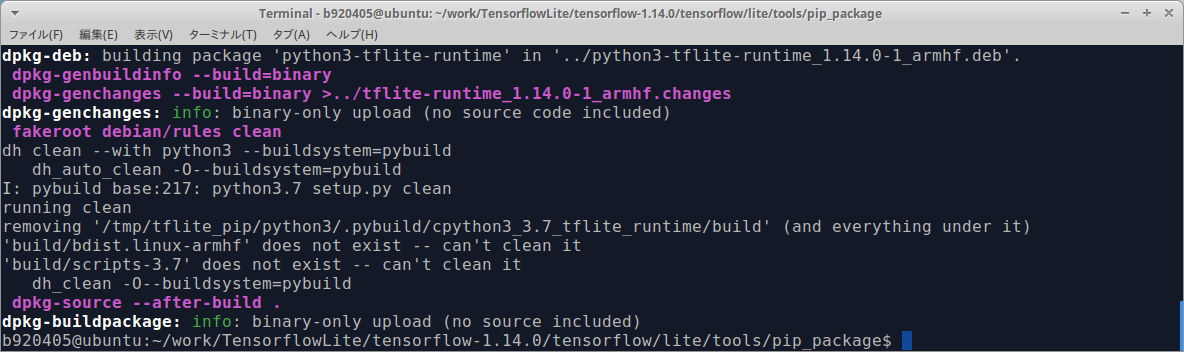
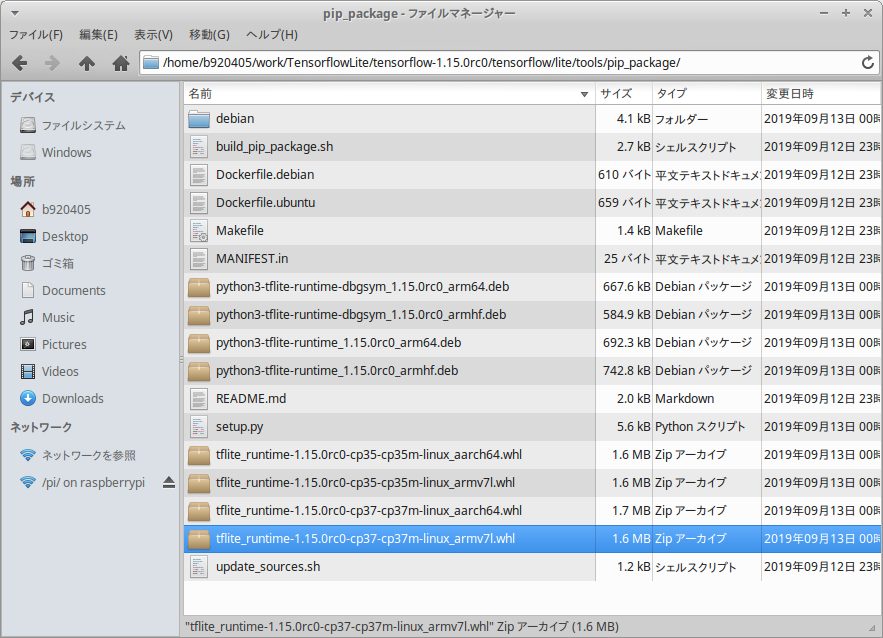
ビルドに成功すると下図の青色の箇所のように .whl ファイルが生成されます。 私は同様の手順でRaspbian Stretch用のバイナリや、aarch64アーキテクチャ用のバイナリも同時に作成しましたので、複数の .whl が表示されています。
3−4.Tensorflow Lite performance test [Classification]
RaspberryPi3 + MultiThread による、 MobileNetV1 と MobileNetV2 のパフォーマンステストと、 RaspberryPi4 による、 MobileNetV1 のパフォーマンステストを行います。
$ cd ~;mkdir test
$ curl https://raw.githubusercontent.com/tensorflow/tensorflow/master/tensorflow/lite/examples/label_image/testdata/grace_hopper.bmp > ~/test/grace_hopper.bmp
$ curl https://storage.googleapis.com/download.tensorflow.org/models/mobilenet_v1_1.0_224_frozen.tgz | tar xzv -C ~/test mobilenet_v1_1.0_224/labels.txt
$ mv ~/test/mobilenet_v1_1.0_224/labels.txt ~/test/
$ curl http://download.tensorflow.org/models/mobilenet_v1_2018_02_22/mobilenet_v1_1.0_224_quant.tgz | tar xzv -C ~/test
$ cd ~/test
import argparse
import numpy as np
import time

from PIL import Image

from tflite_runtime.interpreter import Interpreter

def load_labels(filename):
  my_labels = []
  input_file = open(filename, 'r')
  for l in input_file:
    my_labels.append(l.strip())
  return my_labels
if __name__ == "__main__":
  floating_model = False
  parser = argparse.ArgumentParser()
  parser.add_argument("-i", "--image", default="/tmp/grace_hopper.bmp", \
    help="image to be classified")
  parser.add_argument("-m", "--model_file", \
    default="/tmp/mobilenet_v1_1.0_224_quant.tflite", \
    help=".tflite model to be executed")
  parser.add_argument("-l", "--label_file", default="/tmp/labels.txt", \
    help="name of file containing labels")
  parser.add_argument("--input_mean", default=127.5, help="input_mean")
  parser.add_argument("--input_std", default=127.5, \
    help="input standard deviation")
  parser.add_argument("--num_threads", default=1, help="number of threads")
  args = parser.parse_args()

  interpreter = Interpreter(model_path=args.model_file)
  interpreter.allocate_tensors()
  input_details = interpreter.get_input_details()
  output_details = interpreter.get_output_details()
  # check the type of the input tensor
  if input_details[0]['dtype'] == np.float32:
    floating_model = True
  # NxHxWxC, H:1, W:2
  height = input_details[0]['shape'][1]
  width = input_details[0]['shape'][2]
  img = Image.open(args.image)
  img = img.resize((width, height))
  # add N dim
  input_data = np.expand_dims(img, axis=0)
  if floating_model:
    input_data = (np.float32(input_data) - args.input_mean) / args.input_std

  interpreter.set_num_threads(int(args.num_threads)) #<- Specifies the num of threads assigned to inference
  interpreter.set_tensor(input_details[0]['index'], input_data)

  start_time = time.time()
  interpreter.invoke()
  stop_time = time.time()

  output_data = interpreter.get_tensor(output_details[0]['index'])
  results = np.squeeze(output_data)
  top_k = results.argsort()[-5:][::-1]
  labels = load_labels(args.label_file)
  for i in top_k:
    if floating_model:
      print('{0:08.6f}'.format(float(results[i]))+":", labels[i])
    else:
      print('{0:08.6f}'.format(float(results[i]/255.0))+":", labels[i])

  print("time: ", stop_time - start_time)
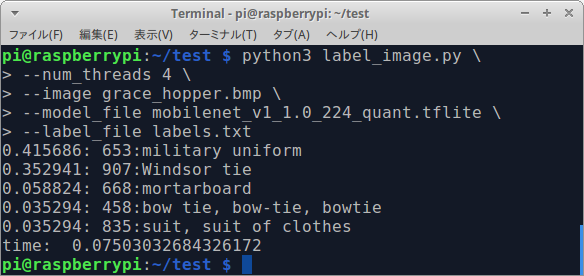
$ python3 label_image.py \
--num_threads 4 \
--image grace_hopper.bmp \
--model_file mobilenet_v1_1.0_224_quant.tflite \
--label_file labels.txt
Sample of MultiThread x4 by Tensorflow Lite [RaspberryPi3 / MobileNetV1 / 75ms]
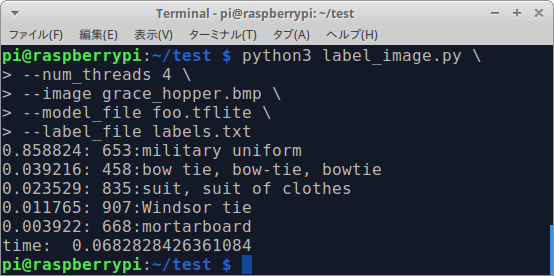
MobileNetV2 でテストを行う場合は、Tensorflow公式のtfliteファイルをダウンロードし、モデルのバグを自力で修正する必要があります。 公式が提供するモデルをそのまま使用するとSoftmaxがモデルに含まれていないため推論結果が正常になりません。 バグフィックスの方法は こちら を参考にしてください。 https://github.com/tensorflow/tensorflow/issues/31229#issuecomment-527296093
Tensorflow公式のtfliteファイルのサンプルは こちら からゲットできます。 https://www.tensorflow.org/lite/guide/hosted_models
$ python3 label_image.py \
--num_threads 4 \
--image grace_hopper.bmp \
--model_file foo.tflite \
--label_file labels.txt
Sample of MultiThread x4 by Tensorflow Lite [RaspberryPi3 / MobileNetV2 / 68ms]
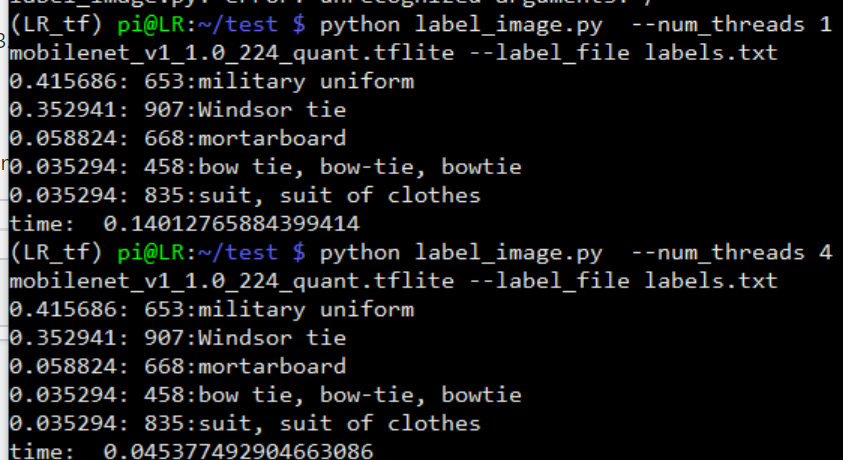
海外の方が RaspberryPi4 でパフォーマンス検証を行ってくれました。 RaspberryPi3 で実行するよりも大幅にパフォーマンスが改善されてることが分かります。 わずか 45ms/推論 のコストです。 https://github.com/PINTO0309/Tensorflow-bin/issues/9#issuecomment-530297338
Sample of MultiThread x4 by Tensorflow Lite [RaspberryPi4 / MobileNetV1 / 45ms]
3−5.Tensorflow Lite performance test [Object Detection]
RaspberryPi3 + MultiThread による、 MobileNetV2-SSD のパフォーマンステストを行います。
$ wget https://github.com/PINTO0309/TensorflowLite-bin/raw/master/models/mobilenet_ssd_v2_coco_quant_postprocess.tflite
import numpy as np
import time
from tflite_runtime.interpreter import Interpreter
import cv2
LABELS = [
'???','person','bicycle','car','motorcycle','airplane','bus','train','truck','boat',
'traffic light','fire hydrant','???','stop sign','parking meter','bench','bird','cat','dog','horse',
'sheep','cow','elephant','bear','zebra','giraffe','???','backpack','umbrella','???',
'???','handbag','tie','suitcase','frisbee','skis','snowboard','sports ball','kite','baseball bat',
'baseball glove','skateboard','surfboard','tennis racket','bottle','???','wine glass','cup','fork','knife',
'spoon','bowl','banana','apple','sandwich','orange','broccoli','carrot','hot dog','pizza',
'donut','cake','chair','couch','potted plant','bed','???','dining table','???','???',
'toilet','???','tv','laptop','mouse','remote','keyboard','cell phone','microwave','oven',
'toaster','sink','refrigerator','???','book','clock','vase','scissors','teddy bear','hair drier',
'toothbrush']
class ObjectDetectorLite():
def __init__(self, model_path='detect.tflite'):
self.interpreter = Interpreter(model_path=model_path)
self.interpreter.set_num_threads(4)
self.interpreter.allocate_tensors()
self.input_details = self.interpreter.get_input_details()
self.output_details = self.interpreter.get_output_details()
def _boxes_coordinates(self,
image,
boxes,
classes,
scores,
max_boxes_to_draw=20,
min_score_thresh=.5):
if not max_boxes_to_draw:
max_boxes_to_draw = boxes.shape[0]
number_boxes = min(max_boxes_to_draw, boxes.shape[0])
person_boxes = []
for i in range(number_boxes):
if scores is None or scores[i] > min_score_thresh:
box = tuple(boxes[i].tolist())
ymin, xmin, ymax, xmax = box
im_height, im_width, _ = image.shape
left, right, top, bottom = [int(z) for z in (xmin * im_width, xmax * im_width, ymin * im_height, ymax * im_height)]
person_boxes.append([(left, top), (right, bottom), scores[i], LABELS[classes[i]]])
return person_boxes
def detect(self, image, threshold=0.1):
# Resize and normalize image for network input
frame = cv2.resize(image, (300, 300))
frame = np.expand_dims(frame, axis=0)
frame = frame.astype('uint8')
# run model
self.interpreter.set_tensor(self.input_details[0]['index'], frame)
start_time = time.time()
self.interpreter.invoke()
stop_time = time.time()
print("time: ", stop_time - start_time)
# get results
boxes = self.interpreter.get_tensor(self.output_details[0]['index'])
classes = self.interpreter.get_tensor(self.output_details[1]['index'])
scores = self.interpreter.get_tensor(self.output_details[2]['index'])
num = self.interpreter.get_tensor(self.output_details[3]['index'])
# Find detected boxes coordinates
return self._boxes_coordinates(image,
np.squeeze(boxes[0]),
np.squeeze(classes[0]+1).astype(np.int32),
np.squeeze(scores[0]),
min_score_thresh=threshold)
if __name__ == '__main__':
detector = ObjectDetectorLite('mobilenet_ssd_v2_coco_quant_postprocess.tflite')
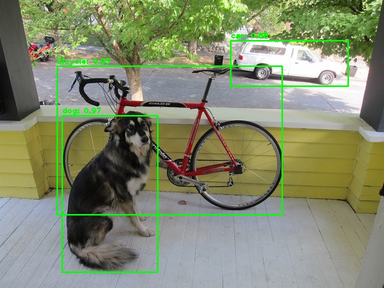
image = cv2.cvtColor(cv2.imread('dog.jpg'), cv2.COLOR_BGR2RGB)
result = detector.detect(image, 0.4)
print(result)
for obj in result:
print('coordinates: {} {}. class: "{}". confidence: {:.2f}'.
format(obj[0], obj[1], obj[3], obj[2]))
cv2.rectangle(image, obj[0], obj[1], (0, 255, 0), 2)
cv2.putText(image, '{}: {:.2f}'.format(obj[3], obj[2]), (obj[0][0], obj[0][1] - 5), cv2.FONT_HERSHEY_PLAIN, 1, (0, 255, 0), 2)
cv2.imwrite('result.jpg', cv2.cvtColor(image, cv2.COLOR_RGB2BGR))
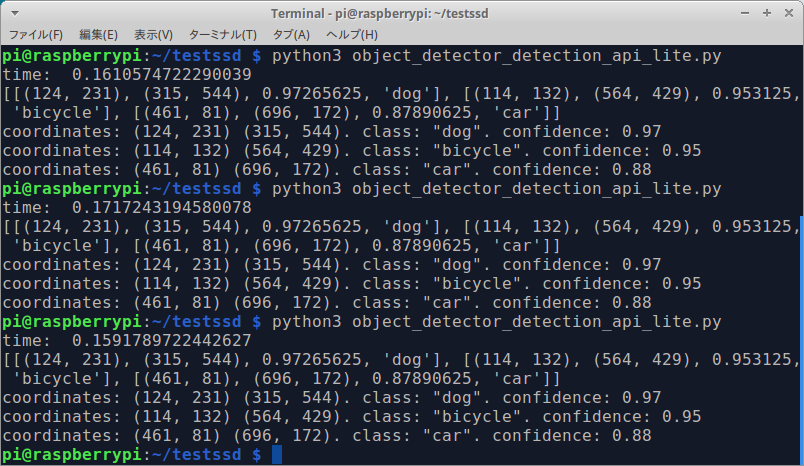
$ python3 mobilenetv2ssd.py
Sample of MultiThread x4 by Tensorflow Lite [RaspberryPi3 / MobileNetV2-SSD / 160ms]
4.Finally
早く RaspberryPi4 が欲しい!!!!!!!!!!!!!!
5.Reference
Tensorflow公式のクロスコンパイル手順 (2019年09月13日時点)
https://github.com/tensorflow/tensorflow/tree/master/tensorflow/lite/tools/pip_package
高速化チューニング済み Tensorflow Lite のWheelファイル保管リポジトリ
https://github.com/PINTO0309/TensorflowLite-bin.git