zumo32u4 
◆ 前回記事
RaspberryPi3とZumoとROSで半永久自走式充放電ロボを作成したい_008日目_SLAM_GMapping_LiDAR(A1M8) の続き
◆ はじめに
面白みのない連投記事でも、見て下さっている方がいるというだけで誠に励みになります。
引き続きお付き合い頂ければ幸いです。
さて、何を隠そう、アホっぽいことが大好物だ。
さらにそのアホっぽいことを、周りのみんなと一緒になって取り組んでワイワイやるのが好きだ。
みんなで一緒にワイワイやるには手順を汎化しなくてはならない。
仕事ではなく、しがらみを一切意識する必要がないので、困難だ、と言われるほどワクワクして燃える。
仕事だったら、まず間違いなくやらない。
先に言っておくが、Mではない。
ただの 「わくわくさん」 だ。
誤解が無いように注意されたい。
ということで、 32bit OS の RaspberryPi (Raspbian Stretch) でなんて、きっと誰も試さないだろうと思うし、あえて皆がチャレンジしないような領域をダメ元でトライして人柱になろうと思う。
GoogleCarで名を馳せたCartoGrapherというアルゴリズムだ。
GoogleCarを初めて見たときは物凄く衝撃的だった。
奴らはなんて先進的でアグレッシブなのか、と。
まさか、そのアルゴリズムを自分で駆使する日が来るなんて夢にも思わなかった。
なお、本記事は動かすことを第一義とし、理論には一切触れない。というか、理論に触れられるほど学が無い。
今後もインスピレーションだけで突き進んでいくため、見苦しい点はご容赦頂きたい。
| 今回 | 他記事 | アルゴリズム | 特徴 |
|---|---|---|---|
| 008日目 | Gmapping | 一番有名らしい、ROS対応、loop closure有り | |
| ★ | Google Cartographer | 精度が高そう、ROS対応、loop closure有り | |
| 010日目 | Hector SLAM | 精度がいまいちっぽい、loop closure無し | |
| 011日目 | Karto SLAM | 単眼カメラでも動く、ROS対応、Visual-SLAM | |
| 012日目 | ORB-SLAM2 | 単眼カメラでも動く、Visual-SLAM | |
| 007日目 | mono-vo | 単眼カメラでも動く、Visual-SLAM | |
| 013日目 | VINS-Mono | 単眼カメラでも動く、ROS対応、Visual-SLAM、ドローン | |
| ー | ー | CNN-SLAM | 単眼カメラでも動く、3D、アイデアのメモ情報しか見当たらなかったため検証対象外とする |
| ー | ー | RGBD-SLAM-V2 | RGB-Dカメラ専用、検証対象外とする |
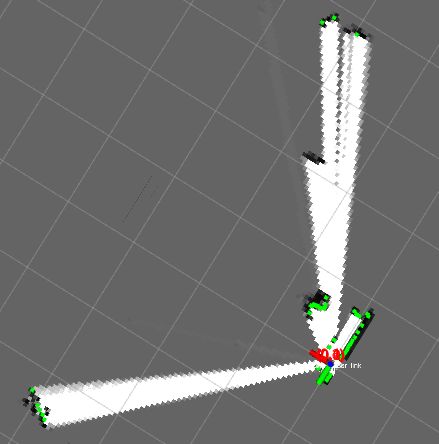
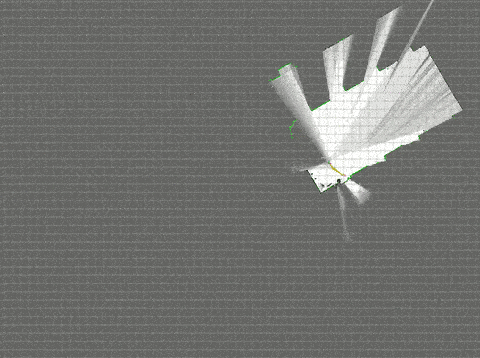
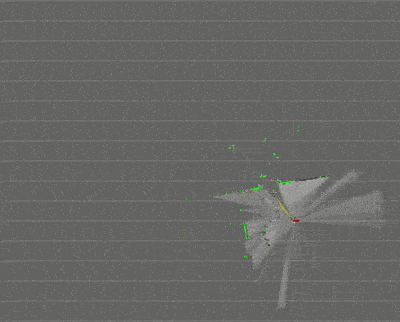
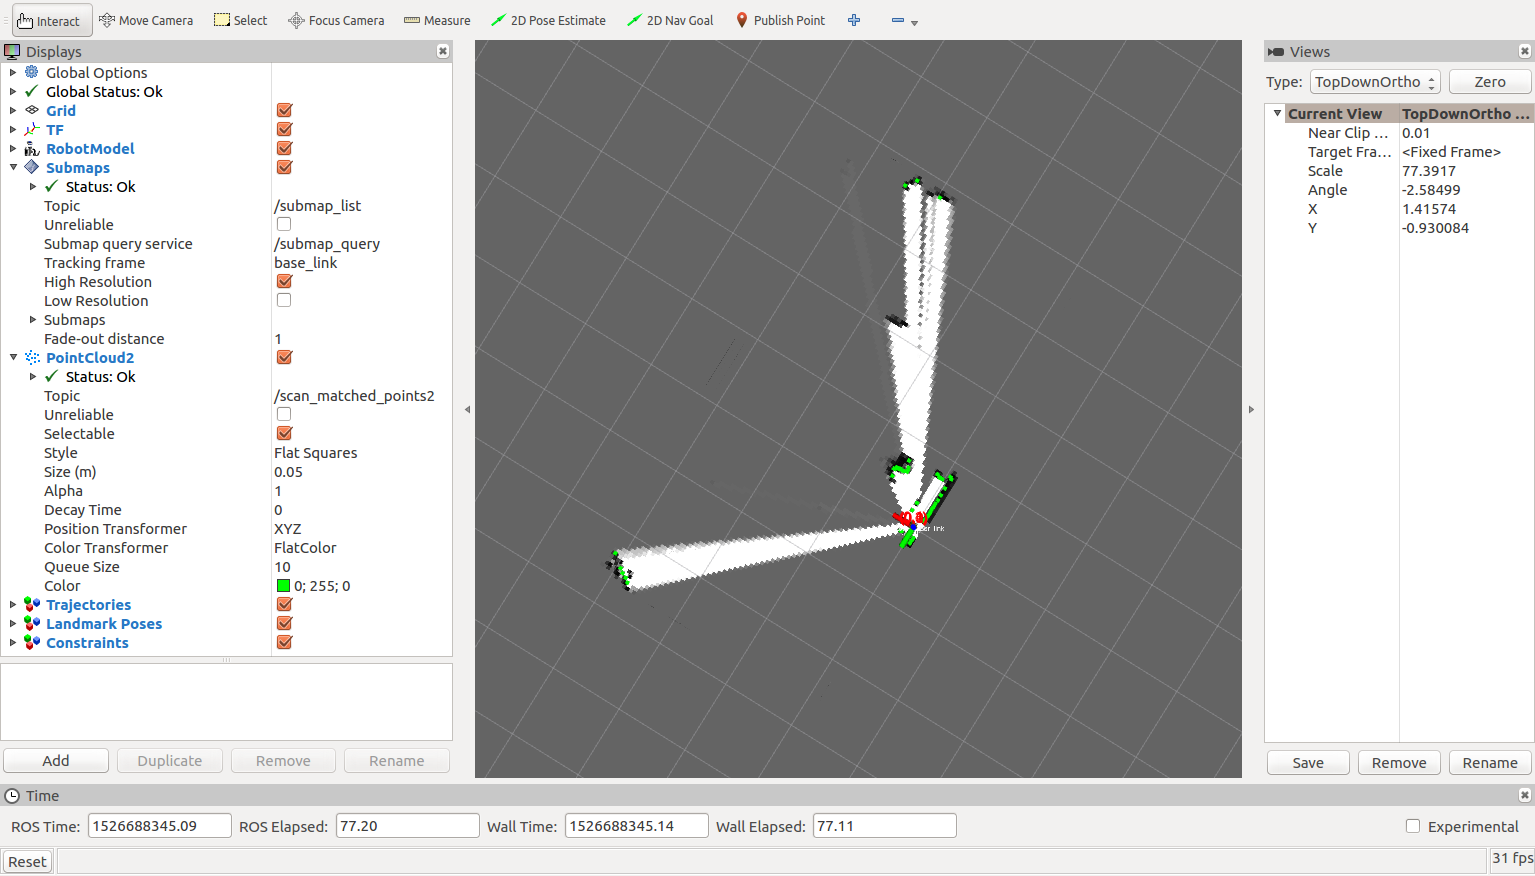
毎度恒例、先に試行結果の画像を公開する。
GMappingより早くて精度が高い。
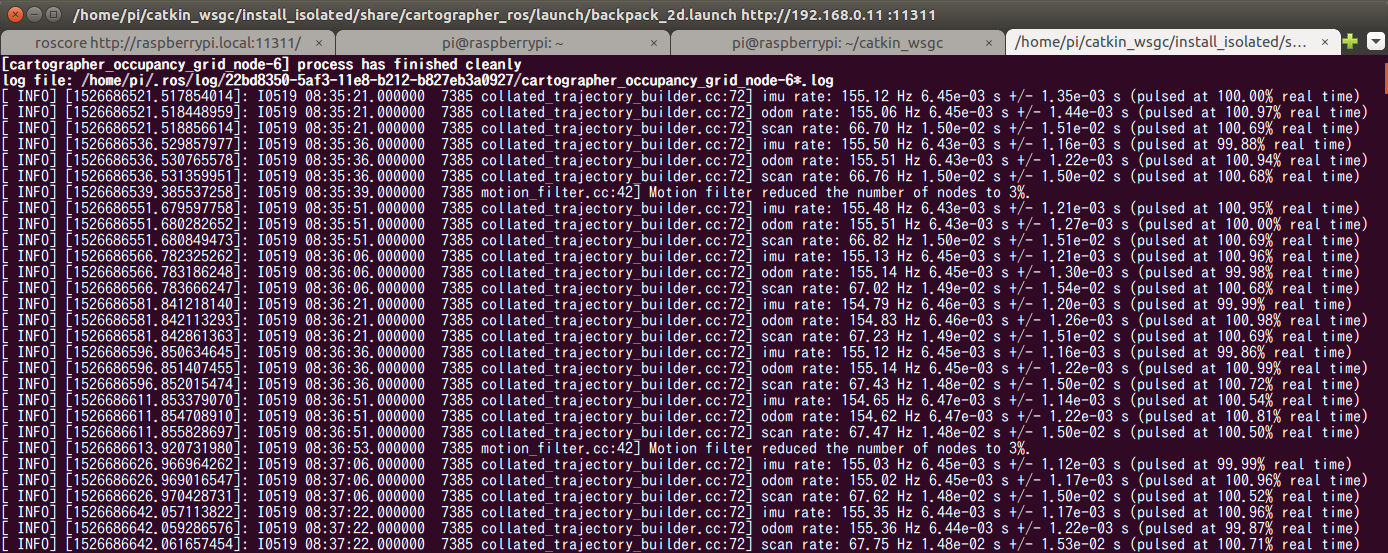
実行中のRaspberryPi側のコンソールはこんな感じ。
◆ 参考にさせていただいた記事、謝辞
【公式】
【Cartographer ROS Integration】 https://google-cartographer-ros.readthedocs.io/en/latest/
【Cartographer】 https://google-cartographer.readthedocs.io/en/latest/index.html#system-requirements
【Github】 https://github.com/googlecartographer/cartographer
師匠。その爆死、決して無駄にはいたしません。
【syoamakaseさん】
GoogleのCartographerをシミュレーターで使いたいだけの人生だった[失敗談] Qiita
こちらの Crafty_as_a_Foxさん の Qiita記事 ならびに Github へコミットされているリソースの完成度が凄まじい。
そこらの製品マニュアルよりも細かいし、プログラムなどの整理の仕方もとても綺麗。
猛烈にリスペクト。
BeagleBoneBlack + Ubuntu16.04 で実機を構築していらっしゃる。
手前勝手な希望を言えば、ソフトウェア仕様書のほうもアップデートしていただけないかな。。。
【Crafty_as_a_Foxさん】
ROSとGazeboによる自律移動シミュレーション 〜SLAMの実装〜 Qiita
下記 NextWorldさん のQiita記事は北陽のLiDARだけど、タイムリー過ぎて感激のあまり涙が出そうに。。。
【NextWorldさん】
ROS31:Cartographerを動かすまで Qiita
ROS32:cartgrapher(2D)のデータを保存、再生する。 Qiita
下記、段取り確認のため、少しだけ参考にさせていただきました。
【BRILLIANTSERVICE TECHNICAL BLOG】
ROSで始めるロボティクス(3) ー 差動二輪ロボットを準備する
ROSで始めるロボティクス(4) ー シミュレータ上でロボットを動かしてみる
ROSで始めるロボティクス(5) ー GazeboでToFセンサーをシミュレーションする
ROSで始めるロボティクス(7) ー ロボットのための二次元mapを作る
ROSで始めるロボティクス(8) ー ロボットのナビゲーションを行う
◆ システム要件
● ハードウェアとOS
【 Googleの公式ドキュメントから引用 】
Cartographerは他のシステムでも動作しますが、次の要件を満たすシステムで動作することが確認されています。
- 64ビット CPU(例:第3世代i7)
- 16GB RAM
- Ubuntu 14.04 と 16.04
- gccバージョン4.8.4 および 5.4.0
● 既知の問題
【 Googleの公式ドキュメントから引用 】
32ビットのビルドには、クラッシュやメモリ破損の原因となるlibeigenアラインメントの問題があります。
システム要件が・・・桁違いに高すぎる・・・
しかも32bitでは まともに動きません ときたか・・・
最終的にはPC非介在での自律航行が目的なので、もはや詰んでいる匂いがプンプン。
Googleの賢い方々がおっしゃっていることなので、きっと間違いないに決まっている。
が、あえて突き進む。
ドMなんで。
◆ 作業に着手する前の前提条件
Raspbian Stretch+NCS(Neural Compute Stick)+YoloV2+Webカメラ+ROSによるリアルタイム複数動体検知環境の構築 と 002日目 から 008日目 の記事を参考に、全ての作業を実施済みであり、導入済みパッケージの種類と数の同期がとれていることを前提とする。
◆ UbuntuPCでのシミュレーション
このフェーズで使用する検証環境は下記。
■ 検証用PC
- OS:Ubuntu 16.04
- CPU:第3世代 Intel Core i7-3517U(1.9GHz)
- MEM:16GB
- ROS kinetic
● GoogleCartographerの導入
$ sudo apt update
$ sudo apt install -y python-wstool python-rosdep ninja-build
$ mkdir catkin_wsgc
$ cd catkin_wsgc
$ wstool init src
$ wstool merge -t src https://raw.githubusercontent.com/googlecartographer/cartographer_ros/master/cartographer_ros.rosinstall
$ wstool update -t src
$ src/cartographer/scripts/install_proto3.sh
$ sudo rosdep init #<--- エラーになっても無視
$ rosdep update
$ rosdep install --from-paths src --ignore-src --rosdistro=${ROS_DISTRO} -y
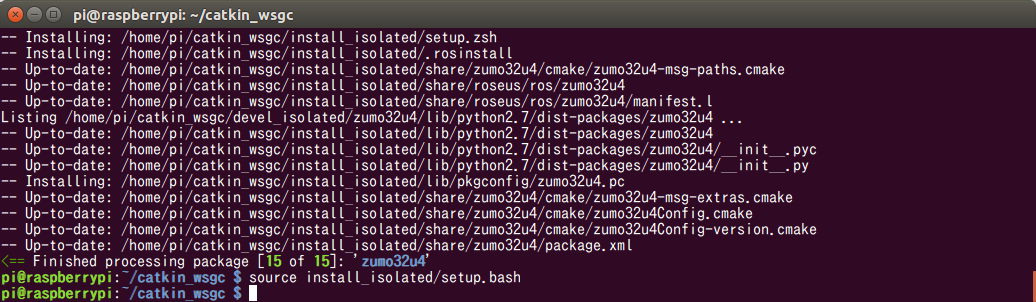
$ catkin_make_isolated --install --use-ninja
$ source install_isolated/setup.bash
● Google CartoGrapherのデモ実行
# Download the 2D backpack example bag. <--- 471MB
$ wget -P ~/Downloads https://storage.googleapis.com/cartographer-public-data/bags/backpack_2d/cartographer_paper_deutsches_museum.bag
# Launch the 2D backpack demo.
$ roslaunch cartographer_ros demo_backpack_2d.launch bag_filename:=${HOME}/Downloads/cartographer_paper_deutsches_museum.bag
Ubuntuなら、ものすごく簡単にシミュレーションまで動かすことができた。
そして、衝撃的な綺麗さ。さぞ高機能で重量級の処理が実行されているのだろう。
# Download the Revo LDS example bag.  <--- 3.0MB
$ wget -P ~/Downloads https://storage.googleapis.com/cartographer-public-data/bags/revo_lds/cartographer_paper_revo_lds.bag
# Launch the Revo LDS demo.
$ roslaunch cartographer_ros demo_revo_lds.launch bag_filename:=${HOME}/Downloads/cartographer_paper_revo_lds.bag
3D版のデモも多数公開されているが、サンプルデータが数GBもあるうえに、 やりたいこと は3Dである必要がないので今回は検証をスキップする。
◆ RaspberryPi (Raspbian Stretch) へ GoogleCartographerの導入
一応、イメージバックアップを取得し、ROSのワークスペースは 前回 までのものとは別に確保してから実施することにする。
RaspberryPi (Raspbian Stretch) へ GoogleCartographerを導入する。
$ sudo apt update;sudo apt upgrade
$ sudo apt install -y python-wstool python-rosdep ninja-build
$ mkdir catkin_wsgc;cd catkin_wsgc
$ wstool init src
$ wstool merge -t src https://raw.githubusercontent.com/googlecartographer/cartographer_ros/master/cartographer_ros.rosinstall
$ wstool update -t src
$ src/cartographer/scripts/install_proto3.sh
$ sudo rosdep init   #<--- エラーになっても無視
$ rosdep update
$ rosdep install --from-paths src --ignore-src --rosdistro=${ROS_DISTRO} -y

ですよね。。。公式手順で見事にエラー。。。
とはいえ、 [urdf] と [rviz] ということなので華麗に無視して先へ進んでみる。
「マズさ」を理解していない初心者をナメるなよ。
<参考:Debianパッケージ検索用Webページ "パッケージ名"で検索>
https://www.debian.org/distrib/packages
$ sudo nano /etc/dphys-swapfile
CONF_SWAPSIZE=2048
$ sudo /etc/init.d/dphys-swapfile restart swapon -s
$ sudo apt install libsuitesparse-dev libsuitesparseconfig4 libcxsparse3 \
libmetis-dev libmetis5 libmetis5-dbg metis libtbb-dev libtbb2 lua-bit32 \
lua-bit32-dev liblua5.3-0 liblua5.3-0-dbg liblua5.3-dev lua5.3 sphinx-common \
liburdfdom-tools libogre-1.9.0v5 ogre-1.9-tools libogre-1.9-dev \
assimp-utils libassimp3v5 python-pyassimp libassimp-dev \
qt3d-assimpsceneio-plugin sip-dev librviz-dev librviz2d python-rviz rviz
$ cd src
$ git clone https://github.com/PINTO0309/urdf.git
$ git clone https://github.com/PINTO0309/urdfdom_headers.git
$ git clone https://github.com/PINTO0309/rosconsole_bridge.git
$ cd urdfdom_headers
$ mkdir build && cd build && cmake ../ && make && sudo make install
$ cd ~/catkin_wsgc/src
$ git clone https://github.com/PINTO0309/urdfdom.git
$ cd urdfdom
$ mkdir build && cd build && cmake ../ && make && sudo make install
$ cd ~/catkin_wsgc/src
$ git clone https://github.com/PINTO0309/interactive_markers.git
$ git clone https://github.com/PINTO0309/python_qt_binding.git
$ git clone https://github.com/PINTO0309/resource_retriever.git
$ git clone https://github.com/PINTO0309/robot_state_publisher.git
$ git clone https://github.com/PINTO0309/kdl_parser.git
$ git clone https://github.com/PINTO0309/rplidar_ros.git
$ git clone https://github.com/PINTO0309/rosserial.git
$ git clone https://github.com/PINTO0309/zumo32u4.git
$ cd ~
$ git clone https://github.com/PINTO0309/pybindgen.git
$ cd pybindgen
$ sudo python setup.py install
$ cd ~/catkin_wsgc/src/cartographer_ros
$ rm -r -f cartographer_rviz

$ cd ~/catkin_wsgc
$ catkin_make_isolated -j1 --install --use-ninja
$ source install_isolated/setup.bash
無駄の限りを尽くしたが、チュートリアルを完全に無視した、オリジナルのビルド手順でなんとか完遂したようだ。
ここまでくると自分の中で、ROSのビルドエラーの対応方法が定型化してきている。
SWAPエリア不足によりフリーズして半日を無駄にしたが、酒飲みながら、工数およそ1日で終わった。
Segmentation Fault など発生せずにまともに動けばよいが。。。
◆ Google CartoGrapher
さて、それでは実行してみる。
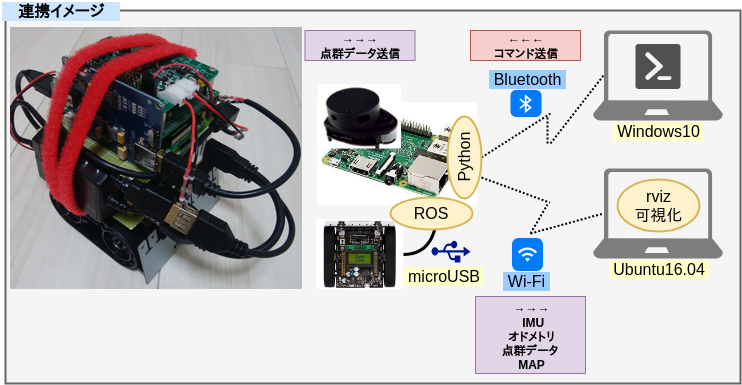
このフェーズの作業環境・実行環境は下記。
■ ロボット
-
Arduino 32u4
- 加速度、方位、エンコーダ値、ジャイロの取得
- 左右のモーター制御
-
RaspberryPi3(Raspbian Stretch)
- ロボット操作コマンドのBluetooth中継
- オドメトリ/IMUデータ加工・Publish
- LiDARの点群データ加工・Publish
- ROSのMaster起動
- Google Cartographerパッケージ起動
-
RPLidar A1M8 (SDK ver 1.5.7 / Firmware ver 1.20)
- 点群データ採取
■ 作業PC
- Ubuntu16.04
- Arduinoスケッチのコンパイル + Arduino へのスケッチ書き込み
- RaspberryPi からの公開トピックによるrviz可視化
■ ロボット操作PC
- Windows10 Pro
- TeraTermによる、ロボットへの前後進、右左折、停止、指示操作
● UbuntuPCで作業実施
ここからはUbuntuPC上で作業を実施。
$ cd ~/catkin_wsgc
$ git clone https://github.com/PINTO0309/zumo32u4.git
$ cd ~/catkin_wsgc/src/cartographer_ros/cartographer_ros/launch
$ cp backpack_2d.launch BK_backpack_2d.launch
$ nano backpack_2d.launch
下記のように編集する。
<?xml version="1.0" ?>
<launch>
  <param
      name="robot_description"
      textfile="$(find cartographer_ros)/urdf/zumo32u4.urdf"
  />
  <node
      name="rviz"
      pkg="rviz"
      type="rviz"
      required="true"
      args="-d $(find cartographer_ros)/configuration_files/demo_2d.rviz"
  />
</launch>
下記を実行する。
$ cd ~/catkin_wsgc/src/zumo32u4/urdf
$ cp zumo32u4.STL ~/catkin_wsgc/install_isolated/share/cartographer_ros/urdf
$ cp zumo32u4.gv ~/catkin_wsgc/install_isolated/share/cartographer_ros/urdf
$ cp zumo32u4.urdf ~/catkin_wsgc/install_isolated/share/cartographer_ros/urdf
$ nano ~/catkin_wsgc/install_isolated/share/cartographer_ros/urdf/zumo32u4.urdf
<geometry>
    <mesh filename="package://zumo32u4/urdf/zumo32u4.STL" scale="1 1 1"/>
</geometry>
<geometry>
    <mesh filename="package://cartographer_ros/urdf/zumo32u4.STL" scale="1 1 1"/>
</geometry>
下記を実行する。
$ cd ~/catkin_wsgc
$ catkin_make_isolated --install --use-ninja
$ source install_isolated/setup.bash
● RaspberryPiで作業実施
ここからはRaspberryPi上で作業を実施。
$ cd ~/catkin_wsgc/src/cartographer_ros/cartographer_ros/launch
$ cp backpack_2d.launch BK_backpack_2d.launch
$ nano backpack_2d.launch
下記のように編集する。
<?xml version="1.0" ?>
<launch>
  <param
      name="robot_description"
      textfile="$(find zumo32u4)/urdf/zumo32u4.urdf"
  />
  <node
     name="horizontal_laser"
     pkg="rplidar_ros"
     type="rplidarNode"
     output="screen">
     <param name="serial_port"      type="string" value="/dev/ttyUSB0"/>
     <param name="serial_baudrate"  type="int"    value="115200"/>
     <param name="frame_id"         type="string" value="horizontal_laser_link"/>
     <param name="inverted"         type="bool"   value="false"/>
     <param name="angle_compensate" type="bool"   value="true"/>
  </node>
  <node
      pkg="tf"
      type="static_transform_publisher"
      name="laser_link_connect"
      args="0 0 0 0 0 0 /horizontal_laser_link /scan 100"
  />
  <node
      pkg="tf"
      type="static_transform_publisher"
      name="base_link_connect"
      args="0 0 0 0 0 0 /base_link /horizontal_laser_link 100"
  />
  <node
      name="robot_state_publisher"
      pkg="robot_state_publisher"
      type="robot_state_publisher"
  />
  <node
      name="cartographer_occupancy_grid_node"
      pkg="cartographer_ros"
      type="cartographer_occupancy_grid_node"
      args="-resolution 0.05"
  />
  <node
      name="cartographer_node"
      pkg="cartographer_ros"
      type="cartographer_node"
      args="-configuration_directory $(find cartographer_ros)/configuration_files -configuration_basename backpack_2d.lua"
      output="screen">
  </node>
</launch>
$ cd ~/catkin_wsgc/src/cartographer_ros/cartographer_ros/configuration_files
$ cp backpack_2d.lua BK_backpack_2d.lua
$ nano backpack_2d.lua
下記のように編集する。
include "map_builder.lua"
include "trajectory_builder.lua"

options = {
  map_builder = MAP_BUILDER,
  trajectory_builder = TRAJECTORY_BUILDER,
  map_frame = "map",
  tracking_frame = "base_link",
  published_frame = "base_link",
  odom_frame = "odom",
  provide_odom_frame = false,
  publish_frame_projected_to_2d = false,
  use_odometry = true,
  use_nav_sat = false,
  use_landmarks = false,
  num_laser_scans = 1,
  num_multi_echo_laser_scans = 0,
  num_subdivisions_per_laser_scan = 10,
  num_point_clouds = 0,
  lookup_transform_timeout_sec = 0.2,
  submap_publish_period_sec = 0.3,
  pose_publish_period_sec = 5e-3,
  trajectory_publish_period_sec = 30e-3,
  rangefinder_sampling_ratio = 1.,
  odometry_sampling_ratio = 1.,
  fixed_frame_pose_sampling_ratio = 1.,
  imu_sampling_ratio = 1.,
  landmarks_sampling_ratio = 1.,
}

MAP_BUILDER.use_trajectory_builder_2d = true
TRAJECTORY_BUILDER_2D.num_accumulated_range_data = 10

return options
下記を実行する。
$ cd ~/catkin_wsgc
$ catkin_make_isolated --install --use-ninja
$ source install_isolated/setup.bash
● 一気通貫でGoogleCartoGrapherを実行
1.Arduino と RaspberryPi を microUSBケーブル で接続
2.RPLidarA1M8 と RaspberryPi を USBケーブル で接続
3.下記を順番に実施
$ roscore
$ rosrun rosserial_python serial_node.py _port:=/dev/ttyACM0 _baud:=115200
$ rosrun zumo32u4 zumo32u4.py
$ cd ~/catkin_wsgc
$ source install_isolated/setup.bash
$ roslaunch cartographer_ros backpack_2d.launch
$ cd ~/catkin_wsgc
$ source install_isolated/setup.bash
$ export ROS_MASTER_URI=http://raspberrypi.local:11311/
$ roslaunch cartographer_ros backpack_2d.launch
4.UbuntuPCに表示されているrviz画面左下の Add ボタンをクリックする
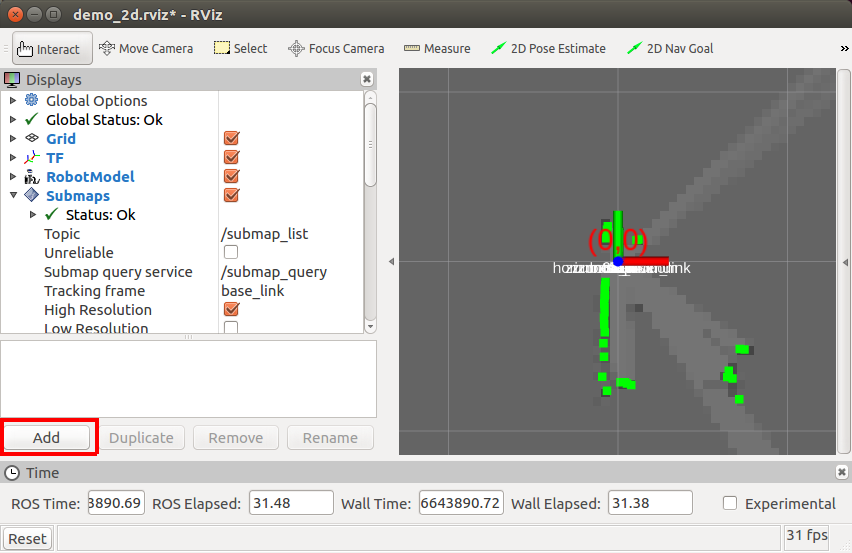
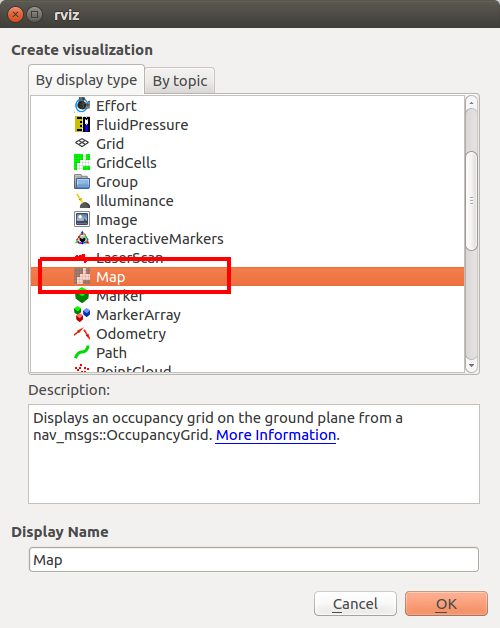
5.ダイアログのリストの中から Map を選択してOKボタンをクリック
なんと! RaspberryPi (Raspbian Stretch) でエラーにならずに動いた!
ド―――(゚∀゚)―――ン!!
GMappingよりもなめらかで、圧倒的に素早くマップが生成されるようだ。
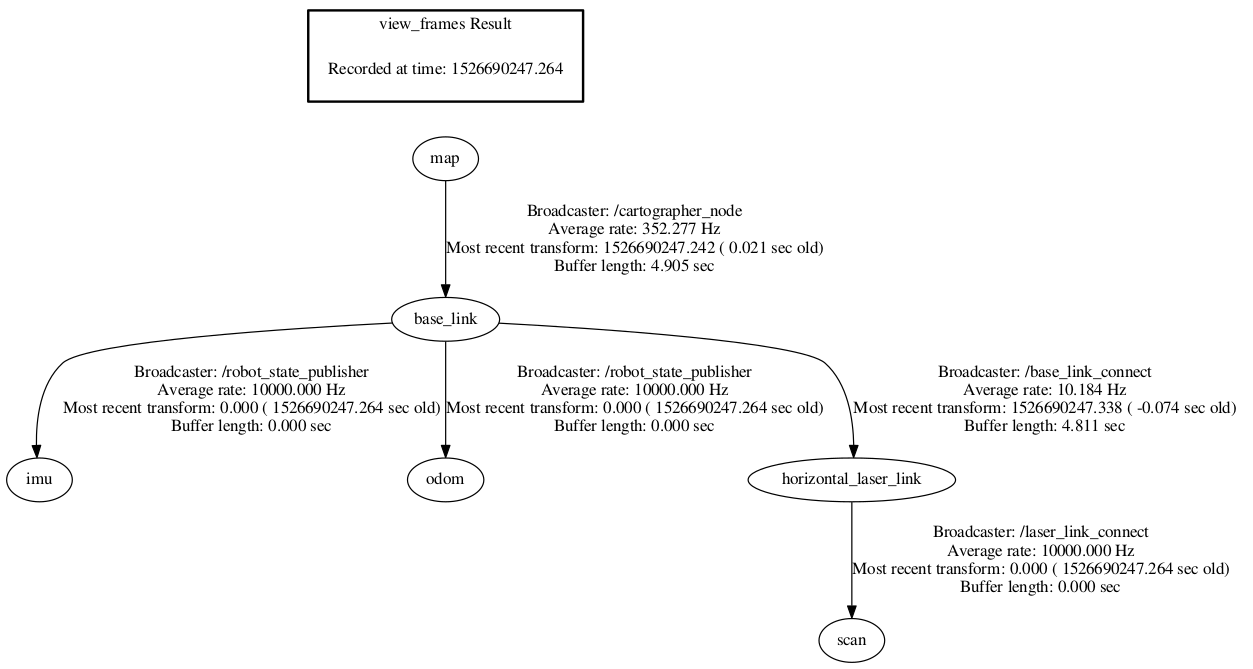
実行時のRaspberryPi側の tf構成 は下図のとおりになった。
Windows10PCでのロボット操作手順は省略する。
思い違いかもしれないが、launchファイルやluaファイルなどの設定ファイルを調整するごとに、 catkin_make_isolated --install --use-ninja を実行する必要があるような気がする。
実行しないと修正した内容が反映されないようだ。
なお、一部のパッケージはGMapping環境構築のときに作成したパッケージを使用するが、今回用に少しだけ手を入れて Github へコミットしてしまった。
PublishするときのTOPIC名をシンプルにしただけだけども。。。
GMapping側の記事も少し修正しなくてはならないかもしれない。
※Gitのブランチの切り方が分からないので後日修正しようと思う。
#        self.pub_imu       = rospy.Publisher('/zumo32u4/imu', Imu, queue_size=10)
#        rospy.loginfo("Publisher initialization success /zumo32u4/imu")
#        self.pub_odom      = rospy.Publisher('/zumo32u4/odom', Odometry, queue_size=10)
#        rospy.loginfo("Publisher initialization success /zumo32u4/odom")
        self.pub_imu       = rospy.Publisher('imu', Imu, queue_size=10)
        rospy.loginfo("Publisher initialization success /imu")
        self.pub_odom      = rospy.Publisher('odom', Odometry, queue_size=10)
        rospy.loginfo("Publisher initialization success /odom")
◆ 本日のまとめ
- RaspberryPi + Raspbian Stretch + CartoGrapher による地図生成に成功した。
- さすがにSDカードの中身がすごいことになってきた。
- 広大な地図を作ろうとすると不安定になるのかな? あまり関係ないような気もする。
- 全て綺麗にまとめようとすると記事が長くなりすぎることが分かったので、今回以降は 008日目 以降の記事を全て読むことを前提にし、必要以上に記事1回あたりの情報量を増やさないようにしようと思う。
- navigationパッケージをビルドしたときより10倍楽だった。
- アルゴリズムを全て試す前に、使い勝手の良さとパフォーマンスの観点で、 「もう、CartoGrapherでいいんじゃね?」 ってなりかけている。
◆ 次回予告
RaspberryPi で Hector SLAM にチャレンジしようと思う。
まだまだ先は長そうだ。
◆ 次回記事
RaspberryPi3とZumoとROSで半永久自走式充放電ロボを作成したい_010日目_SLAM_Hector SLAM_LiDAR(A1M8) へ続く