◆ はじめに
先月ようやく、今時のGPU付きのノートパソコンを購入できたので、本格的に趣味でDeepLearningに取り組めるようになった。
ただ、セマンティック・セグメンテーションに興味を持ってあれこれとモデルを作り始めてみたものの、最終生成されたモデルのサイズが 500MB とか、200MB とか、ロースペック端末では現実的に利用不可能な巨大なサイズとなることが分かり、途方に暮れていた。
都合上、 Pure Caffe や Pure Tensorflow 、あるいは、それらの派生フレームワーク で実装できないモデルは除外して検証してきている。
目的の本質は、 Neural Compute Stick + RapberryPi の構成でセマンティック・セグメンテーションをブーストすること、なのだが、NCSDK側のAPIが各レイヤーに対応していない、あるいは、中間コード生成時に float16 の精度をオーバーしてしまうため 今のところは 断念している。
NCSDKが近々バージョンアップして公開される想定のため、対応レイヤーが増えた場合にすぐ動作検証できるように、各種モデルを事前生成しておく意味合いもある。
ちなみに、今まで試してきたセマンティック・セグメンテーションのモデルは下記。
次回は、ENet の記事を残そうと思う。
1. UNet (Tensorflow)
2. ENet (Caffe)
3. PSPNet (話にならない巨大サイズのモデル)
4. FCN (話にならない巨大サイズのモデル)
5. RefineNet (話にならない巨大サイズのモデル)
6. SegNet (Tensorflow) (話にならない巨大サイズのモデル)
すでに誰かが投稿しているかもしれないため今更感があるかもしれないが、念の為書き残しておくことにする。
例によって例のごとく、流行りの論文めいた記事や、分り易いグラフを書く技量は無いが、動かす・実際に使う、ことだけを前提に記載する。
今回生成したモデルのサイズは、10.8MB。
ENet に次ぐ驚異的な軽量さだ。 (ENet は 1〜2MB)
にもかかわらず、かなり良い数値上の精度を叩き出している。
FineTuning + モデルの量子化(Quantize) によって、高精度と極限の軽量さを実現しているようだ。
| No. | Configuration | Pixel Accuracy | Mean IOU |
|---|---|---|---|
| 1 | Initial L2 regularized training | 96.20 | 83.23 |
| 2 | L1 regularized fine tuning | 96.32 | 83.94 |
| 3 | Sparse fine tuned(nearly 80% zero coefficients) | 96.11 | 82.85 |
| 4 | Sparse(80%), Quantized(8-bit dynamic fixed point) | 95.91 | 82.15 |
| 5 | Overall impact due to sparse+quant | -0.42 | -1.79 |
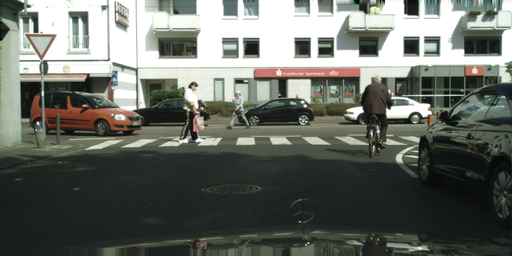
<サンプルその1: GrandTruth>
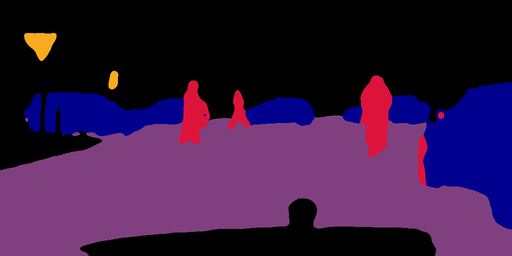
<サンプルその1: Segmentation>
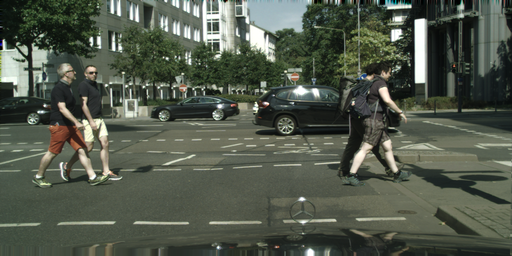
<サンプルその2: GrandTruth>
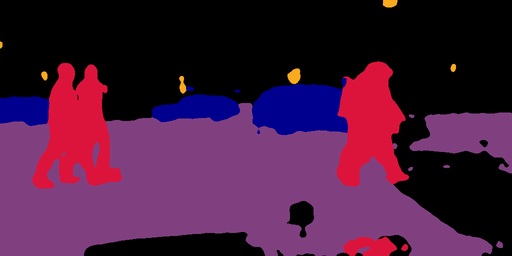
<サンプルその2: Segmentation>
◆ 参考にさせていただいた記事、謝辞
tktktks10 さん
U-NetでPascal VOC 2012の画像をSemantic Segmentationする (TensorFlow) - Qiita
TimoSaemann
ENet: A Deep Neural Network Architecture for Real-Time Semantic Segmentation - Github
tidsp
Caffe-jacinto - embedded deep learning framework - Github
ねっぽ さん
wget で認証突破! Cityscapes データセットをダウンロードする
◆ 環境
- Ubuntu 16.04
- CUDA 9.0
- cuDNN 7
- caffe-jacinto caffe-0.17 (NVCaffe [nvidia/Caffe] のForkリポジトリ)
- Geforce GTX 1070
- Python 2.7
- numpy
- OpenCV 3.x
- Cityscapesデータセット
◆ 環境構築
● CUDA9.0/cuDNN7の導入
1.下記コマンドを実行する。
$ sudo apt remove cuda-*;sudo apt purge cuda-*
$ cd ~
$ wget http://developer.download.nvidia.com/compute/cuda/repos/ubuntu1604/x86_64/cuda-repo-ubuntu1604_9.0.176-1_amd64.deb
$ sudo dpkg -i cuda-*
$ sudo apt update
$ sudo apt install cuda-9.0
2.下記のURLから 2種類の Debファイルをダウンロードする。(ログイン必要)
https://developer.nvidia.com/rdp/cudnn-archive
Download cuDNN v7.3.0 (Sept 19, 2018), for CUDA 9.0
cuDNN v7.3.0 Runtime Library for Ubuntu16.04 (Deb)
cuDNN v7.3.0 Developer Library for Ubuntu16.04 (Deb)
3.下記コマンドを実行する。
$ sudo dpkg -i libcudnn*
$ sudo apt update;sudo apt upgrade
4.下記コマンドを実行する。
$ echo 'export PATH=/usr/local/cuda-9.0/bin:${PATH}' >> ~/.bashrc
$ echo 'export LD_LIBRARY_PATH=/usr/local/cuda-9.0/lib64:${LD_LIBRARY_PATH}' >> ~/.bashrc
$ source ~/.bashrc
$ sudo ldconfig
$ nvcc -V
$ cd ~;nano cudnn_version.cpp

# include <cudnn.h>
# include <iostream>

int main(int argc, char** argv) {
    std::cout << "CUDNN_VERSION: " << CUDNN_VERSION << std::endl;
    return 0;
}

$ nvcc cudnn_version.cpp -o cudnn_version
$ ./cudnn_version
● caffe-jacintoの導入
1.下記コマンドを実行する。
$ cd ~
$ git clone https://github.com/tidsp/caffe-jacinto.git
$ cd caffe-jacinto
$ git checkout caffe-0.17
2.下記コマンドを実行し、Makefile.config の修正を開始する。
$ cp Makefile.config.example Makefile.config
$ nano Makefile.config
3.下記のとおり修正して保存する。
## Refer to http://caffe.berkeleyvision.org/installation.html
# Contributions simplifying and improving our build system are welcome!

# cuDNN acceleration switch (uncomment to build with cuDNN).
# cuDNN version 6 or higher is required.
USE_CUDNN := 1

# NCCL acceleration switch (uncomment to build with NCCL)
# See https://github.com/NVIDIA/nccl
# USE_NCCL := 1

# Builds tests with 16 bit float support in addition to 32 and 64 bit.
# TEST_FP16 := 1

# uncomment to disable IO dependencies and corresponding data layers
# USE_OPENCV := 0
# USE_LEVELDB := 0
# USE_LMDB := 0

# Uncomment if you're using OpenCV 3
OPENCV_VERSION := 3

# To customize your choice of compiler, uncomment and set the following.
# N.B. the default for Linux is g++ and the default for OSX is clang++
# CUSTOM_CXX := g++

# CUDA directory contains bin/ and lib/ directories that we need.
CUDA_DIR := /usr/local/cuda-9.0
# On Ubuntu 14.04, if cuda tools are installed via
# "sudo apt-get install nvidia-cuda-toolkit" then use this instead:
# CUDA_DIR := /usr

# CUDA architecture setting: going with all of them.
CUDA_ARCH := 	-gencode arch=compute_50,code=sm_50 \
		-gencode arch=compute_52,code=sm_52 \
		-gencode arch=compute_60,code=sm_60 \
		-gencode arch=compute_61,code=sm_61 \
		-gencode arch=compute_61,code=compute_61

# BLAS choice:
# atlas for ATLAS
# mkl for MKL
# open for OpenBlas - default, see https://github.com/xianyi/OpenBLAS
BLAS := open
# Custom (MKL/ATLAS/OpenBLAS) include and lib directories.
BLAS_INCLUDE := /opt/OpenBLAS/include/
BLAS_LIB := /opt/OpenBLAS/lib/

# Homebrew puts openblas in a directory that is not on the standard search path
# BLAS_INCLUDE := $(shell brew --prefix openblas)/include
# BLAS_LIB := $(shell brew --prefix openblas)/lib

# This is required only if you will compile the matlab interface.
# MATLAB directory should contain the mex binary in /bin.
# MATLAB_DIR := /usr/local
# MATLAB_DIR := /Applications/MATLAB_R2012b.app

# NOTE: this is required only if you will compile the python interface.
# We need to be able to find Python.h and numpy/arrayobject.h.
PYTHON_INCLUDE := /usr/include/python2.7 \
		/usr/lib/python2.7/dist-packages/numpy/core/include \
		/usr/local/lib/python2.7/dist-packages/numpy/core/include
# Anaconda Python distribution is quite popular. Include path:
# Verify anaconda location, sometimes it's in root.
# ANACONDA_HOME := $(HOME)/anaconda
# PYTHON_INCLUDE := $(ANACONDA_HOME)/include \
		# $(ANACONDA_HOME)/include/python2.7 \
		# $(ANACONDA_HOME)/lib/python2.7/site-packages/numpy/core/include \

# Uncomment to use Python 3 (default is Python 2)
# PYTHON_LIBRARIES := boost_python3 python3.5m
# PYTHON_INCLUDE := /usr/include/python3.5m \
#                 /usr/lib/python3.5/dist-packages/numpy/core/include

# We need to be able to find libpythonX.X.so or .dylib.
PYTHON_LIB := /usr/lib
# PYTHON_LIB := $(ANACONDA_HOME)/lib

# Homebrew installs numpy in a non standard path (keg only)
# PYTHON_INCLUDE += $(dir $(shell python -c 'import numpy.core; print(numpy.core.__file__)'))/include
# PYTHON_LIB += $(shell brew --prefix numpy)/lib

# Uncomment to support layers written in Python (will link against Python libs)
WITH_PYTHON_LAYER := 1

# Whatever else you find you need goes here.
INCLUDE_DIRS := $(PYTHON_INCLUDE) /usr/local/include /usr/include/hdf5/serial
LIBRARY_DIRS := $(PYTHON_LIB) /usr/local/lib /usr/lib /usr/lib/x86_64-linux-gnu/hdf5/serial

# If Homebrew is installed at a non standard location (for example your home directory) and you use it for general dependencies
# INCLUDE_DIRS += $(shell brew --prefix)/include
# LIBRARY_DIRS += $(shell brew --prefix)/lib

# Uncomment to use `pkg-config` to specify OpenCV library paths.
# (Usually not necessary -- OpenCV libraries are normally installed in one of the above $LIBRARY_DIRS.)
# USE_PKG_CONFIG := 1

BUILD_DIR := build
DISTRIBUTE_DIR := distribute

# Uncomment for debugging. Does not work on OSX due to https://github.com/BVLC/caffe/issues/171
# DEBUG := 1

# The ID of the GPU that 'make runtest' will use to run unit tests.
TEST_GPUID := 0

# enable pretty build (comment to see full commands)
Q ?= @

# shared object suffix name to differentiate branches
LIBRARY_NAME_SUFFIX := -nv
4.下記コマンドを実行し、依存パッケージを導入する。
$ sudo apt install python-pip python3-pip
$ sudo pip2 install --upgrade pip
$ sudo -H pip2 install numpy lmdb scikit-image
$ sudo apt-get install libprotobuf-dev libleveldb-dev libsnappy-dev libopencv-dev libhdf5-serial-dev protobuf-compiler
$ sudo apt-get install --no-install-recommends libboost-all-dev
$ sudo apt-get install libgflags-dev libgoogle-glog-dev liblmdb-dev python-skimage
$ sudo apt-get install libturbojpeg
5.下記コマンドを実行し、caffe-jacintoをビルドする。 <your user name> の部分は各自置き換え。
$ make -j8
$ make pycaffe
$ sudo ln -s /usr/lib/x86_64-linux-gnu/libturbojpeg.so.0.1.0 /usr/lib/x86_64-linux-gnu/libturbojpeg.so

$ echo 'export CAFFE_ROOT=/home/<your user name>/caffe-jacinto' >> ~/.bashrc
$ echo 'export PYTHONPATH=.:$CAFFE_ROOT/python:${PYTHONPATH}' >> ~/.bashrc
$ source ~/.bashrc
6.下記コマンドを実行する。 ※caffe-jacintoフォルダと同じ階層にCloneする必要がある。
$ cd ~
$ git clone https://github.com/tidsp/caffe-jacinto-models.git
$ cd caffe-jacinto-models
$ git checkout caffe-0.17
$ sudo chmod 777 * --recursive
7.Cityscapesデータセットのダウンロード。
https://www.cityscapes-dataset.com/login/
- データセットのダウンロードにはアカウントの事前作成が必要
- ヨーロッパ? のCityscapesプロジェクトメンバーから承認を得る必要がある
- @yahoo.co.jp や @gmail.com などのフリーメールのドメインは拒絶される
- 英語メールで簡単なやり取りが必要
- アカウント承認を申し入れると2〜3日後にメールで返信が来る
- 君はどういう組織の人間なのか? どういう用途を想定しているか? といった簡単な英語の質問に英語で回答する
- 製品開発での利用は認められていないので、 「私はDeepLearning(Semantic Segmentation)を研究しているエンジニアです。プロダクトの開発をするつもりはありません。」 とでも返信しておけばよい
- 更に2〜3日後、アカウントを承認した。というメールが来る
- 承認されると初めてログインが可能な状態になる
- 1件1件のメールを人力で読み、窓口担当者が1件ずつ丁寧に監査しているようだ
- アカウントの承認後、下記コマンドが使用できるようになる
$ cd ~;mkdir Cityscapes;cd Cityscapes
$ wget --keep-session-cookies --save-cookies=cookies.txt --post-data 'username=XXXXXX&password=YYYYYY&submit=Login' https://www.cityscapes-dataset.com/login/
$ wget --load-cookies cookies.txt --content-disposition https://www.cityscapes-dataset.com/file-handling/?packageID=1
$ wget --load-cookies cookies.txt --content-disposition https://www.cityscapes-dataset.com/file-handling/?packageID=3
$ unzip gtFine_trainvaltest.zip
$ unzip leftImg8bit_trainvaltest.zip
8.トレーニング用画像リストの生成。
$ cd ~/caffe-jacinto-models/scripts
$ nano tools/utils/create_cityscapes_lists.sh

export DATASETPATH=/data/ssd/datasets/object-detect/other/cityscapes/data
↓
export DATASETPATH=/home/<your user name>/Cityscapes

$ ./tools/utils/create_cityscapes_lists.sh
9.LMDBファイルの生成。
$ ./tools/utils/create_cityscapes_segmentation_lmdb.sh
◆ トレーニングの実行
1.トレーニング用パラメータの調整。
$ cd ~/caffe-jacinto-models/scripts
$ nano ./train_cityscapes_segmentation.sh

batch_size=16
↓
batch_size=8
2.トレーニングの実行。
GTX 1070 で 学習完了まで37時間掛かった。 GTX 1080 だと 22時間で完了する、らしい。
電気代がバカにならない。
ここのところ、毎日毎日ハードにブン回しすぎているので、GPUがブッ壊れないことを切に願う。。。
$ ./train_cityscapes_segmentation.sh
学習は大きく3ステップに分けて実行される。
GTX 1070 での目安。
1ステップ目.initialステップ・・・18時間28分
2ステップ目.l1regステップ・・・9時間15分
3ステップ目.sparseステップ・・・9時間40分
一応、学習完了間際のログだけ下記に参考記載する。
Accuracy値に大した意味は無いとしても、Loss値がかなり低い。 (0.166175 loss)
もう一度言っておくが、 これでも わずか10MB のモデルだ。
I1006 13:02:31.027254  5661 net.cpp:2742] Total Sparsity (zero_weights/count) =  (2.17197e+06/2.69117e+06) 0.807
I1006 13:02:31.145781  5661 solver.cpp:501] Iteration 60000, loss = 0.0320298
I1006 13:02:31.145813  5661 solver.cpp:538] Iteration 60000, Testing net (#0)
I1006 13:02:39.969820  5687 blocking_queue.cpp:40] Data layer prefetch queue empty
I1006 13:02:39.976511  5690 data_reader.cpp:320] Restarting data pre-fetching
I1006 13:02:39.988224  5688 data_reader.cpp:320] Restarting data pre-fetching
I1006 13:02:40.085002  5661 solver.cpp:624]     Test net output #0: accuracy/top1 = 0.958187
I1006 13:02:40.085031  5661 solver.cpp:624]     Test net output #1: accuracy/top5 = 0.999999
I1006 13:02:40.085039  5661 solver.cpp:624]     Test net output #2: loss = 0.166175 (* 1 = 0.166175 loss)
I1006 13:02:40.085057  5661 caffe.cpp:268] Solver performance on device 0: 1.724 * 8 = 27.58 img/sec (60000 itr in 3.481e+04 sec)
I1006 13:02:40.085069  5661 caffe.cpp:271] Optimization Done in 9h 40m 39s
いじょ。
Pre-Trainedモデル と deploy.prototxt は下記にコミットしてある。
https://github.com/PINTO0309/MobileNet-SSD-RealSense/tree/master/caffemodel/SemanticSegmentation/512x1024_citysapes
◆ 次回予告
今更ながら、 ENet の記事を書こうと思う。
ロボット製造の記事に戻れるのはいつになることやら。。。