はじめに
Zybo-Z7の開発環境を Windows 11 のWSL2(Unbuntu 18.04)に置いているのだが、そのPCを置いてある部屋が寒いので、暖かい部屋からMicrosoft Remote Desktop(以下RDP)でWindowsにリモート接続して、操作していた。(WindowsにVcXsrvをインストールし、GUIアプリを表示できるようにしている)
RDPでUbuntu desktopに直接入れることを知り、早速ためしてみた。本記事はその備忘録である。
前提
WSL2のUbuntuでGUIアプリを使用するため、あらかじめ、以下を参考に環境設定をしておいた。
インストール手順は、②の Windows側にXサーバーをインストール,Ubuntu側にGUIアプリをインストールを参考にし、設定は ①のGUIの設定を参考にした。どちらも Ubuntu 20.04 での例だが、18.04 でも問題なく行えた。
これで、Windows Terminal上のWSL2(Ubuntu)からGUIアプリを起動し、Windows Desktop上にGUIアプリのウィンドウが表示されるようになった。
手順
- WSL2を外部からアクセス可能にする
- Ubuntu Desktopをインストールする
- RDPで接続できるようにする
- RDPクライアントで接続してみる
1. WSL2を外部からアクセス可能にする
WSL2のネットワーク接続は、ホストPCのNICとの間にHyper-Vの仮想スイッチを介して接続される。デフォルトは、NATをはさんだプライベートネットワークとなり、ホストPCのNICとは異なるネットワークのIPアドレスが割り当てられる。そのため、ホストPCからはアクセスできるが、ホストPCの外部からはアクセスできない。
そこで、外部からアクセスできるようにするため、仮想スイッチをブリッジモードにする。
1.1 仮想ネットワークスイッチに接続の種類が「外部」のネットワークスイッチを追加する
- Hyper-V マネージャーの仮想スイッチを開き、新しい仮想ネットワークスイッチを追加する
- 名前:任意の名前 WSL (External) とした
- 接続の種類:外部ネットワーク
- NICを選択
- 管理オペレーティングシステムこのネットワークアダプタの共有を許可するにチェック

1.2 WSL2をブリッジモードにする
- 追加したネットワークスイッチを用いて、ブリッジモードとするよう.wslconfigファイルに記述する
- とりあえずdhcpとIPv6を有効にした
- ファイルの保存場所:Windowsのホームディレクトリ C:\Users\ユーザー
.wslconfig[wsl2] networkingMode=bridged vmSwitch=External dhcp=true ipv6=true
1.3 WSL2を再起動し、ネットワークアクセスを確認する
-
WSL2をシャットダウンする
Windows PowerShell> wsl --shutdown
- eth0にLANのIPアドレスが振られているか確認
- 無事にIPアドレスが割り当てられていた。
ubuntu$ ifconfig eth0: flags=4163<UP,BROADCAST,RUNNING,MULTICAST> mtu 1500 inet 192.168.0.16 netmask 255.255.255.0 broadcast 192.168.0.255 inet6 fe80::5cbb:f6ff:fe9e:eefa prefixlen 64 scopeid 0x20<link> inet6 240f:3b:8085:1:5cbb:f6ff:fe9e:eefa prefixlen 64 scopeid 0x0<global> ether 5e:bb:f6:9e:ee:fa txqueuelen 1000 (Ethernet) RX packets 40961 bytes 13987779 (13.9 MB) RX errors 0 dropped 0 overruns 0 frame 0 TX packets 20109 bytes 59182603 (59.1 MB) TX errors 0 dropped 0 overruns 0 carrier 0 collisions 0 lo: flags=73<UP,LOOPBACK,RUNNING> mtu 65536 inet 127.0.0.1 netmask 255.0.0.0 inet6 ::1 prefixlen 128 scopeid 0x10<host> loop txqueuelen 1000 (Local Loopback) RX packets 398 bytes 34671 (34.6 KB) RX errors 0 dropped 0 overruns 0 frame 0 TX packets 398 bytes 34671 (34.6 KB) TX errors 0 dropped 0 overruns 0 carrier 0 collisions 0
-
外部と通信できるか確認
ubuntu$ ping 192.168.0.1 PING 192.168.0.1 (192.168.0.1) 56(84) bytes of data. 64 bytes from 192.168.0.1: icmp_seq=1 ttl=64 time=2.97 ms 64 bytes from 192.168.0.1: icmp_seq=2 ttl=64 time=2.88 ms 64 bytes from 192.168.0.1: icmp_seq=3 ttl=64 time=3.99 ms ... $ ping google.com PING google.com(nrt13s52-in-x0e.1e100.net (2404:6800:4004:823::200e)) 56 data bytes 64 bytes from nrt13s52-in-x0e.1e100.net (2404:6800:4004:823::200e): icmp_seq=1 ttl=117 time=6.05 ms 64 bytes from nrt13s52-in-x0e.1e100.net (2404:6800:4004:823::200e): icmp_seq=2 ttl=117 time=6.61 ms 64 bytes from nrt13s52-in-x0e.1e100.net (2404:6800:4004:823::200e): icmp_seq=3 ttl=117 time=5.94 ms
参考
2. Ubuntu Desktopをインストールする
RDPでUbuntuにリモート接続してGUIアプリケーションを利用するなら、Ubuntu Desktopが必要だろうということで、インストールした。
すでにWindows 11のデスクトップにGUIウィンドウを表示するため、必要なツールはインストールしてあったので、今回はUbuntu Dsktopのみインストールした。
-
Ubuntu Dsktopのインストール
ubuntu$ sudo apt install ubuntu-desktop
-
Ubuntuを再起動する。
ubuntu$ exit
- これだけではシェルを閉じただけなので、PowershellからUbuntuをシャットダウンし、もう一度起動する。
Windows Powershell
> wsl --shutdown
> wsl -d Ubuntu-18.04
-
次に、デスクトップのためのサービスをスタートする。
ubuntu$ sudo service x11-common start && sudo service dbus start && gnome-shell --x11 -r
参考
3. RDPで接続できるようにする
-
RDPでリモート接続できるようにxrdpサーバをインストールする
-
インストールするパッケージ
- openssh_server : SSHサーバ
- tmux : 端末多重化ソフトウェア
- xrdp : オープンソースのリモートデスクトッププロトコルサーバ
Ubuntu$ sudo apt install openssh-server tmux xrdp -y
-
-
xrdpの設定
-
/etc/xrdp/startwm.shに、環境変数GNOME_SHELL_SESSION_MODE,XDG_CURRENT_DESKTOPを追加/etc/xrdp/startwm.sh#!/bin/sh # xrdp X session start script (c) 2015, 2017 mirabilos # published under The MirOS Licence export GNOME_SHELL_SESSION_MODE=ubuntu export XDG_CURRENT_DESKTOP=ubuntu:GNOME if test -r /etc/profile; then ...
-
参考
4. RDPクライアントで接続してみる
xrdpサーバの用意ができたので、Windows,Mac それぞれから接続してみる。
4.1 Windows 10から
4.1.1 TeraTermでSSH接続
- 新しい接続
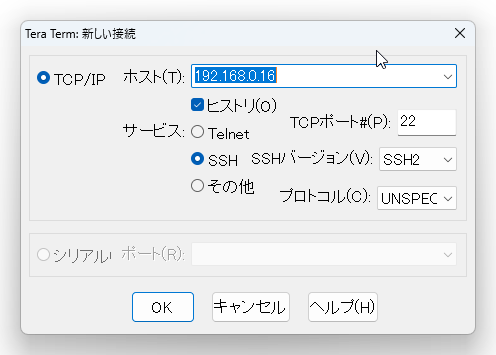
- ユーザ名,パスフレーズ入力
とりあえずプレインテキストで

- 接続できた!

4.1.2 RDPクライアントで接続
- ログオン設定 - IPアドレスだけ入力

- 画面の色は、32ビットだと重くなるそうなので、15ビットに設定

- ログイン画面が出るので、ユーザ名とパスワードを入力
ログオン設定にユーザ名を設定したら、ここに入るのだろうか?

- Ubuntu Desktopが表示された!

4.2 Mac OSから
4.2.1 ターミナルでSSH接続
% ssh ozorakobo@192.168.0.16
ozorakobo@192.168.0.16's password:
Welcome to Ubuntu 18.04.6 LTS (GNU/Linux 5.15.133.1-microsoft-standard-WSL2 x86_64)
...
PetaLinux environment set to '/home/ozorakobo/petalinux/2022.1'
WARNING: This is not a supported OS
INFO: Checking free disk space
INFO: Checking installed tools
INFO: Checking installed development libraries
INFO: Checking network and other services
WARNING: No tftp server found - please refer to "UG1144 2022.1 PetaLinux Tools Documentation Reference Guide" for its impact and solution
ozorakobo:~$
4.2.2 RDPクライアントで接続
- Microsoft Remote Desktopを起動
- Connections > Add PC
- PC Name : IPアドレス
- Display Color Quality : Medium (16bit)

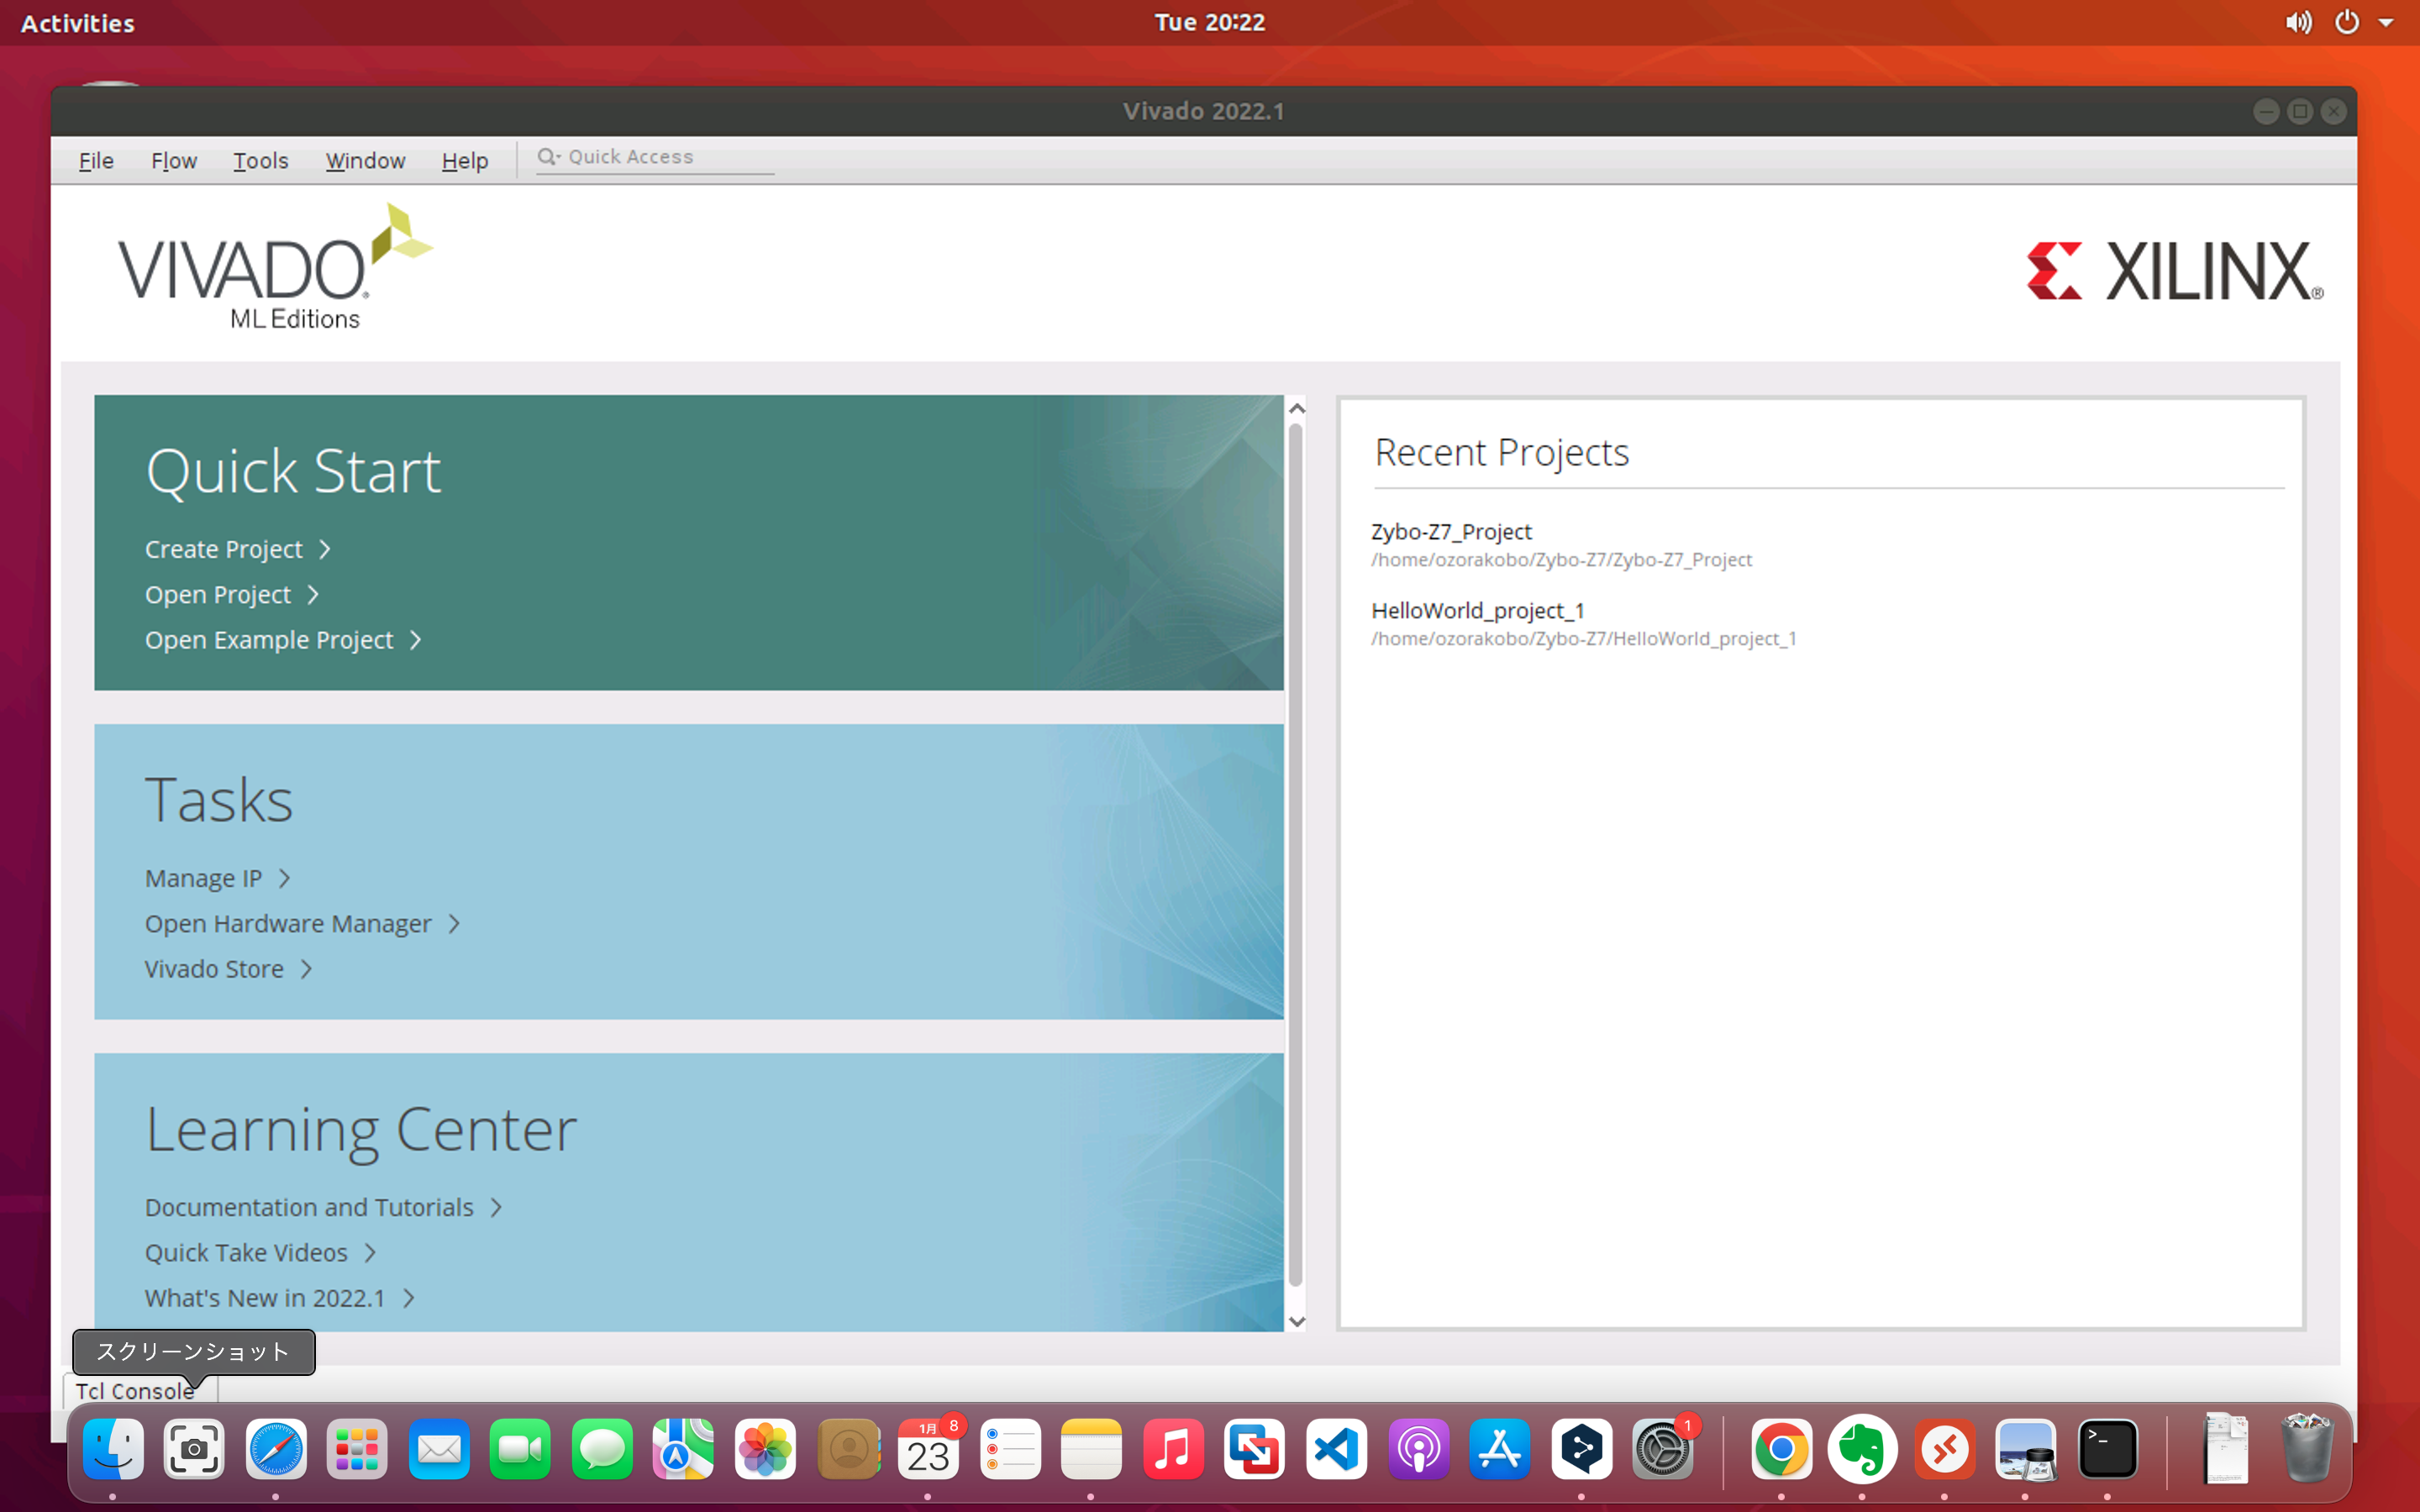
- Ubuntu Desktopが表示された!

- Vivado と Vitis も起動できて一安心

4.3 マルチユーザー接続
-
Ubunuにユーザを追加し、WindowsとMacのそれぞれから、異なるユーザ名で同時に接続できるか?
- 同時接続できた!
-
同じユーザ名で接続したら
- 後から接続したほうが画面を乗っ取った。