※2018年1月18日時点の情報です
← Lumberyardに触れる(3)-文字表示編 Lumberyardに触れる(5)-ゲーム開始編 →
はじめに
今回はクリックを取得します。
Lumberyardでのキーインプットやスクリプトの書き方に触れていきます。
キーの取得の前に
インプットのコンポーネント含まれるキャラを
先に読み込みます。
キャラ(スライス)の読み込み
今回はデフォルトで用意されているキャラクターを使います。
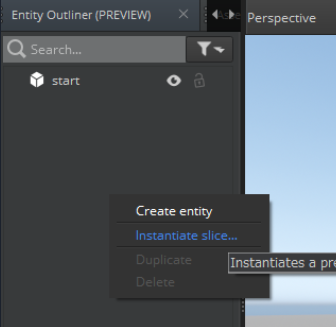
Entity Outlinerにて右クリック
Instantiate slice…をクリック
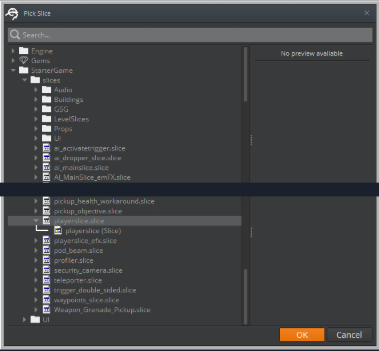
StarterGame>slices>pleyerSlice.sliceを選択します。
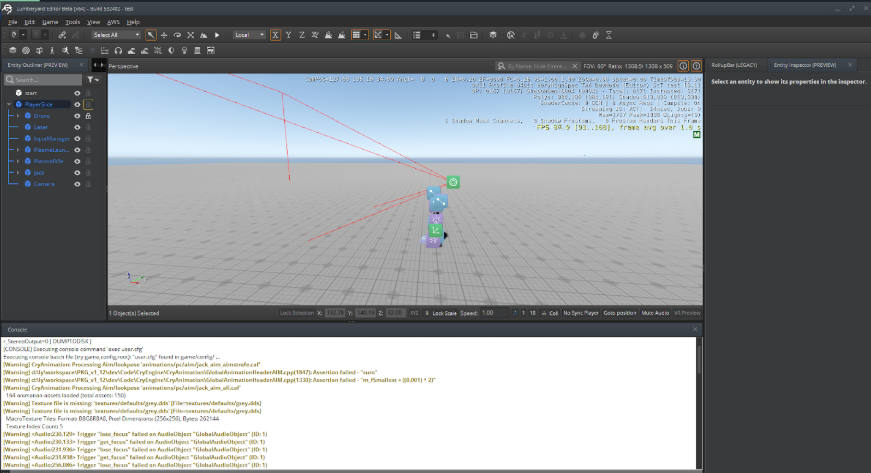
読み込み出来ました。
インプット
Lumberyardはインプットを取得するコンポーネントを追加することによってキーの取得ことが出来ます。
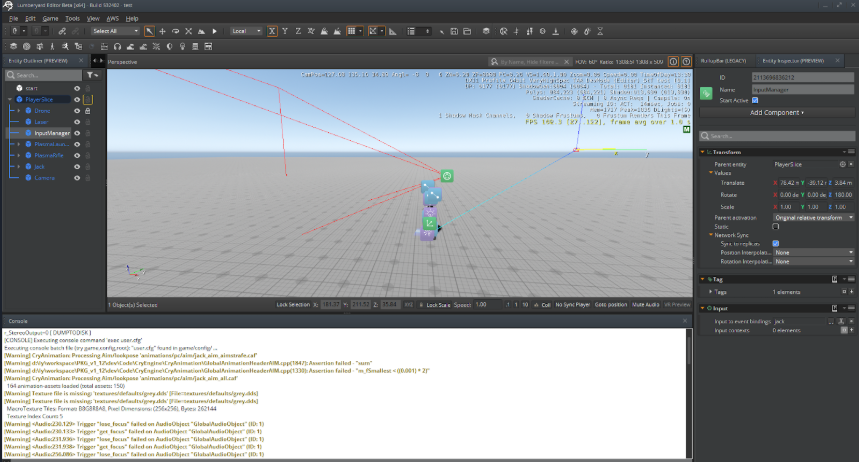
キャラに紐付いているインプットコンポーネントの中身を見ていきましょう。
PlayerSlice>InputManagerのエンティティにコンポーネントがついています。
すでに色々キーの入力は追加されていますが
今回は新規追加していきましょう。
Input to event bindingsのジョイスティックレバーのようなマークをクリックします。

Input Event Groupsの右の+をクリックしてクリック用イベントを追加します。
(とても重くウィンドウが落ちてしまう事があります)
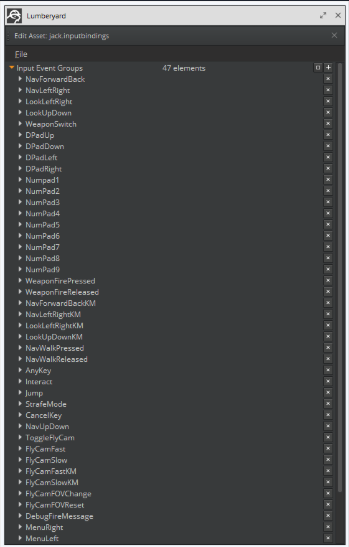
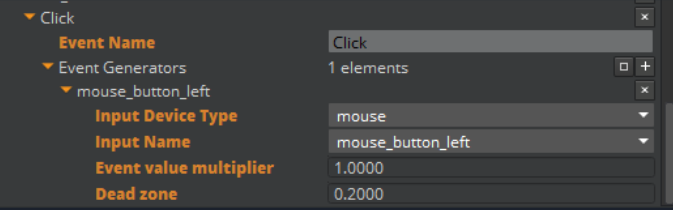
下のように設定し、保存します。
インプットの設定は終了です。
イベントを受け取るスクリプトの設定をしていきます。
Luaスクリプトについて
イベントを受け取るスクリプトの設定をしていきます。
Lumberyardでインプット情報を取得するためにはイベントバス(EBus)というシステムを使います。
Ebus
EBusの機能は2つ。
1.通知バス
2.リクエストバス
インプットの場合は通知バスを利用します。
実際に設定しながら中身を見ていきます。
Luaスクリプト(pressed)
まず、スクリプトの準備をしましょう。
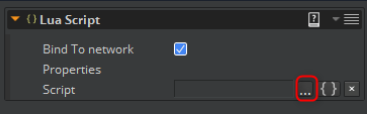
前回作成したエンティティのEntity InspectorにてAdd ComponentでLua Scriptを選択します。
追加されたコンポーネントのScript横の…ボタンを選択します。
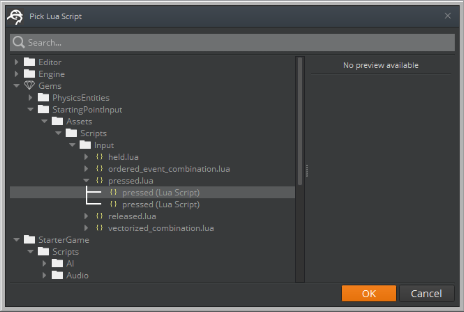
インプットの受け取りを行うluaスクリプトはGame>StartingPointInput>Assets>Scripts>Inputにあります。
選択してOKを押します。
local pressed =
{
   Properties =
   {
        IncomingInputEventName = "",
        OutgoingGameplayEventName = "",
   },
}

function pressed:OnActivate()
    local inputBusId = InputEventNotificationId(self.Properties.IncomingInputEventName)
    self.inputBus = InputEventNotificationBus.Connect(self, inputBusId)
end

function pressed:OnPressed(floatValue)
    GameplayNotificationBus.Event.OnEventBegin(GameplayNotificationId(self.entityId, self.Properties.OutgoingGameplayEventName, "float"), floatValue)
end

function pressed:OnHeld(floatValue)
end

function pressed:OnReleased(floatValue)
    GameplayNotificationBus.Event.OnEventEnd(GameplayNotificationId(self.entityId, self.Properties.OutgoingGameplayEventName, "float"), floatValue)
end

function pressed:OnDeactivate()
    self.inputBus:Disconnect()
end

return pressed
コメントを入れて全体43行あります。
では、一から解説をしていきます。
local pressed =
{
   Properties =
   {
        IncomingInputEventName = "",
        OutgoingGameplayEventName = "",
   },
}
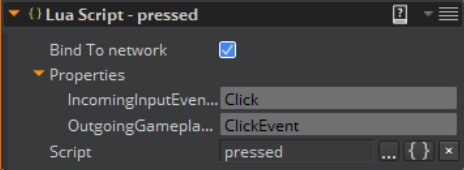
先頭行のPropertiesから説明します。
これは、エディタで入力出来るようにした変数群です。
下のようにインスペクタ側で設定が出来るようになります。
-
OnActivate
OnActiveはスクリプトを含むエンティティが有効になったときにエンジンが呼びます -
OnDeactivate
OnDeactivateはスクリプトを含むエンティティが無効になったときにエンジンが呼びます
function pressed:OnActivate()
    local inputBusId = InputEventNotificationId(self.Properties.IncomingInputEventName)
    self.inputBus = InputEventNotificationBus.Connect(self, inputBusId)
end
OnActiveで通知バスに接続します。
OnActiveでこの様にハンドラーで接続することによって、
バスからイベントがディスパッチされると、ハンドラーの関数が実行されるようになります。
function pressed:OnDeactivate()
    self.inputBus:Disconnect()
end
OnDeactivateで通知バスを切ります。
切らなくても大丈夫ではありますが、処理が重くなったりメモリを消費したりするので、しっかり実装しておきます。
OnReleased、OnHeld、OnPressedは
それぞれ通知イベントバス(InputEventNotificationBus)へ接続して使えるようになります。
-
OnReleased
入力がしきい値を超えなくなった時(離した時) -
OnHeld
入力がしきい値を超え続けた時(長押し) -
OnPressed
入力がしきい値を超えた時(押した時)
今回は押したときに接続して離したときにリリース処理をしていきます。
function pressed:OnPressed(floatValue)
    GameplayNotificationBus.Event.OnEventBegin(GameplayNotificationId(self.entityId, self.Properties.OutgoingGameplayEventName, "float"), floatValue)
end
OnPressedではself.Properties.OutgoingGameplayEventNameで定義した名前でイベントを開始通知します。
function pressed:OnReleased(floatValue)
    GameplayNotificationBus.Event.OnEventEnd(GameplayNotificationId(self.entityId, self.Properties.OutgoingGameplayEventName, "float"), floatValue)
end
OnReleasedではself.Properties.OutgoingGameplayEventNameで定義した名前でイベントを終了通知します。
OnHeldは今回、何もしていないです。
まとめ
これでInputの取得は以上になります。
意外と簡単だったのではないでしょうか?
通知バスに接続するだけで使えるようになるのは簡単ですね。
次回は今回のInputの通知バスを利用して
前回表示した「ゲームスタート」の文字を消す処理を実装します。