動機
アウトランダーPHEVに乗っているが、3年前に補機バッテリー上がりを経験した。その時は、ディーラーのモバイルバッテリーブースターで起動してもらい、様子を見ることになった。
その約7か月後に再び、補機バッテリー上がりとなり、補機バッテリーを交換することになった。その頃から補機バッテリーの電圧を取得することを考え始めた。
調べていくうちに、トラ技2022年8月号でRaspbery piとCAN通信を使ってODBⅡ経由で車の状態を取得できることを知り、方向が違うが興味を持ちやってみた。
実際は、トラ技の記事だとCANコントローラーとCANトランシーバーが必要だったが、参考のページでは、ESP32とCANトランシーバーで出来ると書いてあったので、そちらで試してみることにした。
(何のことはない、ESP32がCANトラーバーの役目をしただけのことである。)
試したコード
#include <Arduino.h>
#include <CAN.h>
#include <OBD2.h>
#include <vector>

#define LED_PIN 32

std::vector<int> pids;

void setup()
{
    pinMode(LED_PIN, OUTPUT);
    digitalWrite(LED_PIN, HIGH);
    Serial.begin(115200);
    while (!Serial);
    delay(500);

    Serial.println(F("OBD2 Supported PIDs"));

    CAN.setPins(26, 27);

    // Attempting to connect to OBD2 CAN bus
    while (true) {
        Serial.print(F("Attempting to connect to OBD2 CAN bus ... "));

        if (!OBD2.begin())
        {
            Serial.println(F("failed!"));
        }
        else
        {
            Serial.println(F("success"));
            break;
        }
        delay(1000);
        digitalWrite(LED_PIN, (uint8_t)(digitalRead(LED_PIN) == LOW ? HIGH : LOW));
    }

    digitalWrite(LED_PIN, HIGH);

    // Get OBD-II Suport PIDs
    // loop through PIDs 0 to 95, reading and printing the names of the supported PIDs
    for (int pid = 0; pid < 96; pid++) {
        if (OBD2.pidSupported(pid)) {
            Serial.println(OBD2.pidName(pid));
            pids.push_back(pid);
        }
    }

    digitalWrite(LED_PIN, LOW);
}

void loop()
{
    digitalWrite(LED_PIN, (uint8_t)(digitalRead(LED_PIN) == LOW ? HIGH : LOW));

    // get the value of PID which get in the vector earlier
    for (int pid : pids)
    {
        printPID(pid);
        delay(1);
    }
    Serial.println();

    delay(1000);
}

void printPID(int pid) {
    // print PID name
    Serial.print(OBD2.pidName(pid));
    Serial.print(F(" = "));

    if (OBD2.pidValueRaw(pid))
    {
        // read the raw PID value
        unsigned long pidRawValue = OBD2.pidReadRaw(pid);

        Serial.print(F("0x"));
        Serial.print(pidRawValue, HEX);
    }
    else
    {
        // read the PID value
        float pidValue = OBD2.pidRead(pid);

        if (isnan(pidValue)) {
            Serial.print("error");
        } else {
            // print value with units
            Serial.print(pidValue);
            Serial.print(F(" "));
            Serial.print(OBD2.pidUnits(pid));
        }
    }

    Serial.println();
}
Exapmleでは目的のPIDの値を出力するものと、サポートされているPIDを取得するものとなっていたので、以下のコードを付け足してサポートされているPIDをSetup内部で取得して、そのPIDの値を出力するように改良した。サポートPIDをSetupで取得するコードが以下の部分。
pidsはvectorで、グローバル変数で宣言している。
    // loop through PIDs 0 to 95, reading and printing the names of the supported PIDs
    for (int pid = 0; pid < 96; pid++) {
        if (OBD2.pidSupported(pid)) {
            Serial.println(OBD2.pidName(pid));
            pids.push_back(pid);
        }
    }
取得した結果
OBD2 Supported PIDs
Attempting to connect to OBD2 CAN bus ... failed!      // IG off. But OBD-II Power line alive.
Attempting to connect to OBD2 CAN bus ... failed!
Attempting to connect to OBD2 CAN bus ... failed!
Attempting to connect to OBD2 CAN bus ... failed!
Attempting to connect to OBD2 CAN bus ... failed!
Attempting to connect to OBD2 CAN bus ... failed!
Attempting to connect to OBD2 CAN bus ... failed!
Attempting to connect to OBD2 CAN bus ... success      // After IG on
PIDs supported [01 - 20]
Monitor status since DTCs cleared
Fuel system status
Calculated engine load
Engine coolant temperature
Short term fuel trim - Bank 1
Long term fuel trim - Bank 1
Intake manifold absolute pressure
Engine RPM
Vehicle speed
Timing advance
Intake air temperature
MAF air flow rate
Throttle position
Oxygen sensors present (in 2 banks)
Oxygen Sensor 2 - Short term fuel trim
OBD standards this vehicle conforms to
Run time since engine start
PIDs supported [21 - 40]
Distance traveled with malfunction indicator lamp (MIL) on
Oxygen Sensor 1 - Fuel - Air Equivalence Ratio
Commanded EGR
Commanded evaporative purge
Fuel Tank Level Input
Warm-ups since codes cleared
Distance traveled since codes cleared
Absolute Barometric Pressure
PIDs supported [41 - 60]
Monitor status this drive cycle
Control module voltage
Absolute load value
Fuel - Air commanded equivalence ratio
Relative throttle position
Ambient air temperature
Absolute throttle position B
Commanded throttle actuator
Fuel Type
Relative accelerator pedal position
PIDs supported [01 - 20] = 0xBE3FA813                               // start get (there was no blank line)
Monitor status since DTCs cleared = 0x76100
Fuel system status = 0x400
Calculated engine load = 0.00 %
Engine coolant temperature = 17.00 °C
Short term fuel trim - Bank 1 = 0.00 %
Long term fuel trim - Bank 1 = 0.00 %
Intake manifold absolute pressure = 104.00 kPa
Engine RPM = 0.00 rpm
Vehicle speed = 0.00 km/h
Timing advance = 61.00 ° before TDC
Intake air temperature = 17.00 °C
MAF air flow rate = 0.00 grams/sec
Throttle position = 15.69 %
Oxygen sensors present (in 2 banks) = 0x3
Oxygen Sensor 2 - Short term fuel trim = 0.00 %
OBD standards this vehicle conforms to = 0xA
Run time since engine start = 3.00 seconds
PIDs supported [21 - 40] = 0x9017A001
Distance traveled with malfunction indicator lamp (MIL) on = 0.00 km
Oxygen Sensor 1 - Fuel - Air Equivalence Ratio = 1.00 ratio
Commanded EGR = 0.00 %
Commanded evaporative purge = 0.00 %
Fuel Tank Level Input = 98.82 %
Warm-ups since codes cleared = 255.00 count
Distance traveled since codes cleared = 10637.00 km
Absolute Barometric Pressure = 101.00 kPa
PIDs supported [41 - 60] = 0xFE108040
Monitor status this drive cycle = 0x76161
Control module voltage = 14.50 V
Absolute load value = 0.00 %
Fuel - Air commanded equivalence ratio = 0.87 ratio
Relative throttle position = 8.24 %
Ambient air temperature = 17.00 °C
Absolute throttle position B = 16.47 %
Commanded throttle actuator = 8.24 %
Fuel Type = 0x0
Relative accelerator pedal position = 0.00 %

PIDs supported [01 - 20] = 0xBE3FA813                              // second time
Monitor status since DTCs cleared = 0x76100
Fuel system status = 0x400
Calculated engine load = 0.00 %
Engine coolant temperature = 17.00 °C
Short term fuel trim - Bank 1 = 0.00 %
Long term fuel trim - Bank 1 = 0.00 %
Intake manifold absolute pressure = 104.00 kPa
Engine RPM = 0.00 rpm
Vehicle speed = 0.00 km/h
Timing advance = 61.00 ° before TDC
Intake air temperature = 17.00 °C
MAF air flow rate = 0.00 grams/sec
Throttle position = 15.69 %
Oxygen sensors present (in 2 banks) = 0x3
Oxygen Sensor 2 - Short term fuel trim = 0.00 %
OBD standards this vehicle conforms to = 0xA
Run time since engine start = 6.00 seconds
PIDs supported [21 - 40] = 0x9017A001
Distance traveled with malfunction indicator lamp (MIL) on = 0.00 km
Oxygen Sensor 1 - Fuel - Air Equivalence Ratio = 1.00 ratio
Commanded EGR = 0.00 %
Commanded evaporative purge = 0.00 %
Fuel Tank Level Input = 98.82 %
Warm-ups since codes cleared = 255.00 count
Distance traveled since codes cleared = 10637.00 km
Absolute Barometric Pressure = 101.00 kPa
PIDs supported [41 - 60] = 0xFE108040
Monitor status this drive cycle = 0x76161
Control module voltage = 14.50 V
Absolute load value = 0.00 %
Fuel - Air commanded equivalence ratio = 0.87 ratio
Relative throttle position = 8.24 %
Ambient air temperature = 17.00 °C
Absolute throttle position B = 16.47 %
Commanded throttle actuator = 8.24 %
Fuel Type = 0x0
Relative accelerator pedal position = 0.00 %
イグニッション-OFFにすると、データは来なくなる。
調べた事やった事
参考ページ
CANからODBⅡへ
Arduino用のCANライブラリは参考ページにあるこちらを使わせていただいた。
さらにページの下部にあるExamplesに下行があり、ODBⅡのライブラリが用意されていた。
For OBD-II examples, checkout the arduino-OBD2 library's examples.
集めた部品
ESP32 DevKitC V4 ESP-WROOM-32 ESP-32
(手元品:LDOは自前で強化品に変更してある。ねむいさんのぶろぐを参考に真似た)
AmazonからOBDⅡのコネクター(+電源、アース、CANH、CANLのみ)を入手した。
MCP2562は在庫切れだったので、MCP2561を購入
残り手元品
三端子DC/DCレギュレータ 5V( https://akizukidenshi.com/catalog/g/gM-11188/ )
レギュレータは、ESP32のONボードでも良かったと思うが、念のため。こちらを使った。結果OBDⅡの電源ラインは、イグニッション-OFFでも生きていることは分かった。
ブレッドボード、LED、抵抗、セラミックコンデンサ など
MCP2561
秋月電子よりMCP2561を入手(MCP2562は在庫切れだった)
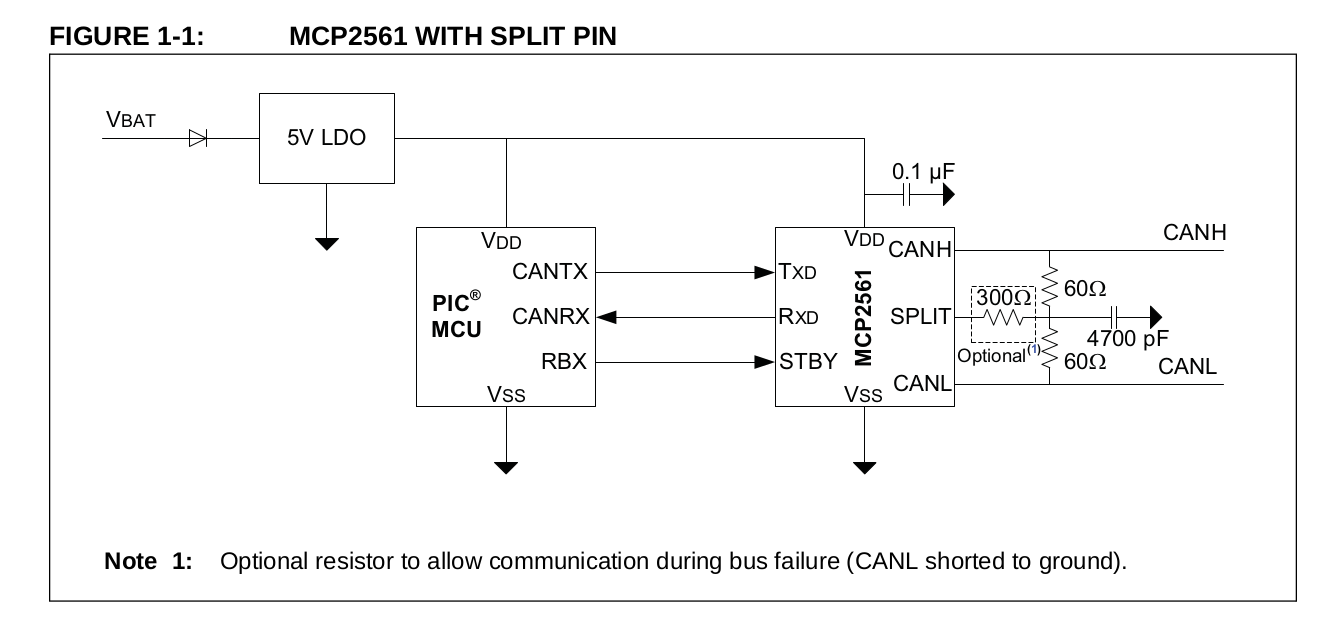
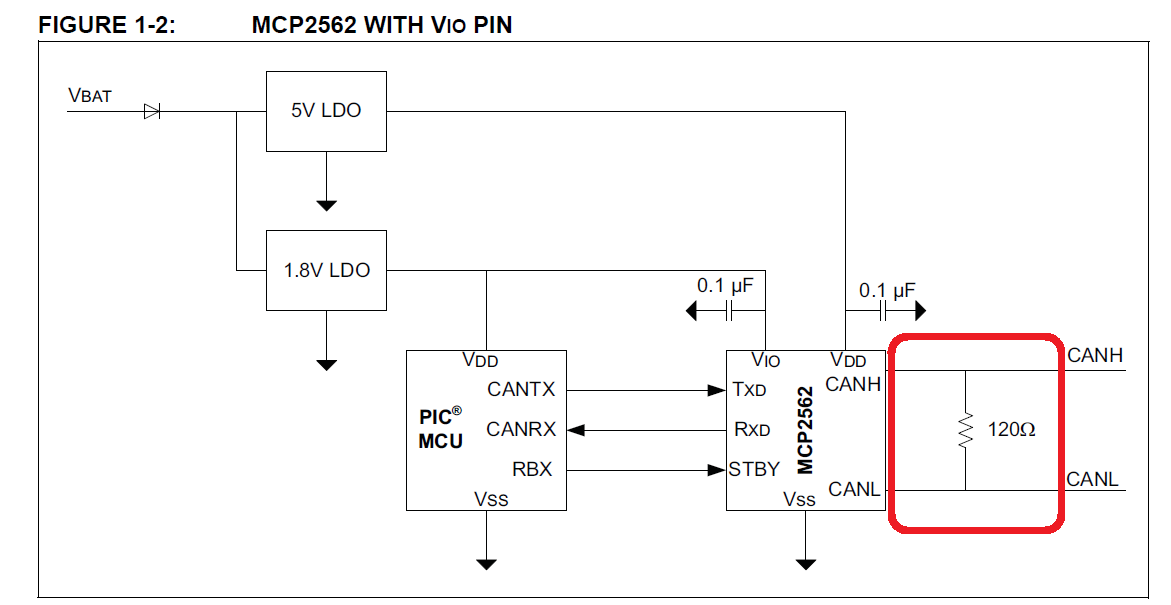
MCP2562とは、CANH、CANLの物理インターフェース部の簡便さが違う。でも、1.8V LDOが別途必要なので、結果的にはMCP2561で良かったかも。
ブレッドボード外観
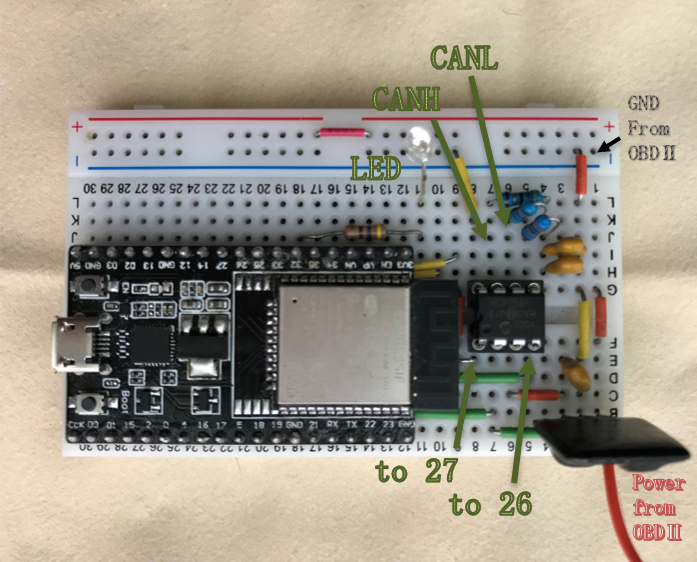
ESP32は、PCと接続して、シリアル出力を監視した。もちろんRaspbery piでもOK。(結局、トラ技と変わらないか???)