はじめに
以前、ARDKのSemantic Segmentationを利用して巨大なオブジェクトにオクルージョン処理をかける記事を書きました。
【参考リンク】:【ARDK】Semantic Segmentationで巨大なオブジェクトにオクルージョン処理を行う際の注意点
その発展として、新機能であるSemantic Confidenceを利用したデモを作成しました。experimentalということもあり、かなり遠回りな実装が必要だったのでメモします。
ARDKの新機能調査中です👍
— KENTO⚽️XRエンジニア😎Shader100記事マラソン挑戦中82/100 (@kento_xr) November 25, 2022
セグメンテーションの境界線をぼやけさせる処理を試しました😆#ARDK pic.twitter.com/JUG9fgi4Dq
バージョン情報
ARDK 2.3.0
ARDK
ARDKはNianticが提供するARライブラリです。
リアルワールドメタバースを目指しているだけあって、
ARの実装時に活躍する様々な機能が用意されています。
Semantic Confidence
ARDKにExperimentalとして追加された新機能です。Semantic Segmentationの拡張機能という立ち位置で、文字通りピクセルの認識における信頼度を利用可能になります。今まで0か1かで識別していたセグメントを「おそらくこの領域は80パーセントの確立で『空』であろう」といった具合で取得できるということです。
もっと簡潔にいうとセグメントをグラデーションで取得可能になるということです。公式ドキュメント記載の以下GIFがわかりやすいです。中央が従来のSemantic segmentationで、右側がSemantic Confidenceを利用した結果です。境界がぼやけているのが見て取れます。
【引用元】:Semantic Confidence
実装手法
Semantic Confidenceでできることはわかりましたが、それをどうオクルージョン処理に落とし込むかについてはわかりませんでした。
そこで公式フォーラムにI'm Stuckとして質問を投げた結果以下のような回答をいただきました。
At the moment Semantic confidence is used for shader effects only as it is experimental.
The way the giant yeti in the sky video was made was to render it to a texture and blend that into the scene with the confidence mask.
e.g.
Add the objects you want to draw to a layer (sky_layer),
Hide it from the main camera.
Add a second camera that renders to texture and set it to only render that layer.
Then in your blit pass you can send in the texture with your cg, and the confidence mask.
In the shader you can then composite the items together.
【引用元】:How can I use semantic confidence for occlusion?
簡単にまとめると以下です。
- ARオブジェクト専用のカメラとそれ以外を描画するカメラ(MainCameraとする)を用意する。
- ARオブジェクト専用カメラのレンダリング結果をShaderに渡してSemantic ConfidenceのTextureをかけ合わせる。
- その結果をMainCameraのレンダリング結果にBlitする。
少しわかりずらいので処理を1枚ずつ画像にわけて解説していきます。UnityEditor上でのシミュレート結果を用いて説明するのでわかりにくいですが、Humanoidのオブジェクト以外は現実空間の物体である想定で話を進めていきます。
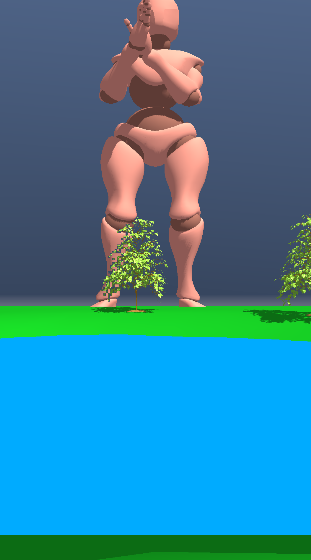
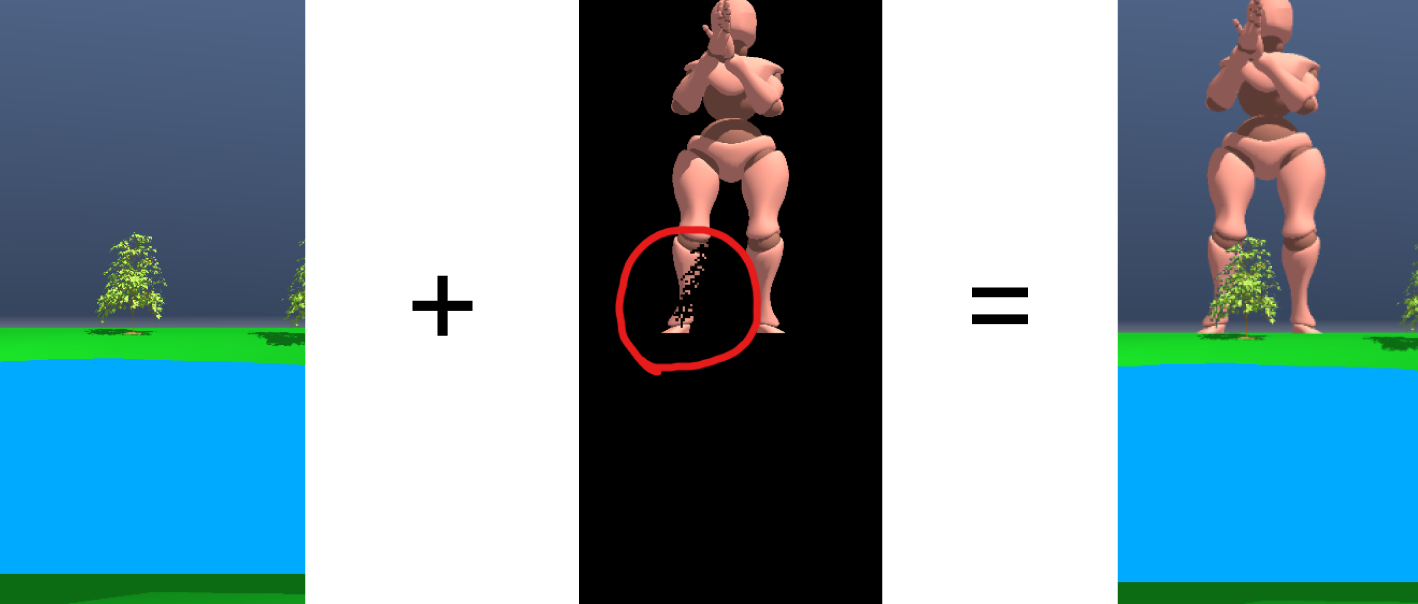
上記想定での最終的な描画結果は以下画像の通りです。木がHumanoidのオブジェクトより全面に表示されているのがわかります。この"木でオクルージョンされた状態"をつくっていきます。
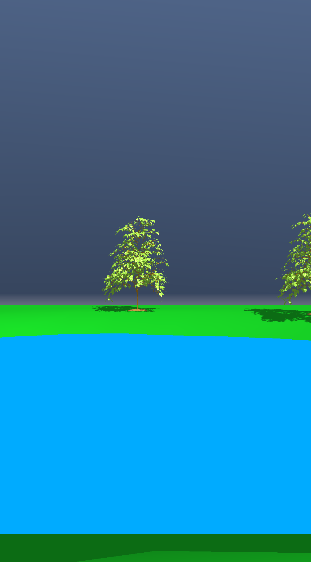
まず、MainCameraの描画は以下です。Humanoidのオブジェクト以外を描画するように設定してあります。
次にSemantic Confidenceの実行結果のTexture取得です。
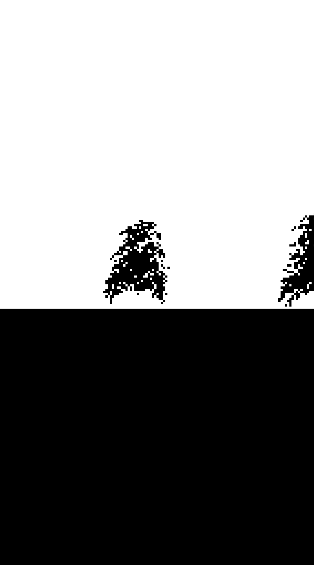
実際にShaderに流し込んで白黒表示した画像が以下です。今回は空である可能性が高いピクセルほど0に近い値を返すようにして適用しています。
(以下画像について、正確にはSemantic Segmentationのシミュレート結果です。Semantic ConfidenceをUnityEditor上でシミュレートする機能はないのでSemantic Confidenceをシミュレートした結果であると仮定して話を進めます)
残すはARオブジェクト専用のカメラの描画結果です。この描画結果はRenderTextureとして利用します。
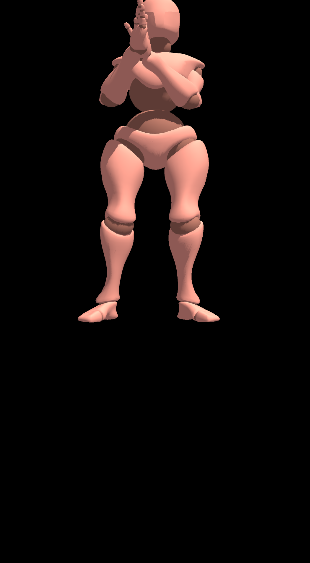
ここまでで、必要な描画処理はそろいました。あとはこれらをかけあわせていきます。
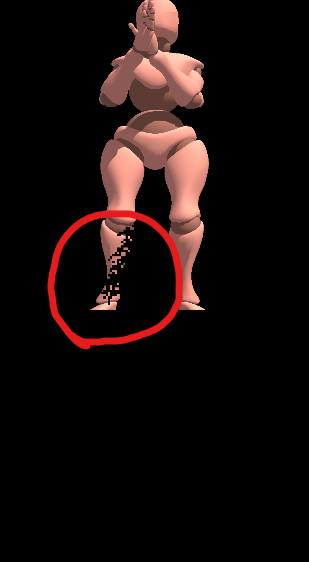
Semantic Confidenceの実行結果のTextureとARオブジェクト専用のカメラの描画結果をShaderでかけ合わせものが以下になります。赤い丸で囲った部分に注目します。木の描画領域がきれいに切り抜かれています。

あとはこの描画結果をMainCameraにBlitしてあげれば完成です。
前回のSemantic Segmentationと異なる点として、DepthによるMask処理は行っていないことが挙げられます。
コード
ARDKのサンプルに含まれるSemanticSegmentationExampleManager.csに追記します。
変更点としては//追記とコメントした3か所のみです。
using Niantic.ARDK.AR;
using Niantic.ARDK.AR.Awareness;
using Niantic.ARDK.AR.Awareness.Semantics;
using Niantic.ARDK.Extensions;
using Niantic.ARDK.Rendering;
using UnityEngine;
using UnityEngine.UI;

namespace Niantic.ARDKExamples
{
    public class SemanticSegmentationExampleManager :
        MonoBehaviour
    {
        [SerializeField] private ARSemanticSegmentationManager _semanticSegmentationManager;

        [SerializeField] private Material _overlayMaterial;

        // 追記
        // "ARオブジェクトだけ描画したカメラに設定したRenderTexture"を利用する
        [SerializeField] private RenderTexture _renderTexture;

        [Header("UI")] [SerializeField] private GameObject _togglesParent;

        [SerializeField] private Text _toggleFeaturesButtonText;

        [SerializeField] private Text _toggleInterpolationText;

        [SerializeField] private Text _channelNameText;

        [SerializeField] private Text _selectedModeText;

        private Texture2D _semanticTexture;
        private bool _useThresholdedSemantics = true;
        private bool _semanticsUpdated = false;

        // All channels available in the model will be stored here.
        private string[] _channels;

        // The index of the currently displayed semantics channel in the array
        private int _featureChannel;

        private void Start()
        {
            // 追記
            // カメラの描画サイズに合わせる
            _renderTexture.Release();
            _renderTexture.width = Screen.width;
            _renderTexture.height = Screen.height;

            // Disable the UI while contextual awareness is initializing
            if (_togglesParent != null)
                _togglesParent.SetActive(false);

            // Enable the UI when the semantic segmentation stream starts
            _semanticSegmentationManager.SemanticBufferInitialized += EnableUserInterface;
            _semanticSegmentationManager.SemanticBufferUpdated += OnSemanticBufferUpdated;
        }

        private void OnSemanticBufferUpdated(ContextAwarenessStreamUpdatedArgs<ISemanticBuffer> args)
        {
            if (!args.IsKeyFrame)
            {
                return;
            }

            // Get the name of the observed channel
            var currentChannelName = _channels[_featureChannel];

            if (_useThresholdedSemantics)
            {
                // Update the texture using thresholded semantics
                _semanticsUpdated = _semanticSegmentationManager.GetThresholdedARGB32
                (
                    ref _semanticTexture,
                    currentChannelName
                );
            }
            else
            {
                // Update the texture using confidence values
                _semanticsUpdated = _semanticSegmentationManager.GetConfidencesARGB32
                (
                    ref _semanticTexture,
                    currentChannelName
                );
            }
        }

        // We use this callback to overlay semantics on the rendered background
        private void OnRenderImage(RenderTexture src, RenderTexture dest)
        {
            // 追記
            Graphics.Blit(src, dest);

            if (!_semanticSegmentationManager.enabled || !_semanticsUpdated)
            {
                Graphics.Blit(src, dest);
                return;
            }

            // Get the transformation to correctly map the texture to the viewport
            var sampler = _semanticSegmentationManager.SemanticBufferProcessor.SamplerTransform;

            // Update the transform
            _overlayMaterial.SetMatrix(PropertyBindings.SemanticsTransform, sampler);

            // Update the texture
            _overlayMaterial.SetTexture(PropertyBindings.SemanticChannel, _semanticTexture);

            // Display semantics
            Graphics.Blit(src, dest, _overlayMaterial);
        }

        private void OnDestroy()
        {
            // Release semantic overlay texture
            if (_semanticTexture != null)
                Destroy(_semanticTexture);

            _semanticSegmentationManager.SemanticBufferUpdated -= OnSemanticBufferUpdated;
        }

        private void EnableUserInterface(ContextAwarenessArgs<ISemanticBuffer> args)
        {
            _channels = _semanticSegmentationManager.SemanticBufferProcessor.Channels;

            _semanticSegmentationManager.SemanticBufferInitialized -= EnableUserInterface;

            if (_togglesParent != null)
                _togglesParent.SetActive(true);

            _channelNameText.text = _channels[_featureChannel];

            // Tell the manager for which channels the semantic confidence is needed.
            _semanticSegmentationManager.SetConfidenceChannels(_channels[_featureChannel]);
        }

        public void ChangeFeatureChannel()
        {
            // Increment the channel count with wraparound.
            _featureChannel += 1;
            if (_featureChannel == _channels.Length)
                _featureChannel = 0;

            // Tell the manager for which channels the semantic confidence is needed.
            _semanticSegmentationManager.SetConfidenceChannels(_channels[_featureChannel]);
            _channelNameText.text = _channels[_featureChannel];
        }

        public void ToggleSessionSemanticFeatures()
        {
            var newEnabledState = !_semanticSegmentationManager.enabled;
            _toggleFeaturesButtonText.text = newEnabledState ? "Disable Features" : "Enable Features";
            _semanticSegmentationManager.enabled = newEnabledState;
        }

        public void ToggleInterpolation()
        {
            var provider = _semanticSegmentationManager.SemanticBufferProcessor;
            var current = provider.InterpolationMode;
            provider.InterpolationMode = current == InterpolationMode.None
                ? InterpolationMode.Smooth
                : InterpolationMode.None;

            _toggleInterpolationText.text =
                provider.InterpolationMode != InterpolationMode.None
                    ? "Disable Interpolation"
                    : "Enable Interpolation";
        }

        public void ToggleBinaryAndConfidence()
        {
            _useThresholdedSemantics = !_useThresholdedSemantics;

            _selectedModeText.text = _useThresholdedSemantics
                ? "Mode:\nThresholded"
                : "Mode:\nConfidence";
        }
    }
}
Scriptで特筆すべきポイントは特にありません。ほとんどがサンプル内ですでに用意されています。
OnRenderImage内でGraphics.Blit(src, dest);を呼んでいる理由は一度レンダリング結果を更新しておかないと前フレームの描画結果を取りまわしてしまうからです。記述しない場合、以下GIFのような挙動になります。

Shader側は以下です。
Shader "Custom/SemanticOverlay"
{
    Properties
    {
        // "ARオブジェクトだけ描画したカメラに設定したRenderTexture"を利用する
        _OverlayTex ("Overlay Texture", 2D) = "" {}
    }

    SubShader
    {
        Tags
        {
            "RenderType"="Transparent"
        }

        Lighting Off
        Blend SrcAlpha OneMinusSrcAlpha
        ZWrite Off
        ZTest Always
        Fog{ Mode Off }

        Pass
        {

            CGPROGRAM
            #pragma vertex vert
            #pragma fragment frag
            #pragma fragmentoption ARB_precision_hint_fastest

            #include "UnityCG.cginc"

            struct appdata_t
            {
                float4 vertex : POSITION;
                float2 uv : TEXCOORD0;
            };

            struct v2f
            {
                float4 vertex : SV_POSITION;
                float2 color_uv : TEXCOORD0;
                float3 semantic_uv : TEXCOORD1;
            };

            sampler2D _OverlayTex;
            sampler2D _textureSemantic;

            float4x4 _semanticsTransform;

            v2f vert(appdata_t v)
            {
                v2f o;

                o.vertex = UnityObjectToClipPos(v.vertex);
                o.color_uv = v.uv;
                o.semantic_uv = mul(_semanticsTransform, float4(v.uv, 1.0f, 1.0f)).xyz;

                return o;
            }

            float4 frag(v2f i) : COLOR
            {
                //RenderTextureサンプリング
                float4 overlayColor = tex2D(_OverlayTex, i.color_uv);

                //UV計算
                float2 semanticUV = float2(i.semantic_uv.x / i.semantic_uv.z, i.semantic_uv.y / i.semantic_uv.z);

                //SemanticTexture取得
                float3 semColor = tex2D(_textureSemantic, semanticUV).rgb;

                //Semantic Confidenceの値とRenderTextureをかけあわせる
                float interpolation = saturate(semColor.r);
                float4 texColor = overlayColor * interpolation;

                return texColor;
            }
            ENDCG
        }
    }

    Fallback off
}
_textureSemanticにはSemanticSegmentationExampleManager.csのOnRenderImage内で渡したSemantic ConfidenceのTextureが入ります。あとはその描画結果のうち、r成分だけ取り出してRenderTextureのサンプリング結果とかけあわせています。
先ほどの例でいうと以下画像がこのShaderの結果で得られます。
r成分だけ利用するという観点では、GetConfidencesRFloatという関数もあるようです。
(今回のサンプルで適用したところ、従来のSemantic Segmentationと交互に機能を切り替えての検証時にエラーを吐いて切り替えた先の機能が動作しなかったため使用しませんでした)
おわりに
まだExperimentalな機能ですが、本実装として提供されるのが楽しみな機能でした。