Fusion360の3DプリンターのデータをAR表示したい。
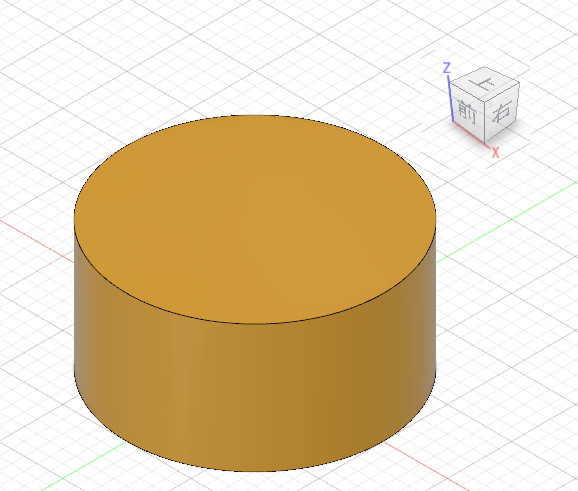
直径20mm 高さ10mmの図形
手っ取り早い方法
obj形式でエクスポートする。
色とかテクスチャー情報が付加されないので、htmlで追加する。
スケールの変更及び軸の変更[回転](3Dプリンターとかは通常高さ方向がZ軸で、3Dグラフィック関係は奥行きがZ軸)
<html>
  <head>
    <script src="https://aframe.io/releases/0.9.2/aframe.min.js"></script>
  </head>
  <body>
    <a-scene>
<!--       <a-entity obj-model="obj: cup2wood.obj;" material="color: red" scale="0.001 0.001 0.001" rotation="-90 0 0" ></a-entity>-->
        <a-obj-model src="cup2wood.obj" position="0 0 0" color="red" scale="0.001 0.001 0.001" rotation="-90 0 0"></a-obj-model>
        <a-camera position="0 0 0.5"></a-camera>
    </a-scene>
  </body>
</html>
他の方法
Step1 Fusion360のデータの作り方
色の付け方(外観で色付け)
Wood(solid)-Finish テクスチャーはなくなりそれらしい色。
ペイント-メタリック テクスチャーはなくなりそれらしい色。
ペイント―メタルフレーム テクスチャーはなくなりそれらしい色。
ダメなのもあったような気がします。
Step2 Fusion360からの出力
FBX形式もしくは、DAE形式で出力。
FBX形式はエクスポートで FBXファイル で出力する。
DAE形式はCollada Writer(add on)をインストールし、アドオンのアイコンを押す。
Collada Writer(DAE Export addon)は色情報が付加されていないがクラウドを使わないので出力が早し、軸変換もしてくれる。
https://apps.autodesk.com/FUSION/en/Detail/Index?id=934783265519220722&appLang=en&os=Win64&autostart=true
Step3 データの変換
https://blackthread.io/gltf-converter/
でFBXからGLB(glTFのBinary)に変換します。
※IEでは開けませんでした。(Firefoxで使えました)
※DAEもこのサイトで変換できます。
A-Frmaeでの表示
下のようなHTMLで確認
カメラの位置が既定では0, 1.8, 4なので 変更している。
<html>
  <head>
    <script src="https://aframe.io/releases/0.9.2/aframe.min.js"></script>
  </head>
  <body>
    <a-scene >
        <a-sky color="#c5eefd"></a-sky>
     <a-gltf-model src="NO2XYZ10.glb" ></a-gltf-model>
        <a-camera position="0 0 1.1"></a-camera>
    </a-scene>
  </body>
</html>
軸
エクスポート(FBX)では、そのままなのでA-Frameでは上から見た図
Collada Writer(add on)は 軸変換 (Y-Z)をしてくれる?ので横から見た図
サイズ
エクスポート(FBX)では、mm単位
Collada Writer(add on)は cm単位
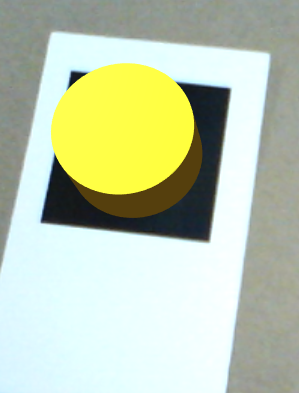
AR.jsでの表示
こんな感じになりました。
マーカーは50x50mm(黒い部分は40mmx40mm)で作成しています。
ARマーカーは500x500pxの画像を用意して、
https://jeromeetienne.github.io/AR.js/three.js/examples/marker-training/examples/generator.html
で作成します。
googleで”ar marker generator”で検索すると出ます。
Wordで名刺用紙に設定し、画像を50x50mmで貼り付けます。
<html>
  <head>
    <script src="https://aframe.io/releases/0.9.2/aframe.min.js"></script>
    <script src="https://cdn.rawgit.com/jeromeetienne/AR.js/1.7.7/aframe/build/aframe-ar.js"></script>
  </head>
  <body>
    <a-scene embedded arjs="debugUIEnabled:false;trackingMethod:best;" vr-mode-ui="enabled: false">
        <a-marker type="pattern" url="pattern-GK01.patt" >
        <!-- Pattern Size=40mmx40xx -->
   <!-- for FBX Export -->
            <a-gltf-model src="No1xyz10.glb" scale="0.04 0.04 0.04" rotation="-90 0 0" ></a-gltf-model>

   <!-- for DAE Output -->
     <!-- <a-gltf-model src="NO2XYZ10.glb" scale="0.4 0.4 0.4" ></a-gltf-model> -->

        </a-marker>
        <!-- <a-camera></a-camera> Posiotionをあわせればこっちでも 上手く行くかも -->
        <!-- <a-entity camera></a-entity> -->
          <a-camera-static></a-camera-static>
    </a-scene>
  </body>
</html>
※CAD上の1mmが1mになっているので scaleは 40/1000倍(40はマーカーの幅40mm)
※Markerの真中が原点(0,0,0)の様
※a-frameは高さがy軸 3Dプリンターはz軸が高さ
※a-markerのscaleが機能していないような気がする。